
Owners Manual
Page 15
... THE INCLUDED ACCESSORIES 7 GETTING THE MOST OUT OF YOUR CAMERA 11 SYSTEM MAP 14 „ SETUP PARTS NAMES 15 INSTALLING THE CARD 20 PREPARING THE DOCKING STATION 22 PREPARING THE REMOTE CONTROL UNIT 23 PREPARING THE POWER 26 TURNING THE CAMERA ON AND OFF 30 OPERATION BUTTONS 33 DATE AND TIME SETTING...
... THE INCLUDED ACCESSORIES 7 GETTING THE MOST OUT OF YOUR CAMERA 11 SYSTEM MAP 14 „ SETUP PARTS NAMES 15 INSTALLING THE CARD 20 PREPARING THE DOCKING STATION 22 PREPARING THE REMOTE CONTROL UNIT 23 PREPARING THE POWER 26 TURNING THE CAMERA ON AND OFF 30 OPERATION BUTTONS 33 DATE AND TIME SETTING...

Owners Manual
Page 21
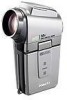
CHECKING THE INCLUDED ACCESSORIES i Handstrap and camera case: 1 set i SANYO Software Pack (CD-ROM): 2 i Li-ion battery pack: 1 i Docking station: 1 i Dedicated S-AV interface cable: 1 i Dedicated USB interface cable: 1 i Dedicated component cable: 1 i AC adaptor and power cord: 1 7 English
CHECKING THE INCLUDED ACCESSORIES i Handstrap and camera case: 1 set i SANYO Software Pack (CD-ROM): 2 i Li-ion battery pack: 1 i Docking station: 1 i Dedicated S-AV interface cable: 1 i Dedicated USB interface cable: 1 i Dedicated component cable: 1 i AC adaptor and power cord: 1 7 English

Owners Manual
Page 25
The docking station makes it simple to connect other devices to your camera, providing you can even capture still images while recording a video clip. Wide-screen recording and ...
The docking station makes it simple to connect other devices to your camera, providing you can even capture still images while recording a video clip. Wide-screen recording and ...

Owners Manual
Page 27
GETTING THE MOST OUT OF YOUR CAMERA Docking station for easy connection The docking station simplifies those complicated connections to your TV or computer right away. Just set the camera in the docking station, and you can view your photos on your TV or computer. Docking station To AC adaptor Dedicated USB interface cable Dedicated component cable Dedicated S-AV interface cable Printer Computer TV 13 English
GETTING THE MOST OUT OF YOUR CAMERA Docking station for easy connection The docking station simplifies those complicated connections to your TV or computer right away. Just set the camera in the docking station, and you can view your photos on your TV or computer. Docking station To AC adaptor Dedicated USB interface cable Dedicated component cable Dedicated S-AV interface cable Printer Computer TV 13 English

Owners Manual
Page 28
Remote control unit Cable adaptor TV Computer Printer Docking station i Card reader i DPOF-compatible printer i Photo shop Separately sold or commercially available SD Memory Card AC adaptor (supplied) Battery charger (optional) English 14 SYSTEM MAP You can connect the camera to various devices to expand its capabilities.
Remote control unit Cable adaptor TV Computer Printer Docking station i Card reader i DPOF-compatible printer i Photo shop Separately sold or commercially available SD Memory Card AC adaptor (supplied) Battery charger (optional) English 14 SYSTEM MAP You can connect the camera to various devices to expand its capabilities.
Owners Manual
Page 31
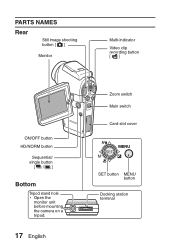
PARTS NAMES Rear Still image shooting button [ ] Monitor Multi-indicator Video clip recording button [] ON/OFF button HD/NORM button Sequential/ single button [O/ ] Bottom Tripod stand hole h Open the monitor unit before mounting the camera on a tripod. 17 English Zoom switch Main switch Card slot cover SET button MENU button Docking station terminal
PARTS NAMES Rear Still image shooting button [ ] Monitor Multi-indicator Video clip recording button [] ON/OFF button HD/NORM button Sequential/ single button [O/ ] Bottom Tripod stand hole h Open the monitor unit before mounting the camera on a tripod. 17 English Zoom switch Main switch Card slot cover SET button MENU button Docking station terminal

Owners Manual
Page 32
Docking station Front Rear Docking station terminal Operation mode button [] DC IN terminal COMPONENT terminal USB/AV terminal English 18
Docking station Front Rear Docking station terminal Operation mode button [] DC IN terminal COMPONENT terminal USB/AV terminal English 18

Owners Manual
Page 33
DC IN terminal 19 English Cable adaptor Docking station terminal USB/AV terminal * The dedicated component cable (supplied) cannot be connected to the right 7 Works the same as toggling SET button down or pushing ...
DC IN terminal 19 English Cable adaptor Docking station terminal USB/AV terminal * The dedicated component cable (supplied) cannot be connected to the right 7 Works the same as toggling SET button down or pushing ...

Owners Manual
Page 36
h Use the supplied AC adaptor and power cord. PREPARING THE DOCKING STATION The supplied docking station is used to connect your camera to a computer, printer or TV, as well as to charge the battery pack installed in the camera. 1 Connect the docking station to a power outlet. Docking station DC IN terminal To power outlet Supplied AC adaptor Supplied power cord English 22
h Use the supplied AC adaptor and power cord. PREPARING THE DOCKING STATION The supplied docking station is used to connect your camera to a computer, printer or TV, as well as to charge the battery pack installed in the camera. 1 Connect the docking station to a power outlet. Docking station DC IN terminal To power outlet Supplied AC adaptor Supplied power cord English 22

Owners Manual
Page 39
... to "RC CODE 1" at the time of purchase. 1 Aim the infrared emitter at the remote control sensor on the docking station. 2 Hold down the CH button and press the [J] button for about 3 seconds. 3 Press a button on the...camera is used to operate the camera. 1 Aim the infrared emitter at the remote control sensor on the docking station. 2 Hold down the CH button and press the [I] button for the remote control unit and the camera ... code The remote control unit will also work with other Sanyo cameras that only the intended camera operates when the remote control unit is receiving correctly.
... to "RC CODE 1" at the time of purchase. 1 Aim the infrared emitter at the remote control sensor on the docking station. 2 Hold down the CH button and press the [J] button for about 3 seconds. 3 Press a button on the...camera is used to operate the camera. 1 Aim the infrared emitter at the remote control sensor on the docking station. 2 Hold down the CH button and press the [I] button for the remote control unit and the camera ... code The remote control unit will also work with other Sanyo cameras that only the intended camera operates when the remote control unit is receiving correctly.

Owners Manual
Page 40
Power to the camera can also be supplied from a power outlet if the docking station or the cable adaptor is used. h The battery cover comes off. Battery cover lock 2 Open the battery cover (3). Charging the battery pack 1 While pressing the battery cover lock, slide it . Battery cover English 26 PREPARING THE POWER Please charge the supplied battery pack before using it (1), and pull out the battery cover toward the bottom of the camera (2).
Power to the camera can also be supplied from a power outlet if the docking station or the cable adaptor is used. h The battery cover comes off. Battery cover lock 2 Open the battery cover (3). Charging the battery pack 1 While pressing the battery cover lock, slide it . Battery cover English 26 PREPARING THE POWER Please charge the supplied battery pack before using it (1), and pull out the battery cover toward the bottom of the camera (2).

Owners Manual
Page 41
...h Raise the edge of the battery pack to the terminal contacts in the docking station. h Charging begins when the camera is set the camera in the docking station. Reset the camera correctly in the docking station. h Set the camera securely, making sure that the battery pack is defective ... camera is approx. 90 minutes. 27 English Charge indicator Docking station terminal h If the charge indicator flashes red, it . 5 Prepare the docking station (page 22). 6 Close the camera's monitor unit, and set in the docking station. When charging is correctly oriented in relation to remove it...
...h Raise the edge of the battery pack to the terminal contacts in the docking station. h Charging begins when the camera is set the camera in the docking station. Reset the camera correctly in the docking station. h Set the camera securely, making sure that the battery pack is defective ... camera is approx. 90 minutes. 27 English Charge indicator Docking station terminal h If the charge indicator flashes red, it . 5 Prepare the docking station (page 22). 6 Close the camera's monitor unit, and set in the docking station. When charging is correctly oriented in relation to remove it...

Owners Manual
Page 42
...about 2 days. If you attempt to charge the battery pack. The battery pack can photograph and view images while the camera is set in the docking station. HINT About the internal backup battery i This camera's internal battery serves to be charged when the camera is in the playback mode, but not... be cleared. English 28 i A small amount of power is still used even if the camera is turned off, and it is set in the docking station... i You can be used continuously for a long time. When not using your camera again, be sure to confirm that the battery pack be removed...
...about 2 days. If you attempt to charge the battery pack. The battery pack can photograph and view images while the camera is set in the docking station. HINT About the internal backup battery i This camera's internal battery serves to be charged when the camera is in the playback mode, but not... be cleared. English 28 i A small amount of power is still used even if the camera is turned off, and it is set in the docking station... i You can be used continuously for a long time. When not using your camera again, be sure to confirm that the battery pack be removed...

Owners Manual
Page 43
Using the docking station Use the supplied power cord to connect the docking station to a power outlet. Using the cable adaptor Connect the cable adaptor to the camera, and use the supplied power cord to connect the cable adaptor to a power outlet, and set the camera in the docking station. PREPARING THE POWER When using a power outlet Power to the camera can be supplied from a power outlet if the docking station or the cable adaptor is used. Supplied cable adaptor To power outlet 29 English Supplied AC adaptor Supplied power cord
Using the docking station Use the supplied power cord to connect the docking station to a power outlet. Using the cable adaptor Connect the cable adaptor to the camera, and use the supplied power cord to connect the cable adaptor to a power outlet, and set the camera in the docking station. PREPARING THE POWER When using a power outlet Power to the camera can be supplied from a power outlet if the docking station or the cable adaptor is used. Supplied cable adaptor To power outlet 29 English Supplied AC adaptor Supplied power cord

Owners Manual
Page 91
... image stabilizer menu, and press the SET button. i Due to compensate for the camera to the mechanical characteristics of view display). i When using a tripod, the docking station or other means to work correctly. If the motion compensation function is enabled when it is convenient when shooting mostly video clips (video clip field...
... image stabilizer menu, and press the SET button. i Due to compensate for the camera to the mechanical characteristics of view display). i When using a tripod, the docking station or other means to work correctly. If the motion compensation function is enabled when it is convenient when shooting mostly video clips (video clip field...

Owners Manual
Page 165
How to connect i Connect the USB/AV terminal or COMPONENT terminal to the AUDIO and VIDEO input terminals on the docking station. USB/AV terminal Yellow plug: To Video Input terminal Supplied dedicated S-AV interface cable To AC adaptor i Insert the plug with the [n] mark facing up.... i When the camera's monitor unit is closed and the camera is set in the docking station, press the operation mode button [ ] on the TV. White plug: To Audio Input (L) terminal Red plug: To Audio Input (R) terminal Not connected* Set the...
How to connect i Connect the USB/AV terminal or COMPONENT terminal to the AUDIO and VIDEO input terminals on the docking station. USB/AV terminal Yellow plug: To Video Input terminal Supplied dedicated S-AV interface cable To AC adaptor i Insert the plug with the [n] mark facing up.... i When the camera's monitor unit is closed and the camera is set in the docking station, press the operation mode button [ ] on the TV. White plug: To Audio Input (L) terminal Red plug: To Audio Input (R) terminal Not connected* Set the...

Owners Manual
Page 168
...date and time, as well as it appears on the TV is different from your TV does not have 720p video input capability i The images will not appear on the TV. If your camera. Enjoy higher image quality ...(progressive output) If your TV has a 720p input terminal, you can enjoy the high video quality of the Menu Screen as the counter, are not ...connect the dedicated S-AV interface cable and the dedicated component cable to the docking station at the TV monitor. To 720p input terminal During recording:The image appears on the TV.
...date and time, as well as it appears on the TV is different from your TV does not have 720p video input capability i The images will not appear on the TV. If your camera. Enjoy higher image quality ...(progressive output) If your TV has a 720p input terminal, you can enjoy the high video quality of the Menu Screen as the counter, are not ...connect the dedicated S-AV interface cable and the dedicated component cable to the docking station at the TV monitor. To 720p input terminal During recording:The image appears on the TV.

Owners Manual
Page 169
... interface cable i Insert the plug with the [n] mark facing up. USB/AV terminal To AC adaptor To USB connector on the printer. 2 Use the supplied docking station or adaptor to connect the camera to select images and initiate printing (PictBridge printing). By connecting the camera directly to a PictBridge-enabled printer, the camera...
... interface cable i Insert the plug with the [n] mark facing up. USB/AV terminal To AC adaptor To USB connector on the printer. 2 Use the supplied docking station or adaptor to connect the camera to select images and initiate printing (PictBridge printing). By connecting the camera directly to a PictBridge-enabled printer, the camera...

Owners Manual
Page 192
... Alternatively, press the docking station's operation mode button [ ] to the docking station. Not a malfunction. Charging Cause The playback volume setting on it to the docking station. Check that the connection between the camera and the docking station is connected correctly. When inserting the camera in the docking station, push down on ... connected to light the CHARGE indicator. The protect mode is cut off . The camera is in the docking station but the installed battery is no sound. Action Adjust the playback volume. Problem There is not being recharged.
... Alternatively, press the docking station's operation mode button [ ] to the docking station. Not a malfunction. Charging Cause The playback volume setting on it to the docking station. Check that the connection between the camera and the docking station is connected correctly. When inserting the camera in the docking station, push down on ... connected to light the CHARGE indicator. The protect mode is cut off . The camera is in the docking station but the installed battery is no sound. Action Adjust the playback volume. Problem There is not being recharged.

Owners Manual
Page 194
DOCKING STATION Remote control unit Problem The remote control unit does not seem to work. Cause The remote control unit is not correctly inserted. Reference page 23, ...
DOCKING STATION Remote control unit Problem The remote control unit does not seem to work. Cause The remote control unit is not correctly inserted. Reference page 23, ...


