Instruction Manual, VPC-TH1EX Safety
Page 1
..., incorporates high-voltage circuits. i Any internal check, setting, or repair should not be performed by lightning, do not use the devices during use the docking station or AC adaptor/charger, unplug the power cord from lightning. Doing so may cause a fire or electric shock. k Be aware of light. Do not allow it may damage the internal parts. Doing so may damage that it...
..., incorporates high-voltage circuits. i Any internal check, setting, or repair should not be performed by lightning, do not use the devices during use the docking station or AC adaptor/charger, unplug the power cord from lightning. Doing so may cause a fire or electric shock. k Be aware of light. Do not allow it may damage the internal parts. Doing so may damage that it...

Instruction Manual, VPC-TH1EX Safety
Page 4
... instruction manuals that could not be recorded, are intended to a radio or TV set, it from images that may differ depending on the supplied cables are damaged, the battery pack will diminish. i Storage temperature: -10 to 30°C (14 to flash, and the camera will allow contaminants from the power outlet.) 2 Remove the dirt with no condensation) FOR CORRECT USE OF YOUR CAMERA...
... instruction manuals that could not be recorded, are intended to a radio or TV set, it from images that may differ depending on the supplied cables are damaged, the battery pack will diminish. i Storage temperature: -10 to 30°C (14 to flash, and the camera will allow contaminants from the power outlet.) 2 Remove the dirt with no condensation) FOR CORRECT USE OF YOUR CAMERA...

Instruction Manual
Page 7
... camera or card flaw. h The display changes to the Playback Screen. 2 Select the image to go i Sanyo declines any claim for compensation for the framed image is set up or down to move the orange frame to the image you wish to play back. REC/PLAY button SET button 2009.12.24 18:41 Full-HD 6.5MB OK 100-0006 00:00:05 Orange frame Remaining battery power idication English...
... camera or card flaw. h The display changes to the Playback Screen. 2 Select the image to go i Sanyo declines any claim for compensation for the framed image is set up or down to move the orange frame to the image you wish to play back. REC/PLAY button SET button 2009.12.24 18:41 Full-HD 6.5MB OK 100-0006 00:00:05 Orange frame Remaining battery power idication English...

Instruction Manual
Page 12
SHOOT, PLAY BACK AND SAVE Burn video clips onto a DVD (For Windows Vista users) Here's how to [All Programs] → [Nero 8], and click on [Nero Vision Essentials]. h Nero Vision starts up, and the start screen. 1 Insert a blank DVD in your computer's DVD drive. 2 Click the Start button, and point to write your camera are different from those of the commercially sold edition. h The specifications for...
SHOOT, PLAY BACK AND SAVE Burn video clips onto a DVD (For Windows Vista users) Here's how to [All Programs] → [Nero 8], and click on [Nero Vision Essentials]. h Nero Vision starts up, and the start screen. 1 Insert a blank DVD in your computer's DVD drive. 2 Click the Start button, and point to write your camera are different from those of the commercially sold edition. h The specifications for...

Instruction Manual
Page 23
... the focus setting 61 Hints for taking pictures 62 VIDEO CLIP RECORDING 63 SHOOTING SINGLE SHOTS 64 Using the flash 66 SHOOT A STILL IMAGE WHILE RECORDING A VIDEO CLIP ..........68 MACRO-PHOTOGRAPHY (ZOOM 70 SHOOTING AND PLAYBACK WITH THE REMOTE CONTROL UNIT 72 PLAYBACK PLAYING BACK VIDEO CLIPS AND STILL IMAGES 73 How to save one frame from a video clip as a still image 76 SLIDESHOW PLAYBACK 77 PLAYBACK VOLUME 78 DELETING FILES 79 Delete single/delete all 79 Delete selected 80 PLAYBACK MODES 82 21-image display playback...
... the focus setting 61 Hints for taking pictures 62 VIDEO CLIP RECORDING 63 SHOOTING SINGLE SHOTS 64 Using the flash 66 SHOOT A STILL IMAGE WHILE RECORDING A VIDEO CLIP ..........68 MACRO-PHOTOGRAPHY (ZOOM 70 SHOOTING AND PLAYBACK WITH THE REMOTE CONTROL UNIT 72 PLAYBACK PLAYING BACK VIDEO CLIPS AND STILL IMAGES 73 How to save one frame from a video clip as a still image 76 SLIDESHOW PLAYBACK 77 PLAYBACK VOLUME 78 DELETING FILES 79 Delete single/delete all 79 Delete selected 80 PLAYBACK MODES 82 21-image display playback...

Instruction Manual
Page 24
... stabilizer) setting 92 Focus range setting 93 Focus mode setting 94 Light-measuring mode setting 94 ISO sensitivity setting 95 RECORDING MENU 3 96 White balance setting 96 Exposure setting 97 Face chaser setting 98 Photo wide D-range setting 99 High sensitivity mode setting 100 Digital zoom setting 100 Exposure compensation 101 Field of view 102 PLAYBACK PLAYBACK MENU 1 103 Slideshow settings 103 File protect setting 104 Resize 106 Rotate 106 PLAYBACK MENU 2 107 Correcting the image 107 Editing video clips 108 Printing instructions 117 FILE INFO DISPLAY 121 3 English
... stabilizer) setting 92 Focus range setting 93 Focus mode setting 94 Light-measuring mode setting 94 ISO sensitivity setting 95 RECORDING MENU 3 96 White balance setting 96 Exposure setting 97 Face chaser setting 98 Photo wide D-range setting 99 High sensitivity mode setting 100 Digital zoom setting 100 Exposure compensation 101 Field of view 102 PLAYBACK PLAYBACK MENU 1 103 Slideshow settings 103 File protect setting 104 Resize 106 Rotate 106 PLAYBACK MENU 2 107 Correcting the image 107 Editing video clips 108 Printing instructions 117 FILE INFO DISPLAY 121 3 English

Instruction Manual
Page 27
...; "Select the focus setting" (super macro mode) on page 61 For more accurate focus • "How to use the manual focus" (manual focus) on page 93 Set the focus to viewing images using various techniques, you can locate the exact operation for your photos • "DATE AND TIME SETTING" on page 38 Zoom in the following table. From creating precisely the photo you want, to a narrow range • "Focus mode setting" on page 94...
...; "Select the focus setting" (super macro mode) on page 61 For more accurate focus • "How to use the manual focus" (manual focus) on page 93 Set the focus to viewing images using various techniques, you can locate the exact operation for your photos • "DATE AND TIME SETTING" on page 38 Zoom in the following table. From creating precisely the photo you want, to a narrow range • "Focus mode setting" on page 94...

Instruction Manual
Page 54
... to the USB hub. Recharging when connected to the USB terminal (page 6 in the Xacti Software CD INSTRUCTION MANUAL) i The battery can be recharged while the camera is connected to charge it is therefore recommended that when the battery pack is removed for a long time. CHARGING THE BATTERY PACK CAUTION Do not charge the battery pack immediately after the camera has been in continuous use for a long time i The battery pack becomes...
... to the USB hub. Recharging when connected to the USB terminal (page 6 in the Xacti Software CD INSTRUCTION MANUAL) i The battery can be recharged while the camera is connected to charge it is therefore recommended that when the battery pack is removed for a long time. CHARGING THE BATTERY PACK CAUTION Do not charge the battery pack immediately after the camera has been in continuous use for a long time i The battery pack becomes...

Instruction Manual
Page 83
... flashing red indicator turns off. SIMPLE/SHOOTING Hints for taking pictures with the light coming from behind the subject, due to capture another image. i All the image and sound files are being recorded... Taking pictures in the camera. i While the multi-indicator is flashing red, depending on the card installed in backlight conditions... Another image can be captured after shooting. However, even when the multi-indicator is flashing red, the image files are recorded on the camera's internal memory...
... flashing red indicator turns off. SIMPLE/SHOOTING Hints for taking pictures with the light coming from behind the subject, due to capture another image. i All the image and sound files are being recorded... Taking pictures in the camera. i While the multi-indicator is flashing red, depending on the card installed in backlight conditions... Another image can be captured after shooting. However, even when the multi-indicator is flashing red, the image files are recorded on the camera's internal memory...

Instruction Manual
Page 90
... the video clip recording size. i The photo stabilizer (pages 52 and 92) is suggested that you intend to capture a still image while recording a video clip. About the recording size of still images i The size of the remaining video recording time. If you take note of a still image captured during video clip recording depends on the video clip recording mode (page 85). SHOOT A STILL IMAGE WHILE RECORDING A VIDEO CLIP HINT i When shooting a still image while recording a video clip, the flash does not operate.
... the video clip recording size. i The photo stabilizer (pages 52 and 92) is suggested that you intend to capture a still image while recording a video clip. About the recording size of still images i The size of the remaining video recording time. If you take note of a still image captured during video clip recording depends on the video clip recording mode (page 85). SHOOT A STILL IMAGE WHILE RECORDING A VIDEO CLIP HINT i When shooting a still image while recording a video clip, the flash does not operate.

Instruction Manual
Page 94
... file you wish to play back. Orange frame 2009. 12.25 14:25 Full-HR 37.6MB OK 100-0006 00:00:25 73 English SET button PLAYBACK SIMPLE/PLAYBACK PLAYING BACK VIDEO CLIPS AND STILL IMAGES 1 Set the camera to the playback mode (page 41). 2 Select the image to play back. h The image information for the framed image is shown at the bottom of the screen. 3 Press the SET button...
... file you wish to play back. Orange frame 2009. 12.25 14:25 Full-HR 37.6MB OK 100-0006 00:00:25 73 English SET button PLAYBACK SIMPLE/PLAYBACK PLAYING BACK VIDEO CLIPS AND STILL IMAGES 1 Set the camera to the playback mode (page 41). 2 Select the image to play back. h The image information for the framed image is shown at the bottom of the screen. 3 Press the SET button...

Instruction Manual
Page 99
...the SET button. English 78 SIMPLE/PLAYBACK PLAYBACK VOLUME Adjust the playback volume for video clips and audio files. 1 Display the SIMPLE Mode Playback Menu (page 44), select the playback volume setting, and press the SET button. PLAY VOLUME 2 Toggle the SET button to the left or right to adjust the volume. h The playback volume is set, and the display returns to the SIMPLE Mode Playback Menu. 4 VOLUME SETTING HINT The volume can be adjusted during playback i During video clip or audio file playback, if you push the zoom switch toward [T/]] or [W/P], the volume control bar...
...the SET button. English 78 SIMPLE/PLAYBACK PLAYBACK VOLUME Adjust the playback volume for video clips and audio files. 1 Display the SIMPLE Mode Playback Menu (page 44), select the playback volume setting, and press the SET button. PLAY VOLUME 2 Toggle the SET button to the left or right to adjust the volume. h The playback volume is set, and the display returns to the SIMPLE Mode Playback Menu. 4 VOLUME SETTING HINT The volume can be adjusted during playback i During video clip or audio file playback, if you push the zoom switch toward [T/]] or [W/P], the volume control bar...

Instruction Manual
Page 108
RECORDING MENU 1 HINT You can capture a still image during an audio recording i Press the [ ] button during audio recording to capture a [ still image. The recording session continues until you stop recording, but video clip or voice memo recording is temporarily interrupted while the file is saved once, and the recording continues in a new file. (These 4 GB segments are automatically created. When recording a video clip whose file size exceeds 4 GB, the recorded file is saved once, and the recording continues in...
RECORDING MENU 1 HINT You can capture a still image during an audio recording i Press the [ ] button during audio recording to capture a [ still image. The recording session continues until you stop recording, but video clip or voice memo recording is temporarily interrupted while the file is saved once, and the recording continues in a new file. (These 4 GB segments are automatically created. When recording a video clip whose file size exceeds 4 GB, the recorded file is saved once, and the recording continues in...

Instruction Manual
Page 116
... image shooting: ISO 50 to the SET button (pages 126 and 130), you can set faster shutter speeds and capture images in darker locations, but noise in the image. 95 English i By setting a higher ISO sensitivity, you can be set to 800; However, the ISO sensitivity can change the ISO setting from the Recording Screen. HINT i At the = setting, the ISO sensitivity is set automatically (video clip recording: ISO 50 to a fixed setting. RECORDING MENU...
... image shooting: ISO 50 to the SET button (pages 126 and 130), you can set faster shutter speeds and capture images in darker locations, but noise in the image. 95 English i By setting a higher ISO sensitivity, you can be set to 800; However, the ISO sensitivity can change the ISO setting from the Recording Screen. HINT i At the = setting, the ISO sensitivity is set automatically (video clip recording: ISO 50 to a fixed setting. RECORDING MENU...

Instruction Manual
Page 142
... 1 second. h The Information Screen EXPOSE +0.3 6 appears. h If the MENU button is ; 20089.12.25 19:30 9 pressed again, the Information Screen is canceled. 1 Video clip mode settings 2 Image or sound number 3 Protect setting 4 File size 5 Shooting or recording time INFO 100-0002 2 A 1600×1200 3 987KB 4 F6.8 7 1/1000 8 +0.3 6 ISO 50 B ; 20098.12.25 19:30 9 6 Exposure compensation setting 7 Aperture value 8 Shutter speed 9 Remaining battery charge 0 Date and time of image INFO AAC 100-0003...
... 1 second. h The Information Screen EXPOSE +0.3 6 appears. h If the MENU button is ; 20089.12.25 19:30 9 pressed again, the Information Screen is canceled. 1 Video clip mode settings 2 Image or sound number 3 Protect setting 4 File size 5 Shooting or recording time INFO 100-0002 2 A 1600×1200 3 987KB 4 F6.8 7 1/1000 8 +0.3 6 ISO 50 B ; 20098.12.25 19:30 9 6 Exposure compensation setting 7 Aperture value 8 Shutter speed 9 Remaining battery charge 0 Date and time of image INFO AAC 100-0003...

Instruction Manual
Page 160
... the camera is also erased, so before formatting a card, any data you are transferring the card to someone else to use, it is set to the "LOCK" position. i If you want to keep should be copied to the camera or eject the card during formatting i Do not turn off the power to your personal computer's hard disk or other storage medium. The card cannot be formatted if the lock switch is...
... the camera is also erased, so before formatting a card, any data you are transferring the card to someone else to use, it is set to the "LOCK" position. i If you want to keep should be copied to the camera or eject the card during formatting i Do not turn off the power to your personal computer's hard disk or other storage medium. The card cannot be formatted if the lock switch is...
Instruction Manual
Page 184
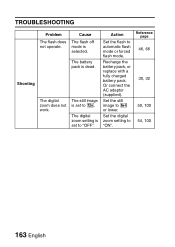
The digital zoom does not work. Reference page 46, 66 30, 32 50, 100 54, 100 163 English The still image is set to I. The digital zoom setting is set to U or lower. Or connect the AC adaptor (supplied). Cause The flash off mode is dead. Action Set the flash to "ON". Recharge the battery pack, or replace with a fully charged battery pack. The battery pack is selected. Set the digital zoom setting to automatic flash mode or forced flash mode. TROUBLESHOOTING Shooting Problem The flash does not operate. Set the still image to "OFF".
The digital zoom does not work. Reference page 46, 66 30, 32 50, 100 54, 100 163 English The still image is set to I. The digital zoom setting is set to U or lower. Or connect the AC adaptor (supplied). Cause The flash off mode is dead. Action Set the flash to "ON". Recharge the battery pack, or replace with a fully charged battery pack. The battery pack is selected. Set the digital zoom setting to automatic flash mode or forced flash mode. TROUBLESHOOTING Shooting Problem The flash does not operate. Set the still image to "OFF".

Instruction Manual
Page 192
... Images/ Possible Shooting Time/ Possible Recording Time" (page 180). Reference page 124 - - 171 English Normal change occurring with a new battery pack. Depending on the card, the capacity may be swollen. Even with normal correct use of the lithium-ion battery, it has a tendency to swell as the number of charge and discharge cycles adds up and it with battery use. TROUBLESHOOTING Misc. Problem The audio guide does not sound. The recording...
... Images/ Possible Shooting Time/ Possible Recording Time" (page 180). Reference page 124 - - 171 English Normal change occurring with a new battery pack. Depending on the card, the capacity may be swollen. Even with normal correct use of the lithium-ion battery, it has a tendency to swell as the number of charge and discharge cycles adds up and it with battery use. TROUBLESHOOTING Misc. Problem The audio guide does not sound. The recording...

Instruction Manual
Page 201
... recording time of a voice memo exceeds about 13 hours, the recorded file is saved once, and then recording continues in a new file. (These 4 GB segments are automatically created. Possible No. In the video clip recording mode, when the size of Images/Possible Shooting Time/ Possible Recording Time Shooting/ recording mode Still image mode Video clip mode Resolution setting I U V ] + t , [ R c e ! Y & ) X f SD Memory Card 4 GB 8 GB 1,000 images 1,000 images 1,470 images 1,960 images 5,390 images 5,640 images 10,300 images 24,800 images 1,470 images 2,950 images...
... recording time of a voice memo exceeds about 13 hours, the recorded file is saved once, and then recording continues in a new file. (These 4 GB segments are automatically created. Possible No. In the video clip recording mode, when the size of Images/Possible Shooting Time/ Possible Recording Time Shooting/ recording mode Still image mode Video clip mode Resolution setting I U V ] + t , [ R c e ! Y & ) X f SD Memory Card 4 GB 8 GB 1,000 images 1,000 images 1,470 images 1,960 images 5,390 images 5,640 images 10,300 images 24,800 images 1,470 images 2,950 images...

Xacti Library
Page 24
... pressed during playback. Be careful when editing images that are stored in multiple albums. i If you save edited images under new names. HINT Did the images in a Xacti Library album (page 20). 1 Display the screen to play back, and press the SET button. h A list of albums appears. 3 Select the desired album to select playback files (page 15). 2 Select "ALBUM", and press the SET button. English 18
... pressed during playback. Be careful when editing images that are stored in multiple albums. i If you save edited images under new names. HINT Did the images in a Xacti Library album (page 20). 1 Display the screen to play back, and press the SET button. h A list of albums appears. 3 Select the desired album to select playback files (page 15). 2 Select "ALBUM", and press the SET button. English 18


