

VPC-E2BL Owners Manual English
Page 8
... [No thanks !] option button, and then click on the camera SET button Supplied dedicated USB interface cable USB CONNECTION COMPUTER PRINTER CANCEL CANCEL OK vii English To USB connector on the computer To USB/AV terminal on the [OK] button. h When the installation window closes, a dialog ... installation window closes. Copy data from your camera to the computer. 1 Turn on the camera's monitor. h Connect the cable between the camera's USB/AV terminal and the computer's USB connector. 2 Turn on [Finish]. SHOOT, PLAY BACK AND SAVE 3 In the installation window, click on the camera (...
... [No thanks !] option button, and then click on the camera SET button Supplied dedicated USB interface cable USB CONNECTION COMPUTER PRINTER CANCEL CANCEL OK vii English To USB connector on the computer To USB/AV terminal on the [OK] button. h When the installation window closes, a dialog ... installation window closes. Copy data from your camera to the computer. 1 Turn on the camera's monitor. h Connect the cable between the camera's USB/AV terminal and the computer's USB connector. 2 Turn on [Finish]. SHOOT, PLAY BACK AND SAVE 3 In the installation window, click on the camera (...

VPC-E2BL Owners Manual English
Page 28
CHECKING THE INCLUDED ACCESSORIES i Handstrap and soft case (pages 13 and 14): 1 set i Xacti Software DVD (DVDROM) (page 4 in the Xacti Software DVD INSTRUCTION MANUAL): 1 i Li-ion battery pack (pages 23 and 25): 1 i Lithium-ion battery pack charger (page 23): 1 i Dedicated USB interface cable (page 157, page 9 in the Xacti Software DVD INSTRUCTION MANUAL): 1 i Dedicated AV interface cable (page 155): 1 11 English
CHECKING THE INCLUDED ACCESSORIES i Handstrap and soft case (pages 13 and 14): 1 set i Xacti Software DVD (DVDROM) (page 4 in the Xacti Software DVD INSTRUCTION MANUAL): 1 i Li-ion battery pack (pages 23 and 25): 1 i Lithium-ion battery pack charger (page 23): 1 i Dedicated USB interface cable (page 157, page 9 in the Xacti Software DVD INSTRUCTION MANUAL): 1 i Dedicated AV interface cable (page 155): 1 11 English
VPC-E2BL Owners Manual English
Page 37
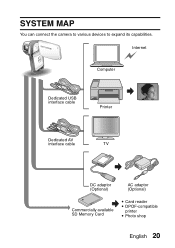
SYSTEM MAP You can connect the camera to various devices to expand its capabilities. Internet Computer Dedicated USB interface cable Printer Dedicated AV interface cable TV DC adaptor (Optional) AC adaptor (Optional) Commercially available SD Memory Card i Card reader i DPOF-compatible printer i Photo shop English 20
SYSTEM MAP You can connect the camera to various devices to expand its capabilities. Internet Computer Dedicated USB interface cable Printer Dedicated AV interface cable TV DC adaptor (Optional) AC adaptor (Optional) Commercially available SD Memory Card i Card reader i DPOF-compatible printer i Photo shop English 20

VPC-E2BL Owners Manual English
Page 47
h If you close the monitor unit. i When the camera is connected to a computer or printer using the dedicated USB interface cable, the power save function is disabled, and the camera turns off the camera after about 1 hour, or when you press the REC/PLAY button for ... active In order to preserve battery pack power, the power save (sleep) function will switch to the power save function has been active for about 12 hours. h Press the [ ] or [ ] button.
h If you close the monitor unit. i When the camera is connected to a computer or printer using the dedicated USB interface cable, the power save function is disabled, and the camera turns off the camera after about 1 hour, or when you press the REC/PLAY button for ... active In order to preserve battery pack power, the power save (sleep) function will switch to the power save function has been active for about 12 hours. h Press the [ ] or [ ] button.

VPC-E2BL Owners Manual English
Page 159
i If the TV system setting is output from your camera's USB/AV terminal. 1 Display the Option Setting Menu [2] (page 129). 2 Select "TV SYSTEM", and press the SET button. PAL: Outputs PAL video signals. HINT If no ... connected equipment, no image appears on the monitor. h The selected TV system is set to "PAL" and connected to a TV using the included AV interface cable (page 155) Shooting: Images are displayed on the TV only and do not appear on the TV. h The TV System Screen appears. Playback: Images are...
i If the TV system setting is output from your camera's USB/AV terminal. 1 Display the Option Setting Menu [2] (page 129). 2 Select "TV SYSTEM", and press the SET button. PAL: Outputs PAL video signals. HINT If no ... connected equipment, no image appears on the monitor. h The selected TV system is set to "PAL" and connected to a TV using the included AV interface cable (page 155) Shooting: Images are displayed on the TV only and do not appear on the TV. h The TV System Screen appears. Playback: Images are...
VPC-E2BL Owners Manual English
Page 172
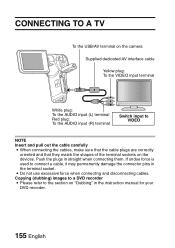
... when connecting them. OTHER DEVICES AND CONNECTIONS CONNECTING TO A TV CONNECTING TO A TV CONNECTING TO A TV To the USB/AV terminal on the camera Supplied dedicated AV interface cable Yellow plug: To the VIDEO input terminal White plug: To the AUDIO input (L) terminal Red plug: To the AUDIO ...input (R) terminal Switch input to VIDEO NOTE Insert and pull out the cable carefully i When connecting the cables, make sure that the cable plugs are correctly oriented and that they match the shapes of the terminal sockets on "Dubbing" in the instruction manual...
... when connecting them. OTHER DEVICES AND CONNECTIONS CONNECTING TO A TV CONNECTING TO A TV CONNECTING TO A TV To the USB/AV terminal on the camera Supplied dedicated AV interface cable Yellow plug: To the VIDEO input terminal White plug: To the AUDIO input (L) terminal Red plug: To the AUDIO ...input (R) terminal Switch input to VIDEO NOTE Insert and pull out the cable carefully i When connecting the cables, make sure that the cable plugs are correctly oriented and that they match the shapes of the terminal sockets on "Dubbing" in the instruction manual...

VPC-E2BL Owners Manual English
Page 174
... on the camera Supplied dedicated USB interface cable USB CONNECTION COMPUTER PRINTER CANCEL CANCEL OK 157 English To USB connector on the camera (page 30). h Connect the camera's USB/AV terminal to the printer. h The USB Connection Screen appears on , and use the supplied USB interface cable to connect the camera to the printer's USB connector. 2 Turn on the...
... on the camera Supplied dedicated USB interface cable USB CONNECTION COMPUTER PRINTER CANCEL CANCEL OK 157 English To USB connector on the camera (page 30). h Connect the camera's USB/AV terminal to the printer. h The USB Connection Screen appears on , and use the supplied USB interface cable to connect the camera to the printer's USB connector. 2 Turn on the...

VPC-E2BL Owners Manual English
Page 175
...the camera's button operation response is sufficient. i If the camera is powered by the battery pack for printing, make sure that the cable plugs are correctly oriented and that the remaining battery charge is slower. 3 Select "PRINTER", and press the SET button. 4 The PictBridge... pins in straight when connecting them. If the camera does not operate correctly, disconnect the USB interface cable, turn off while it may not operate correctly. h The camera switches to connect a cable, it is activated. Push the plugs in the terminal socket. Caution when connecting a printer...
...the camera's button operation response is sufficient. i If the camera is powered by the battery pack for printing, make sure that the cable plugs are correctly oriented and that the remaining battery charge is slower. 3 Select "PRINTER", and press the SET button. 4 The PictBridge... pins in straight when connecting them. If the camera does not operate correctly, disconnect the USB interface cable, turn off while it may not operate correctly. h The camera switches to connect a cable, it is activated. Push the plugs in the terminal socket. Caution when connecting a printer...

