
Owners Manual
Page 1
INSTRUCTION MANUAL Digital Movie Camera VPC-CG6EX VPC-CG6 VPC-CG6GX Important note This manual explains how to read these products will be labeled as such. Keep this manual in a safe place for later reference. Make sure to safely operate the VPC-CG6EX, VPC-CG6 and VPC-CG6GX. Any information regarding only one of these instructions carefully before using the camera. Please read and understand the separate booklet "SAFETY MANUAL".
INSTRUCTION MANUAL Digital Movie Camera VPC-CG6EX VPC-CG6 VPC-CG6GX Important note This manual explains how to read these products will be labeled as such. Keep this manual in a safe place for later reference. Make sure to safely operate the VPC-CG6EX, VPC-CG6 and VPC-CG6GX. Any information regarding only one of these instructions carefully before using the camera. Please read and understand the separate booklet "SAFETY MANUAL".

Owners Manual
Page 3
... in ! Symbols used electrical and electronic products. CAUTION Points that electrical and electronic equipment, at your household waste. Your SANYO product is designed and manufactured with Canadian ICES-003. Please dispose of this manual HINT Points giving some extended instructions or ...special points to pay attention to questions or problems concerning camera operation in other areas of -life, should be recycled and reused. FOR CANADIAN USERS i This Class B digital apparatus complies with high quality materials and components which can be disposed ...
... in ! Symbols used electrical and electronic products. CAUTION Points that electrical and electronic equipment, at your household waste. Your SANYO product is designed and manufactured with Canadian ICES-003. Please dispose of this manual HINT Points giving some extended instructions or ...special points to pay attention to questions or problems concerning camera operation in other areas of -life, should be recycled and reused. FOR CANADIAN USERS i This Class B digital apparatus complies with high quality materials and components which can be disposed ...
Owners Manual
Page 14
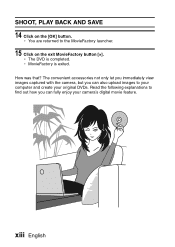
The convenient accessories not only let you immediately view images captured with the camera, but you can also upload images to find out how you can fully enjoy your original DVDs. Read the following explanations to your computer and create your camera's digital movie feature. How was that? xiii English h MovieFactory is completed. h You are returned to the MovieFactory launcher. 15 Click on the [OK] button. SHOOT, PLAY BACK AND SAVE 14 Click on the exit MovieFactory button [×]. h The DVD is exited.
The convenient accessories not only let you immediately view images captured with the camera, but you can also upload images to find out how you can fully enjoy your original DVDs. Read the following explanations to your computer and create your camera's digital movie feature. How was that? xiii English h MovieFactory is completed. h You are returned to the MovieFactory launcher. 15 Click on the [OK] button. SHOOT, PLAY BACK AND SAVE 14 Click on the exit MovieFactory button [×]. h The DVD is exited.
Owners Manual
Page 17
...WIND NOISE REDUCTION 127 NOISE-REDUCTION FUNCTION 128 ADJUST THE IMAGE QUALITY 129 FLICKER-REDUCTION 130 DIGITAL ZOOM SETTING 131 ASSIGN SET BUTTON FUNCTIONS 132 MONITOR BRIGHTNESS 134 SCREEN LANGUAGE 135 TV SYSTEM ...SETTING 136 POWER SAVE FUNCTION 137 FILE NO. CONTENTS CORRECTING CAMERA SHAKE AND RED-EYE EFFECT 100 EDITING VIDEO CLIPS 102 Procedure to cut (extract) a portion of...DISPLAYING THE OPTION MENU 120 Overview of images and video recording time 145 For audio data 145 CHECKING THE REMAINING BATTERY PACK CHARGE 146 3 English
...WIND NOISE REDUCTION 127 NOISE-REDUCTION FUNCTION 128 ADJUST THE IMAGE QUALITY 129 FLICKER-REDUCTION 130 DIGITAL ZOOM SETTING 131 ASSIGN SET BUTTON FUNCTIONS 132 MONITOR BRIGHTNESS 134 SCREEN LANGUAGE 135 TV SYSTEM ...SETTING 136 POWER SAVE FUNCTION 137 FILE NO. CONTENTS CORRECTING CAMERA SHAKE AND RED-EYE EFFECT 100 EDITING VIDEO CLIPS 102 Procedure to cut (extract) a portion of...DISPLAYING THE OPTION MENU 120 Overview of images and video recording time 145 For audio data 145 CHECKING THE REMAINING BATTERY PACK CHARGE 146 3 English

Owners Manual
Page 71
For video clip recording, see page 45. 57 English When the zoom switch is pressed toward the [T] or [W] side to the digital zoom mode and zooming continues. Monitor When both optical and digital zoom are enabled Zoom bar Optical zoom Digital zoom (yellow) When optical zoom only is at the ... shooting still images, see page 41. h When the zoom switch is enabled (page 131). 1 Point the camera lens at maximum, zooming stops temporarily. You can specify whether or not the digital zoom is moved, the zoom bar appears on the subject. [W]: Zoom out. Zoom switch 2 Push the zoom...
For video clip recording, see page 45. 57 English When the zoom switch is pressed toward the [T] or [W] side to the digital zoom mode and zooming continues. Monitor When both optical and digital zoom are enabled Zoom bar Optical zoom Digital zoom (yellow) When optical zoom only is at the ... shooting still images, see page 41. h When the zoom switch is enabled (page 131). 1 Point the camera lens at maximum, zooming stops temporarily. You can specify whether or not the digital zoom is moved, the zoom bar appears on the subject. [W]: Zoom out. Zoom switch 2 Push the zoom...
Owners Manual
Page 88
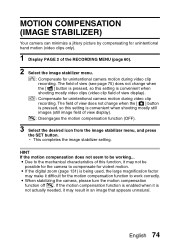
...when shooting mostly still images (still image field of view display). i When stabilizing the camera, please turn the motion compensation function off ]. q: Compensate for unintentional camera motion during video clip recording. h This completes the image stabilizer setting. If the motion compensation function is enabled .... English 74 HINT If the motion compensation does not seem to the mechanical characteristics of the RECORDING MENU (page 60). 2 Select the image stabilizer menu. i If the digital zoom (page 131) is not actually needed, it may make it difficult for the motion ...
...when shooting mostly still images (still image field of view display). i When stabilizing the camera, please turn the motion compensation function off ]. q: Compensate for unintentional camera motion during video clip recording. h This completes the image stabilizer setting. If the motion compensation function is enabled .... English 74 HINT If the motion compensation does not seem to the mechanical characteristics of the RECORDING MENU (page 60). 2 Select the image stabilizer menu. i If the digital zoom (page 131) is not actually needed, it may make it difficult for the motion ...

Owners Manual
Page 115
...detect a flaw, or it may incorrectly identify a flaw where it does not exist. h A screen appears for images captured using a different digital camera. HINT About the blur correction icon i On the Blur Correction Screen, an icon indicating the degree of blur appears. : Blur correction unnecessary ...or blur correction completed. : Blur correction possible : Blur correction not possible i Blur correction is corrected and saved, the recorded date and time of extreme blur. SAVE AS NEW: The corrected image is saved as a separate image, and the original image is saved....
...detect a flaw, or it may incorrectly identify a flaw where it does not exist. h A screen appears for images captured using a different digital camera. HINT About the blur correction icon i On the Blur Correction Screen, an icon indicating the degree of blur appears. : Blur correction unnecessary ...or blur correction completed. : Blur correction possible : Blur correction not possible i Blur correction is corrected and saved, the recorded date and time of extreme blur. SAVE AS NEW: The corrected image is saved as a separate image, and the original image is saved....
Owners Manual
Page 126
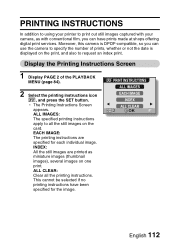
... film, you can have been specified for each individual image. ALL CLEAR: Clear all the still images on the card. Moreover, this camera is displayed on one print. ALL IMAGES: The specified printing instructions apply to all the printing instructions. This cannot be selected if no... printing instructions have prints made at shops offering digital print services. PRINTING INSTRUCTIONS In addition to using your printer to print out still images captured with your camera, as miniature images (thumbnail images), several images on the print, and also to...
... film, you can have been specified for each individual image. ALL CLEAR: Clear all the still images on the card. Moreover, this camera is displayed on one print. ALL IMAGES: The specified printing instructions apply to all the printing instructions. This cannot be selected if no... printing instructions have prints made at shops offering digital print services. PRINTING INSTRUCTIONS In addition to using your printer to print out still images captured with your camera, as miniature images (thumbnail images), several images on the print, and also to...
Owners Manual
Page 127
...HINT Printing a single frame from a video clip, you must first save it (extract still) as a still image (page 111). You can connect your camera to a DPOF-compatible printer to produce your prints. i The quality of the print output will be printed in their original orientation. You can also set... the printing instructions for the desired images, and then have the digital print service shop print out a still image from a video clip i To print with a printer or have the requested images printed automatically (page...
...HINT Printing a single frame from a video clip, you must first save it (extract still) as a still image (page 111). You can connect your camera to a DPOF-compatible printer to produce your prints. i The quality of the print output will be printed in their original orientation. You can also set... the printing instructions for the desired images, and then have the digital print service shop print out a still image from a video clip i To print with a printer or have the requested images printed automatically (page...
Owners Manual
Page 136
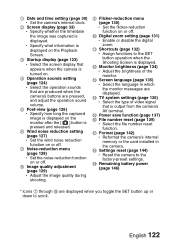
...-view (page 126) h Specify how long the captured image is displayed on or off. 0 Digital zoom setting (page 131) h Enable or disable the digital zoom. G Format (page 142) h Reformat the camera's internal memory or the card installed in which the monitor messages are displayed when you toggle the ...SET button up or down to scroll. English 122 H Settings reset (page 144) h Reset the camera to the SET button...
...-view (page 126) h Specify how long the captured image is displayed on or off. 0 Digital zoom setting (page 131) h Enable or disable the digital zoom. G Format (page 142) h Reformat the camera's internal memory or the card installed in which the monitor messages are displayed when you toggle the ...SET button up or down to scroll. English 122 H Settings reset (page 144) h Reset the camera to the SET button...
Owners Manual
Page 156
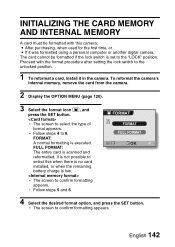
... and press the SET button. FORMAT: A normal formatting is low. It is not possible to select this camera: i After purchasing, when used for the first time, or i If it in the camera. h Follow steps 5 and 6. h The screen to confirm formatting appears. English 142 Proceed with this when...: The entire card is set to the unlocked position. 1 To reformat a card, install it was formatted using a personal computer or another digital camera. FORMAT FORMAT FULL FORMAT OK 4 Select the desired format option, and press the SET button. The card cannot be formatted with the format ...
... and press the SET button. FORMAT: A normal formatting is low. It is not possible to select this camera: i After purchasing, when used for the first time, or i If it in the camera. h Follow steps 5 and 6. h The screen to confirm formatting appears. English 142 Proceed with this when...: The entire card is set to the unlocked position. 1 To reformat a card, install it was formatted using a personal computer or another digital camera. FORMAT FORMAT FULL FORMAT OK 4 Select the desired format option, and press the SET button. The card cannot be formatted with the format ...
Owners Manual
Page 176
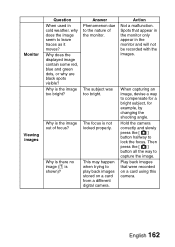
Spots that were recorded on a card from a different digital camera. Then press the [ ] button all the way to compensate for a bright subject, for example, by changing the shooting angle. Monitor Viewing images Question When used in the monitor and will not be recorded with the images. Why is the image out of ...some red, blue and green dots, or why are black spots visible? When capturing an image, devise a way to capture the image. Hold the camera correctly and slowly press the [ ] button halfway to leave traces as it moves? Why is the image too bright? Why is there no image ...
Spots that were recorded on a card from a different digital camera. Then press the [ ] button all the way to compensate for a bright subject, for example, by changing the shooting angle. Monitor Viewing images Question When used in the monitor and will not be recorded with the images. Why is the image out of ...some red, blue and green dots, or why are black spots visible? When capturing an image, devise a way to capture the image. Hold the camera correctly and slowly press the [ ] button halfway to leave traces as it moves? Why is the image too bright? Why is there no image ...
Owners Manual
Page 177
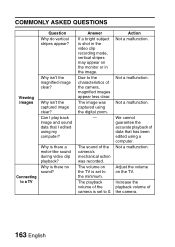
... images appear less clear. Increase the playback volume of the camera's mechanical action was captured using my computer? Viewing images Why isn't the captured image clear? Can I edited using the digital zoom. - Not a malfunction. Why is shot in the video clip recording mode, vertical stripes may appear on the monitor or in the...
... images appear less clear. Increase the playback volume of the camera's mechanical action was captured using my computer? Viewing images Why isn't the captured image clear? Can I edited using the digital zoom. - Not a malfunction. Why is shot in the video clip recording mode, vertical stripes may appear on the monitor or in the...
Owners Manual
Page 190
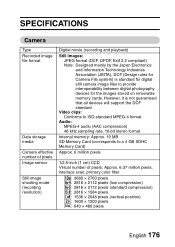
...; 2048 pixels (vertical position) G: 1600 × 1200 pixels [: 640 × 480 pixels English 176 SPECIFICATIONS Camera Type Recorded image file format Data storage media Camera effective number of pixels Image sensor Still image shooting mode (recording resolution) Digital movie (recording and playback) Still images: JPEG format (DCF, DPOF, Exif 2.2 compliant) Note: Designed mainly by the Japan...
...; 2048 pixels (vertical position) G: 1600 × 1200 pixels [: 640 × 480 pixels English 176 SPECIFICATIONS Camera Type Recorded image file format Data storage media Camera effective number of pixels Image sensor Still image shooting mode (recording resolution) Digital movie (recording and playback) Still images: JPEG format (DCF, DPOF, Exif 2.2 compliant) Note: Designed mainly by the Japan...
Owners Manual
Page 191
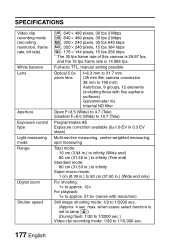
Full-auto TTL, manual setting possible Optical 5.0× zoom lens f=6.3 mm to 31.7 mm (35 mm film camera conversion 38 mm to 190 mm) Autofocus, 9 groups, 12 elements (including three with five aspheric surfaces) Galvanometer iris Internal ND filter Open F=3.5 (Wide) ...1/10,000 sec. 177 English max. when scene select function is 14.985 fps. SPECIFICATIONS Video clip recording mode (recording resolution, frame rate, bit rate) White balance Lens Aperture Exposure control type Light-measuring mode Range Digital zoom Shutter speed b: 640 × 480 pixels, 30 fps 3 Mbps a: 640 × 480 ...
Full-auto TTL, manual setting possible Optical 5.0× zoom lens f=6.3 mm to 31.7 mm (35 mm film camera conversion 38 mm to 190 mm) Autofocus, 9 groups, 12 elements (including three with five aspheric surfaces) Galvanometer iris Internal ND filter Open F=3.5 (Wide) ...1/10,000 sec. 177 English max. when scene select function is 14.985 fps. SPECIFICATIONS Video clip recording mode (recording resolution, frame rate, bit rate) White balance Lens Aperture Exposure control type Light-measuring mode Range Digital zoom Shutter speed b: 640 × 480 pixels, 30 fps 3 Mbps a: 640 × 480 ...

Owners Manual
Page 201
...in the background by using a high resolution. Taking care to your subject's face will appear too bright. i After the flash operates, keep the camera and the subjects motionless for about 2 seconds. NOTE i When shooting with the night scene in on distant scenery, it's better to picture composition...scene. 187 English i For zoom photography, use the optical zoom. i Pay attention to use the optical zoom. Using the digital zoom produces a coarser image. Stabilize the camera when shooting. HINTS FOR TAKING PICTURES Night photography (night view portrait mode /) Points: i Avoid...
...in the background by using a high resolution. Taking care to your subject's face will appear too bright. i After the flash operates, keep the camera and the subjects motionless for about 2 seconds. NOTE i When shooting with the night scene in on distant scenery, it's better to picture composition...scene. 187 English i For zoom photography, use the optical zoom. i Pay attention to use the optical zoom. Using the digital zoom produces a coarser image. Stabilize the camera when shooting. HINTS FOR TAKING PICTURES Night photography (night view portrait mode /) Points: i Avoid...


