
Owners Manual
Page 5
... or card flaw. h The image information for recorded contents etc. in case of the screen. REC/PLAY button SET button 2009.12.24 18:41 HD-SHQ 6.5MB OK 100-0006 00:00:05 Orange frame Remaining battery power idication English iv Playback 1 Press the REC/PLAY button. h Toggle the SET... button left, right, up and ready to play back. h The display changes to the Playback Screen. 2 Select the image to go i Sanyo declines any claim for compensation for the framed image is set up or down to move the orange frame to the image you wish to...
... or card flaw. h The image information for recorded contents etc. in case of the screen. REC/PLAY button SET button 2009.12.24 18:41 HD-SHQ 6.5MB OK 100-0006 00:00:05 Orange frame Remaining battery power idication English iv Playback 1 Press the REC/PLAY button. h Toggle the SET... button left, right, up and ready to play back. h The display changes to the Playback Screen. 2 Select the image to go i Sanyo declines any claim for compensation for the framed image is set up or down to move the orange frame to the image you wish to...

Owners Manual
Page 24
High-quality images with "High Definition" (pages 48, 59 and 82) Your camera can record video clips in one high-performance camera. 15 English You get both compact file size and high picture quality in High Definition. GETTING THE MOST OUT OF YOUR CAMERA Your dual camera can capture high definition (HD) 1280 × 720-pixel video clips. Also, the H.264/MPEG-4 AVC standard is used for formatting video files.
High-quality images with "High Definition" (pages 48, 59 and 82) Your camera can record video clips in one high-performance camera. 15 English You get both compact file size and high picture quality in High Definition. GETTING THE MOST OUT OF YOUR CAMERA Your dual camera can capture high definition (HD) 1280 × 720-pixel video clips. Also, the H.264/MPEG-4 AVC standard is used for formatting video files.
Owners Manual
Page 25
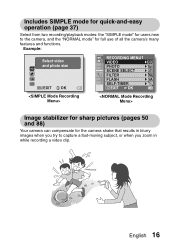
... shake that results in while recording a video clip. English 16 Example: Select video and photo size SN EXIT OK RECORDING MENU 1 1 2 3 VIDEO PHOTO SCENE SELECT HD-SHQ 1 FILTER 2 FLASH 3 SELF-TIMER EXIT OK Image stabilizer for sharp pictures (pages 50 and 88) Your camera can compensate for full use of all...
... shake that results in while recording a video clip. English 16 Example: Select video and photo size SN EXIT OK RECORDING MENU 1 1 2 3 VIDEO PHOTO SCENE SELECT HD-SHQ 1 FILTER 2 FLASH 3 SELF-TIMER EXIT OK Image stabilizer for sharp pictures (pages 50 and 88) Your camera can compensate for full use of all...
Owners Manual
Page 45
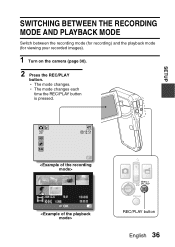
SETUP SWITCHING BETWEEN THE RECORDING MODE AND PLAYBACK MODE Switch between the recording mode (for recording) and the playback mode (for viewing your recorded images). 1 Turn on the camera (page 30). 2 Press the REC/PLAY button. h The mode changes each time the REC/PLAY button is pressed. 10M-S 357 00:13:51 2009.12.24 18:41 HD-SHQ 6.5MB OK 100-0006 00:00:05 REC/PLAY button English 36 h The mode changes.
SETUP SWITCHING BETWEEN THE RECORDING MODE AND PLAYBACK MODE Switch between the recording mode (for recording) and the playback mode (for viewing your recorded images). 1 Turn on the camera (page 30). 2 Press the REC/PLAY button. h The mode changes each time the REC/PLAY button is pressed. 10M-S 357 00:13:51 2009.12.24 18:41 HD-SHQ 6.5MB OK 100-0006 00:00:05 REC/PLAY button English 36 h The mode changes.

Owners Manual
Page 49
h The Menu Screen for the selected tab appears. Tab Push up or down 2 FLASH 3 SELF-TIMER S N EXIT OK 5 Toggle the SET button to the right. Push to the right RECORDING MENU 1 1 2 3 VIDEO PHOTO SCENE SELECT HD-SHQ 1 FILTER 2 FLASH 3 SELF-TIMER EXIT OK English 40 SETUP Using the NORMAL Mode Menu 4 Toggle the SET button up RECORDING MENU 1 1 2 3 VIDEO PHOTO SCENE SELECT HD-SHQ 1 FILTER Push down to select a tab.
h The Menu Screen for the selected tab appears. Tab Push up or down 2 FLASH 3 SELF-TIMER S N EXIT OK 5 Toggle the SET button to the right. Push to the right RECORDING MENU 1 1 2 3 VIDEO PHOTO SCENE SELECT HD-SHQ 1 FILTER 2 FLASH 3 SELF-TIMER EXIT OK English 40 SETUP Using the NORMAL Mode Menu 4 Toggle the SET button up RECORDING MENU 1 1 2 3 VIDEO PHOTO SCENE SELECT HD-SHQ 1 FILTER Push down to select a tab.

Owners Manual
Page 50
Push up or down Select an item to change , and press the SET button. h To return to the Menu Screen, press the MENU button. h The Setting Screen for the selected item appears. SWITCHING THE OPERATING MODE 6 Toggle the SET button up Push down to select the item you wish to change 1 2 3 RECORDING MENU 1 VIDEO PHOTO HD-SHQ SCENE SELECT 1 FILTER 2 FLASH 3 SELF-TIMER EXIT OK Applicable mode Press PHOTO 12M 4000×3000 10M-H 3648×2736 10M-S 3648×2736 7.5M 3648×2056 [16:9] 2M 1600×1200 0.9M 1280×720 [16:9] OK 41 English
Push up or down Select an item to change , and press the SET button. h To return to the Menu Screen, press the MENU button. h The Setting Screen for the selected item appears. SWITCHING THE OPERATING MODE 6 Toggle the SET button up Push down to select the item you wish to change 1 2 3 RECORDING MENU 1 VIDEO PHOTO HD-SHQ SCENE SELECT 1 FILTER 2 FLASH 3 SELF-TIMER EXIT OK Applicable mode Press PHOTO 12M 4000×3000 10M-H 3648×2736 10M-S 3648×2736 7.5M 3648×2056 [16:9] 2M 1600×1200 0.9M 1280×720 [16:9] OK 41 English

Owners Manual
Page 56
SWITCHING THE OPERATING MODE Overview of the NORMAL Mode Setting Screen NORMAL Mode Recording Menu RECORDING MENU 1 1 2 3 VIDEO PHOTO SCENE SELECT HD-SHQ 1 2 3 1 FILTER 4 2 FLASH 5 3 SELF-TIMER 6 EXIT OK 7 47 English
SWITCHING THE OPERATING MODE Overview of the NORMAL Mode Setting Screen NORMAL Mode Recording Menu RECORDING MENU 1 1 2 3 VIDEO PHOTO SCENE SELECT HD-SHQ 1 2 3 1 FILTER 4 2 FLASH 5 3 SELF-TIMER 6 EXIT OK 7 47 English

Owners Manual
Page 57
1 Video clip settings (page 82) &: Record at 1280 × 720 pixels, 30 fps (30p). (: Record at 640 × 480 pixels, 60 fps (60p). ): Record at 640 × 480 pixels, 30 fps (30p). : Portrait mode +: Landscape mode /: Night view portrait mode k: Snow & beach mode +: Fireworks mode Q: Lamp mode 4 Filter (page 86) &: No filter %: Cosmetic filter W: Monochrome filter ,: Sepia filter 5 Flash k: The camera will not operate even in dark situations. 6 Self-timer (page 87) N: Self-timer is off. l: The flash will detect the subject brightness and use the flash only when necessary. x: Shooting ...
1 Video clip settings (page 82) &: Record at 1280 × 720 pixels, 30 fps (30p). (: Record at 640 × 480 pixels, 60 fps (60p). ): Record at 640 × 480 pixels, 30 fps (30p). : Portrait mode +: Landscape mode /: Night view portrait mode k: Snow & beach mode +: Fireworks mode Q: Lamp mode 4 Filter (page 86) &: No filter %: Cosmetic filter W: Monochrome filter ,: Sepia filter 5 Flash k: The camera will not operate even in dark situations. 6 Self-timer (page 87) N: Self-timer is off. l: The flash will detect the subject brightness and use the flash only when necessary. x: Shooting ...

Owners Manual
Page 79
... clip playback, and toggle the SET button down . During still image playback: Toggle the SET button down again. Orange frame 2009. 12.25 14:25 HD-SHQ 37.6MB OK 100-0006 00:00:25 SET button English 70 h Toggle the SET button left, right, up or down to move the...
... clip playback, and toggle the SET button down . During still image playback: Toggle the SET button down again. Orange frame 2009. 12.25 14:25 HD-SHQ 37.6MB OK 100-0006 00:00:25 SET button English 70 h Toggle the SET button left, right, up or down to move the...
Owners Manual
Page 86
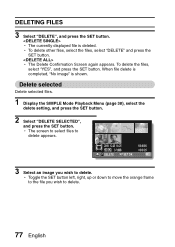
h The Delete Confirmation Screen again appears. h The screen to select files to delete appears. 2009. 12.25 14:25 HD-SHQ 37.6MB DELETE SET OK 100-0006 00:00:25 3 Select an image you wish to delete. h To delete other files, select the files, ...
h The Delete Confirmation Screen again appears. h The screen to select files to delete appears. 2009. 12.25 14:25 HD-SHQ 37.6MB DELETE SET OK 100-0006 00:00:25 3 Select an image you wish to delete. h To delete other files, select the files, ...

Owners Manual
Page 91
CAUTION When editing video clips... i Video clips that were photographed in different modes cannot be joined, they must have been photographed in either the HD mode (16:9 horizontal to be joined. This menu is also proportionately larger, using up more memory. Audio recording k Audio recording 1 Select i In order for video ...
CAUTION When editing video clips... i Video clips that were photographed in different modes cannot be joined, they must have been photographed in either the HD mode (16:9 horizontal to be joined. This menu is also proportionately larger, using up more memory. Audio recording k Audio recording 1 Select i In order for video ...
Owners Manual
Page 97
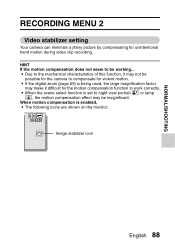
... to compensate for the motion compensation function to work correctly. i When the scene select function is enabled, i The following icons are shown on the monitor: HD-SHQ 00:04:30 Image stabilizer icon English 88 i Due to be insignificant. HINT If the motion compensation does not seem to the mechanical characteristics...
... to compensate for the motion compensation function to work correctly. i When the scene select function is enabled, i The following icons are shown on the monitor: HD-SHQ 00:04:30 Image stabilizer icon English 88 i Due to be insignificant. HINT If the motion compensation does not seem to the mechanical characteristics...

Owners Manual
Page 98
... focus range is set to the Recording Screen. i In some cases there may be a slight variance between the center of the lens and the subject. HD-SHQ 00:09:24 HINT About the focus range i The focus distance indication shows the distance between the distance (numerical figure) you set , and you...
... focus range is set to the Recording Screen. i In some cases there may be a slight variance between the center of the lens and the subject. HD-SHQ 00:09:24 HINT About the focus range i The focus distance indication shows the distance between the distance (numerical figure) you set , and you...
Owners Manual
Page 99
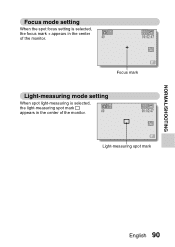
Focus mode setting When the spot focus setting is selected, the focus mark + appears in the center of the monitor. 40 HD-SHQ 00:02:47 Focus mark Light-measuring mode setting When spot light-measuring is selected, the light-measuring spot mark appears in the center of the monitor. 40 HD-SHQ 00:02:47 Light-measuring spot mark NORMAL/SHOOTING English 90
Focus mode setting When the spot focus setting is selected, the focus mark + appears in the center of the monitor. 40 HD-SHQ 00:02:47 Focus mark Light-measuring mode setting When spot light-measuring is selected, the light-measuring spot mark appears in the center of the monitor. 40 HD-SHQ 00:02:47 Light-measuring spot mark NORMAL/SHOOTING English 90
Owners Manual
Page 110
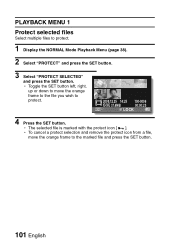
h Toggle the SET button left, right, up or down to move the orange frame to protect. 2009.12.25 14:25 100-0006 HD-SHQ 37.6MB 00:00:25 LOCK 4 Press the SET button. h To cancel a protect selection and remove the protect icon from a file, move the orange ...
h Toggle the SET button left, right, up or down to move the orange frame to protect. 2009.12.25 14:25 100-0006 HD-SHQ 37.6MB 00:00:25 LOCK 4 Press the SET button. h To cancel a protect selection and remove the protect icon from a file, move the orange ...

Owners Manual
Page 121
h The 8-image playback display for video clips appears. 2009.12.24 HD-SHQ SAVE 20:53 100-0016 00:00:05 SET OK 3 Move the orange frame to the video clip you wish to 9 video clips can ... a selection and remove the number label from a video clip, select the video clip and press the SET button. 1 2009.12.24 20:53 100-0016 HD-SHQ 00:00:05 00:00:05 SAVE SET OK English 112 EDIT VIDEO CUT JOIN OK 2 Select "JOIN" and press the SET button.
h The 8-image playback display for video clips appears. 2009.12.24 HD-SHQ SAVE 20:53 100-0016 00:00:05 SET OK 3 Move the orange frame to the video clip you wish to 9 video clips can ... a selection and remove the number label from a video clip, select the video clip and press the SET button. 1 2009.12.24 20:53 100-0016 HD-SHQ 00:00:05 00:00:05 SAVE SET OK English 112 EDIT VIDEO CUT JOIN OK 2 Select "JOIN" and press the SET button.
Owners Manual
Page 128
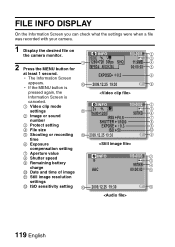
... 100-0003 2 3 987KB 4 00:00:03 5 A Still image resolution settings B ISO sensitivity setting ; 2009.12.25 19:30 9 119 English h The Information Screen 0.3 6 appears. INFO HD-SHQ 100-0001 2 3 2 1 1280×720 30fps SHQ 11.9MB 4 Press the MENU button for MPEG-4 AVC/H.264 00:00:03 5 at least 1 second. FILE...
... 100-0003 2 3 987KB 4 00:00:03 5 A Still image resolution settings B ISO sensitivity setting ; 2009.12.25 19:30 9 119 English h The Information Screen 0.3 6 appears. INFO HD-SHQ 100-0001 2 3 2 1 1280×720 30fps SHQ 11.9MB 4 Press the MENU button for MPEG-4 AVC/H.264 00:00:03 5 at least 1 second. FILE...

Owners Manual
Page 142
However, note that for some TVs that is output when the "TV TYPE" setting is changed. INTRODUCTION TO THE OPTION SETTING MENU Relation between "TV TYPE" setting and TV display The tables below show the video signal that have an auto-detect function, the output may not conform to be displayed TV display Still image (4:3) 4:3 4:3 Video clip in SD mode Video clip in HD mode 133 English "TV TYPE" TV type to be setting connected Image file to the table, or the TV display may not change at all.
However, note that for some TVs that is output when the "TV TYPE" setting is changed. INTRODUCTION TO THE OPTION SETTING MENU Relation between "TV TYPE" setting and TV display The tables below show the video signal that have an auto-detect function, the output may not conform to be displayed TV display Still image (4:3) 4:3 4:3 Video clip in SD mode Video clip in HD mode 133 English "TV TYPE" TV type to be setting connected Image file to the table, or the TV display may not change at all.

Owners Manual
Page 143
... image does not change the screen size setting on your TV. OPTION SETTINGS English 134 To change to the instruction manual for images captured in HD mode CAUTION If the TV display is not correct, you can either change the camera's "TV TYPE" setting, or change the screen size setting on...
... image does not change the screen size setting on your TV. OPTION SETTINGS English 134 To change to the instruction manual for images captured in HD mode CAUTION If the TV display is not correct, you can either change the camera's "TV TYPE" setting, or change the screen size setting on...

Owners Manual
Page 147
... the monitor. h The remaining video recording time appears in the upper left of the monitor. Checking the remaining number of images Remaining video recording time HD-SHQ 362 00:05:08 OPTION SETTINGS English 138 Remaining number of images and video recording time 1 Set the camera to the recording mode (page...
... the monitor. h The remaining video recording time appears in the upper left of the monitor. Checking the remaining number of images Remaining video recording time HD-SHQ 362 00:05:08 OPTION SETTINGS English 138 Remaining number of images and video recording time 1 Set the camera to the recording mode (page...
