
Instruction Manual
Page 2
... or subject it to the unit. - Windows MediaTM Player is trademark or registered trademark of this manual. - SANYO takes no responsibility for , any unlawful use of Microsoft Corporation. - [ENGLISH] Contents Precautions 1 Controls 3 Before use 5 Recording 9 Playback 12 Selecting display 14 Erasing 15 Using timer 17 Menu setting 19 Connecting to re-record copyright material, permission from the copyright owner is necessary. SANYO does not approve of, and cannot be...
... or subject it to the unit. - Windows MediaTM Player is trademark or registered trademark of this manual. - SANYO takes no responsibility for , any unlawful use of Microsoft Corporation. - [ENGLISH] Contents Precautions 1 Controls 3 Before use 5 Recording 9 Playback 12 Selecting display 14 Erasing 15 Using timer 17 Menu setting 19 Connecting to re-record copyright material, permission from the copyright owner is necessary. SANYO does not approve of, and cannot be...
Instruction Manual
Page 3
... instruction manual may be changed to improve operability or other functions, priority is printed prior to the product specification itself. Therefore, the actual product and packaging, as well as an example in this manual may not entirely match all the functions of the product specification must be different from the manual. Accessories Original USB connection cable x 1 USB driver CD-ROM x 1 Headphones x 1 Battery x 1 USB cover stand x 1 [ENGLISH] GB-2 The screen...
... instruction manual may be changed to improve operability or other functions, priority is printed prior to the product specification itself. Therefore, the actual product and packaging, as well as an example in this manual may not entirely match all the functions of the product specification must be different from the manual. Accessories Original USB connection cable x 1 USB driver CD-ROM x 1 Headphones x 1 Battery x 1 USB cover stand x 1 [ENGLISH] GB-2 The screen...

Instruction Manual
Page 4
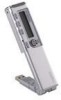
... stereo microphone socket ( ) 3. Speaker 7. Record button (m REC) 6 11. Erase button (ERASE) 15. Recording indicator 2. Volume buttons (VOLUME) 5. Battery compartment lid 8. Folder/Repeat button (FOLDER/RPT) 16. Built-in stereo microphones (L, R) 17. Stop/Menu button (n STOP/MENU) 7 12. USB terminal 10. Jog switch (f a POWER e) 14 13 3 12 4 11 10 5 (Power/Play/Speed/Skip/Search) 4. USB terminal protector 9. LCD display 13. Hold switch (b HOLD) 6. Controls 17 1 16 2 15 1. Index button (INDEX) 14. Headphones socket ( ) 9 8 GB-3 [ENGLISH...
... stereo microphone socket ( ) 3. Speaker 7. Record button (m REC) 6 11. Erase button (ERASE) 15. Recording indicator 2. Volume buttons (VOLUME) 5. Battery compartment lid 8. Folder/Repeat button (FOLDER/RPT) 16. Built-in stereo microphones (L, R) 17. Stop/Menu button (n STOP/MENU) 7 12. USB terminal 10. Jog switch (f a POWER e) 14 13 3 12 4 11 10 5 (Power/Play/Speed/Skip/Search) 4. USB terminal protector 9. LCD display 13. Hold switch (b HOLD) 6. Controls 17 1 16 2 15 1. Index button (INDEX) 14. Headphones socket ( ) 9 8 GB-3 [ENGLISH...

Instruction Manual
Page 8
... b HOLD switch to VOL 20). The volume level appears (VOL 0 to the right. Press the Jog switch for more than 15 minutes turns off the power after creating the recorded file. Auto power off . Set the b HOLD switch to the left. If an operation button is pressed while the hold function is engaged. - To adjust the volume Press the VOLUME + or - Selecting the beep sound (See page 21) Selecting the menu mode...
... b HOLD switch to VOL 20). The volume level appears (VOL 0 to the right. Press the Jog switch for more than 15 minutes turns off the power after creating the recorded file. Auto power off . Set the b HOLD switch to the left. If an operation button is pressed while the hold function is engaged. - To adjust the volume Press the VOLUME + or - Selecting the beep sound (See page 21) Selecting the menu mode...
Instruction Manual
Page 9
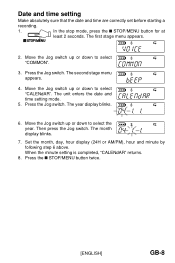
Date and time setting Make absolutely sure that the date and time are correctly set before starting a recording. 1. Press the Jog switch. The unit enters the date and time setting mode. 5. Press the n STOP/MENU button twice. [ENGLISH] GB-8 Move the Jog switch up or down to select "COMMON". 3. In the stop mode, press the n STOP/MENU button for at least 2 seconds. Then press the Jog switch. Move the Jog switch up or down to select the...
Date and time setting Make absolutely sure that the date and time are correctly set before starting a recording. 1. Press the Jog switch. The unit enters the date and time setting mode. 5. Press the n STOP/MENU button twice. [ENGLISH] GB-8 Move the Jog switch up or down to select "COMMON". 3. In the stop mode, press the n STOP/MENU button for at least 2 seconds. Then press the Jog switch. Move the Jog switch up or down to select the...
Instruction Manual
Page 10
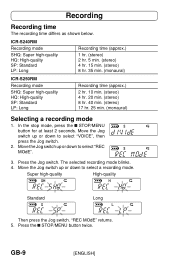
...: Long Recording time (approx.) 1 hr. (stereo) 2 hr. 5 min. (stereo) 4 hr. 15 min. (stereo) 8 hr. 35 min. (monaural) ICR-S250RM Recording mode SHQ: Super high-quality HQ: High-quality SP: Standard LP: Long Recording time (approx.) 2 hr. 10 min. (stereo) 4 hr. 20 min. (stereo) 8 hr. 40 min. (stereo) 17 hr. 25 min. (monaural) Selecting a recording mode 1. Move the Jog switch up or down to select "REC MOdE". 3. "REC MOdE" returns. 5. In the stop mode, press the n STOP/MENU button...
...: Long Recording time (approx.) 1 hr. (stereo) 2 hr. 5 min. (stereo) 4 hr. 15 min. (stereo) 8 hr. 35 min. (monaural) ICR-S250RM Recording mode SHQ: Super high-quality HQ: High-quality SP: Standard LP: Long Recording time (approx.) 2 hr. 10 min. (stereo) 4 hr. 20 min. (stereo) 8 hr. 40 min. (stereo) 17 hr. 25 min. (monaural) Selecting a recording mode 1. Move the Jog switch up or down to select "REC MOdE". 3. "REC MOdE" returns. 5. In the stop mode, press the n STOP/MENU button...
Instruction Manual
Page 11
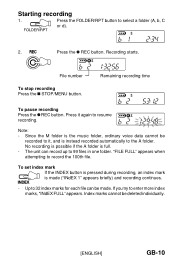
... the music folder, ordinary voice data cannot be recorded to it again to record the 100th file. To set index mark If the INDEX button is pressed during recording, an index mark is instead recorded automatically to 99 files in one folder. Up to 32 index marks for each file can record up to the A folder. Starting recording 1. Recording starts. The unit can be deleted individually. [ENGLISH] GB-10 Remaining recording time To pause recording...
... the music folder, ordinary voice data cannot be recorded to it again to record the 100th file. To set index mark If the INDEX button is pressed during recording, an index mark is instead recorded automatically to 99 files in one folder. Up to 32 index marks for each file can record up to the A folder. Starting recording 1. Recording starts. The unit can be deleted individually. [ENGLISH] GB-10 Remaining recording time To pause recording...
Instruction Manual
Page 12
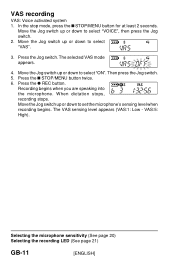
... m REC button. The VAS sensing level appears (VAS:1: Low - VAS recording VAS: Voice activated system 1. In the stop mode, press the n STOP/MENU button for at least 2 seconds. When dictation stops, recording stops. Move the Jog switch up or down to select "ON". Press the n STOP/MENU button twice. 6. Then press the Jog switch. 5. Move the Jog switch up or down to select "VAS". 3. Move the Jog switch up or down to set the microphone...
... m REC button. The VAS sensing level appears (VAS:1: Low - VAS recording VAS: Voice activated system 1. In the stop mode, press the n STOP/MENU button for at least 2 seconds. When dictation stops, recording stops. Move the Jog switch up or down to select "ON". Press the n STOP/MENU button twice. 6. Then press the Jog switch. 5. Move the Jog switch up or down to select "VAS". 3. Move the Jog switch up or down to set the microphone...
Instruction Manual
Page 15
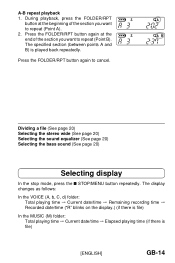
... display In the stop mode, press the n STOP/MENU button repeatedly. Press the FOLDER/RPT button again to repeat (Point B). Press the FOLDER/RPT button again at the beginning of the section you want to cancel. The display changes as follows: In the VOICE (A, b, C, d) folder: Total playing time v Current date/time v Remaining recording time v Recorded date/time ("R" blinks on the display.) (if there is file) In the MUSIC (M) folder: Total playing time v Current date/time v Elapsed playing time (if there is played back repeatedly. During playback, press the FOLDER...
... display In the stop mode, press the n STOP/MENU button repeatedly. Press the FOLDER/RPT button again to repeat (Point B). Press the FOLDER/RPT button again at the beginning of the section you want to cancel. The display changes as follows: In the VOICE (A, b, C, d) folder: Total playing time v Current date/time v Remaining recording time v Recorded date/time ("R" blinks on the display.) (if there is file) In the MUSIC (M) folder: Total playing time v Current date/time v Elapsed playing time (if there is played back repeatedly. During playback, press the FOLDER...

Instruction Manual
Page 16
... the folder. 2. Erasing files in other formats is blinking, press the ERASE button again for at least 2 seconds. While the display is not possible. Press the FOLDER/RPT button to erase, press the n STOP/MENU button. The selected file is erased. All the files in the selected folder are no MP3/WMA files in the selected folder 1. Select the folder to be erased. 2. Press the ERASE button for at least 2 seconds. 3. GB-15 [ENGLISH...
... the folder. 2. Erasing files in other formats is blinking, press the ERASE button again for at least 2 seconds. While the display is not possible. Press the FOLDER/RPT button to erase, press the n STOP/MENU button. The selected file is erased. All the files in the selected folder are no MP3/WMA files in the selected folder 1. Select the folder to be erased. 2. Press the ERASE button for at least 2 seconds. 3. GB-15 [ENGLISH...

Instruction Manual
Page 17
Formatting (Erasing all files in all folders) If you need it. Use only when you select the format function from the menu, the memory will be erased. if required. 1. Save a backup copy of your recorded messages on a PC, etc. Then press the Jog switch. Press the n STOP/MENU button twice. [ENGLISH] GB-16 Then press the Jog switch. 3. In the stop mode, press the n STOP/MENU button for at least 2 seconds. Move the Jog switch up or down...
Formatting (Erasing all files in all folders) If you need it. Use only when you select the format function from the menu, the memory will be erased. if required. 1. Save a backup copy of your recorded messages on a PC, etc. Then press the Jog switch. Press the n STOP/MENU button twice. [ENGLISH] GB-16 Then press the Jog switch. 3. In the stop mode, press the n STOP/MENU button for at least 2 seconds. Move the Jog switch up or down...

Instruction Manual
Page 19
... select the hour. Set the minute in the designated folder. 1. ALL: Recording will continue until the n STOP/MENU button is sufficient battery power when using timer recording. - Then press the Jog switch. "TIMER" returns. 6. Timer recording Recording can be started at the same time. [ENGLISH] GB-18 Move the Jog switch up or down to select the timer recording time (30MIN, 60MIN, 120MIN or ALL). The minute display blinks. If you...
... select the hour. Set the minute in the designated folder. 1. ALL: Recording will continue until the n STOP/MENU button is sufficient battery power when using timer recording. - Then press the Jog switch. "TIMER" returns. 6. Timer recording Recording can be started at the same time. [ENGLISH] GB-18 Move the Jog switch up or down to select the timer recording time (30MIN, 60MIN, 120MIN or ALL). The minute display blinks. If you...
Instruction Manual
Page 20
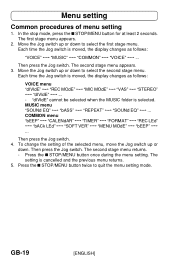
... stage menu appears. 3. To change the setting of menu setting 1. Press the n STOP/MENU button once during the menu setting. Move the Jog switch up or down . COMMON menu "bEEP" wv "CALENdAR" wv "TIMER" wv "FORMAT" wv "REC LEd" wv "bACk LEd" wv "SOFT VER" wv "MENU MOdE" wv "bEEP" wv ... The second stage menu returns. - In the stop mode, press the n STOP/MENU button for at least 2 seconds. MUSIC menu "SOUNd EQ" wv "bASS" wv "REPEAT" wv "SOUNd...
... stage menu appears. 3. To change the setting of menu setting 1. Press the n STOP/MENU button once during the menu setting. Move the Jog switch up or down . COMMON menu "bEEP" wv "CALENdAR" wv "TIMER" wv "FORMAT" wv "REC LEd" wv "bACk LEd" wv "SOFT VER" wv "MENU MOdE" wv "bEEP" wv ... The second stage menu returns. - In the stop mode, press the n STOP/MENU button for at least 2 seconds. MUSIC menu "SOUNd EQ" wv "bASS" wv "REPEAT" wv "SOUNd...
Instruction Manual
Page 21
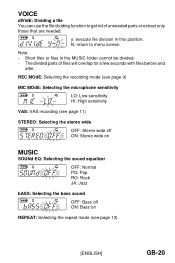
y: execute file division in the MUSIC folder cannot be divided. - The divided parts of unneeded parts or extract only those that are needed. REC MOdE: Selecting the recording mode (see page 9) MIC MOdE: Selecting the microphone sensitivity LO: Low sensitivity HI: High sensitivity VAS: VAS recording (see page 11) STEREO: Selecting the stereo wide OFF: Stereo wide off ON: Stereo wide on MUSIC SOUNd EQ: Selecting the sound equalizer OFF: Normal PO: Pop RO: Rock...
y: execute file division in the MUSIC folder cannot be divided. - The divided parts of unneeded parts or extract only those that are needed. REC MOdE: Selecting the recording mode (see page 9) MIC MOdE: Selecting the microphone sensitivity LO: Low sensitivity HI: High sensitivity VAS: VAS recording (see page 11) STEREO: Selecting the stereo wide OFF: Stereo wide off ON: Stereo wide on MUSIC SOUNd EQ: Selecting the sound equalizer OFF: Normal PO: Pop RO: Rock...
Instruction Manual
Page 24
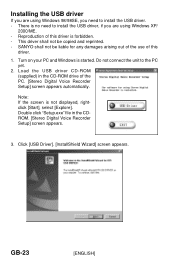
... driver is no need to install the USB driver, if you are using Windows 98/98SE, you are using Windows XP/ 2000/ME. - Load the USB driver CD-ROM (supplied) in the CDROM. [Stereo Digital Voice Recorder Setup] screen appears. 3. Double click "Setup.exe" file in the CD-ROM drive of this driver. 1. Turn on your PC and Windows is not displayed, rightclick [Start], select [Explore]. Installing the USB driver If you need to install the USB driver. - SANYO shall not be copied...
... driver is no need to install the USB driver, if you are using Windows 98/98SE, you are using Windows XP/ 2000/ME. - Load the USB driver CD-ROM (supplied) in the CDROM. [Stereo Digital Voice Recorder Setup] screen appears. 3. Double click "Setup.exe" file in the CD-ROM drive of this driver. 1. Turn on your PC and Windows is not displayed, rightclick [Start], select [Explore]. Installing the USB driver If you need to install the USB driver. - SANYO shall not be copied...

Instruction Manual
Page 31
... Windows when the unit is connected to your PC are transferred, but they must be played if it is said of the case of the directly created folder in the MUSIC_IC folder. - Only those files in the VOICE_IC folder which are stored in this folder. - Files recorded in the internal memory A folder are added. Removable Disk display An icon for a Removable Disk will change if the files in MUSIC_IC folder...
... Windows when the unit is connected to your PC are transferred, but they must be played if it is said of the case of the directly created folder in the MUSIC_IC folder. - Only those files in the VOICE_IC folder which are stored in this folder. - Files recorded in the internal memory A folder are added. Removable Disk display An icon for a Removable Disk will change if the files in MUSIC_IC folder...

Instruction Manual
Page 36
Click [Apply] then [OK]. If this unit. - Any MP3 or WMA files that you transfer and that [Copy protect music] is not checked. 4. Open [Copy Music] in tab. Repeatedly transferring data from the copyright holder, as stipulated by intellectual copyright law. Some MP3/WMA files may not be played on this happens, turn the unit off and on. - GB-35 [ENGLISH] Make sure that are not for your PC and/or deleting data will cause the transfer rate to be used without permission from your own personal enjoyment may not be able to slow. Note: - 3.
Click [Apply] then [OK]. If this unit. - Any MP3 or WMA files that you transfer and that [Copy protect music] is not checked. 4. Open [Copy Music] in tab. Repeatedly transferring data from the copyright holder, as stipulated by intellectual copyright law. Some MP3/WMA files may not be played on this happens, turn the unit off and on. - GB-35 [ENGLISH] Make sure that are not for your PC and/or deleting data will cause the transfer rate to be used without permission from your own personal enjoyment may not be able to slow. Note: - 3.

Instruction Manual
Page 38
... from recording normally. Playing back music files in the created folder When transfering files to the unit, you accidentally formatted using your PC to do the formatting might stop mode, press the FOLDER/RPT button to cancel the folder playback. "F" appears on the display. - Move the Jog switch up or down to start the selected folder playback. Note: Folders are created directly in the MUSIC_IC folder. Formatting the unit's data Always format data using the unit. Using your...
... from recording normally. Playing back music files in the created folder When transfering files to the unit, you accidentally formatted using your PC to do the formatting might stop mode, press the FOLDER/RPT button to cancel the folder playback. "F" appears on the display. - Move the Jog switch up or down to start the selected folder playback. Note: Folders are created directly in the MUSIC_IC folder. Formatting the unit's data Always format data using the unit. Using your...

Instruction Manual
Page 39
Format (initialize) the internal memory and then reattempt recording. The hold function is still connected. The USB connector is set. The volume is wrong. Adjust the volume. Changing files names using different encoder (MP3/WMA conversion) software. Transfer them to the MUSIC_IC folder on the PC were not transferred to "IC_X(folder name)_XXX (file number).MP3". This is not in a playable format. The file name is turned down too low. Files in the playlist...
Format (initialize) the internal memory and then reattempt recording. The hold function is still connected. The USB connector is set. The volume is wrong. Adjust the volume. Changing files names using different encoder (MP3/WMA conversion) software. Transfer them to the MUSIC_IC folder on the PC were not transferred to "IC_X(folder name)_XXX (file number).MP3". This is not in a playable format. The file name is turned down too low. Files in the playlist...

Instruction Manual
Page 41
Do not use benzene, thinner or alcohol since they will mar the finish of the unit with a clean soft cloth, moistened with lukewarm water. Cleaning the cabinet Clean the outside of the surfaces. SERVICE UNITED KINGDOM For online support and assistance contact: UK: Freephone: 0800 328 7060 (Mon-Fri, 8am-5pm) Outside of UK: +44 1582 730 730 (Mon-Fri, 8am-5pm) Email: dictationsupport@sanyo.co.uk or visit our website www.sanyodictation.co.uk [ENGLISH] GB-40
Do not use benzene, thinner or alcohol since they will mar the finish of the unit with a clean soft cloth, moistened with lukewarm water. Cleaning the cabinet Clean the outside of the surfaces. SERVICE UNITED KINGDOM For online support and assistance contact: UK: Freephone: 0800 328 7060 (Mon-Fri, 8am-5pm) Outside of UK: +44 1582 730 730 (Mon-Fri, 8am-5pm) Email: dictationsupport@sanyo.co.uk or visit our website www.sanyodictation.co.uk [ENGLISH] GB-40


