
Owners Manual
Page 2
... can also be maintained. READ AND KEEP THIS OWNER'S MANUAL FOR LATER USE. THIS SYMBOL INDICATES THAT THERE ARE IMPORTANT OPERATING AND MAINTENANCE INSTRUCTIONS IN THE OWNER'S MANUAL WITH THIS UNIT. 2 TO THE OWNER Before operating this projector, read this manual again, check operations and cable connections and try the solutions in the "TROUBLESHOOTING" section at the end of this manual thoroughly and operate the projector properly. Eye damage could result...
... can also be maintained. READ AND KEEP THIS OWNER'S MANUAL FOR LATER USE. THIS SYMBOL INDICATES THAT THERE ARE IMPORTANT OPERATING AND MAINTENANCE INSTRUCTIONS IN THE OWNER'S MANUAL WITH THIS UNIT. 2 TO THE OWNER Before operating this projector, read this manual again, check operations and cable connections and try the solutions in the "TROUBLESHOOTING" section at the end of this manual thoroughly and operate the projector properly. Eye damage could result...
Owners Manual
Page 3
... in a wet basement, near or over a radiator or heat register. This projector should never be placed in a built-in installation such as improper adjustment of the instructions given here and retain them for cleaning. When the power cord or plug is operated. b. e. When replacement parts are covered by the operating instructions as a book case unless proper ventilation is left unattended and unused for...
... in a wet basement, near or over a radiator or heat register. This projector should never be placed in a built-in installation such as improper adjustment of the instructions given here and retain them for cleaning. When the power cord or plug is operated. b. e. When replacement parts are covered by the operating instructions as a book case unless proper ventilation is left unattended and unused for...

Owners Manual
Page 4
..., if not installed and used of the equipment. Model Numbers Trade Name Responsible party Address Telephone No. : PLC-XT11, PLC-XT16 : Sanyo : SANYO FISHER COMPANY : 21605 Plummer Street, Chatsworth, California 91311 : (818)998-7322 AC POWER CORD REQUIREMENT The AC Power Cord supplied with this safety feature. Reorient or relocate the receiving antenna. - The wire which is coloured blue must be connected to stop operation of the...
..., if not installed and used of the equipment. Model Numbers Trade Name Responsible party Address Telephone No. : PLC-XT11, PLC-XT16 : Sanyo : SANYO FISHER COMPANY : 21605 Plummer Street, Chatsworth, California 91311 : (818)998-7322 AC POWER CORD REQUIREMENT The AC Power Cord supplied with this safety feature. Reorient or relocate the receiving antenna. - The wire which is coloured blue must be connected to stop operation of the...

Owners Manual
Page 5
... 14 REMOTE CONTROL BATTERIES INSTALLATION 15 TOP CONTROLS AND INDICATORS 16 SETTING MENU 36 OPERATING ON-SCREEN MENU 17 HOW TO OPERATE ON-SCREEN MENU 17 FLOW OF ON-SCREEN MENU OPERATION 17 APPENDIX 38 MENU BAR 18 BASIC OPERATION TURNING ON / OFF PROJECTOR ADJUSTING SCREEN ZOOM ADJUSTMENT FOCUS ADJUSTMENT LENS SHIFT ADJUSTMENT KEYSTONE ADJUSTMENT PICTURE FREEZE FUNCTION NO SHOW FUNCTION P-TIMER FUNCTION SOUND ADJUSTMENT LAMP REPLACEMENT 38 LAMP REPLACE 38 19 LAMP REPLACE COUNTER 39 OPERATING WIRELESS MOUSE 40 19 MAINTENANCE 41 20 WARNING TEMP. G Windows and...
... 14 REMOTE CONTROL BATTERIES INSTALLATION 15 TOP CONTROLS AND INDICATORS 16 SETTING MENU 36 OPERATING ON-SCREEN MENU 17 HOW TO OPERATE ON-SCREEN MENU 17 FLOW OF ON-SCREEN MENU OPERATION 17 APPENDIX 38 MENU BAR 18 BASIC OPERATION TURNING ON / OFF PROJECTOR ADJUSTING SCREEN ZOOM ADJUSTMENT FOCUS ADJUSTMENT LENS SHIFT ADJUSTMENT KEYSTONE ADJUSTMENT PICTURE FREEZE FUNCTION NO SHOW FUNCTION P-TIMER FUNCTION SOUND ADJUSTMENT LAMP REPLACEMENT 38 LAMP REPLACE 38 19 LAMP REPLACE COUNTER 39 OPERATING WIRELESS MOUSE 40 19 MAINTENANCE 41 20 WARNING TEMP. G Windows and...

Owners Manual
Page 6
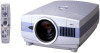
... carry and work anywhere you to turn Projection Lamp off when a projector detects signal interruption and any operation button is extremely compact in ; G S-Video S-Video signal, such as a DVD player output high definition TV signals including 480i, 480p, 575i, 575p, 720p, 1035i or 1080i, can be connected. N Laser Pointer Function Remote Control Unit supplied with motor-driven operation. N Wireless Imager (Optional) This projector can be also adjusted with this projector for computer input and...
... carry and work anywhere you to turn Projection Lamp off when a projector detects signal interruption and any operation button is extremely compact in ; G S-Video S-Video signal, such as a DVD player output high definition TV signals including 480i, 480p, 575i, 575p, 720p, 1035i or 1080i, can be connected. N Laser Pointer Function Remote Control Unit supplied with motor-driven operation. N Wireless Imager (Optional) This projector can be also adjusted with this projector for computer input and...

Owners Manual
Page 12
...) USB Cable Control Cable for Serial Port Terminal Control Cable Control Cable for PS/2 Port ✽ for PS2 Port ✽, or ADB Port ✽ • Audio Cables {Mini Plug (stereo) x 2} ✽ IBM-compatible computer or Macintosh computer (VGA / SVGA / XGA / SXGA) 12 Desktop type Laptop type Monitor Output Monitor Input Audio Output USB port Serial port PS/2 port ADB port MAC Adapter ✽ Set slide switches according to use before the computer is not supplied with the terminal of both the projector and...
...) USB Cable Control Cable for Serial Port Terminal Control Cable Control Cable for PS/2 Port ✽ for PS2 Port ✽, or ADB Port ✽ • Audio Cables {Mini Plug (stereo) x 2} ✽ IBM-compatible computer or Macintosh computer (VGA / SVGA / XGA / SXGA) 12 Desktop type Laptop type Monitor Output Monitor Input Audio Output USB port Serial port PS/2 port ADB port MAC Adapter ✽ Set slide switches according to use before the computer is not supplied with the terminal of both the projector and...

Owners Manual
Page 14
...+ MENU KEYSTONE LASER P-TIMERCOMPUTER 1 ZOOM COMPUTER 2 VIDEO FOCUS LENS POWER ON-OFF BUTTON Used to P37.) DIP SWITCH SETTING SW4 ........ that you want to select remote control code. (Refer to turn projector on or off . When using Remote Control Unit, turn it to select drag ON/OFF position. (P40) LEFT CLICK BUTTON Used as shown in Wireless Mouse Operation. (P40) LENS SHIFT BUTTON Used to "OFF" position. BUTTON Use to operate AUTO PC Adjustment function. (P25) IMAGE BUTTON Used to select image level. (P28, 33) KEYSTONE BUTTON Used to...
...+ MENU KEYSTONE LASER P-TIMERCOMPUTER 1 ZOOM COMPUTER 2 VIDEO FOCUS LENS POWER ON-OFF BUTTON Used to P37.) DIP SWITCH SETTING SW4 ........ that you want to select remote control code. (Refer to turn projector on or off . When using Remote Control Unit, turn it to select drag ON/OFF position. (P40) LEFT CLICK BUTTON Used as shown in Wireless Mouse Operation. (P40) LENS SHIFT BUTTON Used to "OFF" position. BUTTON Use to operate AUTO PC Adjustment function. (P25) IMAGE BUTTON Used to select image level. (P28, 33) KEYSTONE BUTTON Used to...

Owners Manual
Page 15
... DIGITAL ZOOM +/- Maximum operating range for Remote Control Unit is incorrectly replaced. G Danger of a projector. 60° 16.4' (5 m) COMPUTER 2 BUTTON Used to select input source (COMPUTER 2). (P22, 31) 16.4' VIDEO BUTTON (5 m) Used to pan image in ON-SCREEN MENU. G Do not use a new battery with pins in contact with an used to select input 60° source (VIDEO). (P31) Remote Control Batteries Installation 1 Remove battery compartment lid. G Avoid contact with water or liquid. mode. (P30) POINT LEFT/RIGHT buttons...
... DIGITAL ZOOM +/- Maximum operating range for Remote Control Unit is incorrectly replaced. G Danger of a projector. 60° 16.4' (5 m) COMPUTER 2 BUTTON Used to select input source (COMPUTER 2). (P22, 31) 16.4' VIDEO BUTTON (5 m) Used to pan image in ON-SCREEN MENU. G Do not use a new battery with pins in contact with an used to select input 60° source (VIDEO). (P31) Remote Control Batteries Installation 1 Remove battery compartment lid. G Avoid contact with water or liquid. mode. (P30) POINT LEFT/RIGHT buttons...

Owners Manual
Page 16
... BUTTON Used to turn the projector on . TOP CONTROLS AND INDICATORS LAMP REPLACE INDICATOR Turns yellow when the life of the projection lamp draws to select LENS SHIFT function. (P20) INDICATOR Flashes red when internal projector temperature is too high. (P41) READY INDICATOR Lights green when the projector is also used as VOLUME +/- buttons. (P21) INPUT BUTTON Used to select input source. (P22, 31) IMAGE BUTTON Used to select image level. (P28, 33) ZOOM BUTTON Used to adjust zoom. (P20) FOCUS BUTTON Used to adjust focus. (P20) 16 ON-OFF SELECT KEYSTONE POWER ON-OFF BUTTON Used...
... BUTTON Used to turn the projector on . TOP CONTROLS AND INDICATORS LAMP REPLACE INDICATOR Turns yellow when the life of the projection lamp draws to select LENS SHIFT function. (P20) INDICATOR Flashes red when internal projector temperature is too high. (P41) READY INDICATOR Lights green when the projector is also used as VOLUME +/- buttons. (P21) INPUT BUTTON Used to select input source. (P22, 31) IMAGE BUTTON Used to select image level. (P28, 33) ZOOM BUTTON Used to adjust zoom. (P20) FOCUS BUTTON Used to adjust focus. (P20) 16 ON-OFF SELECT KEYSTONE POWER ON-OFF BUTTON Used...

Owners Manual
Page 18
...) SCREEN MENU Used to set size of projector or reset Lamp Replace Counter. (Refer to P36, 37) INPUT MENU Used to select input source either Computer or Video. (Refer to P22) PC ADJUST MENU Used to adjust parameters to match with input signal format. (Refer to P25-27) IMAGE ADJUST MENU Used to adjust computer image. [Contrast/Brightness /Color Temp. /White Balance (R/G/B) /Gamma] (Refer to P29) SOUND MENU Used to adjust volume or mute sound. (Refer to P21) FOR VIDEO SOURCE Press MENU BUTTON while connecting to select system of ONSCREEN MENU. INPUT MENU Used...
...) SCREEN MENU Used to set size of projector or reset Lamp Replace Counter. (Refer to P36, 37) INPUT MENU Used to select input source either Computer or Video. (Refer to P22) PC ADJUST MENU Used to adjust parameters to match with input signal format. (Refer to P25-27) IMAGE ADJUST MENU Used to adjust computer image. [Contrast/Brightness /Color Temp. /White Balance (R/G/B) /Gamma] (Refer to P29) SOUND MENU Used to adjust volume or mute sound. (Refer to P21) FOR VIDEO SOURCE Press MENU BUTTON while connecting to select system of ONSCREEN MENU. INPUT MENU Used...

Owners Manual
Page 19
... button on Top Control or on page 41.) 4. After cooling down , READY Indicator lights GREEN again and you purchased this projector or service center. 19 Disconnect AC Power Cord from an AC outlet. 2. Clean Air Filters. (See "AIR FILTER CARE AND CLEANING" section on Remote Control Unit, and a message "Power off?" indicator should still continue to flash, contact sales dealer where you can turn off . NOTE : When "On start to operate. Current Input position and Lamp mode status...
... button on Top Control or on page 41.) 4. After cooling down , READY Indicator lights GREEN again and you purchased this projector or service center. 19 Disconnect AC Power Cord from an AC outlet. 2. Clean Air Filters. (See "AIR FILTER CARE AND CLEANING" section on Remote Control Unit, and a message "Power off?" indicator should still continue to flash, contact sales dealer where you can turn off . NOTE : When "On start to operate. Current Input position and Lamp mode status...

Owners Manual
Page 30
... prepared on Remote Control Unit. Digital Zoom - G True and Digital zoom +/- Panning function can be operated when "RGB" is selected on PC SYSTEM Menu (P23). cannot be used . 30 True Provides image in initial mode. G Wide cannot be also compressed by expanding image width uniformly. Press SELECT button to fit screen size. is higher than XGA (1024 x 768) is used for providing a squeezed video signal at 16 : 9. A projected image can be...
... prepared on Remote Control Unit. Digital Zoom - G True and Digital zoom +/- Panning function can be operated when "RGB" is selected on PC SYSTEM Menu (P23). cannot be used . 30 True Provides image in initial mode. G Wide cannot be also compressed by expanding image width uniformly. Press SELECT button to fit screen size. is higher than XGA (1024 x 768) is used for providing a squeezed video signal at 16 : 9. A projected image can be...

Owners Manual
Page 37
... operating several projectors or video equipment together. To change the remote control code of the Remote Control Unit; Refer to Code 8. To change the code of the Remote Control Unit, set into the low power consumption mode. Note ; the factoryset normal code (Code 1) and the other items. Press SELECT button at Remote control, Remote control code Menu appears. 37 On start When this function is "On," projector is automatically turned on just by using this function. When replacing Projection Lamp, reset Lamp Replace Counter by connecting AC Power cord to Code...
... operating several projectors or video equipment together. To change the remote control code of the Remote Control Unit; Refer to Code 8. To change the code of the Remote Control Unit, set into the low power consumption mode. Note ; the factoryset normal code (Code 1) and the other items. Press SELECT button at Remote control, Remote control code Menu appears. 37 On start When this function is "On," projector is automatically turned on just by using this function. When replacing Projection Lamp, reset Lamp Replace Counter by connecting AC Power cord to Code...

Owners Manual
Page 38
... projector and turn on the next page . G Model No. Do not drop a lamp assembly or touch a glass bulb! LAMP COVER SCREWS SCREW HANDLE LAMP ASSEMBLY ORDER REPLACEMENT LAMP Replacement Lamp can be ordered through your projector : G Replacement Lamp Type No. : PLC-XT11/PLC-XT16 POA-LMP59 (Service Parts No. 610 305 5602) 38 The glass can become very hot. Replace Lamp Cover and tighten the screw. 5 Connect AC Power Cord to cool for at least 45 minutes. 2 To remove Lamp Cover, remove...
... projector and turn on the next page . G Model No. Do not drop a lamp assembly or touch a glass bulb! LAMP COVER SCREWS SCREW HANDLE LAMP ASSEMBLY ORDER REPLACEMENT LAMP Replacement Lamp can be ordered through your projector : G Replacement Lamp Type No. : PLC-XT11/PLC-XT16 POA-LMP59 (Service Parts No. 610 305 5602) 38 The glass can become very hot. Replace Lamp Cover and tighten the screw. 5 Connect AC Power Cord to cool for at least 45 minutes. 2 To remove Lamp Cover, remove...

Owners Manual
Page 39
... end. The message "Lamp replace counter reset?" On On Code 1 Move the pointer to Lamp counter reset and then press SELECT button. LAMP HANDLING PRECAUTIONS This projector uses a high-pressure lamp which the projector and lamp are being used. If a lamp explodes, disconnect the projector's AC plug from the cooling air circulation holes. Inappropriate attempts to service the unit by pieces of time than other similar lamps. When the Lamp Replace Counter is replaced. G If the projector indicates that there...
... end. The message "Lamp replace counter reset?" On On Code 1 Move the pointer to Lamp counter reset and then press SELECT button. LAMP HANDLING PRECAUTIONS This projector uses a high-pressure lamp which the projector and lamp are being used. If a lamp explodes, disconnect the projector's AC plug from the cooling air circulation holes. Inappropriate attempts to service the unit by pieces of time than other similar lamps. When the Lamp Replace Counter is replaced. G If the projector indicates that there...

Owners Manual
Page 40
... then turn on a projected screen. Press and release the Drag ON/OFF button, DRAG ON INDICATOR lights green and the remote control is properly installed in Drag mode. DRAG ON D.ZOOM FREEZE NO SHOW INDICATOR LEFT CLICK button MUTE IMAGE LOCK This button has the same function as the left button of the mouse) (right button of the mouse driver (not supplied) is required. Make sure that you are used . Press this button...
... then turn on a projected screen. Press and release the Drag ON/OFF button, DRAG ON INDICATOR lights green and the remote control is properly installed in Drag mode. DRAG ON D.ZOOM FREEZE NO SHOW INDICATOR LEFT CLICK button MUTE IMAGE LOCK This button has the same function as the left button of the mouse) (right button of the mouse driver (not supplied) is required. Make sure that you are used . Press this button...

Owners Manual
Page 41
... projector, and disconnect AC power cord from the AIR FILTER AC outlet. Usage in internal heat build up and remove. 2 Turn the projector upside down and remove four Air Filters by following the steps below . 3 If WARNING TEMP. When the above checks, Cooling Fans or the Internal Circuits may accumulate on a lens, liquid crystal panels, or optical elements inside the projector. APPENDIX MAINTENANCE WARNING TEMP. Indicator flashes red and projector is not in malfunction of a projected image...
... projector, and disconnect AC power cord from the AIR FILTER AC outlet. Usage in internal heat build up and remove. 2 Turn the projector upside down and remove four Air Filters by following the steps below . 3 If WARNING TEMP. When the above checks, Cooling Fans or the Internal Circuits may accumulate on a lens, liquid crystal panels, or optical elements inside the projector. APPENDIX MAINTENANCE WARNING TEMP. Indicator flashes red and projector is not in malfunction of a projected image...

Owners Manual
Page 42
.... G Check WARNING TEMP. and READY indicator. G Check Projection Lens to see if it takes about 30 seconds to page 38.) G Adjust focus of : Projector and computer.) 6. G When turning a projector on . 4. G Check audio cable connection from the projector. Verify that all computer, video and power cord are not seen during the Operation. Image is turned OFF when turning the projector back on page 19.) G Check Projection Lamp. (Refer to display an image. G Make sure the temperature is at least 4.1' (1.2m) from audio input source. G Adjust the audio source...
.... G Check WARNING TEMP. and READY indicator. G Check Projection Lens to see if it takes about 30 seconds to page 38.) G Adjust focus of : Projector and computer.) 6. G When turning a projector on . 4. G Check audio cable connection from the projector. Verify that all computer, video and power cord are not seen during the Operation. Image is turned OFF when turning the projector back on page 19.) G Check Projection Lamp. (Refer to display an image. G Make sure the temperature is at least 4.1' (1.2m) from audio input source. G Adjust the audio source...

Owners Manual
Page 46
... PJ Controller. When using Wireless Imager, set the following model name to the sales dealer. G Control Cable (PS2 Port) G Control Cable (ADB Port) G MAC Adapter G HDB 15 pin-SCART 21 pin Cable G Media Card Imager Kit G Wireless Imager Kit Type No. : POA-MCPS2 Type No. : POA-MCMAC Type No. : POA-MACAP Type No. : POA-CA-SCART Type No. : POA-MD07MCI Type No. : Available models are optionally supplied. When ordering those parts...
... PJ Controller. When using Wireless Imager, set the following model name to the sales dealer. G Control Cable (PS2 Port) G Control Cable (ADB Port) G MAC Adapter G HDB 15 pin-SCART 21 pin Cable G Media Card Imager Kit G Wireless Imager Kit Type No. : POA-MCPS2 Type No. : POA-MCMAC Type No. : POA-MACAP Type No. : POA-CA-SCART Type No. : POA-MD07MCI Type No. : Available models are optionally supplied. When ordering those parts...

Owners Manual
Page 47
... button. ✽ The projector is in the Power management mode. • • • on . The temperature inside the projector is READY to an end, the LAMP REPLACE indicator lights yellow. It cannot be turned on until ✽ the READY indicator lights green. When the projector is turned off ✽ When the life of the lamp. 47 Indicators LAMP WARNING REPLACE TEMP. indicator stops flashing. Check and clean the Air Filter. APPENDIX INDICATORS AND PROJECTOR CONDITION Check the Indicators for service and checkup. Reset the Lamp Replace Counter after...
... button. ✽ The projector is in the Power management mode. • • • on . The temperature inside the projector is READY to an end, the LAMP REPLACE indicator lights yellow. It cannot be turned on until ✽ the READY indicator lights green. When the projector is turned off ✽ When the life of the lamp. 47 Indicators LAMP WARNING REPLACE TEMP. indicator stops flashing. Check and clean the Air Filter. APPENDIX INDICATORS AND PROJECTOR CONDITION Check the Indicators for service and checkup. Reset the Lamp Replace Counter after...

