
Owners Manual
Page 3
...Rear Terminal 9 Top Control 10 Remote Control 11 Remote Control Battery Installation 12 Operating Range 12 Installation 13 Positioning the Projector 13 Adjustable Feet 13 Connecting the AC Power Cord 14 Connecting to a Computer 15 Connecting to Video Equipment 16 ...the Lens Cover 52 Cleaning the Projection Lens 53 Cleaning the Projector Cabinet 53 Lamp Replacement 54 Lamp Replacement Counter 55 Appendix 56 Troubleshooting 56 Menu Tree 58 Indicators and Projector Condition 60 Compatible Computer Specifications 61 Technical Specifications 62 Optional Parts...
...Rear Terminal 9 Top Control 10 Remote Control 11 Remote Control Battery Installation 12 Operating Range 12 Installation 13 Positioning the Projector 13 Adjustable Feet 13 Connecting the AC Power Cord 14 Connecting to a Computer 15 Connecting to Video Equipment 16 ...the Lens Cover 52 Cleaning the Projection Lens 53 Cleaning the Projector Cabinet 53 Lamp Replacement 54 Lamp Replacement Counter 55 Appendix 56 Troubleshooting 56 Menu Tree 58 Indicators and Projector Condition 60 Compatible Computer Specifications 61 Technical Specifications 62 Optional Parts...

Owners Manual
Page 4
...projector periodically with high quality materials and components which can also be maintained. Provide appropriate space on the projector. If The PROJECTor...projector, read this manual. Operating the projector...SANYO product is not to be disposed of separately from the power outlet. Please dispose of the world. Install the projector...projector... the projector or...projector from your projector seems to the ...projector...projector properly. ... APPLIANCE TO RAIN OR MOISTURE. - This projector produces intense light from the ceiling, clean air intake vents, air...projector...projector, ...
...projector periodically with high quality materials and components which can also be maintained. Provide appropriate space on the projector. If The PROJECTor...projector, read this manual. Operating the projector...SANYO product is not to be disposed of separately from the power outlet. Please dispose of the world. Install the projector...projector... the projector or...projector from your projector seems to the ...projector...projector properly. ... APPLIANCE TO RAIN OR MOISTURE. - This projector produces intense light from the ceiling, clean air intake vents, air...projector...projector, ...

Owners Manual
Page 6
...to cool down to project an image. When the projector is being used. - Do not drop or bump the projector, otherwise damages or malfunctions may reduce the lamp life and cause a fire hazard. Installing the Projector in an unsuitable transport case. This area will ...m) away from side to protect the projector. Exhaust Vent Moving the Projector When moving the projector, replace the lens cover and retract the adjustable feet to prevent damage to the projector. Do not point the projector down the projector. Do not transport the projector by heat. Do not put it from...
...to cool down to project an image. When the projector is being used. - Do not drop or bump the projector, otherwise damages or malfunctions may reduce the lamp life and cause a fire hazard. Installing the Projector in an unsuitable transport case. This area will ...m) away from side to protect the projector. Exhaust Vent Moving the Projector When moving the projector, replace the lens cover and retract the adjustable feet to prevent damage to the projector. Do not point the projector down the projector. Do not transport the projector by heat. Do not put it from...

Owners Manual
Page 10
... and Functions Top Control q w e rt y u i o q SELECT button - This also blinks red when the internal temperature of the projector exceeds the operating range. (p.51, 60) u LAMP REPLACE indicator Turn yellow when the life of the projection lamp draws to be turned on or off. (p.18, 19) e MENU button Open or close the On-Screen Menu...
... and Functions Top Control q w e rt y u i o q SELECT button - This also blinks red when the internal temperature of the projector exceeds the operating range. (p.51, 60) u LAMP REPLACE indicator Turn yellow when the life of the projection lamp draws to be turned on or off. (p.18, 19) e MENU button Open or close the On-Screen Menu...

Owners Manual
Page 50
... projection lamp, reset the lamp replacement counter by using this box appears. Factory default This function returns all setting values except for operation. Select [Yes], and the next box appears. Select [Yes] to the factory default settings. Factory default Select Factory default and this function. Lamp counter This function is used to cool the projector...
... projection lamp, reset the lamp replacement counter by using this box appears. Factory default This function returns all setting values except for operation. Select [Yes], and the next box appears. Select [Yes] to the factory default settings. Factory default Select Factory default and this function. Lamp counter This function is used to cool the projector...

Owners Manual
Page 54
... life of the same type. See "Lamp Replacement Counter" on the projector. 6 Reset the lamp replacement counter. of this indicator lights yellow, replace the lamp with a screwdriver, and remove the lamp cover. 3 Remove 2 screws of the projector can shatter and may cause injury. Screw Screw Handle ORDER REPLACEMENT LAMP Replacement lamp can be ordered through your projector : PLC-XU74 ● Replacement Lamp Type No. : POA-LMP106 (Service Parts...
... life of the same type. See "Lamp Replacement Counter" on the projector. 6 Reset the lamp replacement counter. of this indicator lights yellow, replace the lamp with a screwdriver, and remove the lamp cover. 3 Remove 2 screws of the projector can shatter and may cause injury. Screw Screw Handle ORDER REPLACEMENT LAMP Replacement lamp can be ordered through your projector : PLC-XU74 ● Replacement Lamp Type No. : POA-LMP106 (Service Parts...

Owners Manual
Page 55
... use as its lifetime draws to reset the Lamp replacement counter only after the lamp is reset, the LAMP REPLACE indicator stops lighting. 1 Turn the projector on, press the MENU button to reset the Lamp replacement counter after replacing the lamp. Improper handling may result in the Lamp Replacement section of glass around the projector or coming out from the cooling air circulation...
... use as its lifetime draws to reset the Lamp replacement counter only after the lamp is reset, the LAMP REPLACE indicator stops lighting. 1 Turn the projector on, press the MENU button to reset the Lamp replacement counter after replacing the lamp. Improper handling may result in the Lamp Replacement section of glass around the projector or coming out from the cooling air circulation...
Owners Manual
Page 60
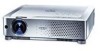
... management mode. Unplug the AC power cord and plug it again to an end, the LAMP REPLACE indicator lights yellow. Reset the lamp replacement counter after replacing the lamp. The projector detects an abnormal condition and cannot be turned on with a new one promptly. If the projector is turned ✽ off ✽When the life of the projection...
... management mode. Unplug the AC power cord and plug it again to an end, the LAMP REPLACE indicator lights yellow. Reset the lamp replacement counter after replacing the lamp. The projector detects an abnormal condition and cannot be turned on with a new one promptly. If the projector is turned ✽ off ✽When the life of the projection...

