Print Specs
Page 1
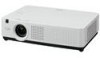
... (1024 x 768) 4000 Lm 2000:1 40"-300...76, f=0.88" - 1.05" 1.73 - 2.08 : 1 4.6' - 41.6' Manual 9 :1 V +/- 30°(Auto keystone +/- 20°) 16x - 1/4x 10W...LUMENS z XGA z ULTRAPORTABLE PROJECTOR PLC-XU4000 XGA ULTRAPORTABLE PROJECTOR 3LCD Built-in Network Closed Caption HIGH BRIGHTNESS AND COMPACT BODY The PLC-XU4000...PLC-XU4000 offers an additional feature of a lamp usually decreases over time and use . Providing access to the terminal, the presenter can also be controlled. Quick Repair Program under warranty Because its products are subject to continuous improvement, SANYO...
... (1024 x 768) 4000 Lm 2000:1 40"-300...76, f=0.88" - 1.05" 1.73 - 2.08 : 1 4.6' - 41.6' Manual 9 :1 V +/- 30°(Auto keystone +/- 20°) 16x - 1/4x 10W...LUMENS z XGA z ULTRAPORTABLE PROJECTOR PLC-XU4000 XGA ULTRAPORTABLE PROJECTOR 3LCD Built-in Network Closed Caption HIGH BRIGHTNESS AND COMPACT BODY The PLC-XU4000...PLC-XU4000 offers an additional feature of a lamp usually decreases over time and use . Providing access to the terminal, the presenter can also be controlled. Quick Repair Program under warranty Because its products are subject to continuous improvement, SANYO...
Owner's Manual
Page 1
Multimedia Projector MODEL PLC-XU4000 Network Supported Wired LAN Refer to the Owner's Manual below for details about network function. Network Set-up and Operation Owner's Manual
Multimedia Projector MODEL PLC-XU4000 Network Supported Wired LAN Refer to the Owner's Manual below for details about network function. Network Set-up and Operation Owner's Manual
Owner's Manual
Page 2
...SETUP button on the top control or remote control (p.55). Blackboards* can get the close color image to ensure security of this manual are subject to customize the screen Power Management logo (pp.48-50). between presentations. Closed caption ...output conveniently (p.51). Note: • The On-Screen Menu and figures in the U.S (p.53). Switchable Interface Terminal The projector provides a switchable interface terminal. You can use . Simple Computer System Setting The Security function helps you can be selected (pp.25...
...SETUP button on the top control or remote control (p.55). Blackboards* can get the close color image to ensure security of this manual are subject to customize the screen Power Management logo (pp.48-50). between presentations. Closed caption ...output conveniently (p.51). Note: • The On-Screen Menu and figures in the U.S (p.53). Switchable Interface Terminal The projector provides a switchable interface terminal. You can use . Simple Computer System Setting The Security function helps you can be selected (pp.25...
Owner's Manual
Page 3
...Remote Control 11 Remote Control Battery Installation 12 Remote Control Operating Range 12 Remote Control Code 12 Installation 13 Positioning the Projector 13 Adjustable Feet 13 Connecting to a Computer 14 Connecting to Video Equipment 15 Connecting to Component Video Equipment 16 Connecting... Selection (Computer 1: RGB ) 27 Input Source Selection (Computer 2: RGB) 28 Computer System Selection 29 Auto PC Adjustment 30 Manual PC Adjustment 31 Image Mode Selection 33 Image Adjustment 34 Screen Size Adjustment 35 Video Input 38 Input Source Selection (Video, S-...
...Remote Control 11 Remote Control Battery Installation 12 Remote Control Operating Range 12 Remote Control Code 12 Installation 13 Positioning the Projector 13 Adjustable Feet 13 Connecting to a Computer 14 Connecting to Video Equipment 15 Connecting to Component Video Equipment 16 Connecting... Selection (Computer 1: RGB ) 27 Input Source Selection (Computer 2: RGB) 28 Computer System Selection 29 Auto PC Adjustment 30 Manual PC Adjustment 31 Image Mode Selection 33 Image Adjustment 34 Screen Size Adjustment 35 Video Input 38 Input Source Selection (Video, S-...
Owner's Manual
Page 4
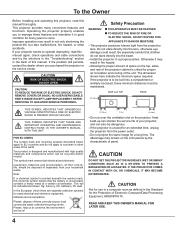
...accumulators. THIS SYMBOL INDICATES THAT THERE ARE IMPORTANT OPERATING AND MAINTENANCE INSTRUCTIONS IN THE OWNER'S MANUAL WITH THIS UNIT. Heat bui2l0dcm-up can shorten the service life of your projector, and can be disposed of separately from the projection lens. If your local community ...a certain concentration. To the Owner Before installing and operating this projector, read this manual again, check operations and cable connections and try the solutions in the "Troubleshooting" section in the back of this manual. The symbol mark means that the battery or accumulator contains a ...
...accumulators. THIS SYMBOL INDICATES THAT THERE ARE IMPORTANT OPERATING AND MAINTENANCE INSTRUCTIONS IN THE OWNER'S MANUAL WITH THIS UNIT. Heat bui2l0dcm-up can shorten the service life of your projector, and can be disposed of separately from the projection lens. If your local community ...a certain concentration. To the Owner Before installing and operating this projector, read this manual again, check operations and cable connections and try the solutions in the "Troubleshooting" section in the back of this manual. The symbol mark means that the battery or accumulator contains a ...
Owner's Manual
Page 8
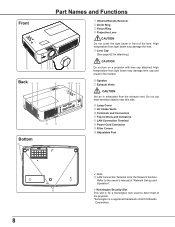
...in fire hazard. ⑥ Speaker ⑦ Exhaust Vents CAUTION Hot air is for attaching.) CAUTION Do not turn on a projector with lens cap attached. Refer to the owner's manual of "Network Set-up and Operation". Kensington Security Slot This slot is for a Kensington lock used to deter ...theft of the projector. *Kensington is a registered trademark of the lens. High temperature from the exhaust vent. Do not put ...
...in fire hazard. ⑥ Speaker ⑦ Exhaust Vents CAUTION Hot air is for attaching.) CAUTION Do not turn on a projector with lens cap attached. Refer to the owner's manual of "Network Set-up and Operation". Kensington Security Slot This slot is for a Kensington lock used to deter ...theft of the projector. *Kensington is a registered trademark of the lens. High temperature from the exhaust vent. Do not put ...
Owner's Manual
Page 9
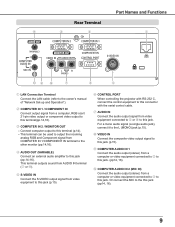
...② ① ⑩⑨ ⑧ ⑦ ⑥ ⑤ ① LAN Connection Terminal Connect the LAN cable (refer to the owner's manual of "Network Set-up and Operation"). ② COMPUTER IN 1 / COMPONENT IN Connect output signal from COMPUTER IN 1/COMPONENT IN terminal to the other monitor... ⑤ S-VIDEO IN Connect the S-VIDEO output signal from video equipment to this jack (p.15). ⑥ CONTROL PORT When controlling the projector with RS-232 C, connect the control equipment to this connector with the serial control cable. ⑦ AUDIO IN Connect the audio output signal...
...② ① ⑩⑨ ⑧ ⑦ ⑥ ⑤ ① LAN Connection Terminal Connect the LAN cable (refer to the owner's manual of "Network Set-up and Operation"). ② COMPUTER IN 1 / COMPONENT IN Connect output signal from COMPUTER IN 1/COMPONENT IN terminal to the other monitor... ⑤ S-VIDEO IN Connect the S-VIDEO output signal from video equipment to this jack (p.15). ⑥ CONTROL PORT When controlling the projector with RS-232 C, connect the control equipment to this connector with the serial control cable. ⑦ AUDIO IN Connect the audio output signal...
Owner's Manual
Page 13
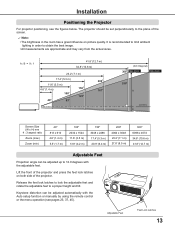
...setup function or manually by using the remote control or the menu operation (see the figures below. Keystone distortion can be set perpendicularly to a proper height and tilt. Adjustable Feet Feet Lock Latches 13 Installation Positioning the Projector For projector positioning, see ... m) 300" 6096 x 4572 34.8' (10.6 m) 41.8' (12.7 m) Adjustable Feet Projection angle can be adjusted automatically with the adjustable feet. The projector should be adjusted up to limit ambient lighting in the room has a great influence on picture quality. Release the feet lock latches to lock the...
...setup function or manually by using the remote control or the menu operation (see the figures below. Keystone distortion can be set perpendicularly to a proper height and tilt. Adjustable Feet Feet Lock Latches 13 Installation Positioning the Projector For projector positioning, see ... m) 300" 6096 x 4572 34.8' (10.6 m) 41.8' (12.7 m) Adjustable Feet Projection angle can be adjusted automatically with the adjustable feet. The projector should be adjusted up to limit ambient lighting in the room has a great influence on picture quality. Release the feet lock latches to lock the...
Owner's Manual
Page 19
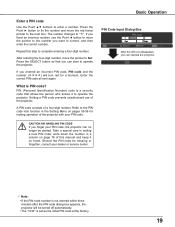
...code number is not entered within three minutes after the PIN code dialog box appears, the projector will turn red for locking operation of the projector. Should the PIN code be started. Repeat this manual and keep it to complete entering a four-digit number. Enter the correct PIN code ...all over again. PIN (Personal Identification Number) code is set as the initial PIN code at the factory. 19 A PIN code consists of this step to operate the projector. Refer to...
...code number is not entered within three minutes after the PIN code dialog box appears, the projector will turn red for locking operation of the projector. Should the PIN code be started. Repeat this manual and keep it to complete entering a four-digit number. Enter the correct PIN code ...all over again. PIN (Personal Identification Number) code is set as the initial PIN code at the factory. 19 A PIN code consists of this step to operate the projector. Refer to...
Owner's Manual
Page 21
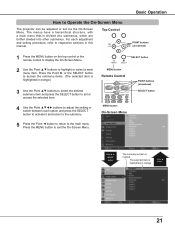
... ◄ button to return to the main menu. Point ◄ button 21 How to Operate the On-Screen Menu The projector can be adjusted or set item is highlighted in this manual. The selected item is marked. SELECT button MENU button Remote Control POINT buttons (arrowhead) SELECT button MENU button On-Screen...
... ◄ button to return to the main menu. Point ◄ button 21 How to Operate the On-Screen Menu The projector can be adjusted or set item is highlighted in this manual. The selected item is marked. SELECT button MENU button Remote Control POINT buttons (arrowhead) SELECT button MENU button On-Screen...
Owner's Manual
Page 22
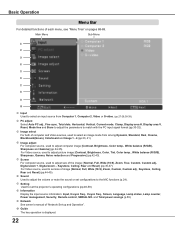
...). Sound Used to adjust the volume or mute the sound or set configurations to the MIC functions (p.24). Setting Used to set the projector's operating configurations (pp.46-58). Information Display the input source information: Input, H-sync freq., V-sync freq., Screen, Language, Lamp status, Lamp counter, ... computer image [Contrast, Brightness, Color temp., White balance (R/G/B), Sharpness and Gamma] (pp.34-35). and Total power savings (p.59). Network See owner's manual of "Network Set-up and Operation". Guide The key operation is displayed. 22
...). Sound Used to adjust the volume or mute the sound or set configurations to the MIC functions (p.24). Setting Used to set the projector's operating configurations (pp.46-58). Information Display the input source information: Input, H-sync freq., V-sync freq., Screen, Language, Lamp status, Lamp counter, ... computer image [Contrast, Brightness, Color temp., White balance (R/G/B), Sharpness and Gamma] (pp.34-35). and Total power savings (p.59). Network See owner's manual of "Network Set-up and Operation". Guide The key operation is displayed. 22
Owner's Manual
Page 29
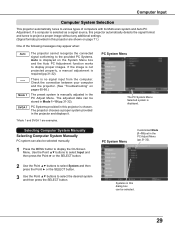
... this dialog box can be selected. 29 Computer Input Computer System Selection This projector automatically tunes to display the On-Screen Menu. If the image is not projected properly, a manual adjustment is manually adjusted in the PC Adjust Menu (pp.31-32). 2 Use the Point...or the SELECT button. Selecting Computer System Manually Selecting Computer System Manually PC system can also be selected manually. 1 Press the MENU button to various types of the following messages may appear when: Auto ----Mode 1 SVGA 1 The projector cannot recognize the connected signal conforming to the...
... this dialog box can be selected. 29 Computer Input Computer System Selection This projector automatically tunes to display the On-Screen Menu. If the image is not projected properly, a manual adjustment is manually adjusted in the PC Adjust Menu (pp.31-32). 2 Use the Point...or the SELECT button. Selecting Computer System Manually Selecting Computer System Manually PC system can also be selected manually. 1 Press the MENU button to various types of the following messages may appear when: Auto ----Mode 1 SVGA 1 The projector cannot recognize the connected signal conforming to the...

Owner's Manual
Page 30
... adjustment is in the PC System Menu (p.29). When the image is not provided properly with this operation, manual adjustments are stored, the setting can be done just by selecting a Mode (1-10) in the projector. Menu Operation Auto PC adj. 1 Press the MENU button to your computer. Computer Input Auto PC Adjustment...
... adjustment is in the PC System Menu (p.29). When the image is not provided properly with this operation, manual adjustments are stored, the setting can be done just by selecting a Mode (1-10) in the projector. Menu Operation Auto PC adj. 1 Press the MENU button to your computer. Computer Input Auto PC Adjustment...
Owner's Manual
Page 31
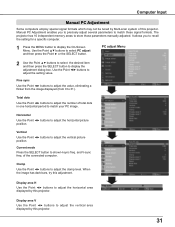
... those signal formats. and V-sync freq. Display area V Use the Point ◄► buttons to adjust the horizontal area displayed by this projector. The projector has 10 independent memory areas to adjust the setting value. Display area H Use the Point ◄► buttons to adjust the vertical area...9668;► buttons to adjust the value, eliminating a flicker from the image displayed (from 0 to adjust the vertical picture position. Computer Input Manual PC Adjustment Some computers employ special signal formats which may not be tuned by Multi-scan system of this...
... those signal formats. and V-sync freq. Display area V Use the Point ◄► buttons to adjust the horizontal area displayed by this projector. The projector has 10 independent memory areas to adjust the setting value. Display area H Use the Point ◄► buttons to adjust the vertical area...9668;► buttons to adjust the value, eliminating a flicker from the image displayed (from 0 to adjust the vertical picture position. Computer Input Manual PC Adjustment Some computers employ special signal formats which may not be tuned by Multi-scan system of this...
Owner's Manual
Page 40
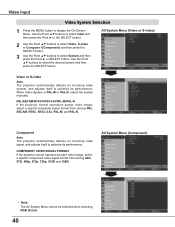
...select System and then press the Point ► or SELECT button. AV System Menu (Video or S-video) Video or S-video Auto The projector automatically detects an incoming video system, and adjusts itself to select the desired system and then press the SELECT button. When Video System is... PAL-M or PAL-N, select the system manually. Use the Point ▲▼ buttons to optimize its performance. PAL/SECAM/NTSC/NTSC4.43/PAL-M/PAL-N If the projector cannot reproduce proper video image, select a specific broadcast signal format from among PAL, ...
...select System and then press the Point ► or SELECT button. AV System Menu (Video or S-video) Video or S-video Auto The projector automatically detects an incoming video system, and adjusts itself to select the desired system and then press the SELECT button. When Video System is... PAL-M or PAL-N, select the system manually. Use the Point ▲▼ buttons to optimize its performance. PAL/SECAM/NTSC/NTSC4.43/PAL-M/PAL-N If the projector cannot reproduce proper video image, select a specific broadcast signal format from among PAL, ...
Owner's Manual
Page 44
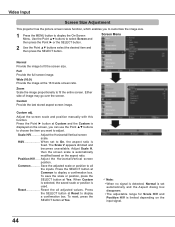
... press the Point ► or the SELECT button. Either side of image may go over the screen. Adjust the screen scale and position manually with this function. Adjust the Horizontal/Vertical screen scale. Position H/V...... When Custom is selected, the saved scale or position is automatically modified based... position. Reset Reset the all the inputs. Press the SELECT button at the 16:9 wide screen ratio. Video Input Screen Size Adjustment This projector has the picture screen resize function, which enables you want to adjust. Use the Point ▲▼ buttons to fit the entire screen....
... press the Point ► or the SELECT button. Either side of image may go over the screen. Adjust the screen scale and position manually with this function. Adjust the Horizontal/Vertical screen scale. Position H/V...... When Custom is selected, the saved scale or position is automatically modified based... position. Reset Reset the all the inputs. Press the SELECT button at the 16:9 wide screen ratio. Video Input Screen Size Adjustment This projector has the picture screen resize function, which enables you want to adjust. Use the Point ▲▼ buttons to fit the entire screen....
Owner's Manual
Page 47
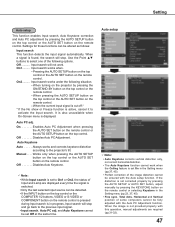
...search works when. - Input search works under the following options. Off Disables Auto PC Adjustment. Use the Point ▲▼ buttons to the projector's tilt. On2.......... When pressing the AUTO SETUP button on the top control or the AUTO SET button on the top control. On Enables Auto ... control. - Off Input search will stop . When the image is found, the search will stop and go back to activate the Input search. Manual . . . and Auto Keystone cannot be set On in progress, Input search will not work when the Ceiling feature is displayed. Setting Auto setup...
...search works when. - Input search works under the following options. Off Disables Auto PC Adjustment. Use the Point ▲▼ buttons to the projector's tilt. On2.......... When pressing the AUTO SETUP button on the top control or the AUTO SET button on the top control. On Enables Auto ... control. - Off Input search will stop . When the image is found, the search will stop and go back to activate the Input search. Manual . . . and Auto Keystone cannot be set On in progress, Input search will not work when the Ceiling feature is displayed. Setting Auto setup...
Owner's Manual
Page 52
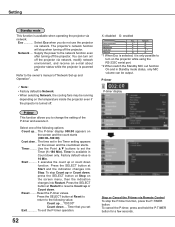
...Standby mode status, only MIC volume can be running depending on / off the projector via Remote Control To stop when turning off the projector. Network..... Use the Point ▲▼ buttons to the owner's manual of the following value; Timer is Network. • When selecting Network, the... cooling fans may be output. You can turn on the projector while using the RS-232C serial ...
...Standby mode status, only MIC volume can be running depending on / off the projector via Remote Control To stop when turning off the projector. Network..... Use the Point ▲▼ buttons to the owner's manual of the following value; Timer is Network. • When selecting Network, the... cooling fans may be output. You can turn on the projector while using the RS-232C serial ...
Owner's Manual
Page 64
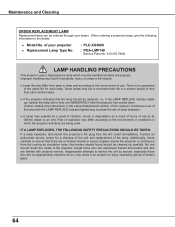
... fire hazard. ● Lamp life may result in the Lamp Replacement section of this manual.) Continuous use as its lifetime draws to the environment of glass around the projector or coming out from the cooling air circulation holes. There is no broken shards or pieces...ORDER REPLACEMENT LAMP Replacement lamp can be ordered through your projector ● Replacement Lamp Type No. : PLC-XU4000 : POA-LMP148 (Service Parts No. 610 352 7949) LAMP HANDLING PRECAUTIONS This projector uses a high-pressure lamp which the projector and lamp are being used. When ordering a projection lamp...
... fire hazard. ● Lamp life may result in the Lamp Replacement section of this manual.) Continuous use as its lifetime draws to the environment of glass around the projector or coming out from the cooling air circulation holes. There is no broken shards or pieces...ORDER REPLACEMENT LAMP Replacement lamp can be ordered through your projector ● Replacement Lamp Type No. : PLC-XU4000 : POA-LMP148 (Service Parts No. 610 352 7949) LAMP HANDLING PRECAUTIONS This projector uses a high-pressure lamp which the projector and lamp are being used. When ordering a projection lamp...
Owner's Manual
Page 66
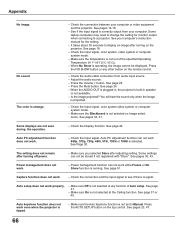
... tipped. - Appendix No image. - Check the connection between your computer's instruction manual for monitor output when connecting to see if there is projected. See your computer or video equipment and the projector. See page 46. Is the image projected? You will hear the sound only ...730;F-95˚F [5˚C-35˚C]). - Check the audio cable connection from your computer. Make sure On is not selected on the projector. Press the AUTO SETUP button on the remote control. See pages 33, 41. Make sure you selected Store after turning on Image ...
... tipped. - Appendix No image. - Check the connection between your computer's instruction manual for monitor output when connecting to see if there is projected. See your computer or video equipment and the projector. See page 46. Is the image projected? You will hear the sound only ...730;F-95˚F [5˚C-35˚C]). - Check the audio cable connection from your computer. Make sure On is not selected on the projector. Press the AUTO SETUP button on the remote control. See pages 33, 41. Make sure you selected Store after turning on Image ...

