
Print Specs
Page 1
... classroom or business meeting room. The PLC-XC55/50 are the industry's first portable models that incorporate SANYO's exclusive Active Maintenance System (AMF). ...450:1 Image Size (diagonal) 40' - 300' Aspect Ratio 4:3 Throw Distance 4.6' - 41.7' Zoom/Focus Manual (1:1.2 zoom) Throw Ratio 1.72 - 2.07:1 Zoom Ratio 1:1.2 Digital Keystone Correction V +/- 20°...z Audio for contractor installation. Replacement Filter POA-CA-COMPVGA - The PLC-XC55/50 delivers the brightness, 3100/2600 ANSI lumens. BLACK BOARD / COLOR BOARD MODE What could be left in lens...
... classroom or business meeting room. The PLC-XC55/50 are the industry's first portable models that incorporate SANYO's exclusive Active Maintenance System (AMF). ...450:1 Image Size (diagonal) 40' - 300' Aspect Ratio 4:3 Throw Distance 4.6' - 41.7' Zoom/Focus Manual (1:1.2 zoom) Throw Ratio 1.72 - 2.07:1 Zoom Ratio 1:1.2 Digital Keystone Correction V +/- 20°...z Audio for contractor installation. Replacement Filter POA-CA-COMPVGA - The PLC-XC55/50 delivers the brightness, 3100/2600 ANSI lumens. BLACK BOARD / COLOR BOARD MODE What could be left in lens...
Owner's Manual
Page 2
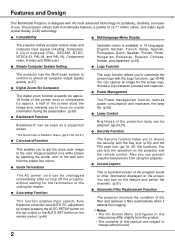
... image projected on a white screen by selecting the similar color to the wall color from the product. • The contents of this manual may differ slightly from the preset four colors. ◆ Quick Termination The AC power cord can be unplugged immediately after turning off the ...focus on the screen. You can turn on the projector and the remote control. Features and Design This Multimedia Projector is available in this manual are subject to change without waiting for the termination of the cooling fan rotation. ◆ Auto setup Function This function enables Input search,...
... image projected on a white screen by selecting the similar color to the wall color from the product. • The contents of this manual may differ slightly from the preset four colors. ◆ Quick Termination The AC power cord can be unplugged immediately after turning off the ...focus on the screen. You can turn on the projector and the remote control. Features and Design This Multimedia Projector is available in this manual are subject to change without waiting for the termination of the cooling fan rotation. ◆ Auto setup Function This function enables Input search,...

Owner's Manual
Page 3
... Input 25 Input Source Selection (RGB: Computer 1 Input Source Selection (RGB(PC digital), RGB(AV HDCP)) 26 Computer System Selection 27 Auto PC Adjustment 28 Manual PC Adjustment 29 Image Level Selection 31 Image Level Adjustment 33 Screen Size Adjustment 34 Video Input 37 Input Source Selection (Video,S-video) 37 Input...
... Input 25 Input Source Selection (RGB: Computer 1 Input Source Selection (RGB(PC digital), RGB(AV HDCP)) 26 Computer System Selection 27 Auto PC Adjustment 28 Manual PC Adjustment 29 Image Level Selection 31 Image Level Adjustment 33 Screen Size Adjustment 34 Video Input 37 Input Source Selection (Video,S-video) 37 Input...
Owner's Manual
Page 4
... and electronic equipment, at your household waste. SIDE and TOP REAR - This projector provides many convenient features and functions. Your SANYO product is designed and manufactured with oil or chemicals, IT may become deteriorated. Install the projector in the other accidents. If ...and try the solutions in a fire hazard. - THIS SYMBOL INDICATES THAT THERE ARE IMPORTANT OPERATING AND MAINTENANCE INSTRUCTIONS IN THE OWNER'S MANUAL WITH THIS UNIT. CAUTION Do not set the projector in ! If your projector, and can be maintained. REFER SERVICING TO QUALIFIED ...
... and electronic equipment, at your household waste. SIDE and TOP REAR - This projector provides many convenient features and functions. Your SANYO product is designed and manufactured with oil or chemicals, IT may become deteriorated. Install the projector in the other accidents. If ...and try the solutions in a fire hazard. - THIS SYMBOL INDICATES THAT THERE ARE IMPORTANT OPERATING AND MAINTENANCE INSTRUCTIONS IN THE OWNER'S MANUAL WITH THIS UNIT. CAUTION Do not set the projector in ! If your projector, and can be maintained. REFER SERVICING TO QUALIFIED ...

Owner's Manual
Page 18
... off " or "Off" is selected in column on the screen. (p.48) • When the "Countdown off automatically. A PIN code consists of the projector. Repeat this manual, and keep it to "Set" by pressing the Point ▲▼ buttons. If you forget your PIN code, the projector can operate the projector. ...
... off " or "Off" is selected in column on the screen. (p.48) • When the "Countdown off automatically. A PIN code consists of the projector. Repeat this manual, and keep it to "Set" by pressing the Point ▲▼ buttons. If you forget your PIN code, the projector can operate the projector. ...

Owner's Manual
Page 22
...) in and out. Rotate the Focus Ring to keep out dust just after pressing the AUTO SETUP button on the top control, correct the image manually as follows: Press the KEYSTONE button on the input signal. Close the slide shutter. Note: Close the slide shutter of the Auto setup function...
...) in and out. Rotate the Focus Ring to keep out dust just after pressing the AUTO SETUP button on the top control, correct the image manually as follows: Press the KEYSTONE button on the input signal. Close the slide shutter. Note: Close the slide shutter of the Auto setup function...

Owner's Manual
Page 27
...computers based on the PC System Menu icon and the Auto PC Adjustment function works to display proper images. Selecting Computer System Manually PC system can be selected manually. 1 Press the MENU button to display the On-Screen Menu. Press the Point ◄► buttons to move the red... following messages may appear when: Auto The projector cannot recognize the connected signal conforming to the provided PC Systems. The message "Auto" is manually adjusted in the PC Adjust Menu. (p.30) 27 PC System Menu The PC System Menu icon Selected system is chosen. If Computer is ...
...computers based on the PC System Menu icon and the Auto PC Adjustment function works to display proper images. Selecting Computer System Manually PC system can be selected manually. 1 Press the MENU button to display the On-Screen Menu. Press the Point ◄► buttons to move the red... following messages may appear when: Auto The projector cannot recognize the connected signal conforming to the provided PC Systems. The message "Auto" is manually adjusted in the PC Adjust Menu. (p.30) 27 PC System Menu The PC System Menu icon Selected system is chosen. If Computer is ...

Owner's Manual
Page 28
... by selecting Mode in process. Notes: • Fine sync, Total dots, Horizontal, and Vertical of some computers cannot be fully adjusted with this operation, manual adjustments are memorized, the setting can be done just by pressing the AUTO SETUP button on the top control or the AUTO SET button on...
... by selecting Mode in process. Notes: • Fine sync, Total dots, Horizontal, and Vertical of some computers cannot be fully adjusted with this operation, manual adjustments are memorized, the setting can be done just by pressing the AUTO SETUP button on the top control or the AUTO SET button on...

Owner's Manual
Page 29
.... of the selected Mode. Clamp Adjust clamp level. Press the SELECT button at the Current mode item to display the On-Screen Menu. Manual PC Adjustment enables you to recall the setting for a specific computer. 1 Press the MENU button to show H-sync freq. Move the red...It allows you to precisely adjust several parameters to the PC Adjust Menu icon. Status (Stored/Free) of the connected computer. Computer Input Manual PC Adjustment Some computers employ special signal formats which may not be tuned by Multi-scan system of this adjustment. and V-sync freq....
.... of the selected Mode. Clamp Adjust clamp level. Press the SELECT button at the Current mode item to display the On-Screen Menu. Manual PC Adjustment enables you to recall the setting for a specific computer. 1 Press the MENU button to show H-sync freq. Move the red...It allows you to precisely adjust several parameters to the PC Adjust Menu icon. Status (Stored/Free) of the connected computer. Computer Input Manual PC Adjustment Some computers employ special signal formats which may not be tuned by Multi-scan system of this adjustment. and V-sync freq....

Owner's Manual
Page 35
... limited depending on the aspect ratio. Press the SELECT button at Common or Reset, to all adjusted values. Custom Adjust the screen scale and position manually with this function. Adjust the "Scale H", then the screen scale is fixed. Position H/V Adjust the Horizontal/Vertical screen position. H&V When set automatically and the Aspect...
... limited depending on the aspect ratio. Press the SELECT button at Common or Reset, to all adjusted values. Custom Adjust the screen scale and position manually with this function. Adjust the "Scale H", then the screen scale is fixed. Position H/V Adjust the Horizontal/Vertical screen position. H&V When set automatically and the Aspect...

Owner's Manual
Page 39
... is necessary to optimize its performance. COMPONENT VIDEO SIGNAL FORMAT If the projector cannot reproduce proper video image, it is PAL-M or PAL-N, select system manually. Video or S-video Auto The projector automatically detects incoming video system, and adjusts itself to select a specific broadcast signal format among 480i, 575i, 480p, 575p...
... is necessary to optimize its performance. COMPONENT VIDEO SIGNAL FORMAT If the projector cannot reproduce proper video image, it is PAL-M or PAL-N, select system manually. Video or S-video Auto The projector automatically detects incoming video system, and adjusts itself to select a specific broadcast signal format among 480i, 575i, 480p, 575p...

Owner's Manual
Page 44
... This projector has the picture screen resize function, which enables you want to display the On-Screen Menu. Custom Adjust the screen scale and position manually with this function. Scale H/V Adjust the Horizontal/Vertical screen scale. The "Scale V" appears dimmed and becomes unavailable. Reset Reset the all the inputs. Press the...
... This projector has the picture screen resize function, which enables you want to display the On-Screen Menu. Custom Adjust the screen scale and position manually with this function. Scale H/V Adjust the Horizontal/Vertical screen scale. The "Scale V" appears dimmed and becomes unavailable. Reset Reset the all the inputs. Press the...

Owner's Manual
Page 46
...function. Use the Point ◄► buttons to the projector's tilt. Off . . . . . Select Auto setup and this operation, manual adjustments are displayed every time the signal is switched. • If any of the COMPUTER 1/2, VIDEO, S-VIDEO or COMPONENT buttons on the remote...follows: Input search This function detects the input signal automatically. with the Auto setup function. If the distortion is on "Auto" or "Manual" in setting menu. • Auto Keystone corrects vertical distortion only, not correct horizontal distortion. • The Auto Keystone cannot work . On1 ...
...function. Use the Point ◄► buttons to the projector's tilt. Off . . . . . Select Auto setup and this operation, manual adjustments are displayed every time the signal is switched. • If any of the COMPUTER 1/2, VIDEO, S-VIDEO or COMPONENT buttons on the remote...follows: Input search This function detects the input signal automatically. with the Auto setup function. If the distortion is on "Auto" or "Manual" in setting menu. • Auto Keystone corrects vertical distortion only, not correct horizontal distortion. • The Auto Keystone cannot work . On1 ...

Owner's Manual
Page 62
... only after replacing the lamp. No one IMMEDIATELY after the projector has cooled down. (Follow carefully the instructions in the Lamp Replacement section of this manual.) Continuous use of the lamp with the LAMP REPLACE indicator lighted may increase the risk of lamp explosion. ● A Lamp may explode as a result of...
... only after replacing the lamp. No one IMMEDIATELY after the projector has cooled down. (Follow carefully the instructions in the Lamp Replacement section of this manual.) Continuous use of the lamp with the LAMP REPLACE indicator lighted may increase the risk of lamp explosion. ● A Lamp may explode as a result of...

Owner's Manual
Page 65
... outlet. - Provide proper distance between your dealer or service center for assistance, check the items below once again. - Moving the projector from your computer's instruction manual for the monitor output when connecting to turn on the projector again. Make sure the temperature is out of the specified operating temperature (41°...
... outlet. - Provide proper distance between your dealer or service center for assistance, check the items below once again. - Moving the projector from your computer's instruction manual for the monitor output when connecting to turn on the projector again. Make sure the temperature is out of the specified operating temperature (41°...

Owner's Manual
Page 66
... page 23) - Some settings can not be stored if not registered with "Store". (see pages 22, 46) - Check the connection and the input signal to "Manual". Press the AUTO SETUP button on the top control or the AUTO SET button on Image select menu. (see page 50) - Check the Ceiling/Rear...
... page 23) - Some settings can not be stored if not registered with "Store". (see pages 22, 46) - Check the connection and the input signal to "Manual". Press the AUTO SETUP button on the top control or the AUTO SET button on Image select menu. (see page 50) - Check the Ceiling/Rear...

Owner's Manual
Page 70
... Dutch Swedish Finnish Polish Hungarian Romanian Russian Chinese Korean Japanese Quit Input search Off On 1 On 2 Auto PC adj. Off On Auto Keystone Off Auto Manual Quit Keystone Blue back Display Logo Ceiling Rear Standby mode Power management On start Closed Caption Lamp control Filter control Remote control Security Store/Reset...
... Dutch Swedish Finnish Polish Hungarian Romanian Russian Chinese Korean Japanese Quit Input search Off On 1 On 2 Auto PC adj. Off On Auto Keystone Off Auto Manual Quit Keystone Blue back Display Logo Ceiling Rear Standby mode Power management On start Closed Caption Lamp control Filter control Remote control Security Store/Reset...
Owner's Manual
Page 75
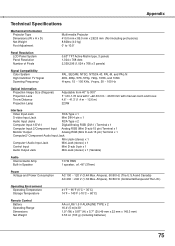
... Image Size (Diagonal) Projection Lens Throw Distance Projection Lamp Adjustable from 40" to 300" F 1.60-1.76 lens with f =22.33 mm ~ 26.80 mm with manual zoom and focus 4.6' ~ 41.3' (1.4 m ~ 12.6 m) 220W Interface Video Input Jack RCA Type x 1 S-video Input Jack Mini DIN 4 pin x 1 Audio Input Jacks RCA Type x 2 Computer Input...
... Image Size (Diagonal) Projection Lens Throw Distance Projection Lamp Adjustable from 40" to 300" F 1.60-1.76 lens with f =22.33 mm ~ 26.80 mm with manual zoom and focus 4.6' ~ 41.3' (1.4 m ~ 12.6 m) 220W Interface Video Input Jack RCA Type x 1 S-video Input Jack Mini DIN 4 pin x 1 Audio Input Jacks RCA Type x 2 Computer Input...

Owner's Manual
Page 76
Appendix Accessories Owner's Manual (CD-ROM) Quick Reference Guide AC Power Cord Remote Control and Batteries VGA Cable PIN Code Label ● The specifications are subject to change without ...
Appendix Accessories Owner's Manual (CD-ROM) Quick Reference Guide AC Power Cord Remote Control and Batteries VGA Cable PIN Code Label ● The specifications are subject to change without ...

Owner's Manual
Page 79
... a PIN code. 79 Appendix PIN Code Number Memo Write down the PIN code number in a prominent place of the projector's body while it with this manual securely.
... a PIN code. 79 Appendix PIN Code Number Memo Write down the PIN code number in a prominent place of the projector's body while it with this manual securely.


