
Print Specs
Page 1
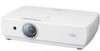
... signal as in lens cover, it has a new projector design preventing excess dust from PC Audio Input or Video Audio Input (stereo mini-jack) Other Terminal Included Accessories D-Sub9 I/R Remote Control z Two "AA" type Batteries z Owner's Manual (CD-ROM & quick reference guide) z AC power cord z VGA Cable z PIN Code Label Optional Accessories 610 339 8600 - This protects the media/AV facilities' investment. A 7-WATT SPEAKER AND MANY FUTURES FOR EDUCATION USE Projectors are...
... signal as in lens cover, it has a new projector design preventing excess dust from PC Audio Input or Video Audio Input (stereo mini-jack) Other Terminal Included Accessories D-Sub9 I/R Remote Control z Two "AA" type Batteries z Owner's Manual (CD-ROM & quick reference guide) z AC power cord z VGA Cable z PIN Code Label Optional Accessories 610 339 8600 - This protects the media/AV facilities' investment. A 7-WATT SPEAKER AND MANY FUTURES FOR EDUCATION USE Projectors are...
Owner's Manual
Page 2
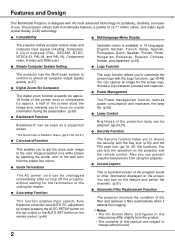
... product. • The contents of this manual are subject to change without waiting for the termination of the cooling fan rotation. ◆ Auto setup Function This function enables Input search, Auto Keystone correction and AUTO PC adjustment by simple pressing the AUTO SETUP button on the top control or the AUTO SET button on the screen. a half of the screen size) the image size, allowing you to focus on crucial information during the presentation...
... product. • The contents of this manual are subject to change without waiting for the termination of the cooling fan rotation. ◆ Auto setup Function This function enables Input search, Auto Keystone correction and AUTO PC adjustment by simple pressing the AUTO SETUP button on the top control or the AUTO SET button on the screen. a half of the screen size) the image size, allowing you to focus on crucial information during the presentation...

Owner's Manual
Page 3
... Power Cord 17 Basic Operation 18 Turning On the Projector 18 Turning Off the Projector 19 How to Operate the On-Screen Menu 20 Menu Bar 21 Zoom and Focus Adjustment 22 Auto setup function 22 Keystone Correction 22 Sound Adjustment 23 Remote Control Operation 23 Computer Input 25 Input Source Selection (RGB: Computer 1 Input Source Selection (RGB(PC digital), RGB(AV HDCP)) 26 Computer System Selection 27 Auto PC Adjustment 28 Manual PC Adjustment 29 Image Level Selection 31 Image Level Adjustment 33 Screen Size Adjustment 34 Video Input...
... Power Cord 17 Basic Operation 18 Turning On the Projector 18 Turning Off the Projector 19 How to Operate the On-Screen Menu 20 Menu Bar 21 Zoom and Focus Adjustment 22 Auto setup function 22 Keystone Correction 22 Sound Adjustment 23 Remote Control Operation 23 Computer Input 25 Input Source Selection (RGB: Computer 1 Input Source Selection (RGB(PC digital), RGB(AV HDCP)) 26 Computer System Selection 27 Auto PC Adjustment 28 Manual PC Adjustment 29 Image Level Selection 31 Image Level Adjustment 33 Screen Size Adjustment 34 Video Input...
Owner's Manual
Page 4
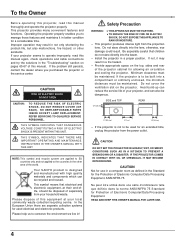
... of the projector cabinet for a considerable time. To the Owner Before operating this projector, read this manual again, check operations and cable connections and try the solutions in the "Troubleshooting" section on pages 65-67 of this manual. If your local community waste collection/recycling centre. REFER SERVICING TO QUALIFIED SERVICE PERSONNEL. THIS SYMBOL INDICATES THAT THERE ARE IMPORTANT OPERATING AND MAINTENANCE INSTRUCTIONS IN THE OWNER'S MANUAL WITH THIS...
... of the projector cabinet for a considerable time. To the Owner Before operating this projector, read this manual again, check operations and cable connections and try the solutions in the "Troubleshooting" section on pages 65-67 of this manual. If your local community waste collection/recycling centre. REFER SERVICING TO QUALIFIED SERVICE PERSONNEL. THIS SYMBOL INDICATES THAT THERE ARE IMPORTANT OPERATING AND MAINTENANCE INSTRUCTIONS IN THE OWNER'S MANUAL WITH THIS...

Owner's Manual
Page 7
... receiver. - Model Number Trade Name Responsible party Address : PLC-XC50 / PLC-XC55 : Sanyo : SANYO FISHER COMPANY : 21605 Plummer Street, Chatsworth, California 91311 Telephone No. : (818)998-7322 AC Power Cord Requirement The AC Power Cord supplied with this projector meets the requirement for the United States and Canada: AC Power Cord used of FCC Rules. AC Power Cord for use the plug with class B limits in Subpart B of Part 15 of...
... receiver. - Model Number Trade Name Responsible party Address : PLC-XC50 / PLC-XC55 : Sanyo : SANYO FISHER COMPANY : 21605 Plummer Street, Chatsworth, California 91311 Telephone No. : (818)998-7322 AC Power Cord Requirement The AC Power Cord supplied with this projector meets the requirement for the United States and Canada: AC Power Cord used of FCC Rules. AC Power Cord for use the plug with class B limits in Subpart B of Part 15 of...

Owner's Manual
Page 10
... image in Digital zoom mode. (p.36) ⑦ POINT (◄►) buttons - Execute the selected item. (p.20) - indicator Emit a red light when the projector detects an abnormal condition. Part Names and Functions Top Control ① ② ③ ④ ⑤ ⑪ ⑩ ⑨ ⑧ ⑦ ⑥ ① POWER indicator - Light green during cooling down. ② LAMP REPLACE indicator Turn yellow when the life of the projector exceeds the operating range. (pp.63, 71-72) ④ WARNING FILTER indicator...
... image in Digital zoom mode. (p.36) ⑦ POINT (◄►) buttons - Execute the selected item. (p.20) - indicator Emit a red light when the projector detects an abnormal condition. Part Names and Functions Top Control ① ② ③ ④ ⑤ ⑪ ⑩ ⑨ ⑧ ⑦ ⑥ ① POWER indicator - Light green during cooling down. ② LAMP REPLACE indicator Turn yellow when the life of the projector exceeds the operating range. (pp.63, 71-72) ④ WARNING FILTER indicator...

Owner's Manual
Page 18
... screen. The number changes to operate. The POWER indicator becomes green and the cooling fans start to operate the projector. The POWER indicator becomes red. 3 Press the POWER ON/STAND-BY button on the top control or on the projector. 2 Connect the projector's AC power cord into an AC outlet. Enter the correct PIN code all operations are invalid. • If the PIN code number is not shown on page 79 of a four-digit number. Setting a PIN code prevents unauthorized use...
... screen. The number changes to operate. The POWER indicator becomes green and the cooling fans start to operate the projector. The POWER indicator becomes red. 3 Press the POWER ON/STAND-BY button on the top control or on the projector. 2 Connect the projector's AC power cord into an AC outlet. Enter the correct PIN code all operations are invalid. • If the PIN code number is not shown on page 79 of a four-digit number. Setting a PIN code prevents unauthorized use...

Owner's Manual
Page 19
... the screen. 2 Press the POWER ON/STAND-BY button again to turn on the projector. The waiting time to restart will terminate directly if the AC power cord is unplugged immediately after 4 seconds. Basic Operation Turning Off the Projector 1 Press the POWER ON/STAND-BY button on the top control or on the remote control, and a message "Power off the projector.The POWER indicator starts to blink red, and the cooling fans keep running. (You can turn...
... the screen. 2 Press the POWER ON/STAND-BY button again to turn on the projector. The waiting time to restart will terminate directly if the AC power cord is unplugged immediately after 4 seconds. Basic Operation Turning Off the Projector 1 Press the POWER ON/STAND-BY button on the top control or on the remote control, and a message "Power off the projector.The POWER indicator starts to blink red, and the cooling fans keep running. (You can turn...
Owner's Manual
Page 24
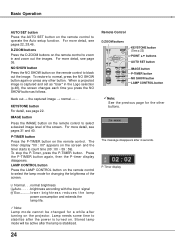
... button again or press any other buttons. normal brightness Auto. . . . . brightness according with the input signal Eco l o w e r b r i g h t n e s s r e d u c e s t h e l a m p power consumption and extends the lamp life. Note: Lamp mode cannot be active after the power is turned on the remote control to stabilize after the lamp is captured and set as "User" in and zoom out the images. The message disappears after turning on the projector. black out → the captured image → normal KEYSTONE button...
... button again or press any other buttons. normal brightness Auto. . . . . brightness according with the input signal Eco l o w e r b r i g h t n e s s r e d u c e s t h e l a m p power consumption and extends the lamp life. Note: Lamp mode cannot be active after the power is turned on the remote control to stabilize after the lamp is captured and set as "User" in and zoom out the images. The message disappears after turning on the projector. black out → the captured image → normal KEYSTONE button...
Owner's Manual
Page 57
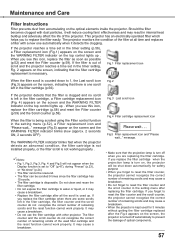
... the Display function is set in the filter cartridge, a Filter cartridge replacement icon (Fig. 4) appears on the screen and the WARNING FILTER indicator on the top control lights up . It may cause a breakdown. When the filter is turned off when you see this icon, replace the filter cartridge (p.58) and reset the Filter counter (p.59) and the Scroll counter (p.59). message (Fig.5) appear on the optical elements inside the projector. message. •...
... the Display function is set in the filter cartridge, a Filter cartridge replacement icon (Fig. 4) appears on the screen and the WARNING FILTER indicator on the top control lights up . It may cause a breakdown. When the filter is turned off when you see this icon, replace the filter cartridge (p.58) and reset the Filter counter (p.59) and the Scroll counter (p.59). message (Fig.5) appear on the optical elements inside the projector. message. •...
Owner's Manual
Page 58
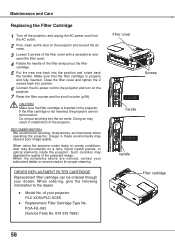
.../PLC-XC55 ● Replacement Filter Cartridge Type No. CAUTION Make sure the filter cartridge is properly and fully inserted. RECOMMENDATION We recommend avoiding dusty/smoky environments when operating the projector. Such condition may result in malfunction of the projected image. Close the filter cover and tighten the 2 screws back into the air vents. When ordering, give the following information to the projector and turn on a lens...
.../PLC-XC55 ● Replacement Filter Cartridge Type No. CAUTION Make sure the filter cartridge is properly and fully inserted. RECOMMENDATION We recommend avoiding dusty/smoky environments when operating the projector. Such condition may result in malfunction of the projected image. Close the filter cover and tighten the 2 screws back into the air vents. When ordering, give the following information to the projector and turn on a lens...

Owner's Manual
Page 60
... timing when the LAMP REPLACE indicator should light is depending on the ceiling, you should stand to an end. This indicator is opened. CAUTION For continued safety, replace with a new one promptly. If replacing the lamp of a projector which has been installed on the lamp mode. Small pieces of glass may fall out when the lamp cover is yellow when the life of the projection lamp draws to the side of the lamp cover...
... timing when the LAMP REPLACE indicator should light is depending on the ceiling, you should stand to an end. This indicator is opened. CAUTION For continued safety, replace with a new one promptly. If replacing the lamp of a projector which has been installed on the lamp mode. Small pieces of glass may fall out when the lamp cover is yellow when the life of the projection lamp draws to the side of the lamp cover...
Owner's Manual
Page 61
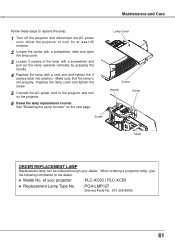
... by grasping the handle. 4 Replace the lamp with a new one and tighten the 2 screws back into position. Make sure that the lamp is set properly. See "Resetting the Lamp Counter" on the projector. 6 Reset the lamp replacement counter. Allow the projector to the projector and turn on the next page . Lamp Cover Screw Handle Screw Screw Lamp ORDER REPLACEMENT LAMP Replacement lamp can be ordered through your projector : PLC-XC50 / PLC-XC55 ● Replacement Lamp Type No. : POA-LMP127 (Service Parts No. 610 339 8600...
... by grasping the handle. 4 Replace the lamp with a new one and tighten the 2 screws back into position. Make sure that the lamp is set properly. See "Resetting the Lamp Counter" on the projector. 6 Reset the lamp replacement counter. Allow the projector to the projector and turn on the next page . Lamp Cover Screw Handle Screw Screw Lamp ORDER REPLACEMENT LAMP Replacement lamp can be ordered through your projector : PLC-XC50 / PLC-XC55 ● Replacement Lamp Type No. : POA-LMP127 (Service Parts No. 610 339 8600...

Owner's Manual
Page 62
...;► buttons to move the red frame pointer to the Setting Menu icon. 2 Press the Point ▲▼ buttons to move the pointer to reset the Lamp replacement counter only after the projector has cooled down. (Follow carefully the instructions in which must be cleaned up , replace the lamp with a new one should check the inside of the lamp usage and the reset option. If you select "Reset", a "Lamp replacement counter Reset?" message appears...
...;► buttons to move the red frame pointer to the Setting Menu icon. 2 Press the Point ▲▼ buttons to move the pointer to reset the Lamp replacement counter only after the projector has cooled down. (Follow carefully the instructions in which must be cleaned up , replace the lamp with a new one should check the inside of the lamp usage and the reset option. If you select "Reset", a "Lamp replacement counter Reset?" message appears...

Owner's Manual
Page 65
... indicators blink, the projector cannot be turned on after turning on . - See if the input signal is not out of focus - Make sure the temperature is correctly output from a cool to warm place may need to change the setting for the monitor output when connecting to see page 48) - Problem No power The initial display is inserted. - See if the filter cartridge is not shown. Check the projection lamp...
... indicators blink, the projector cannot be turned on after turning on . - See if the input signal is not out of focus - Make sure the temperature is correctly output from a cool to warm place may need to change the setting for the monitor output when connecting to see page 48) - Problem No power The initial display is inserted. - See if the filter cartridge is not shown. Check the projection lamp...

Owner's Manual
Page 66
... not set ). (See pages 18, 53 and 54) 66 Appendix Image is Left/Right reversed Image is Top/Bottom reversed No sound The color is strange Some displays are not seen during operations Auto PC adjustment function does not work The setting does not remain after adjusting setting. Check the connection and the input signal to "Manual". Make sure "Off" is projected. - Press the VOLUME + button. (See page 23) - PIN code lock...
... not set ). (See pages 18, 53 and 54) 66 Appendix Image is Left/Right reversed Image is Top/Bottom reversed No sound The color is strange Some displays are not seen during operations Auto PC adjustment function does not work The setting does not remain after adjusting setting. Check the connection and the input signal to "Manual". Make sure "Off" is projected. - Press the VOLUME + button. (See page 23) - PIN code lock...

Owner's Manual
Page 71
...the POWER indicator lights red and the projector can be turned on. indicator keeps blinking.) Check and replace the filter. • • • green / orange / yellow • • • off . (The AC power cord is unplugged.) The projector is in the setting menu. The projector is detecting abnormal condition. The projector is operating normally. Indicators POWER red/green WARNING WARNING TEMP. When the filter is being scrolled, the Filter replacement icon and "Please wait..." Indicators POWER red/green WARNING TEMP. FILTER red orange LAMP REPLACE yellow...
...the POWER indicator lights red and the projector can be turned on. indicator keeps blinking.) Check and replace the filter. • • • green / orange / yellow • • • off . (The AC power cord is unplugged.) The projector is in the setting menu. The projector is detecting abnormal condition. The projector is operating normally. Indicators POWER red/green WARNING WARNING TEMP. When the filter is being scrolled, the Filter replacement icon and "Please wait..." Indicators POWER red/green WARNING TEMP. FILTER red orange LAMP REPLACE yellow...
Owner's Manual
Page 72
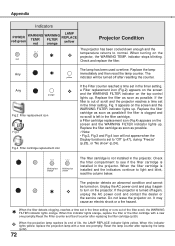
...a time set in the projector. Reset the lamp counter after replacing the filter cartridge (p.59). When the projection lamp reaches its end of scroll and the projector reaches a time set to turn on the projector, the WARNING TEMP. Appendix Indicators POWER red/green WARNING WARNING TEMP. When turning on the projector. Replace the filter cartridge as soon as possible. Check the filter compartment to normal. Do not leave the projector on the screen and the WARNING FILTER indicator lights up . red Check and replace the filter. blinking fast orange blinking fast...
...a time set in the projector. Reset the lamp counter after replacing the filter cartridge (p.59). When the projection lamp reaches its end of scroll and the projector reaches a time set to turn on the projector, the WARNING TEMP. Appendix Indicators POWER red/green WARNING WARNING TEMP. When turning on the projector. Replace the filter cartridge as soon as possible. Check the filter compartment to normal. Do not leave the projector on the screen and the WARNING FILTER indicator lights up . red Check and replace the filter. blinking fast orange blinking fast...

RS232C Extend
Page 13
... Get setting status of Blue Back Get setting status of Display Get setting status of Logo Get setting status of Ceiling Get setting status of Rear Get setting status of Standby Mode Get setting status of Power management Get setting time for Power management Get setting status of ON Start Get setting status of Closed caption channel Get setting status of Closed caption color Get Filter used time Get status of filter clogs Get the information for Filter replacement time Get time when Filter warning OSD is displayed Get number of remaining filter Get selected Remote Control Code...
... Get setting status of Blue Back Get setting status of Display Get setting status of Logo Get setting status of Ceiling Get setting status of Rear Get setting status of Standby Mode Get setting status of Power management Get setting time for Power management Get setting status of ON Start Get setting status of Closed caption channel Get setting status of Closed caption color Get Filter used time Get status of filter clogs Get the information for Filter replacement time Get time when Filter warning OSD is displayed Get number of remaining filter Get selected Remote Control Code...
RS232C Extend
Page 14
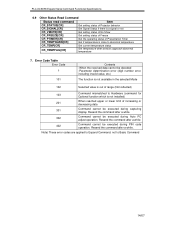
... Command cannot be executed during PIN code operation. Error Code Table Error Code ? 101 Contents -When the received data cannot be decoded -Parameter determination error (digit number error, including invalid value, etc.) The function is not available in the selected Mode 102 Selected value is out of increasing or decreasing data 301 Command cannot be executed during capturing display. PLC-XC50/55 Expand Serial Command Functional Specifications 6.9 Other Status Read Command Status read command...
... Command cannot be executed during PIN code operation. Error Code Table Error Code ? 101 Contents -When the received data cannot be decoded -Parameter determination error (digit number error, including invalid value, etc.) The function is not available in the selected Mode 102 Selected value is out of increasing or decreasing data 301 Command cannot be executed during capturing display. PLC-XC50/55 Expand Serial Command Functional Specifications 6.9 Other Status Read Command Status read command...


