Brochure
Page 1
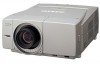
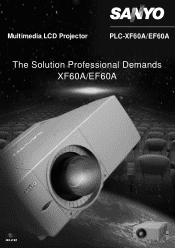
Multimedia LCD Projector PLC-XF60A/EF60A The Solution Professional Demands XF60A/EF60A
Multimedia LCD Projector PLC-XF60A/EF60A The Solution Professional Demands XF60A/EF60A
Brochure
Page 2
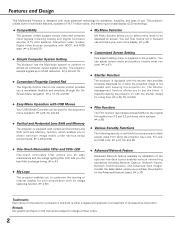
... 5 is required. Warp & Blending(Option) The PLC-XF60A/ EF60A projects images onto a screen with pixels having a 99.99% quality control rating. Safety Precautions Pixelworks ICs are using several projectors on the front panel for the PLC-XF60A/ EF60A's crisp, high-quality images. *In High Contrast ... for the PLC-EF60A 1300:1 Contrast Ratio The new mechanical shutter system helps SANYO's high-performance optical system achieve its horizontal axis in either direction-for more reason for easy access. The two UHP lamps combine with JIS X6911: 2003Data Projector Specifications Format....
... 5 is required. Warp & Blending(Option) The PLC-XF60A/ EF60A projects images onto a screen with pixels having a 99.99% quality control rating. Safety Precautions Pixelworks ICs are using several projectors on the front panel for the PLC-XF60A/ EF60A's crisp, high-quality images. *In High Contrast ... for the PLC-EF60A 1300:1 Contrast Ratio The new mechanical shutter system helps SANYO's high-performance optical system achieve its horizontal axis in either direction-for more reason for easy access. The two UHP lamps combine with JIS X6911: 2003Data Projector Specifications Format....

User Manual
Page 1
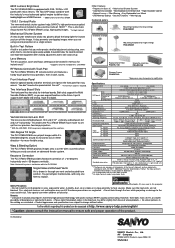
Multimedia Projector MODEL PLC-XF60A PLC-EF60A ✽ Projection lens is optional. Owner's Manual
Multimedia Projector MODEL PLC-XF60A PLC-EF60A ✽ Projection lens is optional. Owner's Manual
User Manual
Page 2
... or interval display for your own menu display. (☞ p.49) ◆ Customized Screen Setting Fine aspect setting menu is prepared in the projector. Remark Any graphic and figure in this book is either a registered trademark or a trademark of its image capturing function. (☞ p.50)... Easy Menu Operation with USB Mouse Your USB Mouse Controller can hide menus not in frequent use . Features and Design This Multimedia Projector is designed with vertical and horizontal Lens Shift and Lens Memory function, which enables you to obtain optimum image easily under various setup...
... or interval display for your own menu display. (☞ p.49) ◆ Customized Screen Setting Fine aspect setting menu is prepared in the projector. Remark Any graphic and figure in this book is either a registered trademark or a trademark of its image capturing function. (☞ p.50)... Easy Menu Operation with USB Mouse Your USB Mouse Controller can hide menus not in frequent use . Features and Design This Multimedia Projector is designed with vertical and horizontal Lens Shift and Lens Memory function, which enables you to obtain optimum image easily under various setup...
User Manual
Page 3
...Design 2 Table of Contents 3 To The Owner 4 Safety Instructions 5 Air Circulation 6 Setup In Proper Directions 6 Moving the Projector 7 Caution in Handling the Projector 7 Compliance 8 Preparation 9 Parts Name 9 Indicators 10 Top Control 11 Terminals 12 Remote Control 14 Remote Control Transmitter 16 Remote... Channel and ID Setup 16 Remote Control Battery Installation 17 Installation 18 Installation 18 Lens Installation 18 Positioning the Projector 18 Lens Shift Adjustment 19 Level Adjustable Feet 19 Connecting AC Power Cord 20 Connection Terminals 21 Interface Board ...
...Design 2 Table of Contents 3 To The Owner 4 Safety Instructions 5 Air Circulation 6 Setup In Proper Directions 6 Moving the Projector 7 Caution in Handling the Projector 7 Compliance 8 Preparation 9 Parts Name 9 Indicators 10 Top Control 11 Terminals 12 Remote Control 14 Remote Control Transmitter 16 Remote... Channel and ID Setup 16 Remote Control Battery Installation 17 Installation 18 Installation 18 Lens Installation 18 Positioning the Projector 18 Lens Shift Adjustment 19 Level Adjustable Feet 19 Connecting AC Power Cord 20 Connection Terminals 21 Interface Board ...

User Manual
Page 4
...projector cabinet for an extended time, unplug the projector from your projector, and can be maintained. This projector provides many convenient features and functions. Operating the projector properly enables you purchased the projector or the service center. REFER SERVICING TO QUALIFIED SERVICE PERSONNEL. Your SANYO... TOP REAR 3.3' (1m) 3.3' (1m) 3.3' (1m) 3.3' (1m) - CAUTION ON HANGING FROM THE CEILING When hanging the projector from the projection lens. Ne peut être utilisé dans une salle d'ordinateurs telle que définie dans la norme ANSI...
...projector cabinet for an extended time, unplug the projector from your projector, and can be maintained. This projector provides many convenient features and functions. Operating the projector properly enables you purchased the projector or the service center. REFER SERVICING TO QUALIFIED SERVICE PERSONNEL. Your SANYO... TOP REAR 3.3' (1m) 3.3' (1m) 3.3' (1m) 3.3' (1m) - CAUTION ON HANGING FROM THE CEILING When hanging the projector from the projection lens. Ne peut être utilisé dans une salle d'ordinateurs telle que définie dans la norme ANSI...

User Manual
Page 5
...fall, causing serious injury to a child or adult, and serious damage to dangerous voltage or other controls may cause hazards. Unplug this projector where the cord may touch dangerous voltage points or short out parts that are provided for example, in safe operating condition. Do not...to protect it from the type of airconditioning equipment. d. Use only with a cart or stand recommended by a qualified technician to restore the projector to rest on an unstable cart, stand, or table. Quick stops, excessive force, and uneven surfaces may expose you are required, be ...
...fall, causing serious injury to a child or adult, and serious damage to dangerous voltage or other controls may cause hazards. Unplug this projector where the cord may touch dangerous voltage points or short out parts that are provided for example, in safe operating condition. Do not...to protect it from the type of airconditioning equipment. d. Use only with a cart or stand recommended by a qualified technician to restore the projector to rest on an unstable cart, stand, or table. Quick stops, excessive force, and uneven surfaces may expose you are required, be ...

User Manual
Page 6
...provided for ventilation and to ensure reliable operation of the product and to protect it as below : 20˚ Do not tilt the projector more than 20 degrees from side to side. 20˚ Do not put on either side to project an image. Bottom Downward (Usual...) Front Upward Bottom Upward Front Downward Positioning Precautions When installing the projector, avoid positioning it from ventilation holes. - Do not touch a peripheral part of the exhaust vent, especially screws and metallic part. Improper positioning...
...provided for ventilation and to ensure reliable operation of the product and to protect it as below : 20˚ Do not tilt the projector more than 20 degrees from side to side. 20˚ Do not put on either side to project an image. Bottom Downward (Usual...) Front Upward Bottom Upward Front Downward Positioning Precautions When installing the projector, avoid positioning it from ventilation holes. - Do not touch a peripheral part of the exhaust vent, especially screws and metallic part. Improper positioning...
User Manual
Page 7
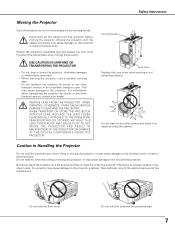
...Handle Lens Cover Replace the Lens cover when carrying or not using the projector. Do not hold the terminal cover when lifting or moving the projector. Safety Instructions Moving the Projector Carry the projector by two or more people by courier or any other transport service, consult...PLATE MAY CAUSE DUST TO GET INSIDE THE PROJECTOR AND RESULT IN MALFUNCTION OF THE PROJECTOR OR DAMAGE OF THE OPTICAL COMPONENTS INSIDE THE PROJECTOR. Moving the projector with the cables connected may result. - For information about transporting the projector by courier or any other transport service in ...
...Handle Lens Cover Replace the Lens cover when carrying or not using the projector. Do not hold the terminal cover when lifting or moving the projector. Safety Instructions Moving the Projector Carry the projector by two or more people by courier or any other transport service, consult...PLATE MAY CAUSE DUST TO GET INSIDE THE PROJECTOR AND RESULT IN MALFUNCTION OF THE PROJECTOR OR DAMAGE OF THE OPTICAL COMPONENTS INSIDE THE PROJECTOR. Moving the projector with the cables connected may result. - For information about transporting the projector by courier or any other transport service in ...

User Manual
Page 8
... green-and-yellow must be required to radio communications. If a replacement fuse cover is required, ensure it . If the plug supplied is marked with this projector meets the requirement for the United States and Canada : AC Power Cord used of the equipment. The wire which is detachable, never use in this...
... green-and-yellow must be required to radio communications. If a replacement fuse cover is required, ensure it . If the plug supplied is marked with this projector meets the requirement for the United States and Canada : AC Power Cord used of the equipment. The wire which is detachable, never use in this...

User Manual
Page 9
... vent. Pay attention to following to ensure proper ventilation and avoid a possible risk of fire and malfunction. ● Do not cover vent slots. ● Keep projector sides clear of any objects. Preparation Preparation Parts Name Front qw e Back y uy rt io !0 Bottom !1 q Remote Receiver w Projection Lens (Option) e Front Cover (inside ) !0 Lamp...
... vent. Pay attention to following to ensure proper ventilation and avoid a possible risk of fire and malfunction. ● Do not cover vent slots. ● Keep projector sides clear of any objects. Preparation Preparation Parts Name Front qw e Back y uy rt io !0 Bottom !1 q Remote Receiver w Projection Lens (Option) e Front Cover (inside ) !0 Lamp...

User Manual
Page 10
... (p.66) u LAMP 2 REPLACE indicator Turns orange when the life of the projector is abnormally high. (p.60, 65) e WARNING FILTER indicator Lights orange when the projector's filter is clogged with dust. (p.61, 66) r LAMP indicator - Turns a dim lighting when the projector is ready to be turned on . (p.65~67) t READY indicator - ... WARNING TEMP indicator Blinks red when the internal temperature of the projection Lamp 2 draws to an end. (p.62, 67) 10 Lights green when the projector is turned on and remains green lighting during operations. - Blinks green in the stand-by mode. -
... (p.66) u LAMP 2 REPLACE indicator Turns orange when the life of the projector is abnormally high. (p.60, 65) e WARNING FILTER indicator Lights orange when the projector's filter is clogged with dust. (p.61, 66) r LAMP indicator - Turns a dim lighting when the projector is ready to be turned on . (p.65~67) t READY indicator - ... WARNING TEMP indicator Blinks red when the internal temperature of the projection Lamp 2 draws to an end. (p.62, 67) 10 Lights green when the projector is turned on and remains green lighting during operations. - Blinks green in the stand-by mode. -
User Manual
Page 11
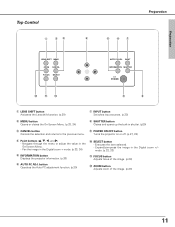
...Menu. (p.33, 34) i SHUTTER button Closes and opens up the built-in the Digital zoom + mode. (p.33, 34) t INFORMATION button Displays the projector information. (p.30) y AUTO PC ADJ. Pan the image in shutter. (p29) e CANCEL button o POWER ON-OFF button Cancels the selection and returns to... the previous menu. Executes the item selected. - Expand/compress the image in the On-Screen Menu. - Turns the projector on or off. (p.27, 28) r Point buttons (e, d, 7, and 8) - mode. (p.32, 33) !1 FOCUS button Adjusts focus of the image. (p.29) !2 ...
...Menu. (p.33, 34) i SHUTTER button Closes and opens up the built-in the Digital zoom + mode. (p.33, 34) t INFORMATION button Displays the projector information. (p.30) y AUTO PC ADJ. Pan the image in shutter. (p29) e CANCEL button o POWER ON-OFF button Cancels the selection and returns to... the previous menu. Executes the item selected. - Expand/compress the image in the On-Screen Menu. - Turns the projector on or off. (p.27, 28) r Point buttons (e, d, 7, and 8) - mode. (p.32, 33) !1 FOCUS button Adjusts focus of the image. (p.29) !2 ...

User Manual
Page 13
.... (p.25) ✽ A built-in micro processor which will shut down and restart the unit. When controling more than two projectors from a computer, connect the other projector to this terminal with the wired remote cable (not supplied) to be reset. Do not use the remote control as wired. ... is used for Optional Interface Board) Optional interface board can be installed into this slot. (p.21, 73) w INPUT 5 (Vacant for the projector maintenance. This can be done by pressing the RESET button with a serial cross cable (commercially available). u SERIAL PORT IN When controling the...
.... (p.25) ✽ A built-in micro processor which will shut down and restart the unit. When controling more than two projectors from a computer, connect the other projector to this terminal with the wired remote cable (not supplied) to be reset. Do not use the remote control as wired. ... is used for Optional Interface Board) Optional interface board can be installed into this slot. (p.21, 73) w INPUT 5 (Vacant for the projector maintenance. This can be done by pressing the RESET button with a serial cross cable (commercially available). u SERIAL PORT IN When controling the...
User Manual
Page 14
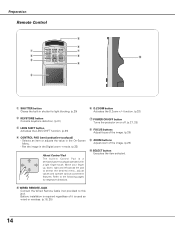
.... Battery installation is used as wired or wireless. (p.16, 25) 14 function. (p.32) w KEYSTONE button Corrects keystone distortion. (p.31) u POWER ON-OFF button Turns the projector on or off. (p.27, 28) e LENS SHIFT button Activates the LENS SHIFT function. (p.29) i FOCUS buttons Adjust focus of the image. (p.29) r CONTROL PAD (semiconductive...
.... Battery installation is used as wired or wireless. (p.16, 25) 14 function. (p.32) w KEYSTONE button Corrects keystone distortion. (p.31) u POWER ON-OFF button Turns the projector on or off. (p.27, 28) e LENS SHIFT button Activates the LENS SHIFT function. (p.29) i FOCUS buttons Adjust focus of the image. (p.29) r CONTROL PAD (semiconductive...
User Manual
Page 15
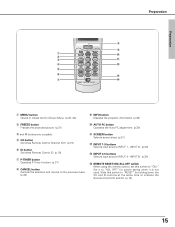
... 2 t CH REMOTE INPUT 5 INPUT 3 y ID !3 u !4 REMOTE RESET ON ALL OFF q MENU button Opens or closes the On-Screen Menu. (p.33, 34) o INFO button Displays the projector information. (p.30) w FREEZE button Freezes the projected picture. (p.31) !0 AUTO PC button Operates the Auto PC adjustment. (p.30) e and r buttons are unusable.
... 2 t CH REMOTE INPUT 5 INPUT 3 y ID !3 u !4 REMOTE RESET ON ALL OFF q MENU button Opens or closes the On-Screen Menu. (p.33, 34) o INFO button Displays the projector information. (p.30) w FREEZE button Freezes the projected picture. (p.31) !0 AUTO PC button Operates the Auto PC adjustment. (p.30) e and r buttons are unusable.

User Manual
Page 16
... Initialize the Remote Control ChVOLa. The Remote Control Channel selection prevents radio frequency interference from eight IDs. When interference between the projector and other equipment and the Remote Control ID selection allows you change the setting, set them again. Wired Remote Control Transmitter...While pressing the CH/ID button, press the SELECT button number of radio equipment is restricted, connecting the remote control and the projector with the wired remote cable (POA-CA-RC30) separatery supplied is recommended. (p.73) Connected with their respective remote controls without ...
... Initialize the Remote Control ChVOLa. The Remote Control Channel selection prevents radio frequency interference from eight IDs. When interference between the projector and other equipment and the Remote Control ID selection allows you change the setting, set them again. Wired Remote Control Transmitter...While pressing the CH/ID button, press the SELECT button number of radio equipment is restricted, connecting the remote control and the projector with the wired remote cable (POA-CA-RC30) separatery supplied is recommended. (p.73) Connected with their respective remote controls without ...

User Manual
Page 17
... the SELECT button. In case of failure in the compartment. If any other radio equipment using 2.4 GHz band away from the remote control and the projector. The remote control is not improved, try CH3 and CH4. Two AA size alkaline batteries For correct polarity (+ and -), be sure battery terminals are in...
... the SELECT button. In case of failure in the compartment. If any other radio equipment using 2.4 GHz band away from the remote control and the projector. The remote control is not improved, try CH3 and CH4. Two AA size alkaline batteries For correct polarity (+ and -), be sure battery terminals are in...

User Manual
Page 18
...lens specifications. Be sure that the keystone correction may lower the image resolution. (p.31) Do not expose the projection screen to the projector and the lens. It may cause serious damages to direct sunlight or excessive ambient lighting. Keystone function allows you to reflection and ...a place with sufficient strength to the projection screen. Otherwise, the projected image may cause serious injury or accidents. Do not move the projector with Smoke Resist Box (POA-SR-140) separately supplied is designed to project on an unstable stand, cart, or ceiling may be ...
...lens specifications. Be sure that the keystone correction may lower the image resolution. (p.31) Do not expose the projection screen to the projector and the lens. It may cause serious damages to direct sunlight or excessive ambient lighting. Keystone function allows you to reflection and ...a place with sufficient strength to the projection screen. Otherwise, the projected image may cause serious injury or accidents. Do not move the projector with Smoke Resist Box (POA-SR-140) separately supplied is designed to project on an unstable stand, cart, or ceiling may be ...
User Manual
Page 19
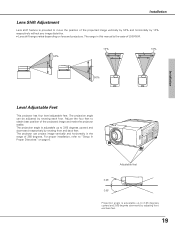
... image vertically by 50% and horizontally by rotating each foot. Adjust the four feet to "Setup In Proper Directions" on lens and projectors. The projector can be adjusted by 10% respectively without any image distortion. ✽ Lens shift range varies depending on page 6. For proper installation,... refer to obtain best position of the projected image and make the projector stable. Installation Lens Shift Adjustment Lens shift feature is the case of LNS-W04. 50% 10% 10% 50% Installation Level Adjustable Feet...
... image vertically by 50% and horizontally by rotating each foot. Adjust the four feet to "Setup In Proper Directions" on lens and projectors. The projector can be adjusted by 10% respectively without any image distortion. ✽ Lens shift range varies depending on page 6. For proper installation,... refer to obtain best position of the projected image and make the projector stable. Installation Lens Shift Adjustment Lens shift feature is the case of LNS-W04. 50% 10% 10% 50% Installation Level Adjustable Feet...


