
Owners Manual
Page 5
... PREPARATION 7 SELECTING COMPUTER SYSTEM COMPATIBLE COMPUTER SPECIFICATIONS 25 27 PC ADJUSTMENT 28 NAME OF EACH PART OF PROJECTOR 7 AUTO PC ADJUSTMENT 28 SETTING-UP PROJECTOR 8 MANUAL PC ADJUSTMENT 29 CONNECTING AC POWER CORD 8 PICTURE IMAGE ADJUSTMENT 31 LENS INSTALLATION 9 IMAGE...FILTER CARE AND CLEANING 43 CLEANING PROJECTION LENS 43 TURNING ON / OFF PROJECTOR 21 LAMP MANAGEMENT 44 ADJUSTING SCREEN 22 LAMP REPLACEMENT 45 ZOOM ADJUSTMENT 22 TROUBLESHOOTING 47 FOCUS ADJUSTMENT LENS SHIFT ADJUSTMENT 22 TECHNICAL SPECIFICATIONS 49 22 KEYSTONE ADJUSTMENT ...
... PREPARATION 7 SELECTING COMPUTER SYSTEM COMPATIBLE COMPUTER SPECIFICATIONS 25 27 PC ADJUSTMENT 28 NAME OF EACH PART OF PROJECTOR 7 AUTO PC ADJUSTMENT 28 SETTING-UP PROJECTOR 8 MANUAL PC ADJUSTMENT 29 CONNECTING AC POWER CORD 8 PICTURE IMAGE ADJUSTMENT 31 LENS INSTALLATION 9 IMAGE...FILTER CARE AND CLEANING 43 CLEANING PROJECTION LENS 43 TURNING ON / OFF PROJECTOR 21 LAMP MANAGEMENT 44 ADJUSTING SCREEN 22 LAMP REPLACEMENT 45 ZOOM ADJUSTMENT 22 TROUBLESHOOTING 47 FOCUS ADJUSTMENT LENS SHIFT ADJUSTMENT 22 TECHNICAL SPECIFICATIONS 49 22 KEYSTONE ADJUSTMENT ...
Owners Manual
Page 26
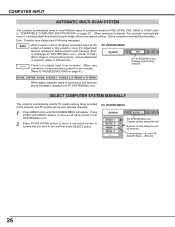
... Menu icon. When selecting Computer, this projector and PC system can be also selected manually. 1 Press MENU button and ON-SCREEN MENU will appear. D-VGA, D-SVGA, D-XGA, D-SXGA 1, D-SXGA 2, D-SXGA3 or D-UXGA When digital computer signal is received on DVI terminal, above message is required. (Refer to TROUBLESHOOTING on page 47.) PC SYSTEM MENU...
... Menu icon. When selecting Computer, this projector and PC system can be also selected manually. 1 Press MENU button and ON-SCREEN MENU will appear. D-VGA, D-SVGA, D-XGA, D-SXGA 1, D-SXGA 2, D-SXGA3 or D-UXGA When digital computer signal is received on DVI terminal, above message is required. (Refer to TROUBLESHOOTING on page 47.) PC SYSTEM MENU...

Owners Manual
Page 47
... problem still exists, check following chart. If both WARNING TEMP. G When turning a projector on . G Adjust audio source. If a projector still does not produce an image, re-start your dealer or service center for assistance, check matters below once again. 1. G Check WARNING TEMP. APPENDIX TROUBLESHOOTING Before calling your computer. 5. In such an event, leave...
... problem still exists, check following chart. If both WARNING TEMP. G When turning a projector on . G Adjust audio source. If a projector still does not produce an image, re-start your dealer or service center for assistance, check matters below once again. 1. G Check WARNING TEMP. APPENDIX TROUBLESHOOTING Before calling your computer. 5. In such an event, leave...

Owners Manual
Page 48
...not too far from Remote Control Unit. (See "SETTING" section on Remote Control Unit is Listed by Underwriters Laboratories Inc. If a projector fails to obtain service. Give model number and explain difficulty. G Check ALL-OFF switch on page 40.) G Check cable connection between ... The CE Mark is necessary, contact Sanyo Service Station or store where you how to work properly, see "TROUBLESHOOTING" section on the nameplate means the product is set to operate this projector. Do not attempt to meet rigid U.L. G Turn a projector on before turning on your computer. ...
...not too far from Remote Control Unit. (See "SETTING" section on Remote Control Unit is Listed by Underwriters Laboratories Inc. If a projector fails to obtain service. Give model number and explain difficulty. G Check ALL-OFF switch on page 40.) G Check cable connection between ... The CE Mark is necessary, contact Sanyo Service Station or store where you how to work properly, see "TROUBLESHOOTING" section on the nameplate means the product is set to operate this projector. Do not attempt to meet rigid U.L. G Turn a projector on before turning on your computer. ...