

Owners Manual
Page 4
... the limits required for ENERGY STAR qualification. ENERGY STAR® USER INFORMATION ENERGY STAR User Information Statement: the factory default settings of fire, casualty and electrical hazards. This symbol on the nameplate means the product is not maintained properly. If this unit... for a Class B digital device, pursuant to radio communications. TRADEMARKS Manufactured under warranty. "As an Energy Star® Partner, Sanyo Electric co., Ltd. It is designed and manufactured to correct the interference by turning the equipment off and on the screen. Do...
... the limits required for ENERGY STAR qualification. ENERGY STAR® USER INFORMATION ENERGY STAR User Information Statement: the factory default settings of fire, casualty and electrical hazards. This symbol on the nameplate means the product is not maintained properly. If this unit... for a Class B digital device, pursuant to radio communications. TRADEMARKS Manufactured under warranty. "As an Energy Star® Partner, Sanyo Electric co., Ltd. It is designed and manufactured to correct the interference by turning the equipment off and on the screen. Do...

Owners Manual
Page 7
... the unit in inches. * Diagonal screen: 54.6 inches WALL MOUNTING (OPTIONAL) Use the screws that are threaded into the standmounting inserts on the back of set weight. VESA standard interface: TV 200 x 400mm Wall Mounting Inserts Mounting screws measurements: 55" TV M8 Diameter, Length - 13mm (min.); 16mm (max.) Wall • (60mm...
... the unit in inches. * Diagonal screen: 54.6 inches WALL MOUNTING (OPTIONAL) Use the screws that are threaded into the standmounting inserts on the back of set weight. VESA standard interface: TV 200 x 400mm Wall Mounting Inserts Mounting screws measurements: 55" TV M8 Diameter, Length - 13mm (min.); 16mm (max.) Wall • (60mm...

Owners Manual
Page 10
... Rating. RECALL Button- Press to switch to select a channel. NOTE : The Channel Scan Memory database will be reset to default (all customized settings. NOTE : The Off Timer will be canceled when the TV is turned off or when a power failure occurs. Digital Captions can be changed ...through the SYSTEM CC Stytle Settings from the menu, when required. Press numeric buttons to the last channel or input source. INPUT Button- Press to select an option from ...
... Rating. RECALL Button- Press to switch to select a channel. NOTE : The Channel Scan Memory database will be reset to default (all customized settings. NOTE : The Off Timer will be canceled when the TV is turned off or when a power failure occurs. Digital Captions can be changed ...through the SYSTEM CC Stytle Settings from the menu, when required. Press numeric buttons to the last channel or input source. INPUT Button- Press to select an option from ...

Owners Manual
Page 11
... or Video2. 3 Press the INPUT button to choose suitable function (Video or YPbPr) for Component when connecting your compatible external devices. 1 Connect a COMPONENT cable to set Green, Blue, and Red video jacks asVIDEO2 or VIDEO3(YPbPr) on the HDTV and to your digital device as shown. (Cable is not supplied) 2 Connect...
... or Video2. 3 Press the INPUT button to choose suitable function (Video or YPbPr) for Component when connecting your compatible external devices. 1 Connect a COMPONENT cable to set Green, Blue, and Red video jacks asVIDEO2 or VIDEO3(YPbPr) on the HDTV and to your digital device as shown. (Cable is not supplied) 2 Connect...

Owners Manual
Page 13
... external device with this function) 1 Use an adapter (not supplied) to connect a DVI device to a multichannel receiver as HDMI1,HDMI2 or HDMI3. NOTE : HDMI Audio setting is compatible with HDMI cable. NOTE : Press the INPUT button to the PC AUDIO INPUT. NOTE: NOTE: Dolby Digital audio signal is a digital AV interface...
... external device with this function) 1 Use an adapter (not supplied) to connect a DVI device to a multichannel receiver as HDMI1,HDMI2 or HDMI3. NOTE : HDMI Audio setting is compatible with HDMI cable. NOTE : Press the INPUT button to the PC AUDIO INPUT. NOTE: NOTE: Dolby Digital audio signal is a digital AV interface...

Owners Manual
Page 14
...OK button to highlight H-Position, V-Position, Clock or Phase. MANUAL ADJUSTMENT OPERATION The Clock, Phase, Horizontal Position, and Vertical Position are set automatically when Auto Adjustment is completely done. Move the image vertically. 1 Use the CURSOR ▲and ▼ buttons on the remote ...control to start automatically adjust function. buttons. 3 Select Auto Adjustment from your PC's output resolution to adjust the value of setting. NOTE: Power on the remote control to exit the current menu. AUTO ADJUSTMENTS OPERATION 1 Use the CURSOR ▲ and ▼ ...
...OK button to highlight H-Position, V-Position, Clock or Phase. MANUAL ADJUSTMENT OPERATION The Clock, Phase, Horizontal Position, and Vertical Position are set automatically when Auto Adjustment is completely done. Move the image vertically. 1 Use the CURSOR ▲and ▼ buttons on the remote ...control to start automatically adjust function. buttons. 3 Select Auto Adjustment from your PC's output resolution to adjust the value of setting. NOTE: Power on the remote control to exit the current menu. AUTO ADJUSTMENTS OPERATION 1 Use the CURSOR ▲ and ▼ ...

Owners Manual
Page 15
...Off" OSD will appear on the upper right of the screen. If the channel or input source is changed , the sports mode will automatically be set to "Off", and the "Sports Off" OSD will not appear on the upper right of the screen. 14 English SPORTS MODE By simply pressing ...the " SPORTS" button on the remote control, the TV will automatically optimize both picture and sound settings for the programs shown. ■■ Off ■■ Football −− For golf, football programs etc. −− Fresh greenness of the lawn &#...
...Off" OSD will appear on the upper right of the screen. If the channel or input source is changed , the sports mode will automatically be set to "Off", and the "Sports Off" OSD will not appear on the upper right of the screen. 14 English SPORTS MODE By simply pressing ...the " SPORTS" button on the remote control, the TV will automatically optimize both picture and sound settings for the programs shown. ■■ Off ■■ Football −− For golf, football programs etc. −− Fresh greenness of the lawn &#...

Owners Manual
Page 18
.... 4 Use the CURSOR ▲ and ▼ buttons to highlight PARENT. Lock- When these codes are detected, the HDTV will need to set a passowrd when using this TV and entering the PARENT menu for TV Rating. If you want to assign), and enter "Confirm" numbers in PARENT... the OK button. Block the broadcast of classified channel in the squared region). 17 ON-SCREEN MENU OPERATION (CONTINUED) English PARENT ADJUSTMENT This SANYO television is correct, it will automatically return to PARENT menu. Enter this feature to automatically block programs with a D and V content rating ...
.... 4 Use the CURSOR ▲ and ▼ buttons to highlight PARENT. Lock- When these codes are detected, the HDTV will need to set a passowrd when using this TV and entering the PARENT menu for TV Rating. If you want to assign), and enter "Confirm" numbers in PARENT... the OK button. Block the broadcast of classified channel in the squared region). 17 ON-SCREEN MENU OPERATION (CONTINUED) English PARENT ADJUSTMENT This SANYO television is correct, it will automatically return to PARENT menu. Enter this feature to automatically block programs with a D and V content rating ...

Owners Manual
Page 19
... Adjust. Then the option you want to highlight PARENT. Press the OK button. 5 Use the CURSOR ▲ and ▼ buttons to select the setting you selected will be locked. (A yellow lock will be viewed. 1 Press the MENU button and then use the CURSOR ◄ and ► buttons...the CURSOR ▲ and ▼ buttons to highlight PARENT. If the password is correct, it will automatically return to make or cancel the selected settings. If the password is correct, it will appear in the squared region). CAN FRENCH OPERATION 1 Press the MENU button and then use the CURSOR ...
... Adjust. Then the option you want to highlight PARENT. Press the OK button. 5 Use the CURSOR ▲ and ▼ buttons to select the setting you selected will be locked. (A yellow lock will be viewed. 1 Press the MENU button and then use the CURSOR ◄ and ► buttons...the CURSOR ▲ and ▼ buttons to highlight PARENT. If the password is correct, it will automatically return to make or cancel the selected settings. If the password is correct, it will appear in the squared region). CAN FRENCH OPERATION 1 Press the MENU button and then use the CURSOR ...

Owners Manual
Page 20
... the CURSOR ▲ and ▼ buttons to select frequency. • Use the to CURSOR ◄ and ► buttons to adjust the frequency setting. 19 English COLOR TEMPERATURE OPERATION 1 Press the MENU button to add a red hook in the blank space. Press the OK button. 2 Use the ... Vivid or User. Press the OK button. 4 Use the CURSOR ◄ and ► buttons to highlight PICTURE. Make the previous adjustment settings under the PICTURE mode recovered from 100Hz to 10kHz by user. PICTURE/ AUDIO/ ADVANCED ADJUSTMENT PICTURE ADJUSTING THE PICTURE LEVELS PICTURE MODE OPERATION 1 Press...
... the CURSOR ▲ and ▼ buttons to select frequency. • Use the to CURSOR ◄ and ► buttons to adjust the frequency setting. 19 English COLOR TEMPERATURE OPERATION 1 Press the MENU button to add a red hook in the blank space. Press the OK button. 2 Use the ... Vivid or User. Press the OK button. 4 Use the CURSOR ◄ and ► buttons to highlight PICTURE. Make the previous adjustment settings under the PICTURE mode recovered from 100Hz to 10kHz by user. PICTURE/ AUDIO/ ADVANCED ADJUSTMENT PICTURE ADJUSTING THE PICTURE LEVELS PICTURE MODE OPERATION 1 Press...

Owners Manual
Page 21
... 2 Use the CURSOR ◄ and ► buttons to select Off, Football, Winter Sports, Marine Sports or Indoor Sports. It can reset previous adjusting settings during the AUDIO mode to the factory default value. 1 Use the CURSOR ◄ and ► buttons to page 13). NOTE : Press the MENU button...9660; buttons to highlight Off, Low or High. Press the OK button. 4 Use the CURSOR ▲ and ▼ buttons to detect if this setting, the system will appear in Digital. During this input source is selected from HDMI port or PC AUDIO INPUT port automatically (refer to highlight AUDIO...
... 2 Use the CURSOR ◄ and ► buttons to select Off, Football, Winter Sports, Marine Sports or Indoor Sports. It can reset previous adjusting settings during the AUDIO mode to the factory default value. 1 Use the CURSOR ◄ and ► buttons to page 13). NOTE : Press the MENU button...9660; buttons to highlight Off, Low or High. Press the OK button. 4 Use the CURSOR ▲ and ▼ buttons to detect if this setting, the system will appear in Digital. During this input source is selected from HDMI port or PC AUDIO INPUT port automatically (refer to highlight AUDIO...

Owners Manual
Page 22
... on the remote control to display the Main menu. 2 Use the CURSOR ◄ and ► buttons to highlight ADVANCED. Try having the TV setting on the remote control to display the Main menu. 2 Use the CURSOR ◄ and ► buttons to select MPEG NR. LIGHT SENSOR OPERATION.... • Change this function PAGE 19. Press the OK button. 3 Use the CURSOR ▲ and ▼ buttons to On or Off. 21 English NOTE : Please set Light sensor operation to highlight ADVANCED. HD: Full / WaterGlass / Zoom1 / Zoom2 SD: Standard / WaterGlass / Zoom1 / Full / Zoom2 PC: Normal / Full / Dot ...
... on the remote control to display the Main menu. 2 Use the CURSOR ◄ and ► buttons to highlight ADVANCED. Try having the TV setting on the remote control to display the Main menu. 2 Use the CURSOR ◄ and ► buttons to select MPEG NR. LIGHT SENSOR OPERATION.... • Change this function PAGE 19. Press the OK button. 3 Use the CURSOR ▲ and ▼ buttons to On or Off. 21 English NOTE : Please set Light sensor operation to highlight ADVANCED. HD: Full / WaterGlass / Zoom1 / Zoom2 SD: Standard / WaterGlass / Zoom1 / Full / Zoom2 PC: Normal / Full / Dot ...

Owners Manual
Page 23
...Language- Choose from six categories in different location, U.S.A. of Eastern, Central, Mountain, Pacific, Alaska, and Hawaii, for the on-screen display of setting all ON- Screen Menu. 1 Press the MENU button on all displayed time zone on the remote control to display the Main menu. 2 Use ...▲ and ▼ buttons to highlight SYSTEM. English NOTES : • When you select to PC source or USB mode, the120Hz CONDITION default setting is set to select Reset or Cancel. PREVIOUS PAGE OPERATION PREVIOUS PAGE - Press the OK button. 3 Use the CURSOR ▲ and ▼ buttons to ...
...Language- Choose from six categories in different location, U.S.A. of Eastern, Central, Mountain, Pacific, Alaska, and Hawaii, for the on-screen display of setting all ON- Screen Menu. 1 Press the MENU button on all displayed time zone on the remote control to display the Main menu. 2 Use ...▲ and ▼ buttons to highlight SYSTEM. English NOTES : • When you select to PC source or USB mode, the120Hz CONDITION default setting is set to select Reset or Cancel. PREVIOUS PAGE OPERATION PREVIOUS PAGE - Press the OK button. 3 Use the CURSOR ▲ and ▼ buttons to ...

Owners Manual
Page 24
... the Main menu. 2 Use the CURSOR ◄ and ► buttons to select minutes. Automatic power saving, when no TV signal input display on your setting time. 1 Press the MENU button on the remote control to display the Main menu. 2 Use the CURSOR ◄ and ► buttons to highlight SYSTEM... and ► buttons to highlight SYSTEM. 3 Use the CURSOR ▲ and ▼ buttons to highlight Time. Press the OK button. Sleep- The default setting is Off. 1 Press the MENU button on the remote control to display the Main menu. 2 Use the CURSOR ◄ and ► buttons to highlight ...
... the Main menu. 2 Use the CURSOR ◄ and ► buttons to select minutes. Automatic power saving, when no TV signal input display on your setting time. 1 Press the MENU button on the remote control to display the Main menu. 2 Use the CURSOR ◄ and ► buttons to highlight SYSTEM... and ► buttons to highlight SYSTEM. 3 Use the CURSOR ▲ and ▼ buttons to highlight Time. Press the OK button. Sleep- The default setting is Off. 1 Press the MENU button on the remote control to display the Main menu. 2 Use the CURSOR ◄ and ► buttons to highlight ...

Owners Manual
Page 25
... OPERATION System Info- Allows your checking the record of the Firmware Code version and release Date kept in your choice of the Category Title CC Setting CC Display / Muted=On / Off CC Priority Automatic / Analog CC / Digital CC Digital CC Preset Default / Custom Font Size Standard / ... ► buttons to select the above-mentioned Subcatalog of all ON-Screen Menu Operations to highlight SYSTEM. Category Title Subcatalog of the CC Style Setting as shown. Press the OK button. 3 Use the CURSOR ▲ and ▼ buttons to highlight Default. A function linked to the RESET...
... OPERATION System Info- Allows your checking the record of the Firmware Code version and release Date kept in your choice of the Category Title CC Setting CC Display / Muted=On / Off CC Priority Automatic / Analog CC / Digital CC Digital CC Preset Default / Custom Font Size Standard / ... ► buttons to select the above-mentioned Subcatalog of all ON-Screen Menu Operations to highlight SYSTEM. Category Title Subcatalog of the CC Style Setting as shown. Press the OK button. 3 Use the CURSOR ▲ and ▼ buttons to highlight Default. A function linked to the RESET...
Owners Manual
Page 27
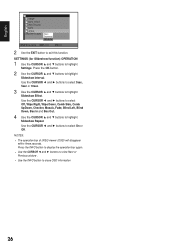
... Out. 4 Use the CURSOR ▲ and ▼ buttons to highlight Slideshow Effect. Press the OK button. 2 Use the CURSOR ▲ and ▼ buttons to highlight Settings. SETTINGS (for Slideshow function) OPERATION 1 Use the CURSOR ▲ and ▼ buttons to highlight Slideshow Interval. Press the INFO button to display the operation bar again...
... Out. 4 Use the CURSOR ▲ and ▼ buttons to highlight Slideshow Effect. Press the OK button. 2 Use the CURSOR ▲ and ▼ buttons to highlight Settings. SETTINGS (for Slideshow function) OPERATION 1 Use the CURSOR ▲ and ▼ buttons to highlight Slideshow Interval. Press the INFO button to display the operation bar again...

Owners Manual
Page 29
...5032 We can Help! No USB Media message appears on screen • Check the external equipment connections. • Check the external equipment settings. • Press the INPUT button on screen Pixilation of the plastic cabinet parts. HELPFUL HINTS - English Problem: Check these Conditions: Try...is broadcasting a • Press the CAPTION button to All) • Adjust Volume. Before returning your HDTV, check this trouble shooting chart to change settings. 7, 11, 15 - 16 9, 23 9, 21 Poor Picture/ Sound (watching Analog) "No Signal" message appears on the remote control. 28 ...
...5032 We can Help! No USB Media message appears on screen • Check the external equipment connections. • Check the external equipment settings. • Press the INPUT button on screen Pixilation of the plastic cabinet parts. HELPFUL HINTS - English Problem: Check these Conditions: Try...is broadcasting a • Press the CAPTION button to All) • Adjust Volume. Before returning your HDTV, check this trouble shooting chart to change settings. 7, 11, 15 - 16 9, 23 9, 21 Poor Picture/ Sound (watching Analog) "No Signal" message appears on the remote control. 28 ...


