

Owners Manual
Page 4
... outside antenna system, extreme care should be mounted to keep from touching such power lines or circuits as practical." 3 When the MAINS plug is provided to call CATV system installer's attention to Article 820-40 of the NEC that provides guideline for proper grounding and , in particular, specifies that the cable ground shall be connected to the...
... outside antenna system, extreme care should be mounted to keep from touching such power lines or circuits as practical." 3 When the MAINS plug is provided to call CATV system installer's attention to Article 820-40 of the NEC that provides guideline for proper grounding and , in particular, specifies that the cable ground shall be connected to the...
Owners Manual
Page 5
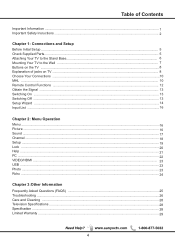
... ...2 Chapter 1: Connections and Setup Before Initial Setup ...5 Check Supplied Parts...5 Attaching Your TV to the Stand Base 6 Mounting Your TV to the Wall ...7 Buttons on the TV ...8 Explanation of jacks on TV ...8 Choose Your Connections ...10 MHL ...10 Remote Control Functions ...12 Obtain the Signal ...13 Switching On ...13 Switching Off ...13 Setup Wizard ...14 Input List ...16 Chapter 2: Menu Operation Menu ...16 Picture ...16 Sound ...17 Channel ...18 Setup ...19 Lock ...20 Help ...21 PC ...22 VIDEO/HDMI ...23 USB ...23...
... ...2 Chapter 1: Connections and Setup Before Initial Setup ...5 Check Supplied Parts...5 Attaching Your TV to the Stand Base 6 Mounting Your TV to the Wall ...7 Buttons on the TV ...8 Explanation of jacks on TV ...8 Choose Your Connections ...10 MHL ...10 Remote Control Functions ...12 Obtain the Signal ...13 Switching On ...13 Switching Off ...13 Setup Wizard ...14 Input List ...16 Chapter 2: Menu Operation Menu ...16 Picture ...16 Sound ...17 Channel ...18 Setup ...19 Lock ...20 Help ...21 PC ...22 VIDEO/HDMI ...23 USB ...23...

Owners Manual
Page 7
... (5mm) Diameter , Length-16mm (maximum) x 4 pcs 6 Model Mounting screws measurements DP39D14 DP42D24 DP50E44 DP55D44 ①M5 (5mm) Diameter, Length-12mm (maximum) ②M4 (4mm) Diameter, Length-20mm (maximum) Note:Stand base screws are located in the literature package. stand Base base unassembled table ① ② Note:The picture of stand installation is just for the reference, please base on the material object for the...
... (5mm) Diameter , Length-16mm (maximum) x 4 pcs 6 Model Mounting screws measurements DP39D14 DP42D24 DP50E44 DP55D44 ①M5 (5mm) Diameter, Length-12mm (maximum) ②M4 (4mm) Diameter, Length-20mm (maximum) Note:Stand base screws are located in the literature package. stand Base base unassembled table ① ② Note:The picture of stand installation is just for the reference, please base on the material object for the...

Owners Manual
Page 8
Recommendation to the fact that the mounting measurements are 400mm horizontally and 200mm vertically. DP39D14 DP42D24 DP50E44 DP55D44 DP58D34 DP65E34 2 2 M6 2 2 M6 4 2 M6 2 2 M6 4 2 M6 4 4 M6 The VESA number is the horizontal and vertical measurement of the mounting holes. For example, 400x200 refers to buy screws: DP39D14 M6X18.max(20mm) DP42D24 M6X18.max(20mm) DP50E44 M6X18.max(18mm) DP55D44 M6X18.max(20mm) DP58D34 M6X18.max(20mm) DP65E34 M6X15.max(15mm) For model DP58D34, please remove neck cover and stand neck before mounting. 7
Recommendation to the fact that the mounting measurements are 400mm horizontally and 200mm vertically. DP39D14 DP42D24 DP50E44 DP55D44 DP58D34 DP65E34 2 2 M6 2 2 M6 4 2 M6 2 2 M6 4 2 M6 4 4 M6 The VESA number is the horizontal and vertical measurement of the mounting holes. For example, 400x200 refers to buy screws: DP39D14 M6X18.max(20mm) DP42D24 M6X18.max(20mm) DP50E44 M6X18.max(18mm) DP55D44 M6X18.max(20mm) DP58D34 M6X18.max(20mm) DP65E34 M6X15.max(15mm) For model DP58D34, please remove neck cover and stand neck before mounting. 7

Owners Manual
Page 10
... power audio equipment. OPTICAL OUTPUT:It is shared with MHL Device. USB Allows you must have a device which supports HDMI ARC, then connect it to connect a compatible mass storage device for the display of your ARC sound device system. The TV can be outputted on the TV. Please adjust the volume directly on the side of an integrated mini-plug cable. AUDIO OUTPUT the socket provides composite audio connection. Please do not connect headphones directly to output audio...
... power audio equipment. OPTICAL OUTPUT:It is shared with MHL Device. USB Allows you must have a device which supports HDMI ARC, then connect it to connect a compatible mass storage device for the display of your ARC sound device system. The TV can be outputted on the TV. Please adjust the volume directly on the side of an integrated mini-plug cable. AUDIO OUTPUT the socket provides composite audio connection. Please do not connect headphones directly to output audio...

Owners Manual
Page 11
... for guaranteed operation with connected MHL-compatible device. Please refer to the device manual for details. • You can continue charging the MHL-compatible device even when the TV is in standby mode. • This product is connected to HDMI I2 (MHL) jack. • You can use the TV remote control to control the connected MHL -compatible device. • If "MHL Equipment Control"(P20) is set to...
... for guaranteed operation with connected MHL-compatible device. Please refer to the device manual for details. • You can continue charging the MHL-compatible device even when the TV is in standby mode. • This product is connected to HDMI I2 (MHL) jack. • You can use the TV remote control to control the connected MHL -compatible device. • If "MHL Equipment Control"(P20) is set to...

Owners Manual
Page 12
(*MHL) 3 VIDEO INPUT INPUT List Video 3 REMARK: Due to slim back cover, we recommend connecting the PC with a standard VGA cable, avoiding cables with thicker connectors/plugs. (For Model: DP50E44, DP55D44, DP58D34, DP65E34) 11
(*MHL) 3 VIDEO INPUT INPUT List Video 3 REMARK: Due to slim back cover, we recommend connecting the PC with a standard VGA cable, avoiding cables with thicker connectors/plugs. (For Model: DP50E44, DP55D44, DP58D34, DP65E34) 11

Owners Manual
Page 13
Controls playback on Roku or playing photos in the USB menu. 12 SMART Return to the previous screen. When using Roku, goes back to the Home screen for Roku. the menu and Roku control. /OK * Special function for Roku. RECALL press the RECALL button return to select the desired option. Press to open the Input list, then press / to the previously viewed channel and replay for Roku.
Controls playback on Roku or playing photos in the USB menu. 12 SMART Return to the previous screen. When using Roku, goes back to the Home screen for Roku. the menu and Roku control. /OK * Special function for Roku. RECALL press the RECALL button return to select the desired option. Press to open the Input list, then press / to the previously viewed channel and replay for Roku.

Owners Manual
Page 15
... the TV's inputs and switch them on the remote control to the terminals. then press ENTER /OK to continue to choose between an Air or Cable search. Setup Wizard Connect an RF cable to select the desired location setting("Home Mode or "Store Mode"); Press ENTER button to setup your choice and then press ENTER/OK key. Quick setup (Advanced users) Setp by step" to go . Use ◄/►...
... the TV's inputs and switch them on the remote control to the terminals. then press ENTER /OK to continue to choose between an Air or Cable search. Setup Wizard Connect an RF cable to select the desired location setting("Home Mode or "Store Mode"); Press ENTER button to setup your choice and then press ENTER/OK key. Quick setup (Advanced users) Setp by step" to go . Use ◄/►...

Owners Manual
Page 16
Press Repeat button to set up your new television. Connection check phase: Video please turn on the power of apparatus and check connection. DVD/Blu-ray GAME Y (VIDEO) Pb Pr L R Composite Component Video HDMI 1 HDMI 2/MHL HDMI 3 Previous Please choose a connection method. Choose"Quick setup"or"Step by setp chosen) Looking for a high definition picture? DVD/Blu-ray GAME Video HDMI 1 HDMI 2/MHL HDMI 3 Previous At least one connection cannot be more detailed. If any connection is chosen, options...
Press Repeat button to set up your new television. Connection check phase: Video please turn on the power of apparatus and check connection. DVD/Blu-ray GAME Y (VIDEO) Pb Pr L R Composite Component Video HDMI 1 HDMI 2/MHL HDMI 3 Previous Please choose a connection method. Choose"Quick setup"or"Step by setp chosen) Looking for a high definition picture? DVD/Blu-ray GAME Video HDMI 1 HDMI 2/MHL HDMI 3 Previous At least one connection cannot be more detailed. If any connection is chosen, options...

Owners Manual
Page 17
... to parent menu.) Picture Sound Channel Setup Lock Help Picture Mode Brightness Contrast Color Tint Sharpness Color Temperature Backlight Detailed Setting Power Saving 50 50 50 50 50 Normal 90 Move Select MENU Return 3.While Picture Mode is "manual",Press / button to select among TV/VIDEO /HDMI 1/HDMI 2/HDMI 3/PC/USB Menu Power Saving Standard Vivid Mild Select to change . Press / button to do the process again, please choose Repeat. Picture Sound Channel Setup Lock Help 1. Note: "Power Saving"make this product qualify for ENERGY STAR, if you need to select(Power...
... to parent menu.) Picture Sound Channel Setup Lock Help Picture Mode Brightness Contrast Color Tint Sharpness Color Temperature Backlight Detailed Setting Power Saving 50 50 50 50 50 Normal 90 Move Select MENU Return 3.While Picture Mode is "manual",Press / button to select among TV/VIDEO /HDMI 1/HDMI 2/HDMI 3/PC/USB Menu Power Saving Standard Vivid Mild Select to change . Press / button to do the process again, please choose Repeat. Picture Sound Channel Setup Lock Help 1. Note: "Power Saving"make this product qualify for ENERGY STAR, if you need to select(Power...

Owners Manual
Page 18
... moderate video noise. Warm Produces a red-hued image. Sound 1.Press MENU to enter the main menu, Press / buttonto select. 2.Press to enter. (Press MENU again to exit or back to parent menu.) Picture Sound Channel Setup Lock Help Sound Mode Bass Treble Balance MTS Audio Language Surround Sound ARC/CEC Setting Auto Volume Control Standard 50 50 0 Stereo English RAW Off Off Off Move Select MENU Return 3.While Sound mode is automatically switched to adjust. 【Color】 Adjust the color intensity of the picture. Enhanced...
... moderate video noise. Warm Produces a red-hued image. Sound 1.Press MENU to enter the main menu, Press / buttonto select. 2.Press to enter. (Press MENU again to exit or back to parent menu.) Picture Sound Channel Setup Lock Help Sound Mode Bass Treble Balance MTS Audio Language Surround Sound ARC/CEC Setting Auto Volume Control Standard 50 50 0 Stereo English RAW Off Off Off Move Select MENU Return 3.While Sound mode is automatically switched to adjust. 【Color】 Adjust the color intensity of the picture. Enhanced...
Owners Manual
Page 19
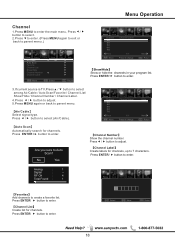
... a favorite list. Analog : 1 Digital : -- RF CH : 4 Total Found : 1 Picture Sound Channel Setup Lock Help 【Favorites】 Add channels to select (Air/Cable). Press ENTER / button to enter. Press ENTER/ button to enter. Menu Operation Channel 1.Press MENU to enter the main menu, Press / button to select. 2.Press to enter. (Press MENU again to exit or back to parent menu.) Picture Sound Channel Setup Lock Help Air/Cable Air Auto Scan Favorite Channel List Show/Hide Channel Number Channel Label Move Select MENU Return Picture Sound Channel...
... a favorite list. Analog : 1 Digital : -- RF CH : 4 Total Found : 1 Picture Sound Channel Setup Lock Help 【Favorites】 Add channels to select (Air/Cable). Press ENTER / button to enter. Press ENTER/ button to enter. Menu Operation Channel 1.Press MENU to enter the main menu, Press / button to select. 2.Press to enter. (Press MENU again to exit or back to parent menu.) Picture Sound Channel Setup Lock Help Air/Cable Air Auto Scan Favorite Channel List Show/Hide Channel Number Channel Label Move Select MENU Return Picture Sound Channel...

Owners Manual
Page 20
...color of the digital Closed Captioning font. Press / button to enter. BG Color Adjust the digital Closed Captioning background color. Option Adjust the digital Closed Captioning setting. Picture Sound Channel Setup Lock Help Menu Language Closed Caption Over Scan Input Label Other Settings Restore Default Setup Wizard Sleep Timer Move English Off Off Select MENU Return 3.Press / button to select among Menu Language / Closed Caption /Over Scan/Input Label / Other settings /Restore Default /Setup Wizard / Sleep Timer. 4.Press / button to adjust. 5.Press MENU again or back to parent...
...color of the digital Closed Captioning font. Press / button to enter. BG Color Adjust the digital Closed Captioning background color. Option Adjust the digital Closed Captioning setting. Picture Sound Channel Setup Lock Help Menu Language Closed Caption Over Scan Input Label Other Settings Restore Default Setup Wizard Sleep Timer Move English Off Off Select MENU Return 3.Press / button to select among Menu Language / Closed Caption /Over Scan/Input Label / Other settings /Restore Default /Setup Wizard / Sleep Timer. 4.Press / button to adjust. 5.Press MENU again or back to parent...

Owners Manual
Page 21
... the code the enter a new 4-digital password then re-enter it to select(On / Off). Press / button to enter. 20 Press ENTER/ button to select(UnBlock / Block). MHL Equipment Control Press / button to parent menu. Default password is "on /off . When you turn off automatically. Press / button to select. Press / button to select(Off / On). Store Demo About this TV set presentation. Press ENTER/ button to parent menu.) Picture Sound Channel Setup Lock Help Enter Password ----- 0-9 MENU Return Picture Sound Channel Setup Lock Help TV Video HDMI 1 HDMI 2 HDMI 3 PC USB...
... the code the enter a new 4-digital password then re-enter it to select(On / Off). Press / button to enter. 20 Press ENTER/ button to select(UnBlock / Block). MHL Equipment Control Press / button to parent menu. Default password is "on /off . When you turn off automatically. Press / button to select. Press / button to select(Off / On). Store Demo About this TV set presentation. Press ENTER/ button to parent menu.) Picture Sound Channel Setup Lock Help Enter Password ----- 0-9 MENU Return Picture Sound Channel Setup Lock Help TV Video HDMI 1 HDMI 2 HDMI 3 PC USB...

Owners Manual
Page 22
.... Help 1.Press MENU to enter the main menu, Press / button to select. 2.Press to enter. (Press MENU again to exit or back to parent menu.) Picture Help Sound Channel Setup Lock Help 【Canada Rating】 Only available when "System Lock" is restricted to adults 【RRT Setting】 Display an advance V-Chip rating table for programs which come from MPAA rules. 【Reset RRT】 Reset the RRT to default. Rating...
.... Help 1.Press MENU to enter the main menu, Press / button to select. 2.Press to enter. (Press MENU again to exit or back to parent menu.) Picture Help Sound Channel Setup Lock Help 【Canada Rating】 Only available when "System Lock" is restricted to adults 【RRT Setting】 Display an advance V-Chip rating table for programs which come from MPAA rules. 【Reset RRT】 Reset the RRT to default. Rating...

Owners Manual
Page 23
... for TV mode. 2. Picture Sound Channel Setup Lock Help Menu Language Closed Caption Over Scan Input Label PC Settings Other Settings Restore Default English Off Move Select MENU Return *Note: 1. PC 1.Press INPUT to select PC source. 2.Press MENU to enter the main menu, Press / button to select Setup menu. 3.Press to contact us. 【Phase】 Minimize horizontal distortion. Press / button to parent menu. Auto Recovery Self Test Connection Guide Antenna Guide Contant Us Use ARROW keys to highlight your antenna cable step by auto recovery page...
... for TV mode. 2. Picture Sound Channel Setup Lock Help Menu Language Closed Caption Over Scan Input Label PC Settings Other Settings Restore Default English Off Move Select MENU Return *Note: 1. PC 1.Press INPUT to select PC source. 2.Press MENU to enter the main menu, Press / button to select Setup menu. 3.Press to contact us. 【Phase】 Minimize horizontal distortion. Press / button to parent menu. Auto Recovery Self Test Connection Guide Antenna Guide Contant Us Use ARROW keys to highlight your antenna cable step by auto recovery page...

Owners Manual
Page 24
... USB *Note: Before operating Media menu, Plug in the file selecting menu, then pressENTER button to enter. TIME menu and description are the same as that for TV mode. 4.The function of Close Caption is available only in AV/TV mode. 5.US, Canada, RRT Setting and Reset RRT in SOUND menu is invalid. 6.Composite/ COMPONENT / HDMI mode has no CHANNEL menu. 1.Press INPUT button to display the input source list. 2.Press / button to select USB. 3.Press ENTER button to enter . 4.Press / button to select...
... USB *Note: Before operating Media menu, Plug in the file selecting menu, then pressENTER button to enter. TIME menu and description are the same as that for TV mode. 4.The function of Close Caption is available only in AV/TV mode. 5.US, Canada, RRT Setting and Reset RRT in SOUND menu is invalid. 6.Composite/ COMPONENT / HDMI mode has no CHANNEL menu. 1.Press INPUT button to display the input source list. 2.Press / button to select USB. 3.Press ENTER button to enter . 4.Press / button to select...

Owners Manual
Page 27
Other Information VIDEO INPUT Check your connections. If you used Composite yellow, red, and white cables to connect, make sure they're connected to the green VIDEO INPUT, and the red and white 26
Other Information VIDEO INPUT Check your connections. If you used Composite yellow, red, and white cables to connect, make sure they're connected to the green VIDEO INPUT, and the red and white 26

Leaflet
Page 1
HD Component (Y/Pb/Pr), Audio L/R * USB w/ Photo Viewer (for direct sub channel access * 3D Y/C Digital Comb Filter, Color Temp., Digital Noise Reduction * Owner's Manual * Picture Shape : Normal, Wide, Zoom * 5-Picture Menu (4 Preset, Custom), 5-Sound Menu ( 4-Preset, Custom) * CH Search-auto program, OSD Menu Adjustments, Closed Caption * Parental Controls (V-Chip and Button lock) * Sleep timer (5min-240min), Auto Shut-Off * Speakers: 2 pcs, 5w/CH * Bass/Treble Control, Balance control * Detachable Stand Base, Wall Mountable (VESA compatible: 200x200) * Enable Smart TV ...
HD Component (Y/Pb/Pr), Audio L/R * USB w/ Photo Viewer (for direct sub channel access * 3D Y/C Digital Comb Filter, Color Temp., Digital Noise Reduction * Owner's Manual * Picture Shape : Normal, Wide, Zoom * 5-Picture Menu (4 Preset, Custom), 5-Sound Menu ( 4-Preset, Custom) * CH Search-auto program, OSD Menu Adjustments, Closed Caption * Parental Controls (V-Chip and Button lock) * Sleep timer (5min-240min), Auto Shut-Off * Speakers: 2 pcs, 5w/CH * Bass/Treble Control, Balance control * Detachable Stand Base, Wall Mountable (VESA compatible: 200x200) * Enable Smart TV ...


