

Owners Manual
Page 2
... these instructions. 2. IMPORTANT SAFETY INSTRUCTIONS 1. The wide blade or the third prong are provided for replacement of time. 14. Servicing is damaged, liquid has been spilled or objects have fallen into such power lines or circuits. If an outside antenna system should be located in wire to an antenna discharge unit, size of grounding conductors, location of antenna discharge unit, connection to dripping...
... these instructions. 2. IMPORTANT SAFETY INSTRUCTIONS 1. The wide blade or the third prong are provided for replacement of time. 14. Servicing is damaged, liquid has been spilled or objects have fallen into such power lines or circuits. If an outside antenna system should be located in wire to an antenna discharge unit, size of grounding conductors, location of antenna discharge unit, connection to dripping...
Owners Manual
Page 3
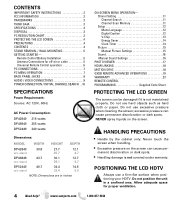
... complies with the instructions, may void the user's authority to radio or television reception, which the receiver is no guarantee that interference will not occur in a residential installation. Increase the separation between the equipment and receiver. - Reorient or relocate the receiving antenna. - Doing so contributes to provide reasonable protection against risk of HDMI Licensing LLC. HDMI, the HDMI Logo and High...
... complies with the instructions, may void the user's authority to radio or television reception, which the receiver is no guarantee that interference will not occur in a residential installation. Increase the separation between the equipment and receiver. - Reorient or relocate the receiving antenna. - Doing so contributes to provide reasonable protection against risk of HDMI Licensing LLC. HDMI, the HDMI Logo and High...
Owners Manual
Page 4
... RESOLUTION CHART 3 PROTECTING THE LCD SCREEN 4 PRECAUTIONS 4 CONTENTS 4 STAND REMOVAL / WALL MOUNTING 5 GETTING STARTED- Do not position the unit in inches ON-SCREEN MENU OPERATION- Chanel Setting 11 Channel Search 11 Channel Scan Memory 11 Setup 12 Menu Language 12 Digital Caption 12 V-Chip 13 Energy Saver 14 Clock Timer 14 Picture 15 Manual Picture Settings 15 Sound 16 Manual Sound Settings 16 PHOTO VIEWER 17 HDMI LINKING 18 MOTION SYNC 18 GXDB REMOTE ADVANCED OPERATIONS 19 WARRANTY 23 REMOTE CONTROL PROGRAMMING Supplied Code Sheet PROTECTING THE LCD SCREEN...
... RESOLUTION CHART 3 PROTECTING THE LCD SCREEN 4 PRECAUTIONS 4 CONTENTS 4 STAND REMOVAL / WALL MOUNTING 5 GETTING STARTED- Do not position the unit in inches ON-SCREEN MENU OPERATION- Chanel Setting 11 Channel Search 11 Channel Scan Memory 11 Setup 12 Menu Language 12 Digital Caption 12 V-Chip 13 Energy Saver 14 Clock Timer 14 Picture 15 Manual Picture Settings 15 Sound 16 Manual Sound Settings 16 PHOTO VIEWER 17 HDMI LINKING 18 MOTION SYNC 18 GXDB REMOTE ADVANCED OPERATIONS 19 WARRANTY 23 REMOTE CONTROL PROGRAMMING Supplied Code Sheet PROTECTING THE LCD SCREEN...
Owners Manual
Page 5
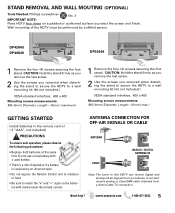
... HDTV can also receive analog or ClearQAM cable channels from an antenna. ANTENNA CONNECTION FOR OFF-AIR SIGNALS OR CABLE ANTENNA CABLE ANALOG / DIGITAL ANTENNA IN Note: The tuner in the remote control ( 2 "AAA", not included) PRECAUTIONS To ensure safe operation, please observe the following precautions: • Replace both batteries at the same time. Need help? CAUTION: Hold the stand firmly as you remove the last screw. 2 Use the screws you removed when detaching the stand to secure the HDTV to a wall mounting...
... HDTV can also receive analog or ClearQAM cable channels from an antenna. ANTENNA CONNECTION FOR OFF-AIR SIGNALS OR CABLE ANTENNA CABLE ANALOG / DIGITAL ANTENNA IN Note: The tuner in the remote control ( 2 "AAA", not included) PRECAUTIONS To ensure safe operation, please observe the following precautions: • Replace both batteries at the same time. Need help? CAUTION: Hold the stand firmly as you remove the last screw. 2 Use the screws you removed when detaching the stand to secure the HDTV to a wall mounting...
Owners Manual
Page 7
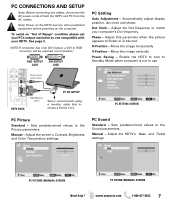
... use. Adjust this parameter when the picture appears to the Sound parameters. PC Sound Standard - PC PICTURE (MANUAL) SCREEN PC SOUND (MANUAL) SCREEN Need help? PC SETTING SCREEN PC Picture Standard - Adjust the screen's Contrast, Brightness and Color Temperature settings. Phase - Adjust the HDTV's Bass and Treble settings. NOTE:If computer has only DVI Output, a DVI to one compatible with your PC's output resolution to RGB converter will be required (not included.) RGB OUTPUT JACK DVI OUTPUT JACK PC Setting Auto Adjustment...
... use. Adjust this parameter when the picture appears to the Sound parameters. PC Sound Standard - PC PICTURE (MANUAL) SCREEN PC SOUND (MANUAL) SCREEN Need help? PC SETTING SCREEN PC Picture Standard - Adjust the screen's Contrast, Brightness and Color Temperature settings. Phase - Adjust the HDTV's Bass and Treble settings. NOTE:If computer has only DVI Output, a DVI to one compatible with your PC's output resolution to RGB converter will be required (not included.) RGB OUTPUT JACK DVI OUTPUT JACK PC Setting Auto Adjustment...
Owners Manual
Page 8
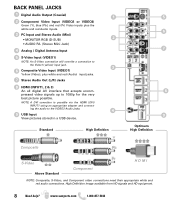
...) Video inputs plus the white and red Audio inputs. 3 PC Input and Stereo Audio (Mini) • MONITOR RGB (D-SUB) 2 • AUDIO R/L (Stereo Mini Jack) 4 Analog / Digital Antenna Input 5 S-Video Input (VIDEO1) NOTE: An S-Video connection will override a connection to the Video1 (yellow) input jack. 3 6 Composite Video Input (VIDEO1) Yellow (Video), plus white and red (Audio) input jacks. 7 Stereo Audio Out (L/R) Jacks 8 HDMI (INPUT1, 2 & 3) An all digital AV interface that accepts uncompressed video signals up to the VIDEO3 Audio jacks. 4 9 USB Input View pictures stored in a USB...
...) Video inputs plus the white and red Audio inputs. 3 PC Input and Stereo Audio (Mini) • MONITOR RGB (D-SUB) 2 • AUDIO R/L (Stereo Mini Jack) 4 Analog / Digital Antenna Input 5 S-Video Input (VIDEO1) NOTE: An S-Video connection will override a connection to the Video1 (yellow) input jack. 3 6 Composite Video Input (VIDEO1) Yellow (Video), plus white and red (Audio) input jacks. 7 Stereo Audio Out (L/R) Jacks 8 HDMI (INPUT1, 2 & 3) An all digital AV interface that accepts uncompressed video signals up to the VIDEO3 Audio jacks. 4 9 USB Input View pictures stored in a USB...
Owners Manual
Page 9
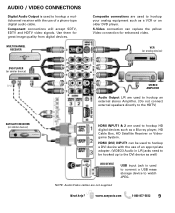
... receiver with the use of a phono-type digital audio cable. HDMI (DVI) INPUT1 can replace the yellow Video connection for great image quality from digital devices. www.sanyoctv.com 1-800-877-5032 9 Use them for enhanced video. Need help? Component connections will accept SDTV, EDTV and HDTV video signals. VCR (or analog device) DVD PLAYER (or similar device) DVI STEREO AMPLIFIER Audio Output L/R are used to hookup an external stereo Amplifier. (Do not connect external speakers directly to the HDTV) SATELLITE RECEIVER...
... receiver with the use of a phono-type digital audio cable. HDMI (DVI) INPUT1 can replace the yellow Video connection for great image quality from digital devices. www.sanyoctv.com 1-800-877-5032 9 Use them for enhanced video. Need help? Component connections will accept SDTV, EDTV and HDTV video signals. VCR (or analog device) DVD PLAYER (or similar device) DVI STEREO AMPLIFIER Audio Output L/R are used to hookup an external stereo Amplifier. (Do not connect external speakers directly to the HDTV) SATELLITE RECEIVER...
Owners Manual
Page 10
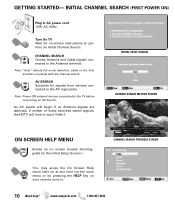
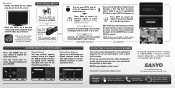
... guide (in AC power cord 120V AC, 60Hz Turn On TV Wait for signals from devices connected to the Antenna terminal. Note: Power ON external devices connected to input Video1. An AV search will begin if no Antenna signals are detected, if neither of these searches detect signals, the HDTV will tune to the TV before comencing an AV Search. INITIAL SETUP SCREEN CHANNEL SEARCH METHOD SCREEN ON SCREEN HELP MENU Access an on your remote control. CHANNEL...
... guide (in AC power cord 120V AC, 60Hz Turn On TV Wait for signals from devices connected to the Antenna terminal. Note: Power ON external devices connected to input Video1. An AV search will begin if no Antenna signals are detected, if neither of these searches detect signals, the HDTV will tune to the TV before comencing an AV Search. INITIAL SETUP SCREEN CHANNEL SEARCH METHOD SCREEN ON SCREEN HELP MENU Access an on your remote control. CHANNEL...
Owners Manual
Page 11
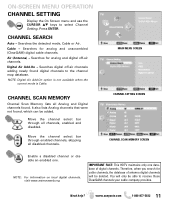
... for analog and unscrambled (ClearQAM) digital cable channels. ON-SCREEN MENU OPERATION CHANNEL SETTING Display the On Screen menu and use the CURSOR LM keys to receive those ClearQAM channels your cable company provides. Press ENTER. Searches the detected mode, Cable or Air. www.sanyoctv.com 1-800-877-5032 11 Searches for cable channels, the database of digital channels. Searches digital off -air channels. MAIN MENU SCREEN CHANNEL SETTING SCREEN CHANNEL SCAN MEMORY SCREEN Enable a disabled channel or disable an enabled one database of antenna digital channels will...
... for analog and unscrambled (ClearQAM) digital cable channels. ON-SCREEN MENU OPERATION CHANNEL SETTING Display the On Screen menu and use the CURSOR LM keys to receive those ClearQAM channels your cable company provides. Press ENTER. Searches the detected mode, Cable or Air. www.sanyoctv.com 1-800-877-5032 11 Searches for cable channels, the database of digital channels. Searches digital off -air channels. MAIN MENU SCREEN CHANNEL SETTING SCREEN CHANNEL SCAN MEMORY SCREEN Enable a disabled channel or disable an enabled one database of antenna digital channels will...
Owners Manual
Page 12
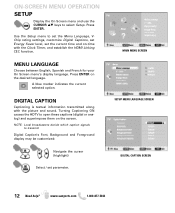
... Screen menu's display language. Turning Captioning ON causes the HDTV to set the Menu Language, VChip rating settings, customize Digital Captions, set Energy Saver level, set parameter. Use the Setup menu to open these captions (digital or analog) and superimpose them on the desired language. DIGITAL CAPTION Captioning is textual information transmitted along with the Clock Timer, and establish the HDMI Linking CEC function. NOTE: Local broadcasters decide which caption signals to select Setup. MAIN MENU SCREEN SETUP MENU LANGUAGE SCREEN DIGITAL CAPTION SCREEN 12 Need...
... Screen menu's display language. Turning Captioning ON causes the HDTV to set the Menu Language, VChip rating settings, customize Digital Captions, set Energy Saver level, set parameter. Use the Setup menu to open these captions (digital or analog) and superimpose them on the desired language. DIGITAL CAPTION Captioning is textual information transmitted along with the Clock Timer, and establish the HDMI Linking CEC function. NOTE: Local broadcasters decide which caption signals to select Setup. MAIN MENU SCREEN SETUP MENU LANGUAGE SCREEN DIGITAL CAPTION SCREEN 12 Need...
Owners Manual
Page 14
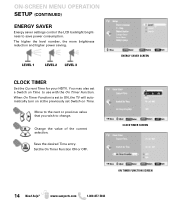
... automatically turn on at the previously set a Switch on Time. You may also set Switch on Time to use with the On Timer Function. LEVEL 1 LEVEL 2 LEVEL 3 CLOCK TIMER Set the Current Time for your HDTV. www.sanyoctv.com 1-800-877-5032 The higher the level number, the more brightness reduction and higher power saving. ON-SCREEN MENU OPERATION SETUP (CONTINUED) ENERGY SAVER Energy saver settings control the LCD backlight brightness to change.
... automatically turn on at the previously set a Switch on Time. You may also set Switch on Time to use with the On Timer Function. LEVEL 1 LEVEL 2 LEVEL 3 CLOCK TIMER Set the Current Time for your HDTV. www.sanyoctv.com 1-800-877-5032 The higher the level number, the more brightness reduction and higher power saving. ON-SCREEN MENU OPERATION SETUP (CONTINUED) ENERGY SAVER Energy saver settings control the LCD backlight brightness to change.
Owners Manual
Page 15
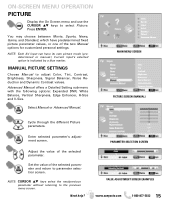
... settings. Need help? ON-SCREEN MENU OPERATION PICTURE Display the On Screen menu and use the CURSOR LM keys to adjust Color, Tint, Contrast, Brightness, Sharpness, Signal Balancer, Noise Reduction and Dynamic Contrast values. Select Manual or Advanced Manual. NOTE: Each AV input can have predetermined fixed picture parameter values, or one of the selected parameter. MAIN MENU SCREEN PICTURE SCREEN (MANUAL) Cycle through the different Picture parameters. You may choose between Movie, Sports, News, Game...
... settings. Need help? ON-SCREEN MENU OPERATION PICTURE Display the On Screen menu and use the CURSOR LM keys to adjust Color, Tint, Contrast, Brightness, Sharpness, Signal Balancer, Noise Reduction and Dynamic Contrast values. Select Manual or Advanced Manual. NOTE: Each AV input can have predetermined fixed picture parameter values, or one of the selected parameter. MAIN MENU SCREEN PICTURE SCREEN (MANUAL) Cycle through the different Picture parameters. You may choose between Movie, Sports, News, Game...
Owners Manual
Page 17
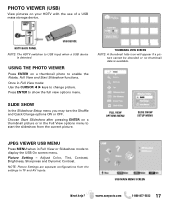
.... Picture Setting - Once in TV and AV inputs. NOTE: Picture Settings are separate configurations from the current picture. Press ENTER to USB Input when a USB device is available. Choose Start Slideshow after pressing ENTER on a thumbnail picture or in the Full View options menu to start the slideshow from the settings in Full View mode: Use the CURSOR keys to display the USB On screen menu. USB DEVICE HDTV BACK PANEL NOTE: The HDTV switches to...
.... Picture Setting - Once in TV and AV inputs. NOTE: Picture Settings are separate configurations from the current picture. Press ENTER to USB Input when a USB device is available. Choose Start Slideshow after pressing ENTER on a thumbnail picture or in the Full View options menu to start the slideshow from the settings in Full View mode: Use the CURSOR keys to display the USB On screen menu. USB DEVICE HDTV BACK PANEL NOTE: The HDTV switches to...
Owners Manual
Page 18
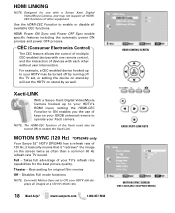
... process and power OFF process. NOTE: The HDMI-CEC function of the Xacti must also be turned off by turning off the TV set, or setting the device on stand-by will set to your HDTV may not support all HDMICEC functions of other without user intervention. Best setting for the best picture quality. HDMI LINKING NOTE: Designed for use of keys on your GXDB universal remote to operate your Xacti...
... process and power OFF process. NOTE: The HDMI-CEC function of the Xacti must also be turned off by turning off the TV set, or setting the device on stand-by will set to your HDTV may not support all HDMICEC functions of other without user intervention. Best setting for the best picture quality. HDMI LINKING NOTE: Designed for use of keys on your GXDB universal remote to operate your Xacti...
Owners Manual
Page 19
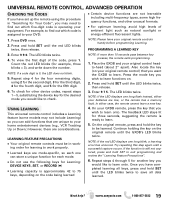
... operating your DVD: 1. NOTE: If the LED displays one long flash instead, either case, the remote cannot learn . G Do not use the following keys for the four remaining digits, using the procedure in work properly. On the original remote, press and hold the key to learn a new key. 4. Also locate the key (on . 2. Press and hold SET until the red LED blinks twice, then release. 3. UNIVERSAL REMOTE CONTROL, ADVANCED OPERATION...
... operating your DVD: 1. NOTE: If the LED displays one long flash instead, either case, the remote cannot learn . G Do not use the following keys for the four remaining digits, using the procedure in work properly. On the original remote, press and hold the key to learn a new key. 4. Also locate the key (on . 2. Press and hold SET until the red LED blinks twice, then release. 3. UNIVERSAL REMOTE CONTROL, ADVANCED OPERATION...
Owners Manual
Page 20
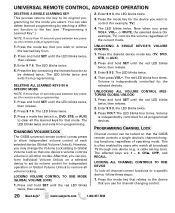
... example, TV) controls the volume regardless of each selected device (Global Volume Unlock). Enter 9 9 3, the LED blinks twice. 3. The affected keys are 1 - 0, CHL, CHM, and RECALL. CHANGING VOLUME LOCK The GXDB universal remote control comes preset to control (for that you select. www.sanyoctv.com 1-800-877-5032 You can be deleted twice. After that one device (e.g., a cable set its original programming for channel changing control. 20 Need help? Press the mode key for...
... example, TV) controls the volume regardless of each selected device (Global Volume Unlock). Enter 9 9 3, the LED blinks twice. 3. The affected keys are 1 - 0, CHL, CHM, and RECALL. CHANGING VOLUME LOCK The GXDB universal remote control comes preset to control (for that you select. www.sanyoctv.com 1-800-877-5032 You can be deleted twice. After that one device (e.g., a cable set its original programming for channel changing control. 20 Need help? Press the mode key for...
Owners Manual
Page 21
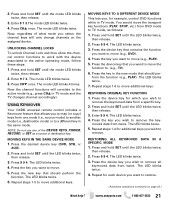
... a specific key. 2. UNLOCKING CHANNEL LOCKS To unlock Channel Lock and thus allow the channel control functions to work with the device associated to move the transport key functions (PLAY, STOP, etc.) from twice. Enter 9 7 3. Press the desired device key (DVD, STB, or AUX). 2. Press the device key that should per- The mode LED blinks twice. 3. Press and hold SET until the LED blinks twice, then release. 2. The mode LED blinks 4 times. You...
... a specific key. 2. UNLOCKING CHANNEL LOCKS To unlock Channel Lock and thus allow the channel control functions to work with the device associated to move the transport key functions (PLAY, STOP, etc.) from twice. Enter 9 7 3. Press the desired device key (DVD, STB, or AUX). 2. Press the device key that should per- The mode LED blinks twice. 3. Press and hold SET until the LED blinks twice, then release. 2. The mode LED blinks 4 times. You...
Quik 'N Easy Setup Guide
Page 1
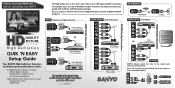
... Standard GOOD Quality Connections BETTER Quality Connections BEST Quality Connections QUALITY PICTURE High Definition QUIK 'N EASY Setup Guide Your SANYO High Definition Television can improve your HDTV's initial setup! S-VIDEO NOTES: Always match the color of the signal being received and correct HD connections make the difference! HD Satellite or Cable service - If you can display great quality picture when: A High Definition signal is due to the same HDTV INPUT. Component cables - Part No. 1JC6P1P0338-- For...
... Standard GOOD Quality Connections BETTER Quality Connections BEST Quality Connections QUALITY PICTURE High Definition QUIK 'N EASY Setup Guide Your SANYO High Definition Television can improve your HDTV's initial setup! S-VIDEO NOTES: Always match the color of the signal being received and correct HD connections make the difference! HD Satellite or Cable service - If you can display great quality picture when: A High Definition signal is due to the same HDTV INPUT. Component cables - Part No. 1JC6P1P0338-- For...
Quik 'N Easy Setup Guide
Page 2
... back. Searches for Antenna signals or Cable signals connected to the AV input jacks. AV SEARCH High quality pictrue is needed. Channel Scan Memory View a list of the AV equipment that the receiver is hooked up to it. NEVER spray liquids on both Analog transmissions and Digital transmissions in your owner's manual. Use the cursor keys to meet your remote to the channel map database. HDMI, the HDMI Logo and High-Definition...
... back. Searches for Antenna signals or Cable signals connected to the AV input jacks. AV SEARCH High quality pictrue is needed. Channel Scan Memory View a list of the AV equipment that the receiver is hooked up to it. NEVER spray liquids on both Analog transmissions and Digital transmissions in your owner's manual. Use the cursor keys to meet your remote to the channel map database. HDMI, the HDMI Logo and High-Definition...
GXDB Remote Guide
Page 1
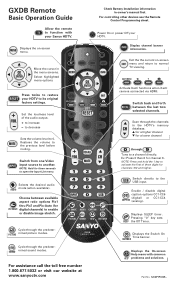
... one Video input source to normal TV viewing. Exit the the current on -screen menu. Switch back and forth RECALL between available aspect ratio options Pix1 thru Pix7 and Pix-Auto (for PIX SHAPE digital channels) to enable or disable image stretch. USB CC PIX SHAPE AUDIO CAPTION SLEEP PICTURE SOUND HELP ON TIMER GXDB 1-800-877-5032 Cycle through the predeterPICTURE mined picture modes. XACTI MENU W T Activate Xacti functions when Xacti camera connected via HDMI...
... one Video input source to normal TV viewing. Exit the the current on -screen menu. Switch back and forth RECALL between available aspect ratio options Pix1 thru Pix7 and Pix-Auto (for PIX SHAPE digital channels) to enable or disable image stretch. USB CC PIX SHAPE AUDIO CAPTION SLEEP PICTURE SOUND HELP ON TIMER GXDB 1-800-877-5032 Cycle through the predeterPICTURE mined picture modes. XACTI MENU W T Activate Xacti functions when Xacti camera connected via HDMI...


