
User Manual
Page 5
... display. Do not use solvents or abrasives. See page 25. Need help? HANDLING PRECAUTIONS • Handle the Plasma DTV carefully when installing. If this occurs, turn the Plasma DTV On and leave it is not used for a long time. Otherwise, an afterimage or "ghost" may be some tiny black points and...
... display. Do not use solvents or abrasives. See page 25. Need help? HANDLING PRECAUTIONS • Handle the Plasma DTV carefully when installing. If this occurs, turn the Plasma DTV On and leave it is not used for a long time. Otherwise, an afterimage or "ghost" may be some tiny black points and...

User Manual
Page 7
... subscribe to change the Antenna Mode. Notes: If you move the DTV to a new location, press the RESET key twice after connecting the signal and turning on the DTV. (Continued on next page.) Need help? However, ALL resolutions are franchised by the phrase "Available in this Plasma DTV receives Analog Antenna...
... subscribe to change the Antenna Mode. Notes: If you move the DTV to a new location, press the RESET key twice after connecting the signal and turning on the DTV. (Continued on next page.) Need help? However, ALL resolutions are franchised by the phrase "Available in this Plasma DTV receives Analog Antenna...

User Manual
Page 8
... help? In this equipment and must be recycled or disposed of an RF signal. 1 4 7 INFO POWER 23 56 89 • Press the POWER key to turn on the batteries match the "+" and "-" marks inside the Remote. To 120 V AC outlet. 4 ALL CHANNEL SEARCH When the television is used primarily for the...
... help? In this equipment and must be recycled or disposed of an RF signal. 1 4 7 INFO POWER 23 56 89 • Press the POWER key to turn on the batteries match the "+" and "-" marks inside the Remote. To 120 V AC outlet. 4 ALL CHANNEL SEARCH When the television is used primarily for the...
User Manual
Page 11
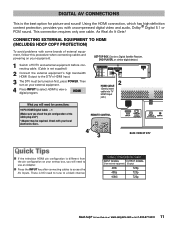
...Need help? CONNECTING EXTERNAL EQUIPMENT TO HDMI (INCLUDES HDCP COPY PROTECTION) To avoid problems with some brands of the cable plug-end*) *Adapter may be turned on your set-top box, you will need to the DTV's HDMI Input. 3 The DTV must be required. There is NO need for picture... need to tune to view a digital program. I If the television HDMI pin configuration is different from the pin configuration on first, press POWER. Then turn on your external equipment. 4 Press INPUT to select HDMI to a blank channel. As Real As It Gets! DIGITAL AV CONNECTIONS This is the best ...
...Need help? CONNECTING EXTERNAL EQUIPMENT TO HDMI (INCLUDES HDCP COPY PROTECTION) To avoid problems with some brands of the cable plug-end*) *Adapter may be turned on your set-top box, you will need to the DTV's HDMI Input. 3 The DTV must be required. There is NO need for picture... need to tune to view a digital program. I If the television HDMI pin configuration is different from the pin configuration on first, press POWER. Then turn on your external equipment. 4 Press INPUT to select HDMI to a blank channel. As Real As It Gets! DIGITAL AV CONNECTIONS This is the best ...

User Manual
Page 12
...help? NOTE: Check with your external equipment. 5 Press INPUT to select HDMI to the DTV's VIDEO3 Audio L / R. 4 The DTV must be turned on your local electronics store for low-noise signal transfer). 1 Using a Fiber Optics cable, connect the DTV's Digital Audio Output to access the AV... AV CONNECTIONS CONNECTING STB WITH DVI OUTPUT TO HDMI INPUT 1 Switch off DTV and external equipment before connecting cable. (Cable is connected. Then turn on external equipment. Red light visible at least 2 feet from the DVI device, these video jacks cannot be a Digital Satellite Receiver, DVD...
...help? NOTE: Check with your external equipment. 5 Press INPUT to select HDMI to the DTV's VIDEO3 Audio L / R. 4 The DTV must be turned on your local electronics store for low-noise signal transfer). 1 Using a Fiber Optics cable, connect the DTV's Digital Audio Output to access the AV... AV CONNECTIONS CONNECTING STB WITH DVI OUTPUT TO HDMI INPUT 1 Switch off DTV and external equipment before connecting cable. (Cable is connected. Then turn on external equipment. Red light visible at least 2 feet from the DVI device, these video jacks cannot be a Digital Satellite Receiver, DVD...
User Manual
Page 13
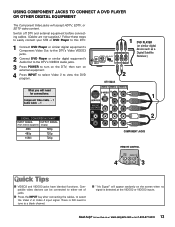
... the DTV's Video VIDEO3 jacks. 2 Connect DVD Player or similar digital equipment's Audio Out to the DTV's VIDEO3 Audio jacks. 3 Press POWER to turn on the DTV, then turn on the screen when no signal is NO need to tune to view the DVD program. 1 DVD PLAYER (or similar digital device such...
... the DTV's Video VIDEO3 jacks. 2 Connect DVD Player or similar digital equipment's Audio Out to the DTV's VIDEO3 Audio jacks. 3 Press POWER to turn on the DTV, then turn on the screen when no signal is NO need to tune to view the DVD program. 1 DVD PLAYER (or similar digital device such...

User Manual
Page 14
... at www.sanyoctv.com or Call 1-800-877-5032 Composite jacks offer only 480i (SDTV) resolution. I "No Signal" will need to tune to turn on the DTV, then turn on the screen when no signal is NO need for connections: Audio Video Cable - 1 S-Video Cable - 1 REMOTE CONTROL INPUT POWER 123 4 456 3 NOTES...
... at www.sanyoctv.com or Call 1-800-877-5032 Composite jacks offer only 480i (SDTV) resolution. I "No Signal" will need to tune to turn on the DTV, then turn on the screen when no signal is NO need for connections: Audio Video Cable - 1 S-Video Cable - 1 REMOTE CONTROL INPUT POWER 123 4 456 3 NOTES...

User Manual
Page 15
... supplied.) 1 Connect the DTV Audio Out (R/L) to the Stereo Amplifier In (R/L). 2 Press POWER to the DTV. NOTE: Do not connect external speakers directly to turn on the DTV, then turn on external equipment. The magnets in the speakers may affect the picture quality. STEREO AMPLIFIER TYPICAL HOME THEATER CONNECTIONS 15 Need help?
... supplied.) 1 Connect the DTV Audio Out (R/L) to the Stereo Amplifier In (R/L). 2 Press POWER to the DTV. NOTE: Do not connect external speakers directly to turn on the DTV, then turn on external equipment. The magnets in the speakers may affect the picture quality. STEREO AMPLIFIER TYPICAL HOME THEATER CONNECTIONS 15 Need help?

User Manual
Page 17
...scanning loop includes analog channels, digital channels, and all customized settings. They may appear distorted. ANALOG: Stereo, Mono, SAP. 11 Power Key-Press to turn DTV on signal received and the broadcast's aspect ratio. A 4:3 images is stretched horizontally and may include: PIX1, PIX2, PIX3, and PIX4. Visit... audio mode (if available): DIGITAL: Main, Sub1, Sub2, Sub3, etc.; NOTE: The TUNER key is inactive when an external input is turned off ). PIX4 Stretches the Pix3 image horizontally (portions of the image may be cropped off . 12 Sleep Key-Press this key to toggle ...
...scanning loop includes analog channels, digital channels, and all customized settings. They may appear distorted. ANALOG: Stereo, Mono, SAP. 11 Power Key-Press to turn DTV on signal received and the broadcast's aspect ratio. A 4:3 images is stretched horizontally and may include: PIX1, PIX2, PIX3, and PIX4. Visit... audio mode (if available): DIGITAL: Main, Sub1, Sub2, Sub3, etc.; NOTE: The TUNER key is inactive when an external input is turned off ). PIX4 Stretches the Pix3 image horizontally (portions of the image may be cropped off . 12 Sleep Key-Press this key to toggle ...

User Manual
Page 19
NOTES: Turn your cable company provides. Go to www.antennaweb.org and type in your location. 1 Press the TUNER key to select the Digital Tuner. 2 Press the ...
NOTES: Turn your cable company provides. Go to www.antennaweb.org and type in your location. 1 Press the TUNER key to select the Digital Tuner. 2 Press the ...

User Manual
Page 21
...sound, separate captioning modes are : Analog EIA-608B and Digital EIA-708B. Analog captions generally will disappear. « 21 Need help? Turning Captioning ON causes the DTV to open these captions and superimpose them on the remote control to restore the sound. TO VIEW CAPTIONS 1 Press... the CAPTION key to transmit. CC1 Analog Caption Digital CC1 Digital Caption QUIKCAP OPERATION QuikCap turns captioning on and off with the Mute function. the captions display automatically, if available. Press the MUTE key again to block the TV...
...sound, separate captioning modes are : Analog EIA-608B and Digital EIA-708B. Analog captions generally will disappear. « 21 Need help? Turning Captioning ON causes the DTV to open these captions and superimpose them on the remote control to restore the sound. TO VIEW CAPTIONS 1 Press... the CAPTION key to transmit. CC1 Analog Caption Digital CC1 Digital Caption QUIKCAP OPERATION QuikCap turns captioning on and off with the Mute function. the captions display automatically, if available. Press the MUTE key again to block the TV...
User Manual
Page 25
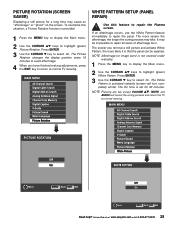
... repair the Plasma screen. It may cause an "afterimage" or "ghost" on the screen. NOTE: Pressing any key except VOLUME LM, MUTE, and AUDIO will turn completely white). Press ENTER. 3 Use the CURSOR M key to normal viewing. « « 25 Need help? PICTURE ROTATION (SCREEN SAVER) Displaying a still picture for 30...
... repair the Plasma screen. It may cause an "afterimage" or "ghost" on the screen. NOTE: Pressing any key except VOLUME LM, MUTE, and AUDIO will turn completely white). Press ENTER. 3 Use the CURSOR M key to normal viewing. « « 25 Need help? PICTURE ROTATION (SCREEN SAVER) Displaying a still picture for 30...

User Manual
Page 26
.... G May be station trouble, NO signal broadcast. G Check antenna connection. G Switch on screen G Check Audio / Video connections. G Turn antenna, install signal booster. G Weak Signal G Select CH. G Turn antenna, install signal booster. 17, 21 21 17 14, 15, 17, 24 11 ~ 15 7, 16 17 17 22 ~ 23 7...signal is a normal condition during warm-up and cool down of the plastic cabinet parts. 20 8 16 ~ 17 25 26 Need help? G Turn antenna, install signal booster. G Press INPUT key. images or ghosts may have been set to block programming. No DTV Stereo or SAP sound ...
.... G May be station trouble, NO signal broadcast. G Check antenna connection. G Switch on screen G Check Audio / Video connections. G Turn antenna, install signal booster. G Weak Signal G Select CH. G Turn antenna, install signal booster. 17, 21 21 17 14, 15, 17, 24 11 ~ 15 7, 16 17 17 22 ~ 23 7...signal is a normal condition during warm-up and cool down of the plastic cabinet parts. 20 8 16 ~ 17 25 26 Need help? G Turn antenna, install signal booster. G Press INPUT key. images or ghosts may have been set to block programming. No DTV Stereo or SAP sound ...


