Instruction Manual
Page 2
... adjustment of customer-operated controls as explained in obtaining repairs and operational information, please contact the following information with new or refurbished products or parts. For assistance in the appropriate model's instruction manual, or (B) the repair of any product whose serial number has been altered, defaced or removed. 2. Where Purchased Date of all other obligation or liability. SANYO Manufacturing Corporation SANYO will repair or replace (at the time warranty service is...
... adjustment of customer-operated controls as explained in obtaining repairs and operational information, please contact the following information with new or refurbished products or parts. For assistance in the appropriate model's instruction manual, or (B) the repair of any product whose serial number has been altered, defaced or removed. 2. Where Purchased Date of all other obligation or liability. SANYO Manufacturing Corporation SANYO will repair or replace (at the time warranty service is...
Instruction Manual
Page 3
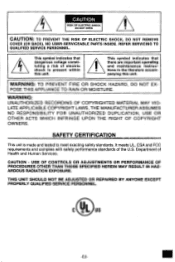
...OPEN CAUTION: TO PREVENT THE RISK OF ELECTRIC SHOCK, DO NOT REMOVE COVER (OR BACK). NO USER-SERVICEABLE PARTS INSIDE. This symbol indicates that there are important operating and maintenance instructions in the literature accompanying this unit. THIS UNIT SHOULD NOT BE ADJUSTED OR REPAIRED BY ANYONE EXCEPT PROPERLY QUALIFIED SERVICE PERSONNEL. USE OF CONTROLS OR ADJUSTMENTS...safety standards. CAUTION - Department of Health and Human Services. WARNING: UNAUTHORIZED RECORDING OF COPYRIGHTED MATERIAL MAY VIOLATE APPLICABLE COPYRIGHT LAWS, THE MANUFACTURER ASSUMES NO ...
...OPEN CAUTION: TO PREVENT THE RISK OF ELECTRIC SHOCK, DO NOT REMOVE COVER (OR BACK). NO USER-SERVICEABLE PARTS INSIDE. This symbol indicates that there are important operating and maintenance instructions in the literature accompanying this unit. THIS UNIT SHOULD NOT BE ADJUSTED OR REPAIRED BY ANYONE EXCEPT PROPERLY QUALIFIED SERVICE PERSONNEL. USE OF CONTROLS OR ADJUSTMENTS...safety standards. CAUTION - Department of Health and Human Services. WARNING: UNAUTHORIZED RECORDING OF COPYRIGHTED MATERIAL MAY VIOLATE APPLICABLE COPYRIGHT LAWS, THE MANUFACTURER ASSUMES NO ...
Instruction Manual
Page 4
..., remove the disc and allow the player to adjust to turn the volume on the amplifier higher than necessary. Please be exposed to direct sunlight. • Because of the CD player's extremely low noise and wide dynamic range, there is connected. • Consult the dealer or an experienced radio/TV technician for a Class B digital device, pursuant to operate this regard. • Sudden changes in any interference received...
..., remove the disc and allow the player to adjust to turn the volume on the amplifier higher than necessary. Please be exposed to direct sunlight. • Because of the CD player's extremely low noise and wide dynamic range, there is connected. • Consult the dealer or an experienced radio/TV technician for a Class B digital device, pursuant to operate this regard. • Sudden changes in any interference received...
Instruction Manual
Page 6
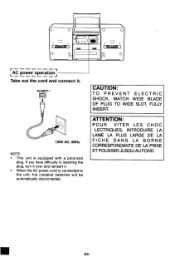
... WIDE BLADE OF PLUG TO WIDE SLOT, FULLY INSERT. O O V ..EL-1 ,0 M 0 0 0 O [AC power operation Take out the cord and connect it . • When the AC power cord is equipped with a polarized plug. If you have difficulty in inserting the plug, turn it over and reinsert it . AC INPUT 0 120V AC, 60Hz NOTE: • This unit is connected to the unit, the installed batteries will be...
... WIDE BLADE OF PLUG TO WIDE SLOT, FULLY INSERT. O O V ..EL-1 ,0 M 0 0 0 O [AC power operation Take out the cord and connect it . • When the AC power cord is equipped with a polarized plug. If you have difficulty in inserting the plug, turn it over and reinsert it . AC INPUT 0 120V AC, 60Hz NOTE: • This unit is connected to the unit, the installed batteries will be...

Instruction Manual
Page 7
... corrosive and can cause personal injury and damage to the polarities shown on the batteries to the unit, observe the following precautions: 1. Match the polarities (+ and - Carefully follow the battery manufacturer's instructions for an extended period of O O r Battery power operation Install batteries. signs. 24 '3 ,4 4 7 8' 8 "D" size batteries (not supplied) Replace lid. POWER SUP O O r 441 6t. 0 I. 0 J O of time, remove the batteries and store them in a cool place. 5.
... corrosive and can cause personal injury and damage to the polarities shown on the batteries to the unit, observe the following precautions: 1. Match the polarities (+ and - Carefully follow the battery manufacturer's instructions for an extended period of O O r Battery power operation Install batteries. signs. 24 '3 ,4 4 7 8' 8 "D" size batteries (not supplied) Replace lid. POWER SUP O O r 441 6t. 0 I. 0 J O of time, remove the batteries and store them in a cool place. 5.

Instruction Manual
Page 8
... is "TUNER", the buttons select preset radio stations. Number buttons (1-9, 0) 2. With any other function, the buttons will not function. • Two buttons must always be pressed. Memory button (MEMORY) 8. Inserting batteries 1. Play/Pause button (►/II) 6. If the function is "CD", the buttons select the track numbers on the front of the unit. To select No. 25, press 2, then 5. Example: To select No. 3, press 0, then 3. Controls ono...
... is "TUNER", the buttons select preset radio stations. Number buttons (1-9, 0) 2. With any other function, the buttons will not function. • Two buttons must always be pressed. Memory button (MEMORY) 8. Inserting batteries 1. Play/Pause button (►/II) 6. If the function is "CD", the buttons select the track numbers on the front of the unit. To select No. 25, press 2, then 5. Example: To select No. 3, press 0, then 3. Controls ono...
Instruction Manual
Page 9
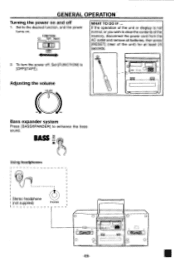
...](TAPE). 0 Adjusting the volume VOLUME ( ) Bass expander system Press [BASSXPANDER] to clear the contents of the memory, disconnect the power cord from the AC outlet and remove all batteries, then press [RESET] (rear of the unit or display is not normal, or you wish to enhance the bass sound. BASS ON OFF Sr i) Using headphones ^6. If the operation of the unit) for at least 20 seconds. Stereo headphone (not supplied) PHONES...
...](TAPE). 0 Adjusting the volume VOLUME ( ) Bass expander system Press [BASSXPANDER] to clear the contents of the memory, disconnect the power cord from the AC outlet and remove all batteries, then press [RESET] (rear of the unit or display is not normal, or you wish to enhance the bass sound. BASS ON OFF Sr i) Using headphones ^6. If the operation of the unit) for at least 20 seconds. Stereo headphone (not supplied) PHONES...
Instruction Manual
Page 10
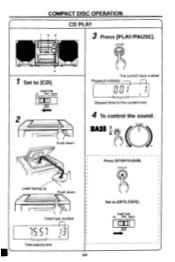
BASS ON OFF VOLUME 0 Press [STOP/CLEAR]. Set to [CD]. PLAY/PAUSE 4 Set to [OFF] (TAPE). FUNCTION CD TAPE RADIO II (OFF) 2 Push down . FUNCTION CD TAPE RADIO I■ ■I II II 1 TR Elapsed time for the current track 4 To control the sound. STOP/CLEAR Label facing up Push down . COMPACT DISC OPERATION CD PLAY 1 3 2 cro OOO o!! 3 Press [PLAY/PAUSE]. The current track number Playback indicator I f r Total track number r r_1 1I 3 I TR Total playing time -E9-
BASS ON OFF VOLUME 0 Press [STOP/CLEAR]. Set to [CD]. PLAY/PAUSE 4 Set to [OFF] (TAPE). FUNCTION CD TAPE RADIO II (OFF) 2 Push down . FUNCTION CD TAPE RADIO I■ ■I II II 1 TR Elapsed time for the current track 4 To control the sound. STOP/CLEAR Label facing up Push down . COMPACT DISC OPERATION CD PLAY 1 3 2 cro OOO o!! 3 Press [PLAY/PAUSE]. The current track number Playback indicator I f r Total track number r r_1 1I 3 I TR Total playing time -E9-
Instruction Manual
Page 11
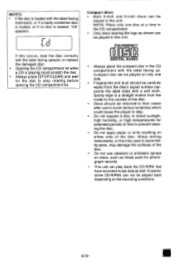
... time to stop rotating before opening the CD compartment lid. Compact disc can be played on only one disc at a time in the CD compartment. • Only discs bearing the logo as those used in this unit. NOTES: • If the disc is loaded with the label facing downward, or if a badly scratched disc is loaded, or if no disc is playing could cause the player...
... time to stop rotating before opening the CD compartment lid. Compact disc can be played on only one disc at a time in the CD compartment. • Only discs bearing the logo as those used in this unit. NOTES: • If the disc is loaded with the label facing downward, or if a badly scratched disc is loaded, or if no disc is playing could cause the player...

Instruction Manual
Page 12
... 3 while track 6 is released, normal play , the player search at high speed in the PAUSE mode when the button is released. N.0" Press and hold down during play will remain in the forward or reverse direction while the button is playing, press [SKIP/SEARCH] repeat- edly until...blinks. 2. NOTE: If [SKIP/SEARCH] I4II-41/41.1 or is pressed while the unit is in the track section on the display. Search (forward/reverse) 1. HNC4.1 ; Play will continue when the button is released. -Ell- PLAY/PAUSE PAUSE MODE 1. Press [PLAY/PAUSE] during the PAUSE mode, no sound...
... 3 while track 6 is released, normal play , the player search at high speed in the PAUSE mode when the button is released. N.0" Press and hold down during play will remain in the forward or reverse direction while the button is playing, press [SKIP/SEARCH] repeat- edly until...blinks. 2. NOTE: If [SKIP/SEARCH] I4II-41/41.1 or is pressed while the unit is in the track section on the display. Search (forward/reverse) 1. HNC4.1 ; Play will continue when the button is released. -Ell- PLAY/PAUSE PAUSE MODE 1. Press [PLAY/PAUSE] during the PAUSE mode, no sound...
Instruction Manual
Page 13
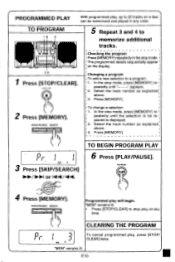
... 20 tracks on the display. The programmed details sequentially appear on a disc can be replaced is displayed. 2. Select the track number as explained , I Press [MEMORY] repeatedly in any time. peatedly until "-- --" appears. 2. MEM TR 3 Press [SKIP/SEARCH] or N/41 . TO BEGIN PROGRAM PLAY 6 Press [PLAY/PAUSE]. In the stop mode. Press [MEMORY]. 2 Press [MEMORY]. r. REPEAT/FM MODE MEMORY Programmed play , press [STOP/ r CLEAR] twice...
... 20 tracks on the display. The programmed details sequentially appear on a disc can be replaced is displayed. 2. Select the track number as explained , I Press [MEMORY] repeatedly in any time. peatedly until "-- --" appears. 2. MEM TR 3 Press [SKIP/SEARCH] or N/41 . TO BEGIN PROGRAM PLAY 6 Press [PLAY/PAUSE]. In the stop mode. Press [MEMORY]. 2 Press [MEMORY]. r. REPEAT/FM MODE MEMORY Programmed play , press [STOP/ r CLEAR] twice...
Instruction Manual
Page 15
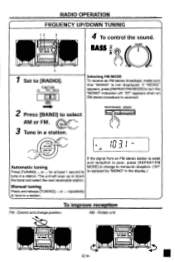
... change position. RADIO OPERATION FRQUENCY UP/DOWN TUNING 1 2 3 1 IOW il dook411 4 To control the sound. BASS ON OFF VOLUME a 4 Set to tune in a station. BA 3 Tune in FM J. "ST' appears when an FM stereo broadcast is replaced by "MONO" in the display.) tune in a station. If "MONO" appears, press [REPEAT/FM MODE] to select AM or FM. VI,/ / 1 0 19: ik...41'r----1- 11.0-4 -E14- IF% AM - Rotate unit. FUNCTION CD TAPE RADIO...
... change position. RADIO OPERATION FRQUENCY UP/DOWN TUNING 1 2 3 1 IOW il dook411 4 To control the sound. BASS ON OFF VOLUME a 4 Set to tune in a station. BA 3 Tune in FM J. "ST' appears when an FM stereo broadcast is replaced by "MONO" in the display.) tune in a station. If "MONO" appears, press [REPEAT/FM MODE] to select AM or FM. VI,/ / 1 0 19: ik...41'r----1- 11.0-4 -E14- IF% AM - Rotate unit. FUNCTION CD TAPE RADIO...
Instruction Manual
Page 16
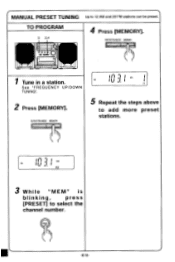
PRESET -E15- See "FREQUENCY UP/DOWN TUNING". 2 Press [MEMORY]. FM In IU 3j. TO PROGRAM 3 2,4 4 Press [MEMORY]. REPEAT/FM MODE MEMORY OMMEMII Tune in a station. REPEAT/FM MODE MEMORY FM sinu 3 m., CH 5 Repeat the steps above to 12 AM and 20 FM stations can be preset. MANUAL PRESET TUNING Up to add more preset stations. MEM 3 While "MEM" is blinking, press [PRESET] to select the channel number.
PRESET -E15- See "FREQUENCY UP/DOWN TUNING". 2 Press [MEMORY]. FM In IU 3j. TO PROGRAM 3 2,4 4 Press [MEMORY]. REPEAT/FM MODE MEMORY OMMEMII Tune in a station. REPEAT/FM MODE MEMORY FM sinu 3 m., CH 5 Repeat the steps above to 12 AM and 20 FM stations can be preset. MANUAL PRESET TUNING Up to add more preset stations. MEM 3 While "MEM" is blinking, press [PRESET] to select the channel number.

Instruction Manual
Page 17
PRESET 2 Press and hold down [PRESET] for at least 1 second. • "PS" blinks. • The preset station are selected in sequenced for approximately five seconds each. Preset scanning will stop. BA D BAND 2 Press [PRESET] briefly. The number buttons on the remote control can also be used. PRESET -E16- • PRESET 3 Press [PRESET] when the desired station has been selected. LISTENING TO PRESET STATIONS USING [PRESET] PRESET SCAN TUNING 1 Press [BAND] to select AM or FM. Press [BAND] to select AM or FM.
PRESET 2 Press and hold down [PRESET] for at least 1 second. • "PS" blinks. • The preset station are selected in sequenced for approximately five seconds each. Preset scanning will stop. BA D BAND 2 Press [PRESET] briefly. The number buttons on the remote control can also be used. PRESET -E16- • PRESET 3 Press [PRESET] when the desired station has been selected. LISTENING TO PRESET STATIONS USING [PRESET] PRESET SCAN TUNING 1 Press [BAND] to select AM or FM. Press [BAND] to select AM or FM.
Instruction Manual
Page 18
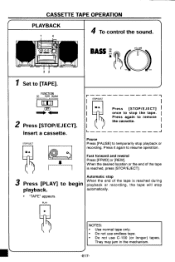
... not use C-100 (or longer) tapes. OOOO ormolu 3 2 BASS ON OFF VOLUME O Set to resume operation. CASSETTE TAPE OPERATION PLAYBACK 1 4 4 To control the sound. STOP/EJECT u/a I r STOP/EJECT M/A Press [STOP/EJECT] once to begin When the end of the tape is reached during playback or recording, the tape will stop the tape. They may jam in the mechanism. \.. -E17- automatically. • "TAPE" appears. FUNCTION CD TAPE RADIO...
... not use C-100 (or longer) tapes. OOOO ormolu 3 2 BASS ON OFF VOLUME O Set to resume operation. CASSETTE TAPE OPERATION PLAYBACK 1 4 4 To control the sound. STOP/EJECT u/a I r STOP/EJECT M/A Press [STOP/EJECT] once to begin When the end of the tape is reached during playback or recording, the tape will stop the tape. They may jam in the mechanism. \.. -E17- automatically. • "TAPE" appears. FUNCTION CD TAPE RADIO...

Instruction Manual
Page 19
...; 3 Press [REC]. Press again to stop the tape. REC PLAY -E18- • Leave the switch in a station. Insert a cassette. tion. BEAT CANCEL switch When recording a radio program, an irritating "whistling" sound may sometimes be heard. BAND Tune in the position that gives the best results. •MIMA I - I k ensone.: 3 1 1 Press [STOP/EJECT]. FUNCTION CD TAPE RADIO II II 1123 • • BEAT CANCEL Press...
...; 3 Press [REC]. Press again to stop the tape. REC PLAY -E18- • Leave the switch in a station. Insert a cassette. tion. BEAT CANCEL switch When recording a radio program, an irritating "whistling" sound may sometimes be heard. BAND Tune in the position that gives the best results. •MIMA I - I k ensone.: 3 1 1 Press [STOP/EJECT]. FUNCTION CD TAPE RADIO II II 1123 • • BEAT CANCEL Press...
Instruction Manual
Page 20
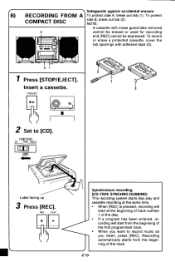
.../EJECT]. FUNCTION CD TAPE RADIO CID imen c'• Label facing up 3 Press [REC]. MC I 2 Set to record music as you listen, press [REC]. Insert a cassette. To protect side B, break out tab (2). Recording automatically starts from the beginning of the track. 1 -E19 REC PLAY Synchronous recording (CD-TAPE SYNCHRO DUBBING) This recording system starts disc play and cassette recording at the same time. • When...
.../EJECT]. FUNCTION CD TAPE RADIO CID imen c'• Label facing up 3 Press [REC]. MC I 2 Set to record music as you listen, press [REC]. Insert a cassette. To protect side B, break out tab (2). Recording automatically starts from the beginning of the track. 1 -E19 REC PLAY Synchronous recording (CD-TAPE SYNCHRO DUBBING) This recording system starts disc play and cassette recording at the same time. • When...
Instruction Manual
Page 21
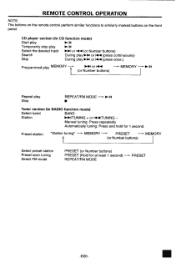
MEMORY - (or Number buttons) Repeat play MEMORY --- PRESET - Manual tuning: Press repeatedly Automatically tuning: Press and hold for at least 1 second) - PRESET REPEAT/FM MODE -E20- ■ Preset station "Station tuning" - REMOTE CONTROL OPERATION NOTE: The buttons on the remote control perform similar functions to similarly marked buttons on the front panel. MEMORY (or Number buttons) Select preset station Preset scan tuning Select FM mode PRESET (or Number buttons) PRESET (Hold for 1 second. CD player section (In CD function mode) Start play 10-111 ...
MEMORY - (or Number buttons) Repeat play MEMORY --- PRESET - Manual tuning: Press repeatedly Automatically tuning: Press and hold for at least 1 second) - PRESET REPEAT/FM MODE -E20- ■ Preset station "Station tuning" - REMOTE CONTROL OPERATION NOTE: The buttons on the remote control perform similar functions to similarly marked buttons on the front panel. MEMORY (or Number buttons) Select preset station Preset scan tuning Select FM mode PRESET (or Number buttons) PRESET (Hold for 1 second. CD player section (In CD function mode) Start play 10-111 ...
Instruction Manual
Page 22
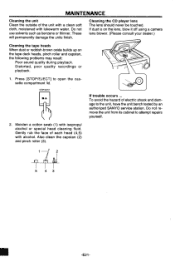
...oxide builds up on the tape deck heads, pinch roller and capstan, the following problems may result: Poor sound quality during playback. STOP/EJECT ,00 If trouble occurs ... Moisten a cotton swab (1) with lukewarm water. Do not remove the unit from its cabinet to open the cassette compartment lid.... alcohol or special head cleaning fluid. Do not use solvents such as benzene or thinner. Cleaning the CD player lens The lens should never be touched. Gently rub the face of electric shock and damage to the unit, have the unit bench tested by an authorized SANYO service station.
...oxide builds up on the tape deck heads, pinch roller and capstan, the following problems may result: Poor sound quality during playback. STOP/EJECT ,00 If trouble occurs ... Moisten a cotton swab (1) with lukewarm water. Do not remove the unit from its cabinet to open the cassette compartment lid.... alcohol or special head cleaning fluid. Do not use solvents such as benzene or thinner. Cleaning the CD player lens The lens should never be touched. Gently rub the face of electric shock and damage to the unit, have the unit bench tested by an authorized SANYO service station.
Instruction Manual
Page 23
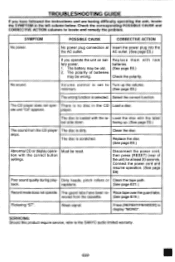
... power cord, then press [RESET] (rear of batteries may be wrong. moved from the CD player The disc is set to the SANYO audio limited warranty. -E22- Check the corresponding POSSIBLE CAUSE and CORRECTIVE ACTION columns to display "MONO". facing up the volume. Clean the disc. SYMPTOM POSSIBLE CAUSE CORRECTIVE ACTION No power. Volume control is dirty. player. SERVICING: Should this product require service, refer to Turn up . (See page E9.) The sound...
... power cord, then press [RESET] (rear of batteries may be wrong. moved from the CD player The disc is set to the SANYO audio limited warranty. -E22- Check the corresponding POSSIBLE CAUSE and CORRECTIVE ACTION columns to display "MONO". facing up the volume. Clean the disc. SYMPTOM POSSIBLE CAUSE CORRECTIVE ACTION No power. Volume control is dirty. player. SERVICING: Should this product require service, refer to Turn up . (See page E9.) The sound...


