Quick Guide (easy Manual) (ver.1.0) (English)
Page 6
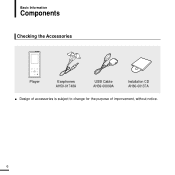
Basic Information Components Checking the Accessories Player Earphones AH59-01748A USB Cable AH39-00899A Installation CD AH80-00137A I Design of accessories is subject to change for the purpose of improvement, without notice. 6
Basic Information Components Checking the Accessories Player Earphones AH59-01748A USB Cable AH39-00899A Installation CD AH80-00137A I Design of accessories is subject to change for the purpose of improvement, without notice. 6
Quick Guide (easy Manual) (ver.1.0) (English)
Page 12
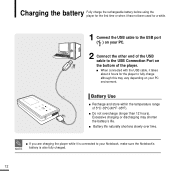
...;C~35°C(40°F~95°F). I Recharge and store within the temperature range of the player. Battery Use I When connected with the USB cable, it takes about 4 hours for a while. 1 Connect the USB cable to the USB port ( ) on your Notebook, make sure the Notebook's NOTE battery is connected to your... PC. 2 Connect the other end of the USB cable to the USB Connection Port on your PC environment. I Do not overcharge (longer than 12 hours). I Battery life naturally shortens slowly over time. I If you are charging the player while it is also fully charged. 12 Charging ...
...;C~35°C(40°F~95°F). I Recharge and store within the temperature range of the player. Battery Use I When connected with the USB cable, it takes about 4 hours for a while. 1 Connect the USB cable to the USB port ( ) on your Notebook, make sure the Notebook's NOTE battery is connected to your... PC. 2 Connect the other end of the USB cable to the USB Connection Port on your PC environment. I Do not overcharge (longer than 12 hours). I Battery life naturally shortens slowly over time. I If you are charging the player while it is also fully charged. 12 Charging ...

Quick Guide (easy Manual) (ver.1.0) (English)
Page 17
.../ Connecting to your PC 2 1 1 Connect the USB cable to the USB port ( ) on the bottom of the USB cable to your PC directly. 17 Loading Your Desired File Connecting to your PC Before you connect the player through a USB hub, the connection may be unstable. Use the USB Cable provided when connecting the player to your PC. 2 Connect the other...
.../ Connecting to your PC 2 1 1 Connect the USB cable to the USB port ( ) on the bottom of the USB cable to your PC directly. 17 Loading Your Desired File Connecting to your PC Before you connect the player through a USB hub, the connection may be unstable. Use the USB Cable provided when connecting the player to your PC. 2 Connect the other...
Quick Guide (easy Manual) (ver.1.0) (English)
Page 21
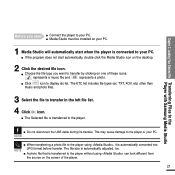
...Choose the file type you want to the Player with Samsung Media Studio Before you start! Loading Your Desired File Transferring Files to transfer by clicking on the screen of these icons. This may cause damage to the player without using , it is automatically converted into .... I The Selected file is transferred to the player or your PC. I Click icon to your PC. CAUTION I If the program does not start when the player is automatically adjusted, too. I When transferring a photo file to the player. I Do not disconnect the USB cable during file transfer.
...Choose the file type you want to the Player with Samsung Media Studio Before you start! Loading Your Desired File Transferring Files to transfer by clicking on the screen of these icons. This may cause damage to the player without using , it is automatically converted into .... I The Selected file is transferred to the player or your PC. I Click icon to your PC. CAUTION I If the program does not start when the player is automatically adjusted, too. I When transferring a photo file to the player. I Do not disconnect the USB cable during file transfer.

Quick Guide (easy Manual) (ver.1.0) (English)
Page 41
I The player will return to select and then tap [ ]. CAUTION 41 To delete the alarm setting 1 Tap [ ] to select the..., tap [ ] and use the NOTE [ ] to delete in the alarm list and then tap [ ]. 4 Use the [ ] and [ ] to the player, the alarm function does not work. I The Confirmation window will appear. 2 Tap [ ]. To end the alarm, press and hold [ ] to move to the...I The Delete window will appear. 3 Tap [ ] to the main menu. Setting Alarm I The selected alarm setting will be deleted. I If the USB cable is connected to edit the setting. Chapter 4.
I The player will return to select and then tap [ ]. CAUTION 41 To delete the alarm setting 1 Tap [ ] to select the..., tap [ ] and use the NOTE [ ] to delete in the alarm list and then tap [ ]. 4 Use the [ ] and [ ] to the player, the alarm function does not work. I The Confirmation window will appear. 2 Tap [ ]. To end the alarm, press and hold [ ] to move to the...I The Delete window will appear. 3 Tap [ ] to the main menu. Setting Alarm I The selected alarm setting will be deleted. I If the USB cable is connected to edit the setting. Chapter 4.

Quick Guide (easy Manual) (ver.1.0) (English)
Page 49
... To Upgrade Firmware Future upgrades may be displayed. 4 Connect the player to your PC with the USB cable. 5 Right click on the Start button on your Desktop. I The uncompressed files will be available for this player to enhance performance and compatibility. 1 Connect to http://www.samsung.com, select [SUPPORT] ¡ [DOWNLOAD CENTER] and then select...
... To Upgrade Firmware Future upgrades may be displayed. 4 Connect the player to your PC with the USB cable. 5 Right click on the Start button on your Desktop. I The uncompressed files will be available for this player to enhance performance and compatibility. 1 Connect to http://www.samsung.com, select [SUPPORT] ¡ [DOWNLOAD CENTER] and then select...

Quick Guide (easy Manual) (ver.1.0) (English)
Page 50
If the battery is complete, the player will be turned off automatically. 9 Push and hold the [œ HOLD ] switch in the opposite direction of the arrow. I The firmware will be upgraded. I When .... 7 Locate and select the Firmware update files (right column) and drag-and-drop it into the Data folder of [Samsung YP-K5] ¡ [Data]. 8 After disconnecting USB Cable, the player will be turned off automatically. The contents of the player. I Check the battery charge status of the Desktop will appear in Windows Explorer (left column).
If the battery is complete, the player will be turned off automatically. 9 Push and hold the [œ HOLD ] switch in the opposite direction of the arrow. I The firmware will be upgraded. I When .... 7 Locate and select the Firmware update files (right column) and drag-and-drop it into the Data folder of [Samsung YP-K5] ¡ [Data]. 8 After disconnecting USB Cable, the player will be turned off automatically. The contents of the player. I Check the battery charge status of the Desktop will appear in Windows Explorer (left column).
Quick Guide (easy Manual) (ver.1.0) (English)
Page 52
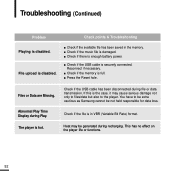
...the player. I Check if the music file is full. I Check if the USB cable is the case, it may be not held responsible for data loss. Check if the USB cable has been disconnected during recharging. Heat may cause serious damage not only to files/data but also to be extra cautious as Samsung cannot... be generated during file or data transmission. I Check if the memory is damaged. Files or Data are Missing. Check if the file is in the memory. This has no effect on the player life or functions. 52 If this is ...
...the player. I Check if the music file is full. I Check if the USB cable is the case, it may be not held responsible for data loss. Check if the USB cable has been disconnected during recharging. Heat may cause serious damage not only to files/data but also to be extra cautious as Samsung cannot... be generated during file or data transmission. I Check if the memory is damaged. Files or Data are Missing. Check if the file is in the memory. This has no effect on the player life or functions. 52 If this is ...
Win 2000/xp/vista ( 59.83 )
Page 1
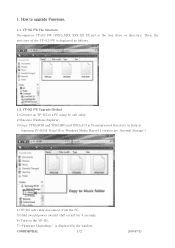
...2 2007-07-21 YP-K5 FW File Structure Decompress YP-K5 FW (YPK5_MXX XXX XX XX.zip) in Samsung YP-K5(If Vista OS or Windows Media Player11 version are "Internal Storage"). 4) YP-K5 usb cable disconnect from the PC. 5) Hold switch(power switch) shift on left for 4 seconds. 6) Turn on ...the YP-K5. 7) "Firmware Upgrading.." is displayed as follows. 1.2. 1. YP-K5 FW Upgrade Method 1) Connect an YP-K5 to a PC using by usb cable. 2) Execute Windows Explorer. 3) Copy YPK5.ROM and YPK5.IMG and YPK5.AUI in Decompressed Directory to upgrade Firmware. 1.1. How to Data in the Any drive...
...2 2007-07-21 YP-K5 FW File Structure Decompress YP-K5 FW (YPK5_MXX XXX XX XX.zip) in Samsung YP-K5(If Vista OS or Windows Media Player11 version are "Internal Storage"). 4) YP-K5 usb cable disconnect from the PC. 5) Hold switch(power switch) shift on left for 4 seconds. 6) Turn on ...the YP-K5. 7) "Firmware Upgrading.." is displayed as follows. 1.2. 1. YP-K5 FW Upgrade Method 1) Connect an YP-K5 to a PC using by usb cable. 2) Execute Windows Explorer. 3) Copy YPK5.ROM and YPK5.IMG and YPK5.AUI in Decompressed Directory to upgrade Firmware. 1.1. How to Data in the Any drive...
Win 2000/xp/vista ( 59.83 )
Page 2
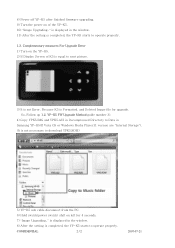
So, Follow up 1.2. YP-K5 FW Upgrade Method guide number 3). 4) Copy YPK5.IMG and YPK5.AUI in Samsung YP-K5(If Vista OS or Windows Media Player11 version are "Internal Storage"). (It is not Error. 8) Power off YP-K5 after finished firmware upgrading. 9) .... 2) If Display Screen of K5 is equal to next picture. 3) It is not necessary to Data in Decompressed Directory to download YPK5.ROM) 5) YP-K5 usb cable disconnect from the PC. 6) Hold switch(power switch) shift on of the YP-K5. 10) "Image Upgrading.." is displayed in the window. 11) After the...
So, Follow up 1.2. YP-K5 FW Upgrade Method guide number 3). 4) Copy YPK5.IMG and YPK5.AUI in Samsung YP-K5(If Vista OS or Windows Media Player11 version are "Internal Storage"). (It is not Error. 8) Power off YP-K5 after finished firmware upgrading. 9) .... 2) If Display Screen of K5 is equal to next picture. 3) It is not necessary to Data in Decompressed Directory to download YPK5.ROM) 5) YP-K5 usb cable disconnect from the PC. 6) Hold switch(power switch) shift on of the YP-K5. 10) "Image Upgrading.." is displayed in the window. 11) After the...

