

User Manual
Page 4
... to Music Listening to Music 31 Listening to your PC 21 Adding Files/Folders in Media Studio........22 Adding Files/Folders in Media Studio with Autoscan 24 Transferring Files with Media Studio .........26 Using as a Removable Disk 28 Disconnecting from your PC 29 Chapter 3. Contents Safety Precautions 2 Contents 4 Chapter 1. Importing Music Files Importing Music Files 18 Transferring Music Files 18 Installing Media Studio 19 Connecting to Music 31 To Play a Playlist 34 User Button Custom Function 36 Recording 39 Voice Recording 39...
... to Music Listening to Music 31 Listening to your PC 21 Adding Files/Folders in Media Studio........22 Adding Files/Folders in Media Studio with Autoscan 24 Transferring Files with Media Studio .........26 Using as a Removable Disk 28 Disconnecting from your PC 29 Chapter 3. Contents Safety Precautions 2 Contents 4 Chapter 1. Importing Music Files Importing Music Files 18 Transferring Music Files 18 Installing Media Studio 19 Connecting to Music 31 To Play a Playlist 34 User Button Custom Function 36 Recording 39 Voice Recording 39...

User Manual
Page 18
Importing Music Files Transferring Music Files To play music files in the player, first transfer music files in MP3, WMA, Audio ASF, Ogg and other supported formats from your PC to the player using Media Studio √ Page 26 ■ Transfer files on your PC to transfer files. Transferring Music Files ■ Transfer files on your PC. Follow the steps below to the player using the "Copy" and "Paste" functions (removable disk) √ Page28 18
Importing Music Files Transferring Music Files To play music files in the player, first transfer music files in MP3, WMA, Audio ASF, Ogg and other supported formats from your PC to the player using Media Studio √ Page 26 ■ Transfer files on your PC to transfer files. Transferring Music Files ■ Transfer files on your PC. Follow the steps below to the player using the "Copy" and "Paste" functions (removable disk) √ Page28 18

User Manual
Page 19
If Media Studio is not installed automatically CAUTION ■ Install the program on PCs running Windows 2000 or Windows XP after logging on with the Administrator account. Insert the installation CD provided with the Administrator account. Chapter 2. Before you start! Please refer to the PC user manual on how to the player. Importing Music Files Transferring Music Files/Installing Media Studio Importing Music Files Installing Media Studio Use Media Studio to transfer music files from your PC to log on with the player into the CD-ROM drive. 1 Click . 19
If Media Studio is not installed automatically CAUTION ■ Install the program on PCs running Windows 2000 or Windows XP after logging on with the Administrator account. Insert the installation CD provided with the Administrator account. Chapter 2. Before you start! Please refer to the PC user manual on how to the player. Importing Music Files Transferring Music Files/Installing Media Studio Importing Music Files Installing Media Studio Use Media Studio to transfer music files from your PC to log on with the player into the CD-ROM drive. 1 Click . 19
User Manual
Page 25
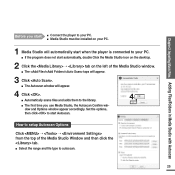
... scans files and adds them to the library. ■ The first time you use Media Studio, the Autoscan Confirm window and Options window appear accordingly. How to setup Autoscan Options Click ➝ ➝ from the top of the Media Studio window. ■ The // taps will appear. 3 Click . ■ The Autoscan window will automatically start when the player is connected to autoscan. 25 Chapter 2. Set the...
... scans files and adds them to the library. ■ The first time you use Media Studio, the Autoscan Confirm window and Options window appear accordingly. How to setup Autoscan Options Click ➝ ➝ from the top of the Media Studio window. ■ The // taps will appear. 3 Click . ■ The Autoscan window will automatically start when the player is connected to autoscan. 25 Chapter 2. Set the...
User Manual
Page 26
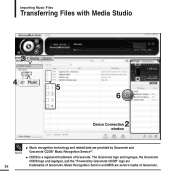
The Gracenote logo and logotype, the Gracenote CDDB logo and logotype, and the "Powered by Gracenote and NOTE Gracenote CDDB® Music Recognition ServiceSM. ■ CDDB is a registered trademark of Gracenote. Music Recognition Service and MRS are 26 trademarks of Gracenote. Importing Music Files Transferring Files with Media Studio 3 4 5 6 2 Device Connection window ■ Music recognition technology and related data are provided by Gracenote CDDB" logo are service marks of Gracenote.
The Gracenote logo and logotype, the Gracenote CDDB logo and logotype, and the "Powered by Gracenote and NOTE Gracenote CDDB® Music Recognition ServiceSM. ■ CDDB is a registered trademark of Gracenote. Music Recognition Service and MRS are 26 trademarks of Gracenote. Importing Music Files Transferring Files with Media Studio 3 4 5 6 2 Device Connection window ■ Music recognition technology and related data are provided by Gracenote CDDB" logo are service marks of Gracenote.

User Manual
Page 27
... program does not start automatically, double click the Media Studio icon on the left of your PC will appear. 6 Click . ■ The selected files are transferred to the player. ■ Do not disconnect the USB Connection Plug during file transfer. NOTE 27 Chapter 2. This may cause damage to the playCAUTION er or your PC. ■ Files on your choice from the Device Connection window...
... program does not start automatically, double click the Media Studio icon on the left of your PC will appear. 6 Click . ■ The selected files are transferred to the player. ■ Do not disconnect the USB Connection Plug during file transfer. NOTE 27 Chapter 2. This may cause damage to the playCAUTION er or your PC. ■ Files on your choice from the Device Connection window...
User Manual
Page 28
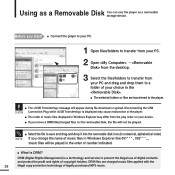
... you start! ■ Connect the player to your PC. 1 Open files/folders to transfer from your PC. 2 Open ➝ from the desktop. 3 Select the files/folders to transfer from the play order on your choice in the order of music files in Windows Explorer like 001* * * , 002* * *..., music files will appear during file download or upload. DRM files are transferred to prevent the illegal use the player as a Removable Disk You can use of digital contents...
... you start! ■ Connect the player to your PC. 1 Open files/folders to transfer from your PC. 2 Open ➝ from the desktop. 3 Select the files/folders to transfer from the play order on your choice in the order of music files in Windows Explorer like 001* * * , 002* * *..., music files will appear during file download or upload. DRM files are transferred to prevent the illegal use the player as a Removable Disk You can use of digital contents...

User Manual
Page 29
... you clicked , the player could not be recharged with power even if it is finished. 29 Chapter 2. Importing Music Files Using as a Removable Disk/ Disconnecting from your PC Disconnecting from your PC Follow the steps below to prevent damage to data CAUTION and the player. ■ You cannot remove the hardware while files within the player are being played on the taskbar...
... you clicked , the player could not be recharged with power even if it is finished. 29 Chapter 2. Importing Music Files Using as a Removable Disk/ Disconnecting from your PC Disconnecting from your PC Follow the steps below to prevent damage to data CAUTION and the player. ■ You cannot remove the hardware while files within the player are being played on the taskbar...

User Manual
Page 31
... automatically turned off when none of the buttons NOTE have a changed extension to play. ■ The music files compatible with the player are MP3, WMA, NOTE Ogg, Audio ASF ■ MP1 or MP2 files which only have been pressed for a preset period of time (Default: 10 seconds) in the pause mode. √ Page 43 31 Listening to Music Listening to Music Before you start! Listening to Music...
... automatically turned off when none of the buttons NOTE have a changed extension to play. ■ The music files compatible with the player are MP3, WMA, NOTE Ogg, Audio ASF ■ MP1 or MP2 files which only have been pressed for a preset period of time (Default: 10 seconds) in the pause mode. √ Page 43 31 Listening to Music Listening to Music Before you start! Listening to Music...

User Manual
Page 36
To set User Button Mode Use the [ USER/ ] button during playback for simple mode change. 1 Press and hold the [ ] button to move to the menu screen. 2 Press the [ + , - ] button to select and then Press the [ ] button. ■ The Settings menu will appear. 3 Press the [ + , - ] button to select the and then press the [ ] button. ■ The User Button Mode menu will appear. 4 Press the [ + , - ] button to Music User Button Custom Function Customize the user button with the frequently used function for convenience. Listening to select...
To set User Button Mode Use the [ USER/ ] button during playback for simple mode change. 1 Press and hold the [ ] button to move to the menu screen. 2 Press the [ + , - ] button to select and then Press the [ ] button. ■ The Settings menu will appear. 3 Press the [ + , - ] button to select the and then press the [ ] button. ■ The User Button Mode menu will appear. 4 Press the [ + , - ] button to Music User Button Custom Function Customize the user button with the frequently used function for convenience. Listening to select...
User Manual
Page 38
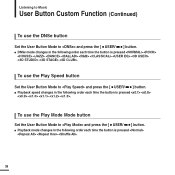
Listening to Music User Button Custom Function (Continued) To use the DNSe button Set the User Button Mode to and press the [ USER/ ] button. ■ DNSe mode changes in the following order each time the button is pressed . To use the Play Mode Mode button Set the User Button Mode to and press the [ USER/ ] button. ■ Playback speed changes in the following order each time the button is pressed . 38 To use the Play Speed button Set the User Button Mode to and press the [ USER/ ] button. ■ Playback mode changes in the...
Listening to Music User Button Custom Function (Continued) To use the DNSe button Set the User Button Mode to and press the [ USER/ ] button. ■ DNSe mode changes in the following order each time the button is pressed . To use the Play Mode Mode button Set the User Button Mode to and press the [ USER/ ] button. ■ Playback speed changes in the following order each time the button is pressed . 38 To use the Play Speed button Set the User Button Mode to and press the [ USER/ ] button. ■ Playback mode changes in the...

User Manual
Page 42
... or . (The higher the number is, the faster the playback speed is a sound effect function for each music genre. To use 3D User Set, select from . ■ Play Mode : Select playback mode such as repeat settings. Select either or . ■ Intro Time : When you press and hold the [ lœœ ] or [ √√l] button during playback. To use User EQ, select from . ■ User EQ Set : Directly select a sound effect (EQ). NOTE ■...
... or . (The higher the number is, the faster the playback speed is a sound effect function for each music genre. To use 3D User Set, select from . ■ Play Mode : Select playback mode such as repeat settings. Select either or . ■ Intro Time : When you press and hold the [ lœœ ] or [ √√l] button during playback. To use User EQ, select from . ■ User EQ Set : Directly select a sound effect (EQ). NOTE ■...

User Manual
Page 43
... menu screen. 2 Press the [ + , - ] button to select and then press the [ ] button. ■ The Settings menu appears. 3 Press the [ + , - ] button to select the and then press the [ ] button. ■ The Time menu appears. 4 Use the [ + , - ] and [ ] buttons to set necessary functions. ■ : Turns off when there is no button operation after the preset time. Chapter 4. Select either or . 43 Setting Music/Setting Time Select either or . ■ : Automatically turns power off power automatically after the preset time...
... menu screen. 2 Press the [ + , - ] button to select and then press the [ ] button. ■ The Settings menu appears. 3 Press the [ + , - ] button to select the and then press the [ ] button. ■ The Time menu appears. 4 Use the [ + , - ] and [ ] buttons to set necessary functions. ■ : Turns off when there is no button operation after the preset time. Chapter 4. Select either or . 43 Setting Music/Setting Time Select either or . ■ : Automatically turns power off power automatically after the preset time...

User Manual
Page 47
... firmware version, number of the memory. 47 Setting the system If the power is stopped. Settings ■ : Selects the recording quality. Chapter 4. Select either or (the higher the number is, the larger the file size becomes). ■ : Search and delete files in memory available is played at default volume. If set within the default volume, the music is slightly less than indicated as the internal firmware uses a portion of stored files...
... firmware version, number of the memory. 47 Setting the system If the power is stopped. Settings ■ : Selects the recording quality. Chapter 4. Select either or (the higher the number is, the larger the file size becomes). ■ : Search and delete files in memory available is played at default volume. If set within the default volume, the music is slightly less than indicated as the internal firmware uses a portion of stored files...
User Manual
Page 51
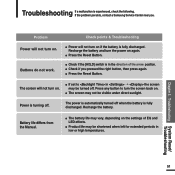
... screen will not turn on. ■ If set to turn on . ■ The screen may be visible under direct sunlight. The power is automatically turned off when the battery is turning off . Check points & Troubleshooting ■ Power will not turn the screen back on . Troubleshooting System Reset/ Troubleshooting 51 If the problem persists, contact a Samsung Service Center near you pressed the right button, then press again. ■ Press the Reset Button. Buttons do not work. Troubleshooting...
... screen will not turn on. ■ If set to turn on . ■ The screen may be visible under direct sunlight. The power is automatically turned off when the battery is turning off . Check points & Troubleshooting ■ Power will not turn the screen back on . Troubleshooting System Reset/ Troubleshooting 51 If the problem persists, contact a Samsung Service Center near you pressed the right button, then press again. ■ Press the Reset Button. Buttons do not work. Troubleshooting...
User Manual
Page 52
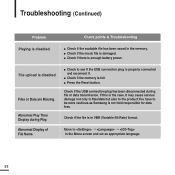
... enough battery power. Troubleshooting (Continued) Problem Check points & Troubleshooting Playing is disabled. ■ Check if the available file has been saved in the memory. ■ Check if the music file is damaged. ■ Check if there is not held responsible for data loss. If this is the case, it . ■ Check if the memory is disabled. Abnormal Play Time Display during file or data transmission. Check if the USB connection...
... enough battery power. Troubleshooting (Continued) Problem Check points & Troubleshooting Playing is disabled. ■ Check if the available file has been saved in the memory. ■ Check if the music file is damaged. ■ Check if there is not held responsible for data loss. If this is the case, it . ■ Check if the memory is disabled. Abnormal Play Time Display during file or data transmission. Check if the USB connection...

User Manual
Page 55
Appendix Menu Tree Music DNSe 3D User Set User EQ Set Play Mode Play Speed Skip Interval Search Speed Intro Time User Button Mode Repeat AB DNSe Play Speed Play Mode Time Display Sleep Scroll Speed Auto Power Off Backlight Time Contrast Tag Display Time LED Effect Language Menu ID3-Tag System Bit Rate Delete File Resume Beep Default Vol Default Set About 55 Menu Tree You can quickly view the menu structure. Menu Select Screen Music Navigation Playlist Settings Chapter 6.
Appendix Menu Tree Music DNSe 3D User Set User EQ Set Play Mode Play Speed Skip Interval Search Speed Intro Time User Button Mode Repeat AB DNSe Play Speed Play Mode Time Display Sleep Scroll Speed Auto Power Off Backlight Time Contrast Tag Display Time LED Effect Language Menu ID3-Tag System Bit Rate Delete File Resume Beep Default Vol Default Set About 55 Menu Tree You can quickly view the menu structure. Menu Select Screen Music Navigation Playlist Settings Chapter 6.
User Manual
Page 56
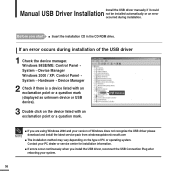
... depending on the device listed with an exclamation point or a question mark (displayed as unknown device or USB device). 3 Double click on the type of the USB driver 1 Check the device manager. Contact your PC dealer or service center for installation information. ■ If errors occur continuously when you are using Windows 2000 and your system. 56 If an error occurs during installation. Manual USB Driver Installation Install the USB driver manually if it could...
... depending on the device listed with an exclamation point or a question mark (displayed as unknown device or USB device). 3 Double click on the type of the USB driver 1 Check the device manager. Contact your PC dealer or service center for installation information. ■ If errors occur continuously when you are using Windows 2000 and your system. 56 If an error occurs during installation. Manual USB Driver Installation Install the USB driver manually if it could...
User Manual
Page 58
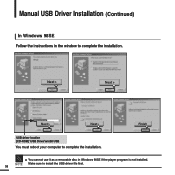
Manual USB Driver Installation (Continued) In Windows 98SE Follow the instructions in Windows 98SE if the player program is not installed. 58 NOTE Make sure to complete the installation. Next > Next > \USB Driver\win98 USB Next > Next > Finish USB driver location [CD-ROM] \USB Driver\win98 USB You must reboot your computer to complete the installation. ■ You cannot use it as a removable disc in the window to install the USB driver file first.
Manual USB Driver Installation (Continued) In Windows 98SE Follow the instructions in Windows 98SE if the player program is not installed. 58 NOTE Make sure to complete the installation. Next > Next > \USB Driver\win98 USB Next > Next > Finish USB driver location [CD-ROM] \USB Driver\win98 USB You must reboot your computer to complete the installation. ■ You cannot use it as a removable disc in the window to install the USB driver file first.
User Manual
Page 59
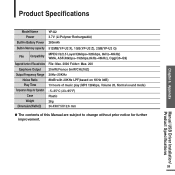
... Ratio Play Time Temperature Range for Operation Case Weight Dimension(WxHxD) 88dB with 20KHz LPF(based on 1KHz 0dB) 13 hours of music play (MP3 128kbps, Volume 20, Normal sound mode) - 5~35°C (23~95°F) Plastic 28g 24.4X87.5X12.6 mm ● The contents of this Manual are subject to change without prior notice for further improvement. Appendix Manual USB Driver Installation/ Product Specifications 59...
... Ratio Play Time Temperature Range for Operation Case Weight Dimension(WxHxD) 88dB with 20KHz LPF(based on 1KHz 0dB) 13 hours of music play (MP3 128kbps, Volume 20, Normal sound mode) - 5~35°C (23~95°F) Plastic 28g 24.4X87.5X12.6 mm ● The contents of this Manual are subject to change without prior notice for further improvement. Appendix Manual USB Driver Installation/ Product Specifications 59...


