User Guide
Page 2
...the USB cable q Formatting Installing yepp Studio To View Help on yepp Studio Basic Usage Playing Music and Turning Off the Device Adjusting the Volume/Hold Function Recording Voice MP3 Encoding Searching for Music/Voice Files Listening to FM Radio FM Encoding 2 Additional Usage Loop Repeating Using Navigation q Changing Mode q Playing/Exiting Folder Setting Playlist Setting up MENU 4 Managing Files 6 q Deleting 9 q Formatting 10 Setting the Advanced Functions Selecting the Playmode Setting the EQ mode DISPLAY q Scroll Speed / Time 12 q Backlight 16 q Contrast 20 Power...
...the USB cable q Formatting Installing yepp Studio To View Help on yepp Studio Basic Usage Playing Music and Turning Off the Device Adjusting the Volume/Hold Function Recording Voice MP3 Encoding Searching for Music/Voice Files Listening to FM Radio FM Encoding 2 Additional Usage Loop Repeating Using Navigation q Changing Mode q Playing/Exiting Folder Setting Playlist Setting up MENU 4 Managing Files 6 q Deleting 9 q Formatting 10 Setting the Advanced Functions Selecting the Playmode Setting the EQ mode DISPLAY q Scroll Speed / Time 12 q Backlight 16 q Contrast 20 Power...

User Guide
Page 5
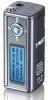
... indicated as the internal firmware uses a part of the battery. Operation can make high quality voice recordings. 8 Player Carrying case AH61-01618A Earphones AH30-00064D USB cable AH39-00589A User manual AH68-01475A One Battery (1.5V AAA/LR03 type) 4301-000115 Neck Strap AH61-01619A Direct Connect USB Adaptor AH39-00590A Line In Cable AH39-00567A Installation CD AH80-00063D Model Built-in memory YP-T5 H 128MB YP-T5 V 256MB YP-T5 X 512MB q The capacity...
... indicated as the internal firmware uses a part of the battery. Operation can make high quality voice recordings. 8 Player Carrying case AH61-01618A Earphones AH30-00064D USB cable AH39-00589A User manual AH68-01475A One Battery (1.5V AAA/LR03 type) 4301-000115 Neck Strap AH61-01619A Direct Connect USB Adaptor AH39-00590A Line In Cable AH39-00567A Installation CD AH80-00063D Model Built-in memory YP-T5 H 128MB YP-T5 V 256MB YP-T5 X 512MB q The capacity...
User Guide
Page 7
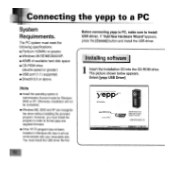
...... 13 Connecting the yepp to install USB driver. q DirectX 8.0 or above. Select [yepp USB Driver] 12 2 Click [Next] in order to format yepp and upgrade firmware. However, you must install the program in the series of available hard disk space q CD-ROM drive. (double speed or greater) q USB port (1.1) supported. Installing software 1 Insert the Installation CD into the CD-ROM drive. q 40MB of windows that appear. Otherwise, installation will not communicate with your removable disk. The...
...... 13 Connecting the yepp to install USB driver. q DirectX 8.0 or above. Select [yepp USB Driver] 12 2 Click [Next] in order to format yepp and upgrade firmware. However, you must install the program in the series of available hard disk space q CD-ROM drive. (double speed or greater) q USB port (1.1) supported. Installing software 1 Insert the Installation CD into the CD-ROM drive. q 40MB of windows that appear. Otherwise, installation will not communicate with your removable disk. The...
User Guide
Page 9
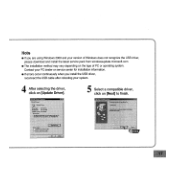
... USB driver, reconnect the USB cable after rebooting your system. 4 After selecting the driver, click on [Update Driver]. 5 Select a compatible driver, click on page 20 if the USB driver is not in place. Follow these steps if the USB driver is in place : When an error occurs during installation of the USB driver 1 Check the device manager. q If errors occur continuously when you are using Windows 2000 and your PC dealer or service...
... USB driver, reconnect the USB cable after rebooting your system. 4 After selecting the driver, click on [Update Driver]. 5 Select a compatible driver, click on page 20 if the USB driver is not in place. Follow these steps if the USB driver is in place : When an error occurs during installation of the USB driver 1 Check the device manager. q If errors occur continuously when you are using Windows 2000 and your PC dealer or service...
User Guide
Page 10
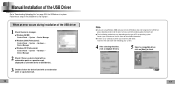
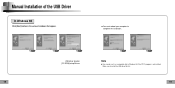
Make sure to complete the installation. Manual Installation of the USB Driver In Windows 98 Click [Next] button in Windows 98 if the YP-T5 program is not installed. USB driver location [CD ROM]\setup\Drivers Note q You cannot use it as a removable disk in the series of windows that appear. q You must reboot your computer to install the USB driver file first. 18 19
Make sure to complete the installation. Manual Installation of the USB Driver In Windows 98 Click [Next] button in Windows 98 if the YP-T5 program is not installed. USB driver location [CD ROM]\setup\Drivers Note q You cannot use it as a removable disk in the series of windows that appear. q You must reboot your computer to install the USB driver file first. 18 19

User Guide
Page 14
... Volume/Hold Function Adjusting the Volume Press the player's , button during playback to adjust the volume. q The power off the power. message will appear on the power. q While in greater increments. Pausing Music Press the button to turn off time can only be set in the direction of 48Kbps-192Kbps. Press and hold the button to resume playback. q Playback starts. Playing Music and Turning Off the Device Turning Power On and Off q Power On : Press the button to pause playback. q Power...
... Volume/Hold Function Adjusting the Volume Press the player's , button during playback to adjust the volume. q The power off the power. message will appear on the power. q While in greater increments. Pausing Music Press the button to turn off time can only be set in the direction of 48Kbps-192Kbps. Press and hold the button to resume playback. q Playback starts. Playing Music and Turning Off the Device Turning Power On and Off q Power On : Press the button to pause playback. q Power...

User Guide
Page 15
... to other modes from LINE_ENC mode, refer to page 36 "Changing Mode". 1 Connect the Audio Output port on the external audio source (or the Line Out port) to the ENC port on the device with the Line cable. 2 Press the REC button to start voice recording. 2 Press the REC button again to stop the recording and a voice file is extremely high, the sound quality may not be set within...
... to other modes from LINE_ENC mode, refer to page 36 "Changing Mode". 1 Connect the Audio Output port on the external audio source (or the Line Out port) to the ENC port on the device with the Line cable. 2 Press the REC button to start voice recording. 2 Press the REC button again to stop the recording and a voice file is extremely high, the sound quality may not be set within...

User Guide
Page 16
... and then press the button. q In the case of a VBR file, you want . Note q VBR(Variable Bit Rate) file: A file that were downloaded in MP2 or MP1 and had their pitch, in FM Mode. Searching for Music/Voice Files To search for specific parts during play q Press and hold the joystick to the left or right during playback to play the next track. q Use , to . q Press the...
... and then press the button. q In the case of a VBR file, you want . Note q VBR(Variable Bit Rate) file: A file that were downloaded in MP2 or MP1 and had their pitch, in FM Mode. Searching for Music/Voice Files To search for specific parts during play q Press and hold the joystick to the left or right during playback to play the next track. q Use , to . q Press the...

User Guide
Page 19
... "Setting Menu". 36 Playing/Exiting Folder [Playing Folder] 1 Press and hold key during folder playback to move to the Navigation mode. 2 Use , keys to move to the file you want and press q When " " appears, the selected file will be played. q After folder play is changed to the Music mode, the selected file will be played. Ex) To change from the Voice mode to the Music mode 1 Press and hole key in the following method. button. [Exiting Folder Play] 1 Press...
... "Setting Menu". 36 Playing/Exiting Folder [Playing Folder] 1 Press and hold key during folder playback to move to the Navigation mode. 2 Use , keys to move to the file you want and press q When " " appears, the selected file will be played. q After folder play is changed to the Music mode, the selected file will be played. Ex) To change from the Voice mode to the Music mode 1 Press and hole key in the following method. button. [Exiting Folder Play] 1 Press...

User Guide
Page 21
... the provided program installed as formatting in the Menu may take a long time. 41 Press the joystick to the position briefly to delete, press the select CONFIRM. button and 40 Formatting 1 Select File in the MENU. (refer to "Setting up MENU") 2 In File, select File Delete and the mode the target file is in memory. q Formatting is performed if CONFIRM is recommended that formatting be deleted when formatting the built-in . 3 Use , to...
... the provided program installed as formatting in the Menu may take a long time. 41 Press the joystick to the position briefly to delete, press the select CONFIRM. button and 40 Formatting 1 Select File in the MENU. (refer to "Setting up MENU") 2 In File, select File Delete and the mode the target file is in memory. q Formatting is performed if CONFIRM is recommended that formatting be deleted when formatting the built-in . 3 Use , to...
User Guide
Page 28
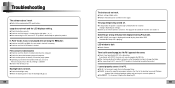
... There is low, the backlight will be downloaded. q Check the battery capacity q Check to connect it again. In PLAY mode, music is full. Please save . Troubleshooting The software doesn't work . q Check and/or replace the battery, turn on settings). Backlight does not work q Refer to see if MP3 or WMA files are files saved in memory. If you formatted to change the folder. q WinME : remove the yepp Driver program and press the Start in the screen.
... There is low, the backlight will be downloaded. q Check the battery capacity q Check to connect it again. In PLAY mode, music is full. Please save . Troubleshooting The software doesn't work . q Check and/or replace the battery, turn on settings). Backlight does not work q Refer to see if MP3 or WMA files are files saved in memory. If you formatted to change the folder. q WinME : remove the yepp Driver program and press the Start in the screen.
User Guide
Page 31
... to comply with Samsung's instructions usage and maintenance. Repair or direct replacement under the terms of the unit under normal use with the warranty on the product has been altered, deleted, removed or made for repairs carried out by a non-authorized person. x The model, serial No. Samsung reserves the right to refuse warranty service if this information has been removed or changed after the...
... to comply with Samsung's instructions usage and maintenance. Repair or direct replacement under the terms of the unit under normal use with the warranty on the product has been altered, deleted, removed or made for repairs carried out by a non-authorized person. x The model, serial No. Samsung reserves the right to refuse warranty service if this information has been removed or changed after the...
Quick Guide
Page 2
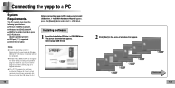
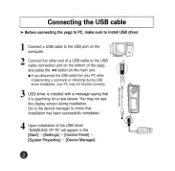
... to install USB driver. 1 Connect a USB cable to the USB port on the computer. 2 Connect the other end of a USB cable to check that it is installed with a message saying that installation has been successfully completed. You may not function correctly. 3 USB driver is searching for a new device. II 4 Upon installation of the yepp, and press the ►u button on the bottom of the USB driver "SAMSUNG YP-T5" will appear in the [Start] [Settings] [Control...
... to install USB driver. 1 Connect a USB cable to the USB port on the computer. 2 Connect the other end of a USB cable to check that it is installed with a message saying that installation has been successfully completed. You may not function correctly. 3 USB driver is searching for a new device. II 4 Upon installation of the yepp, and press the ►u button on the bottom of the USB driver "SAMSUNG YP-T5" will appear in the [Start] [Settings] [Control...

Quick Guide
Page 7
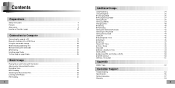
... Instructions Features 6 Accessories • 9 Location of Controls (yepp) 10 Connection to Computer Connecting the yepp to a PC 12 Manual Installation of the USB Driver 16 Using the removable storage 20 • Downloading/Uploading files - - 20 • Disconnecting the USB cable 21 • Formatting 22 Installing yepp Studio 23 To View Help on yepp Studio 25 Basic Usage Playing Music and Turning Off the Device 26 Adjusting the Volume/Hold Function 27 Recording Voice 28 MP3 Encoding 29 Searching for Music/Voice Files...
... Instructions Features 6 Accessories • 9 Location of Controls (yepp) 10 Connection to Computer Connecting the yepp to a PC 12 Manual Installation of the USB Driver 16 Using the removable storage 20 • Downloading/Uploading files - - 20 • Disconnecting the USB cable 21 • Formatting 22 Installing yepp Studio 23 To View Help on yepp Studio 25 Basic Usage Playing Music and Turning Off the Device 26 Adjusting the Volume/Hold Function 27 Recording Voice 28 MP3 Encoding 29 Searching for Music/Voice Files...

Quick Guide
Page 8
Additional Usage 1Loop Repeating 34 Using Navigation 35 Setting Playlist 36 Setting up MENU 37 Managing Files 38 • Deleting 38 • Formatting 39 Setting the Advanced Functions 40 Selecting the Playmode 41 Setting the EQ mode 42 DISPLAY 43 • Scroll Speed / Time 43 • Backlight 44 • Contrast 45 Power OFF Time 46 • Time / Sleep 46 ENCODE 47 • Bitrate / AutoSync Time 47 WOW LEVEL 48 •...
Additional Usage 1Loop Repeating 34 Using Navigation 35 Setting Playlist 36 Setting up MENU 37 Managing Files 38 • Deleting 38 • Formatting 39 Setting the Advanced Functions 40 Selecting the Playmode 41 Setting the EQ mode 42 DISPLAY 43 • Scroll Speed / Time 43 • Backlight 44 • Contrast 45 Power OFF Time 46 • Time / Sleep 46 ENCODE 47 • Bitrate / AutoSync Time 47 WOW LEVEL 48 •...
Quick Guide
Page 17
...; CD-ROM drive. (double speed or greater) • USB port (1.1) supported. • DirectX 8.0 or above. Select [yepp USB Driver] • Install the operating system in Windows 98, then it will not be completed. • Windows ME, 2000 and XP can recognize the driver without installing the provided program. Connecting the yepp to install USB driver. However, you must install the program in order to format yepp and upgrade firmware. • If the YP-T5 program has not...
...; CD-ROM drive. (double speed or greater) • USB port (1.1) supported. • DirectX 8.0 or above. Select [yepp USB Driver] • Install the operating system in Windows 98, then it will not be completed. • Windows ME, 2000 and XP can recognize the driver without installing the provided program. Connecting the yepp to install USB driver. However, you must install the program in order to format yepp and upgrade firmware. • If the YP-T5 program has not...
Quick Guide
Page 22
... not recognize the USB driver, please download and install the latest service pack from windowsupdate.microsoft.com • The installation method may vary depending on [Next] to finish. watrintreafg-wilyz, • 17 Contact your PC dealer or service center for installation information. • If errors occur continuously when you are using Windows 2000 and your system. 4 After selecting the driver, click on [Update Driver]. 5 Select a compatible driver...
... not recognize the USB driver, please download and install the latest service pack from windowsupdate.microsoft.com • The installation method may vary depending on [Next] to finish. watrintreafg-wilyz, • 17 Contact your PC dealer or service center for installation information. • If errors occur continuously when you are using Windows 2000 and your system. 4 After selecting the driver, click on [Update Driver]. 5 Select a compatible driver...

Quick Guide
Page 31
... hold the ►II button to resume playback. yePP/- Molts • WMA files can only be played as music files with a compression rate of 48Kbps-192Kbps. • The power off time can be set in Pause mode, briefly press ►II again to turn on settings), the yepp automatically powers off the power. t.eot ie?o awl )00:81:30 Singer-Song I GOOD BYE - Playing Music Press the ►II button. • Playback starts...
... hold the ►II button to resume playback. yePP/- Molts • WMA files can only be played as music files with a compression rate of 48Kbps-192Kbps. • The power off time can be set in Pause mode, briefly press ►II again to turn on settings), the yepp automatically powers off the power. t.eot ie?o awl )00:81:30 Singer-Song I GOOD BYE - Playing Music Press the ►II button. • Playback starts...

Quick Guide
Page 43
Song 3 DELETE PIRVI M fir[ list INC Iso DELETE COMPLETED DELETE Singer - button and File Delete Format DELETE tet Ull , RN, E Singer - Managing Files Deleting 1 Select File in the MENU. (refer to "Setting up MENU") 2 In File, select File Delete and the mode the target file is in. 3 Use + to move to the file you want to exit the setting. Song 3 Press the joystick to the 144 position briefly to delete, press the select CONFIRM.
Song 3 DELETE PIRVI M fir[ list INC Iso DELETE COMPLETED DELETE Singer - button and File Delete Format DELETE tet Ull , RN, E Singer - Managing Files Deleting 1 Select File in the MENU. (refer to "Setting up MENU") 2 In File, select File Delete and the mode the target file is in. 3 Use + to move to the file you want to exit the setting. Song 3 Press the joystick to the 144 position briefly to delete, press the select CONFIRM.
Quick Guide
Page 63
...service if this product proves defective under warranty. Samsung reserves the right to the original purchaser; Repair or direct replacement under the terms of the unit under normal use and service, you should return the product to the retailer from the dealer. 2.Samsung's obligations are to the repair of the defective part...to or a new starting of the period of purchase, dealer's name, model, serial No. and product number. The liability of Samsung and its discretion, replacement of the product for any repairs or damage caused by an Authorized Samsung Dealer/Service Center. No ...
...service if this product proves defective under warranty. Samsung reserves the right to the original purchaser; Repair or direct replacement under the terms of the unit under normal use and service, you should return the product to the retailer from the dealer. 2.Samsung's obligations are to the repair of the defective part...to or a new starting of the period of purchase, dealer's name, model, serial No. and product number. The liability of Samsung and its discretion, replacement of the product for any repairs or damage caused by an Authorized Samsung Dealer/Service Center. No ...


