
User Manual (ENGLISH)
Page 1
To receive a more complete service, please register your product at www.samsung.com/global/register YP-P2 MP3 Player user manual imagine the possibilities Thank you for purchasing this Samsung product.
To receive a more complete service, please register your product at www.samsung.com/global/register YP-P2 MP3 Player user manual imagine the possibilities Thank you for purchasing this Samsung product.
User Manual (ENGLISH)
Page 2
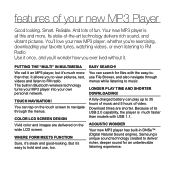
... music and 5 hours of its USB 2.0 capability, the player is all this and more than models with the easy-touse File Brower, and also navigate through the menus. The built-in DNSe™ (Digital Natural Sound engine), Samsung's unique sound technology created to hold and use, too. ...PUTTING THE "MULTI" IN MULTIMEDIA We call it an MP3 player, but it 's easy to deliver richer, deeper sound for files with...
... music and 5 hours of its USB 2.0 capability, the player is all this and more than models with the easy-touse File Brower, and also navigate through the menus. The built-in DNSe™ (Digital Natural Sound engine), Samsung's unique sound technology created to hold and use, too. ...PUTTING THE "MULTI" IN MULTIMEDIA We call it an MP3 player, but it 's easy to deliver richer, deeper sound for files with...
User Manual (ENGLISH)
Page 3
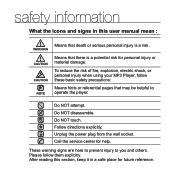
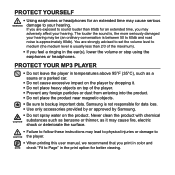
... for help. Do NOT attempt. Follow directions explicitly. To reduce the risk of fire, explosion, electric shock, or personal injury when using your MP3 Player, follow them explicitly. Do NOT touch. Please follow these basic safety precautions: Means hints or referential pages that there is a risk. After reading this section... death or serious personal injury is a potential risk for personal injury or material damage. These warning signs are here to prevent injury to operate the player. Do NOT disassemble. Means that may be helpful to you and others.
... for help. Do NOT attempt. Follow directions explicitly. To reduce the risk of fire, explosion, electric shock, or personal injury when using your MP3 Player, follow them explicitly. Do NOT touch. Please follow these basic safety precautions: Means hints or referential pages that there is a risk. After reading this section... death or serious personal injury is a potential risk for personal injury or material damage. These warning signs are here to prevent injury to operate the player. Do NOT disassemble. Means that may be helpful to you and others.
User Manual (ENGLISH)
Page 4
... in damp, dusty, or sooty areas because these WARNING environments could get in the way of electric shock. ƒ Do not use your new mp3 player. Instead, contact a Samsung Customer Service Center near you. ƒ Do not use the product when it carefully to avoid damaging the...
... in damp, dusty, or sooty areas because these WARNING environments could get in the way of electric shock. ƒ Do not use your new mp3 player. Instead, contact a Samsung Customer Service Center near you. ƒ Do not use the product when it carefully to avoid damaging the...
User Manual (ENGLISH)
Page 5
...the product with chemical CAUTION substances such as benzene or thinner, as a sauna or a parked car. ƒ Do not cause excessive impact on the player by Samsung. ƒ Do not spray water on top of the maximum). ƒ If you print in color and NOTE check "Fit to medium (the ...; Using earphones or headphones for an extended time may cause serious WARNING damage to your hearing. You are exposed to sound louder than 2/3 of the player. ƒ Prevent any foreign particles or dust from entering into the product. ƒ Do not place the product near magnetic objects. ƒ Be...
...the product with chemical CAUTION substances such as benzene or thinner, as a sauna or a parked car. ƒ Do not cause excessive impact on the player by Samsung. ƒ Do not spray water on top of the maximum). ƒ If you print in color and NOTE check "Fit to medium (the ...; Using earphones or headphones for an extended time may cause serious WARNING damage to your hearing. You are exposed to sound louder than 2/3 of the player. ƒ Prevent any foreign particles or dust from entering into the product. ƒ Do not place the product near magnetic objects. ƒ Be...
User Manual (ENGLISH)
Page 6
contents THE BASICS 10 What's included 10 11 13 17 Your MP3 Player Screen displays Using the touch screen 21 Charging the battery 22 Caring for the battery 22 Turning the Power on & off 23 Playing a video fi... Settings 33 Time Settings 34 System Settings 38 Resetting the system EMODIO 39 PC requirements 39 40 41 Installing EmoDio Transferring files to the player with EmoDio
contents THE BASICS 10 What's included 10 11 13 17 Your MP3 Player Screen displays Using the touch screen 21 Charging the battery 22 Caring for the battery 22 Turning the Power on & off 23 Playing a video fi... Settings 33 Time Settings 34 System Settings 38 Resetting the system EMODIO 39 PC requirements 39 40 41 Installing EmoDio Transferring files to the player with EmoDio
User Manual (ENGLISH)
Page 7
... a playlist using EmoDio 60 Creating a playlist 61 Adding music files to a playlist you've created 62 Transferring a playlist to your player using EmoDio 63 Creating a playlist on your MP3 player 64 Playing a playlist 65 Deleting a file from the playlist 65 Deleting all files from the playlist 66 Using the...
... a playlist using EmoDio 60 Creating a playlist 61 Adding music files to a playlist you've created 62 Transferring a playlist to your player using EmoDio 63 Creating a playlist on your MP3 player 64 Playing a playlist 65 Deleting a file from the playlist 65 Deleting all files from the playlist 66 Using the...
User Manual (ENGLISH)
Page 8
contents VIEWING PICTURES 76 Viewing pictures 76 77 Using the picture menu LISTENING TO FM RADIO 82 To use the mute function 82 83 84 To search for FM stations Using the FM radio menu USING THE DATACAST 90 Registering a channel 90 91 91 Creating a new channel group Transferring a datacast from 92 Viewing Datacasts ENJOYING THE PRIME PACK 93 93 Reading text 94 Using the text menu 98 Playing video games 102 Setting the alarm 105 Viewing the calendar 106 Viewing the address book 107 Viewing the world clock 108 Using the Calculator 109 Voice recording 111 Viewing the World Subway Map
contents VIEWING PICTURES 76 Viewing pictures 76 77 Using the picture menu LISTENING TO FM RADIO 82 To use the mute function 82 83 84 To search for FM stations Using the FM radio menu USING THE DATACAST 90 Registering a channel 90 91 91 Creating a new channel group Transferring a datacast from 92 Viewing Datacasts ENJOYING THE PRIME PACK 93 93 Reading text 94 Using the text menu 98 Playing video games 102 Setting the alarm 105 Viewing the calendar 106 Viewing the address book 107 Viewing the world clock 108 Using the Calculator 109 Voice recording 111 Viewing the World Subway Map

User Manual (ENGLISH)
Page 9
contents USING BLUETOOTH 112 112 What is bluetooth? 113 Using a Bluetooth stereo headset 116 Using a Bluetooth mobile phone 122 Transferring files to/from a bluetooth device 127 Using the Bluetooth menu 128 Bluetooth settings TROUBLESHOOTING 130 Troubleshooting 130 APPENDIX 133 133 Menu tree 134 Product specifications 136 License
contents USING BLUETOOTH 112 112 What is bluetooth? 113 Using a Bluetooth stereo headset 116 Using a Bluetooth mobile phone 122 Transferring files to/from a bluetooth device 127 Using the Bluetooth menu 128 Bluetooth settings TROUBLESHOOTING 130 Troubleshooting 130 APPENDIX 133 133 Menu tree 134 Product specifications 136 License
User Manual (ENGLISH)
Page 10
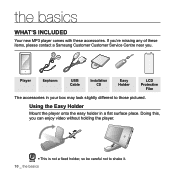
... The accessories in a flat surface place. the basics WHAT'S INCLUDED Your new MP3 player comes with these items, please contact a Samsung Customer Customer Service Centre near you can enjoy video without holding the player. ƒ This is not a fixed holder, so be careful not to those ...pictured. If you're missing any of these accessories. Using the Easy Holder Mount the player onto the easy ...
... The accessories in a flat surface place. the basics WHAT'S INCLUDED Your new MP3 player comes with these items, please contact a Samsung Customer Customer Service Centre near you can enjoy video without holding the player. ƒ This is not a fixed holder, so be careful not to those ...pictured. If you're missing any of these accessories. Using the Easy Holder Mount the player onto the easy ...
User Manual (ENGLISH)
Page 11
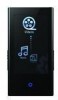
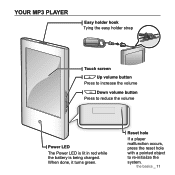
YOUR MP3 PLAYER Easy holder hook Tying the easy holder strap Touch screen Up volume button Press to increase the volume Down volume button Press to re-initialize the system. the basics _ 11 When done, it turns green. Reset hole If a player malfunction occurs, press the reset hole with a pointed object to reduce the volume Power LED The Power LED is lit in red while the battery is being charged.
YOUR MP3 PLAYER Easy holder hook Tying the easy holder strap Touch screen Up volume button Press to increase the volume Down volume button Press to re-initialize the system. the basics _ 11 When done, it turns green. Reset hole If a player malfunction occurs, press the reset hole with a pointed object to reduce the volume Power LED The Power LED is lit in red while the battery is being charged.
User Manual (ENGLISH)
Page 12
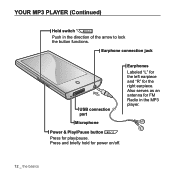
YOUR MP3 PLAYER (Continued) Hold switch Push in the MP3 player. Press and briefly hold for play/pause. Power & Play/Pause button Press for power on/off. 12 _ the basics Also serves as an antenna for the right earpiece. Earphone connection jack USB connection port Microphone Earphones Labeled "L" for the left earpiece and "R" for FM Radio in the direction of the arrow to lock the button functions.
YOUR MP3 PLAYER (Continued) Hold switch Push in the MP3 player. Press and briefly hold for play/pause. Power & Play/Pause button Press for power on/off. 12 _ the basics Also serves as an antenna for the right earpiece. Earphone connection jack USB connection port Microphone Earphones Labeled "L" for the left earpiece and "R" for FM Radio in the direction of the arrow to lock the button functions.

User Manual (ENGLISH)
Page 13
The actual screen NOTE may differ. ƒ Information and icons on the screen if you want to display the video playback information and icons again. the basics _ 13 SCREEN DISPLAYS Video 7 1 8 2 Video Track 1 3 9 4 5 10 11 6 Bluetooth/Lock/Alarm 1 Indicator 2 Battery Status Play/Pause, Search 7 Indicator 8 Video Mode Indicator 3 Current Time 9 Play Status Bar 4 Current /Total Play Time 10 Back Icon 5 File Name 11 Menu Icon 6 Play/Pause, Search Icon ƒ The screen pictures are for illustration purposes only. Tap on the current video playback will disappear ...
The actual screen NOTE may differ. ƒ Information and icons on the screen if you want to display the video playback information and icons again. the basics _ 13 SCREEN DISPLAYS Video 7 1 8 2 Video Track 1 3 9 4 5 10 11 6 Bluetooth/Lock/Alarm 1 Indicator 2 Battery Status Play/Pause, Search 7 Indicator 8 Video Mode Indicator 3 Current Time 9 Play Status Bar 4 Current /Total Play Time 10 Back Icon 5 File Name 11 Menu Icon 6 Play/Pause, Search Icon ƒ The screen pictures are for illustration purposes only. Tap on the current video playback will disappear ...

User Manual (ENGLISH)
Page 14
SCREEN DISPLAYS (Continued) Music 10 11 Songs 12 13 14 Rising Sun 15 16 17 1 2 3 1/52 4 5 6 7 8 9 1 Bluetooth/Lock/Alarm Indicator 2 Current Time 3 Battery Status Current track playing / 4 Total number of tracks Indicator 5 Music Play Screen 6 Play Status Bar 7 Current /Total Play Time 8 Play/Pause, Search Icon 9 A-B Repeat Icon 10 Play/Pause, Search Indicator 11 Music Mode Indicator 12 Parent Menu Indicator 13 Music Title 14 DNSe Mode Indicator 15 Play Mode Indicator 16 Back Icon 17 Menu Icon 14 _ the basics
SCREEN DISPLAYS (Continued) Music 10 11 Songs 12 13 14 Rising Sun 15 16 17 1 2 3 1/52 4 5 6 7 8 9 1 Bluetooth/Lock/Alarm Indicator 2 Current Time 3 Battery Status Current track playing / 4 Total number of tracks Indicator 5 Music Play Screen 6 Play Status Bar 7 Current /Total Play Time 8 Play/Pause, Search Icon 9 A-B Repeat Icon 10 Play/Pause, Search Indicator 11 Music Mode Indicator 12 Parent Menu Indicator 13 Music Title 14 DNSe Mode Indicator 15 Play Mode Indicator 16 Back Icon 17 Menu Icon 14 _ the basics

User Manual (ENGLISH)
Page 15
the basics _ 15 NOTE Tap on the screen if you want to display the picture information and icons again. SCREEN DISPLAYS (Continued) Picture 1 Bluetooth/Lock/Alarm Indicator 7 1 2 Current Time 8 2 3 Battery Status 9 3 Photo image 1 2/8 4 4 Current file / Total number of files Indicator 5 Next Image Icon 6 Zoom Icon 10 5 7 Music Play Status 8 Picture Mode Indicator 9 File Name 11 6 10 Previous Image Icon 12 [Picture View Screen] 11 Back Icon 12 Menu Icon ƒ Information and icons in the current picture display will disappear shortly.
the basics _ 15 NOTE Tap on the screen if you want to display the picture information and icons again. SCREEN DISPLAYS (Continued) Picture 1 Bluetooth/Lock/Alarm Indicator 7 1 2 Current Time 8 2 3 Battery Status 9 3 Photo image 1 2/8 4 4 Current file / Total number of files Indicator 5 Next Image Icon 6 Zoom Icon 10 5 7 Music Play Status 8 Picture Mode Indicator 9 File Name 11 6 10 Previous Image Icon 12 [Picture View Screen] 11 Back Icon 12 Menu Icon ƒ Information and icons in the current picture display will disappear shortly.

User Manual (ENGLISH)
Page 16
SCREEN DISPLAYS (Continued) FM Radio 6 FM Radio 7 8 9 10 11 1 Bluetooth/Lock/Alarm Indicator 1 2 2 Current Time 3 3 Battery Status 4 4 Manual/Preset Indicator 5 Preset Number Icon 6 Radio Mode Indicator 7 Current Frequency(MHz) Indicator 5 8 Frequency location Indicator 9 Menu Icon 10 Back Icon 11 Record Icon 16 _ the basics
SCREEN DISPLAYS (Continued) FM Radio 6 FM Radio 7 8 9 10 11 1 Bluetooth/Lock/Alarm Indicator 1 2 2 Current Time 3 3 Battery Status 4 4 Manual/Preset Indicator 5 Preset Number Icon 6 Radio Mode Indicator 7 Current Frequency(MHz) Indicator 5 8 Frequency location Indicator 9 Menu Icon 10 Back Icon 11 Record Icon 16 _ the basics

User Manual (ENGLISH)
Page 17
the basics _ 17 USING THE TOUCH SCREEN Tap on the touch screen with your fingertip. ƒ Do not use force when touching the touch screen, as it may cause damage to the NOTE screen. ƒ To avoid damage to the touch screen, do not use any object other than your fingers to operate it. ƒ Do not tap on the touch screen if your fingers are not clean. ƒ Do not tap on the touch screen with gloves on. ƒ The touch screen may not function if you use a fingernail or other instruments such as a ballpoint pen.
the basics _ 17 USING THE TOUCH SCREEN Tap on the touch screen with your fingertip. ƒ Do not use force when touching the touch screen, as it may cause damage to the NOTE screen. ƒ To avoid damage to the touch screen, do not use any object other than your fingers to operate it. ƒ Do not tap on the touch screen if your fingers are not clean. ƒ Do not tap on the touch screen with gloves on. ƒ The touch screen may not function if you use a fingernail or other instruments such as a ballpoint pen.

User Manual (ENGLISH)
Page 18
How To 2 Tap on a desired point in four directions - up, down, left and right, according to a desired point before releasing it. ƒ The player resumes playing at the point of release. ex) Play status bar for music How To 1 Tap on and hold the play status bar. 18 _ the basics USING THE TOUCH SCREEN (Continued) You can tap on the screen in the play status bar on the screen and move your finger to the function.
How To 2 Tap on a desired point in four directions - up, down, left and right, according to a desired point before releasing it. ƒ The player resumes playing at the point of release. ex) Play status bar for music How To 1 Tap on and hold the play status bar. 18 _ the basics USING THE TOUCH SCREEN (Continued) You can tap on the screen in the play status bar on the screen and move your finger to the function.

User Manual (ENGLISH)
Page 19
The picture moves and appears in the desired direction. USING THE TOUCH SCREEN (Continued) ex) Zoomed image How To 3 Tap on and hold the screen and slide your finger in the desired direction before releasing it as in the figure below. ƒ In zoom mode, move your finger in that direction. Ä the basics _ 19
The picture moves and appears in the desired direction. USING THE TOUCH SCREEN (Continued) ex) Zoomed image How To 3 Tap on and hold the screen and slide your finger in the desired direction before releasing it as in the figure below. ƒ In zoom mode, move your finger in that direction. Ä the basics _ 19

User Manual (ENGLISH)
Page 20
Video Track 1 20 _ the basics See page 52). See page 52). ƒ Right : Moves to the next file (depending on the the horizontal stroke setting. USING THE TOUCH SCREEN (Continued) ex) Play the previous/next video file How To 4 Slide your finger to the left or right. ƒ Left : Moves to the previous file (depending on the the horizontal stroke setting.
Video Track 1 20 _ the basics See page 52). See page 52). ƒ Right : Moves to the next file (depending on the the horizontal stroke setting. USING THE TOUCH SCREEN (Continued) ex) Play the previous/next video file How To 4 Slide your finger to the left or right. ƒ Left : Moves to the previous file (depending on the the horizontal stroke setting.