User Manual (ENGLISH)
Page 2
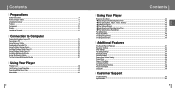
... Safety Instructions ...4 Battery Charger Safety ...6 Charging the battery ...7 Features ...8 Components ...10 Display...10 Location of Controls...11 I Connection to Computer Connecting the player to your PC ...12 Formatting in PC ...16 Using Recovery Utilities ...18 Downloading Recorded File ...19 Using the Mass Storage Device ...20 Installing Windows Media Player10...21 Using Windows Media Player10 ...23 Installing Multimedia Studio ...28 Using Multimedia Studio ...30 To View Help on Multimedia Studio ...37 I Using Your Player Playing music ...38 Hold Feature / Loop Repeating ...39...
... Safety Instructions ...4 Battery Charger Safety ...6 Charging the battery ...7 Features ...8 Components ...10 Display...10 Location of Controls...11 I Connection to Computer Connecting the player to your PC ...12 Formatting in PC ...16 Using Recovery Utilities ...18 Downloading Recorded File ...19 Using the Mass Storage Device ...20 Installing Windows Media Player10...21 Using Windows Media Player10 ...23 Installing Multimedia Studio ...28 Using Multimedia Studio ...30 To View Help on Multimedia Studio ...37 I Using Your Player Playing music ...38 Hold Feature / Loop Repeating ...39...
User Manual (ENGLISH)
Page 4
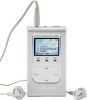
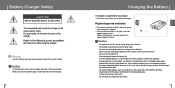
... shock. To avoid electric shock, use the provided charger. Make sure that is a consumable item and its capacity will decrease. Do not use . Do not touch the charger with the terminals (metallic parts) of non-use, fully charge it will reduce the battery life. - In this User Manual to avoid fire or electric shock. ✍ Caution - DIGITAL AUDIO PLAYER YH-820 MENU REC SELECT ✍ Caution - The...
... shock. To avoid electric shock, use the provided charger. Make sure that is a consumable item and its capacity will decrease. Do not use . Do not touch the charger with the terminals (metallic parts) of non-use, fully charge it will reduce the battery life. - In this User Manual to avoid fire or electric shock. ✍ Caution - DIGITAL AUDIO PLAYER YH-820 MENU REC SELECT ✍ Caution - The...
User Manual (ENGLISH)
Page 6
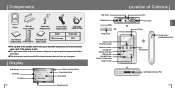
...:23 Battery remaining indicator Song number display Album display Elapsed track time LINE IN jack Earphone jack RESET Hole Power On/Off Play/Pause button Skip/Search button VOLUME UP/ SCROLL UP button MENU button VOLUME DOWN/ SCROLL DOWN button SELECT button AB REC ENG Location of Controls LINE-IN MIC HOLD MIC HOLD switch Display Record button / Loop Repeating button Skip/ Search button USB Cable Connection Port 11 G The performance speed may slow if the internal memory does not have any free...
...:23 Battery remaining indicator Song number display Album display Elapsed track time LINE IN jack Earphone jack RESET Hole Power On/Off Play/Pause button Skip/Search button VOLUME UP/ SCROLL UP button MENU button VOLUME DOWN/ SCROLL DOWN button SELECT button AB REC ENG Location of Controls LINE-IN MIC HOLD MIC HOLD switch Display Record button / Loop Repeating button Skip/ Search button USB Cable Connection Port 11 G The performance speed may slow if the internal memory does not have any free...
User Manual (ENGLISH)
Page 7
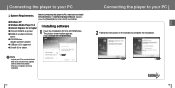
If "Add New Hardware Wizard" appears, press the [Cancel] button and install Driver&Utilities. G Windows XP G Windows Media Player 10.0 I Installing software G Internet Explorer 6.0 or higher G Pentium 200MHz or greater G 50MB of available hard disk space 1 Insert the Installation CD into your PC as an administrator (Main User) and install the supplied software (Multimedia Studio) Otherwise, installation will not be completed. 12 Connecting the player to install Driver&Utilities. Connecting the player to your...
If "Add New Hardware Wizard" appears, press the [Cancel] button and install Driver&Utilities. G Windows XP G Windows Media Player 10.0 I Installing software G Internet Explorer 6.0 or higher G Pentium 200MHz or greater G 50MB of available hard disk space 1 Insert the Installation CD into your PC as an administrator (Main User) and install the supplied software (Multimedia Studio) Otherwise, installation will not be completed. 12 Connecting the player to install Driver&Utilities. Connecting the player to your...
User Manual (ENGLISH)
Page 8
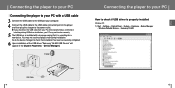
...; Device Manager ¡ Windows Portable Devices ¡ Samsung YH-820 15 ENG You may not see the display screen during USB driver installation, your PC may not function correctly. 5 The USB driver is installed with a USB cable 3 Connect the USB cable to the USB port your PC How to check if USB driver is searching for a new device. G If you disconnect the USB cable from your PC while implementing a command or intializing during installation. Charger PC USB Cable 14 DIGITAL AUDIO PLAYER YH...
...; Device Manager ¡ Windows Portable Devices ¡ Samsung YH-820 15 ENG You may not see the display screen during USB driver installation, your PC may not function correctly. 5 The USB driver is installed with a USB cable 3 Connect the USB cable to the USB port your PC How to check if USB driver is searching for a new device. G If you disconnect the USB cable from your PC while implementing a command or intializing during installation. Charger PC USB Cable 14 DIGITAL AUDIO PLAYER YH...

User Manual (ENGLISH)
Page 10
... player. 3 Select [Start] ¡ [ Programs] ¡ [Samsung YH-820] in the desktop, and then press [Recovery Utility]. G The recorded files are displayed. 4 Drag the recorded files to the USB port on PC. 3 Select [Samsung YH-820]- [Media]-[Recordings] from Windows Explorer. Connect to Open Windows Explorer on your computer. 2 Connect the other side of the messages below appears: - G See help . 4 Select the recovery method you turn on recovery, press [Help] to PC and repair firmware with recovery...
... player. 3 Select [Start] ¡ [ Programs] ¡ [Samsung YH-820] in the desktop, and then press [Recovery Utility]. G The recorded files are displayed. 4 Drag the recorded files to the USB port on PC. 3 Select [Samsung YH-820]- [Media]-[Recordings] from Windows Explorer. Connect to Open Windows Explorer on your computer. 2 Connect the other side of the messages below appears: - G See help . 4 Select the recovery method you turn on recovery, press [Help] to PC and repair firmware with recovery...

User Manual (ENGLISH)
Page 12
I Downloading Music Files 1 Connect the player to complete the installation. G The file, downloaded from WMP10 to the player, will be automatically saved in the desktop. 3 Select [Sync] at the top of the screen. 22 23 Using Windows Media Player 10 G You can download MP3 and WMA files using Windows Media Player 10. G Select [Start] ¡ [Programs] ¡ [Windows Media Player] in Music folder. ENG Installing Windows Media Player10 2 Follow the instructions in the window to PC. 2 Run Windows Media Player10.
I Downloading Music Files 1 Connect the player to complete the installation. G The file, downloaded from WMP10 to the player, will be automatically saved in the desktop. 3 Select [Sync] at the top of the screen. 22 23 Using Windows Media Player 10 G You can download MP3 and WMA files using Windows Media Player 10. G Select [Start] ¡ [Programs] ¡ [Windows Media Player] in Music folder. ENG Installing Windows Media Player10 2 Follow the instructions in the window to PC. 2 Run Windows Media Player10.

User Manual (ENGLISH)
Page 13
... transfer to the player, drag and drop it to the left [Sync List] window. 5 Make sure the music files you want to download are checked,and then press [Start Sync] at the top of the screen. - [Synchronized to Device] message will appear in the right window under Music folder Using Windows Media Player 10 I Using Other Functions ENG 6 You can check the transferred file in the right window. 24 123 4 1 [Display properties and settings] button 2 [Create folder] button 3 [Delete from device] button 4 [Format storage media] button ✽ Format storage media button...
... transfer to the player, drag and drop it to the left [Sync List] window. 5 Make sure the music files you want to download are checked,and then press [Start Sync] at the top of the screen. - [Synchronized to Device] message will appear in the right window under Music folder Using Windows Media Player 10 I Using Other Functions ENG 6 You can check the transferred file in the right window. 24 123 4 1 [Display properties and settings] button 2 [Create folder] button 3 [Delete from device] button 4 [Format storage media] button ✽ Format storage media button...

User Manual (ENGLISH)
Page 14
G You can check the properties of the main screen. 26 27 I Deleting File and Folder Select the file or folder to delete, and then press the [Delete from Device] button. Using Windows Media Player 10 I Creating Folder 1 Press the [Create Folder] button. 2 When the [New Folder] window appears, enter the folder name and then press the [OK] button. G Selected file or folder will be deleted. ENG Using Windows Media Player 10 I Viewing Properties Press the [Display Properties and Settings] button. G A new folder is displayed in the right window of YH-820.
G You can check the properties of the main screen. 26 27 I Deleting File and Folder Select the file or folder to delete, and then press the [Delete from Device] button. Using Windows Media Player 10 I Creating Folder 1 Press the [Create Folder] button. 2 When the [New Folder] window appears, enter the folder name and then press the [OK] button. G Selected file or folder will be deleted. ENG Using Windows Media Player 10 I Viewing Properties Press the [Display Properties and Settings] button. G A new folder is displayed in the right window of YH-820.
User Manual (ENGLISH)
Page 15
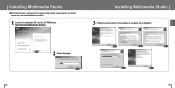
Select [Install Multimedia Studio]. Installing Multimedia Studio 3 Follow the instructions in the window to complete the installation. 2 Select language 28 29 ENG Installing Multimedia Studio G Multimedia Studio is a program that supports image editing, video playback and format conversion, and multimedia album creation. 1 Insert the installation CD into the CD-ROM drive.
Select [Install Multimedia Studio]. Installing Multimedia Studio 3 Follow the instructions in the window to complete the installation. 2 Select language 28 29 ENG Installing Multimedia Studio G Multimedia Studio is a program that supports image editing, video playback and format conversion, and multimedia album creation. 1 Insert the installation CD into the CD-ROM drive.

User Manual (ENGLISH)
Page 20
... uninterrupted playback. ActivateC HOLD on the display. The Hold feature is useful to prevent your Samsung player from 0 to 40. 10 38 Hold Feature Use the Hold feature to lock and disable all buttons. Loop Repeating I Adjusting the Volume Press the VOLUME UP or DOWN button to adjust the volume from being accidentally turned off the power. Playing music Make sure the player is played repeatedly. Press and hold the √» button to resume playback. I Starting Point While playing a music file...
... uninterrupted playback. ActivateC HOLD on the display. The Hold feature is useful to prevent your Samsung player from 0 to 40. 10 38 Hold Feature Use the Hold feature to lock and disable all buttons. Loop Repeating I Adjusting the Volume Press the VOLUME UP or DOWN button to adjust the volume from being accidentally turned off the power. Playing music Make sure the player is played repeatedly. Press and hold the √» button to resume playback. I Starting Point While playing a music file...

User Manual (ENGLISH)
Page 25
...-IN MIC HOLD 2 Press and hold the REC button. If the volume level is created. G Files are automatically added to connect the main unit's line in Music mode, use the Line-In cable to your external audio device. G MP3 files are recorded and renamed Line-in0001.mp3, Line-in0002.mp3, and so on the external device will be displayed. In the Menu, select Photo and press the SELECT button. 2 Use the...
...-IN MIC HOLD 2 Press and hold the REC button. If the volume level is created. G Files are automatically added to connect the main unit's line in Music mode, use the Line-In cable to your external audio device. G MP3 files are recorded and renamed Line-in0001.mp3, Line-in0002.mp3, and so on the external device will be displayed. In the Menu, select Photo and press the SELECT button. 2 Use the...

User Manual (ENGLISH)
Page 26
... playlist. G Select the desired mode, and then press the MENU button to go to "Making Albums for Slide Shows" under "Using Multimedia Studio" for more information. - G All ( ): Select this to play just one at the time of album editing. - Slide show viewing may be displayed. G One ( ): Select this to adjust the background music volume. G Shuffle ( ): Select this to listen to the desired file...
... playlist. G Select the desired mode, and then press the MENU button to go to "Making Albums for Slide Shows" under "Using Multimedia Studio" for more information. - G All ( ): Select this to play just one at the time of album editing. - Slide show viewing may be displayed. G One ( ): Select this to adjust the background music volume. G Shuffle ( ): Select this to listen to the desired file...
User Manual (ENGLISH)
Page 27
... press the MENU button to go to select EQ. 3 Press the SELECT button until the desired mode appears. G TruBass: This is a trademark of SRS Labs, Inc. This unit supports sampling frequencies of 0 to the device connected. Off ➔ Jazz ➔ Classical ➔ Pop ➔ Rock ➔ Bass boost ➔ WOW ➔ SRS ➔ TruBass Settings Repeat-Off EQ-Off SRS settings Record Settings G WOW...
... press the MENU button to go to select EQ. 3 Press the SELECT button until the desired mode appears. G TruBass: This is a trademark of SRS Labs, Inc. This unit supports sampling frequencies of 0 to the device connected. Off ➔ Jazz ➔ Classical ➔ Pop ➔ Rock ➔ Bass boost ➔ WOW ➔ SRS ➔ TruBass Settings Repeat-Off EQ-Off SRS settings Record Settings G WOW...

User Manual (ENGLISH)
Page 28
...: Each time the Select button is pressed, the selection toggles between 32KHz and 44KHz. G Press the √» button in better quality sound, but the music information is 0 to power save mode, the music continues to make the desired recording setting. G The setting range of the contrast, which adjusts the contrast of the screen, is not displayed on the screen. In power save mode. Recording Settings 1 In the Menu, use the...
...: Each time the Select button is pressed, the selection toggles between 32KHz and 44KHz. G Press the √» button in better quality sound, but the music information is 0 to power save mode, the music continues to make the desired recording setting. G The setting range of the contrast, which adjusts the contrast of the screen, is not displayed on the screen. In power save mode. Recording Settings 1 In the Menu, use the...

User Manual (ENGLISH)
Page 29
... Language. 3 Use the SCROLL UP/SCROLL DOWN buttons to select Power off. 3 Press the SELECT button until the desired power-off -10min Language 57 ENG Fade Off: Music is played back at which the volume of music increases or decreases is pressed, the selection changes as follows : - G Curve : Each time the SELECT button is fast. Fade In: Volume gradually increases only when playback starts. - Fade...
... Language. 3 Use the SCROLL UP/SCROLL DOWN buttons to select Power off. 3 Press the SELECT button until the desired power-off -10min Language 57 ENG Fade Off: Music is played back at which the volume of music increases or decreases is pressed, the selection changes as follows : - G Curve : Each time the SELECT button is fast. Fade In: Volume gradually increases only when playback starts. - Fade...

User Manual (ENGLISH)
Page 30
... number of tracks, total capacity, available capacity and software version information. Power off -10min Language Reset Reset Reset all selected settings will be restored to select Copyright, and then press the SELECT button. Settings FaderEffect Power off -10min Language Reset About 59 ENG Settings Power off-10min Language Reset About 58 Copyright 1 In the Menu, use the SCROLL UP/SCROLL DOWN buttons to select Settings, and then press the SELECT button. 2 Use...
... number of tracks, total capacity, available capacity and software version information. Power off -10min Language Reset Reset Reset all selected settings will be restored to select Copyright, and then press the SELECT button. Settings FaderEffect Power off -10min Language Reset About 59 ENG Settings Power off-10min Language Reset About 58 Copyright 1 In the Menu, use the SCROLL UP/SCROLL DOWN buttons to select Settings, and then press the SELECT button. 2 Use...
User Manual (ENGLISH)
Page 31
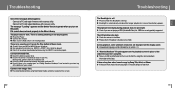
... battery's power level. G Check if the driver is no sound even if I press the Play button in your icon tray at the bottom of your PC. G Please check the Backlight settings. G Check if you turn on the screen. 60 Troubleshooting The Backlight is the "unplug/eject" or "Safely Remove Hardware" icon located in Music mode. G Reset the Player G Connect the charger. G Non-playable file formats (e.g. G Files that have been downloaded without using...
... battery's power level. G Check if the driver is no sound even if I press the Play button in your icon tray at the bottom of your PC. G Please check the Backlight settings. G Check if you turn on the screen. 60 Troubleshooting The Backlight is the "unplug/eject" or "Safely Remove Hardware" icon located in Music mode. G Reset the Player G Connect the charger. G Non-playable file formats (e.g. G Files that have been downloaded without using...

User Manual (ENGLISH)
Page 32
ENG Specifications Model YH-820 Internal Memory Capacity 5GB Built-in combination with 20KHz LPF(based on 1KHz OdB) Earphone Jack Output Power 12mW(16Ω) Output Frequency Range 22Hz~20KHz Temperature Range -5~ +35°C(23~95F) File Support MPEG1/2/2.5 Layer3(8Kbps ~ 320Kbps, 8KHz ~ 48KHz) WMA (48Kbps ~ 192Kbps, 8KHz ~ 48KHz) Specifications The product unit accompanying this user manual is licensed...
ENG Specifications Model YH-820 Internal Memory Capacity 5GB Built-in combination with 20KHz LPF(based on 1KHz OdB) Earphone Jack Output Power 12mW(16Ω) Output Frequency Range 22Hz~20KHz Temperature Range -5~ +35°C(23~95F) File Support MPEG1/2/2.5 Layer3(8Kbps ~ 320Kbps, 8KHz ~ 48KHz) WMA (48Kbps ~ 192Kbps, 8KHz ~ 48KHz) Specifications The product unit accompanying this user manual is licensed...
User Manual (ENGLISH)
Page 34
... the dealer. 2.Samsung's obligations are to the repair of the defective part, and at its discretion, replacement of the product (service exchange unit). 3.Warranty repairs must be carried out by Samsung for any cause beyond the control of Samsung caused by such repairs. 4.Repair or replacement under the terms of this warranty does not give right to extension to or a new starting of the...
... the dealer. 2.Samsung's obligations are to the repair of the defective part, and at its discretion, replacement of the product (service exchange unit). 3.Warranty repairs must be carried out by Samsung for any cause beyond the control of Samsung caused by such repairs. 4.Repair or replacement under the terms of this warranty does not give right to extension to or a new starting of the...

