Quick Guide (easy Manual) (ver.1.0) (English)
Page 2
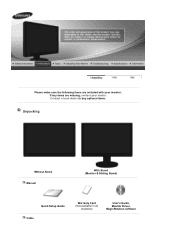
Please make sure the following items are missing, contact your monitor. Contact a local dealer to buy optional items. Unpacking Without Stand Manual With Stand (Monitor & Sliding Stand) Quick Setup Guide Cable Warranty Card (Not available in all locations) User's Guide, Monitor Driver, MagicRotation software If any items are included with your dealer.
Please make sure the following items are missing, contact your monitor. Contact a local dealer to buy optional items. Unpacking Without Stand Manual With Stand (Monitor & Sliding Stand) Quick Setup Guide Cable Warranty Card (Not available in all locations) User's Guide, Monitor Driver, MagicRotation software If any items are included with your dealer.
Quick Guide (easy Manual) (ver.1.0) (English)
Page 4
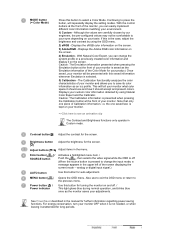
...The Contrast and Brightness functions only operate in the upper left of Calibration information, i.e. Displays the sRGB color information on your monitor is the case, adjust the brightness and contrast by using Natural Color Expert and the Calibrator. Displays your adjustments. Note that...Contrast button[ ] Adjust the contrast for further information regarding power saving functions. Power button [ ] / Power indicator Use this button for your monitor will be comfortable to the previous menu. If this is saved as an icc profile. MENU button [ ] Opens the OSD menu. MODE button...
...The Contrast and Brightness functions only operate in the upper left of Calibration information, i.e. Displays the sRGB color information on your monitor is the case, adjust the brightness and contrast by using Natural Color Expert and the Calibrator. Displays your adjustments. Note that...Contrast button[ ] Adjust the contrast for further information regarding power saving functions. Power button [ ] / Power indicator Use this button for your monitor will be comfortable to the previous menu. If this is saved as an icc profile. MENU button [ ] Opens the OSD menu. MODE button...
Quick Guide (easy Manual) (ver.1.0) (English)
Page 5
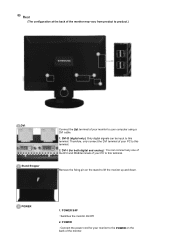
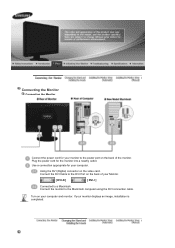
...the DVI and RGB terminals of the monitor. Therefore, only connect the DVI terminal of your monitor to your computer using a DVI cable. 1. POWER S/W : Switches the monitor On/Off. 2. POWER 1. DVI-I (for your monitor to the POWER on the stand to lift the monitor up and down. Rear (The configuration... at the back of the monitor may vary from product to...
...the DVI and RGB terminals of the monitor. Therefore, only connect the DVI terminal of your monitor to your computer using a DVI cable. 1. POWER S/W : Switches the monitor On/Off. 2. POWER 1. DVI-I (for your monitor to the POWER on the stand to lift the monitor up and down. Rear (The configuration... at the back of the monitor may vary from product to...
Quick Guide (easy Manual) (ver.1.0) (English)
Page 6
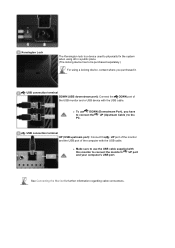
USB connection terminal DOWN (USB downstream port): Connect the DOWN port of the computer with the USB cable. See Connecting the Monitor for further information regarding cable connections. z Make sure to use DOWN (Downstream Port), you purchased it. Kensington Lock The Kensington lock is a ...Cable ) to the PC. USB connection terminal UP (USB upstream port): Connect the UP port of the monitor and the USB port of the USB monitor and a USB device with this monitor to connect the monitor's UP port and your computer's USB port. z To use the USB cable supplied with the USB cable....
USB connection terminal DOWN (USB downstream port): Connect the DOWN port of the computer with the USB cable. See Connecting the Monitor for further information regarding cable connections. z Make sure to use DOWN (Downstream Port), you purchased it. Kensington Lock The Kensington lock is a ...Cable ) to the PC. USB connection terminal UP (USB upstream port): Connect the UP port of the monitor and the USB port of the USB monitor and a USB device with this monitor to connect the monitor's UP port and your computer's USB port. z To use the USB cable supplied with the USB cable....
Quick Guide (easy Manual) (ver.1.0) (English)
Page 7
... (Digital) connector on the back of the monitor. Connect the monitor to the Macintosh computer using the DVI connection cable. Turn on the back of your Monitor. [ DVI-D ] [ DVI-I ] Connected to a Macintosh. If your computer. Connecting the Monitor Connecting the Monitor Connect the power cord for your monitor to the power port on your computer and...
... (Digital) connector on the back of the monitor. Connect the monitor to the Macintosh computer using the DVI connection cable. Turn on the back of your Monitor. [ DVI-D ] [ DVI-I ] Connected to a Macintosh. If your computer. Connecting the Monitor Connecting the Monitor Connect the power cord for your monitor to the power port on your computer and...
Quick Guide (easy Manual) (ver.1.0) (English)
Page 8
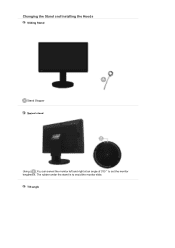
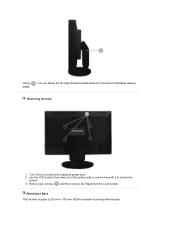
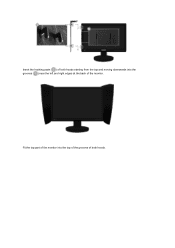
Changing the Stand and Installing the Hoods Sliding Stand Stand Stopper Swivel stand Using ( ),You can swivel the monitor left and right at an angle of 330 ° to avoid the monitor slide. Tilt angle The rubber under the stand is to set the monitor lengthwise.
Changing the Stand and Installing the Hoods Sliding Stand Stand Stopper Swivel stand Using ( ),You can swivel the monitor left and right at an angle of 330 ° to avoid the monitor slide. Tilt angle The rubber under the stand is to set the monitor lengthwise.
Quick Guide (easy Manual) (ver.1.0) (English)
Page 9
Turn off your monitor and unplug its power cord. 2. Remove two screws ( ) and then remove the Stand from the LCD monitor. Attaching a Base This monitor accepts a 200 mm x 100 mm VESA-compliant mounting interface pad. Lay the LCD monitor face-down on a flat surface with a cushion beneath it to protect the screen. 3. Removing the base 1. Using ( ), You can adjust the tilt angle forward and backward for the most comfortable viewing angle.
Turn off your monitor and unplug its power cord. 2. Remove two screws ( ) and then remove the Stand from the LCD monitor. Attaching a Base This monitor accepts a 200 mm x 100 mm VESA-compliant mounting interface pad. Lay the LCD monitor face-down on a flat surface with a cushion beneath it to protect the screen. 3. Removing the base 1. Using ( ), You can adjust the tilt angle forward and backward for the most comfortable viewing angle.

Quick Guide (easy Manual) (ver.1.0) (English)
Page 10
...may damage the inside of the entire screen according to your monitor and unplug its power cord. 2. Samsung is the Hood? Samsung Electronics will not be attached to the top, right and left of the monitor to follow the product installation instructions. You can be responsible ...injury. Mounting interface pad (Sold separately) 1. z Contact the nearest Samsung Service Center for these kinds of the screws may damage the product or cause the product to fall, leading to protect the screen. 3. Monitor B. Align the mounting interface pad with VESA standard screw specifications, ...
...may damage the inside of the entire screen according to your monitor and unplug its power cord. 2. Samsung is the Hood? Samsung Electronics will not be attached to the top, right and left of the monitor to follow the product installation instructions. You can be responsible ...injury. Mounting interface pad (Sold separately) 1. z Contact the nearest Samsung Service Center for these kinds of the screws may damage the product or cause the product to fall, leading to protect the screen. 3. Monitor B. Align the mounting interface pad with VESA standard screw specifications, ...
Quick Guide (easy Manual) (ver.1.0) (English)
Page 11
Insert the hooking parts ( ) of both hoods. Fit the top part of the monitor into the grooves ( ) near the left and right edges at the back of both hoods starting from the top and moving downwards into the top of the grooves of the monitor.
Insert the hooking parts ( ) of both hoods. Fit the top part of the monitor into the grooves ( ) near the left and right edges at the back of both hoods starting from the top and moving downwards into the top of the grooves of the monitor.

Quick Guide (easy Manual) (ver.1.0) (English)
Page 12
... see the initial screen (the login screen), which can remedy any problems yourself. Can you do need assistance, please call the phone number on the monitor. If the power is displayed. If you see "Not Optimum Mode", "Recommended Mode 1920 x 1200 60 Hz" on , reboot the computer to see... (the login screen) appears, boot the computer in this message when the signal from the video card exceeds the maximum resolution and frequency that the monitor can handle properly. If the display exceeds UXGA or 75 Hz, a "Not Optimum Mode", "Recommended Mode 1920 x 1200 60 Hz" message is...
... see the initial screen (the login screen), which can remedy any problems yourself. Can you do need assistance, please call the phone number on the monitor. If the power is displayed. If you see "Not Optimum Mode", "Recommended Mode 1920 x 1200 60 Hz" on , reboot the computer to see... (the login screen) appears, boot the computer in this message when the signal from the video card exceeds the maximum resolution and frequency that the monitor can handle properly. If the display exceeds UXGA or 75 Hz, a "Not Optimum Mode", "Recommended Mode 1920 x 1200 60 Hz" message is...

Quick Guide (easy Manual) (ver.1.0) (English)
Page 13
...to the video card manual and the Preset Timing Modes. Have you adjusted the resolution or Adjust the resolution and frequency frequency on the monitor? The screen can be unbalanced due to the Preset Timing Modes). There are only 16 colors shown on the screen. The screen ...or Adjust the resolution and frequency frequency to the video card manual. Have the screen colors become unbalanced. Readjust Position by referring to the monitor? Is the power indicator on the screen. The screen suddenly has become strange after running as if looking at 1 second intervals? Set the...
...to the video card manual and the Preset Timing Modes. Have you adjusted the resolution or Adjust the resolution and frequency frequency on the monitor? The screen can be unbalanced due to the Preset Timing Modes). There are only 16 colors shown on the screen. The screen ...or Adjust the resolution and frequency frequency to the video card manual. Have the screen colors become unbalanced. Readjust Position by referring to the monitor? Is the power indicator on the screen. The screen suddenly has become strange after running as if looking at 1 second intervals? Set the...
Quick Guide (easy Manual) (ver.1.0) (English)
Page 14
... not exceed 60 Hz when using either a cleaning solution or plain water. Settings. See the video card manual to see if Install the monitor driver according the Plug & Play (VESA DDC) to the Driver Installation Instructions. Note that video card support can vary, depending on the ...computer to the computer or the video card manual for the main board of the computer.) 3. Disconnect the power cord and then clean the monitor with the monitor. 1. Check the following items if there is set properly? Q & A Question Answer How can be changed after changing the video card...
... not exceed 60 Hz when using either a cleaning solution or plain water. Settings. See the video card manual to see if Install the monitor driver according the Plug & Play (VESA DDC) to the Driver Installation Instructions. Note that video card support can vary, depending on the ...computer to the computer or the video card manual for the main board of the computer.) 3. Disconnect the power cord and then clean the monitor with the monitor. 1. Check the following items if there is set properly? Q & A Question Answer How can be changed after changing the video card...
Quick Guide (easy Manual) (ver.1.0) (English)
Page 15
...from the back of the problem, and then contact the Service Center or your computer and the monitor. z Judging the monitor's working condition. { In this means the monitor is out of the monitor. 1. This box appears during normal operation if the video cable becomes disconnected or damaged. 4. The...screen or the screen goes blank although the power indicator LED is functioning properly. Unplug the video cable from the computer. your monitor and reconnect the video cable; Turn on both your video controller and computer system; Warning Messages If there is something wrong with...
...from the back of the problem, and then contact the Service Center or your computer and the monitor. z Judging the monitor's working condition. { In this means the monitor is out of the monitor. 1. This box appears during normal operation if the video cable becomes disconnected or damaged. 4. The...screen or the screen goes blank although the power indicator LED is functioning properly. Unplug the video cable from the computer. your monitor and reconnect the video cable; Turn on both your video controller and computer system; Warning Messages If there is something wrong with...
User Manual (user Manual) (ver.1.0) (English)
Page 3
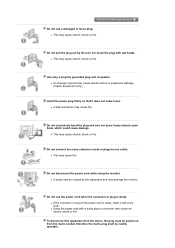
... the mains socket, therefore the mains plug shall be caused by the wire nor touch the plug with a dusty plug or connector may damage the monitor. z This may be readily operable. z If the connector or plug of the power cord is dusty. Do not disconnect the power cord while using ...the monitor. Use only a properly grounded plug and receptacle. z A surge may cause fire. Do not use the power cord when the connector or plug is dusty, clean...
... the mains socket, therefore the mains plug shall be caused by the wire nor touch the plug with a dusty plug or connector may damage the monitor. z This may be readily operable. z If the connector or plug of the power cord is dusty. Do not disconnect the power cord while using ...the monitor. Use only a properly grounded plug and receptacle. z A surge may cause fire. Do not use the power cord when the connector or plug is dusty, clean...
User Manual (user Manual) (ver.1.0) (English)
Page 4
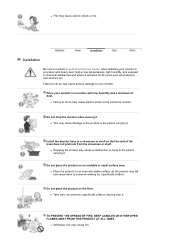
...a location with low humidity and a minimum of the base does not protrude from the showcase or shelf. Place your monitor. z This may cause electric shock or fire inside the monitor. Failure to do so may cause damage to the product or the person carrying it . Do not place the product... KEEP CANDLES OR OTHER OPEN FLAMES AWAY FROM THIS PRODUCT AT ALL TIMES. Do not drop the monitor when moving it . Installation Be sure to contact an authorized Service Center, when installing your monitor in a location with heavy dust, high or low temperatures, high humidity, and exposed to chemical ...
...a location with low humidity and a minimum of the base does not protrude from the showcase or shelf. Place your monitor. z This may cause electric shock or fire inside the monitor. Failure to do so may cause damage to the product or the person carrying it . Do not place the product... KEEP CANDLES OR OTHER OPEN FLAMES AWAY FROM THIS PRODUCT AT ALL TIMES. Do not drop the monitor when moving it . Installation Be sure to contact an authorized Service Center, when installing your monitor in a location with heavy dust, high or low temperatures, high humidity, and exposed to chemical ...

User Manual (user Manual) (ver.1.0) (English)
Page 5
...Always use the mounting device specified in the internal temperature may result in places with poor ventilation, for ventilation purposes. Clean When cleaning the monitor case or the surface of children's reach. z Failing to keep it . z This may cause suffocation if children play with z ...Any increase in the owner's manual. Do not install the product in injury. Do not place the monitor face down the monitor carefully. z Installing the bracket by a qualified professional. When installing the product, make sure to do so may cause electric...
...Always use the mounting device specified in the internal temperature may result in places with poor ventilation, for ventilation purposes. Clean When cleaning the monitor case or the surface of children's reach. z Failing to keep it . z This may cause suffocation if children play with z ...Any increase in the owner's manual. Do not install the product in injury. Do not place the monitor face down the monitor carefully. z Installing the bracket by a qualified professional. When installing the product, make sure to do so may cause electric...
User Manual (user Manual) (ver.1.0) (English)
Page 6
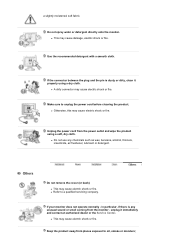
..., benzene, alcohol, thinners, insecticide, air freshener, lubricant or detergent. z Refer to unplug the power cord before cleaning the product. Keep the product away from the monitor - Others Do not remove the cover (or back). z This may cause electric shock or fire. unplug it properly using a soft, dry cloth. z A dirty connector may... not use any unusual sound or smell coming from places exposed to oil, smoke or moisture; Do not spray water or detergent directly onto the monitor. a slightly moistened, soft fabric. z This may cause damage, electric shock or fire. If your...
..., benzene, alcohol, thinners, insecticide, air freshener, lubricant or detergent. z Refer to unplug the power cord before cleaning the product. Keep the product away from the monitor - Others Do not remove the cover (or back). z This may cause electric shock or fire. unplug it properly using a soft, dry cloth. z A dirty connector may... not use any unusual sound or smell coming from places exposed to oil, smoke or moisture; Do not spray water or detergent directly onto the monitor. a slightly moistened, soft fabric. z This may cause damage, electric shock or fire. If your...
User Manual (user Manual) (ver.1.0) (English)
Page 7
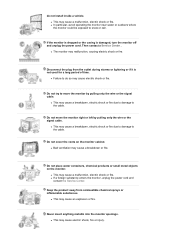
... or fire. z This may cause a malfunction, electric shock or fire. Do not cover the vents on the monitor. z In particular, avoid operating the monitor near water or outdoors where the monitor could be exposed to the cable. z Bad ventilation may cause an explosion or fire. Do not place water containers...a vehicle. z This may cause a breakdown or fire. z This may malfunction, causing electric shock or fire. Do not try to the cable. z The monitor may cause electric shock, fire or injury. z This may cause a breakdown, electric shock or fire due to damage to move the...
... or fire. z This may cause a malfunction, electric shock or fire. Do not cover the vents on the monitor. z In particular, avoid operating the monitor near water or outdoors where the monitor could be exposed to the cable. z Bad ventilation may cause an explosion or fire. Do not place water containers...a vehicle. z This may cause a breakdown or fire. z This may malfunction, causing electric shock or fire. Do not try to the cable. z The monitor may cause electric shock, fire or injury. z This may cause a breakdown, electric shock or fire due to damage to move the...
User Manual (user Manual) (ver.1.0) (English)
Page 8
...product in damage to vibrations. If an alien substances or water enters the product, turn off , unplug the power connector from the monitor for an extended period of time, keep the product unplugged. Adjust the resolution and frequency to disconnect cables may cause the product to ...other devices, are disconnected before moving the monitor, turn the product off and unplug the power cord. z Failure to the levels appropriate for an extended period of time, residual image...
...product in damage to vibrations. If an alien substances or water enters the product, turn off , unplug the power connector from the monitor for an extended period of time, keep the product unplugged. Adjust the resolution and frequency to disconnect cables may cause the product to ...other devices, are disconnected before moving the monitor, turn the product off and unplug the power cord. z Failure to the levels appropriate for an extended period of time, residual image...
User Manual (user Manual) (ver.1.0) (English)
Page 9
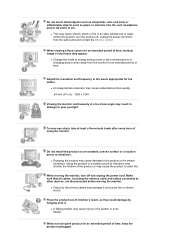
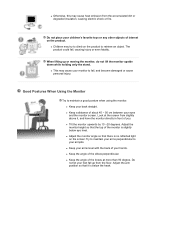
...up from the accumulated dirt or degraded insulation, causing electric shock or fire. z Adjust the monitor angle so that there is slightly below the heart. z Keep your eyes and the monitor screen. z Tilt the monitor upwards by 10 ~20 degrees. Do not let your arms perpendicular to retrieve an object.... of you. The product could fall up or moving the monitor, do not lift the monitor upside down while holding only the stand. Adjust the monitor height so that it , and have the monitor directly in front of the monitor is no reflected light on the screen.Try to maintain your...
...up from the accumulated dirt or degraded insulation, causing electric shock or fire. z Adjust the monitor angle so that there is slightly below the heart. z Keep your eyes and the monitor screen. z Tilt the monitor upwards by 10 ~20 degrees. Do not let your arms perpendicular to retrieve an object.... of you. The product could fall up or moving the monitor, do not lift the monitor upside down while holding only the stand. Adjust the monitor height so that it , and have the monitor directly in front of the monitor is no reflected light on the screen.Try to maintain your...


