User Manual
Page 1
E-MANUAL Thank you for purchasing this Samsung product. To receive more complete service, please register your product at www.samsung.com/register Model Serial No
E-MANUAL Thank you for purchasing this Samsung product. To receive more complete service, please register your product at www.samsung.com/register Model Serial No

User Manual
Page 2
... Cat 7 LAN Cables 21 Connecting to a Wired Internet Network Automatically 22 Connecting to a Wired Internet Network Manually Establishing a Wireless Internet Connection 24 Connecting to a Wireless Internet Network Automatically 25 Connecting to a Wireless Internet Network Manually 26 Connecting to a Wireless Internet Network with WPS Troubleshooting Internet Connectivity Issues 27 Troubleshooting Wired Internet Connectivity...
... Cat 7 LAN Cables 21 Connecting to a Wired Internet Network Automatically 22 Connecting to a Wired Internet Network Manually Establishing a Wireless Internet Connection 24 Connecting to a Wireless Internet Network Automatically 25 Connecting to a Wireless Internet Network Manually 26 Connecting to a Wireless Internet Network with WPS Troubleshooting Internet Connectivity Issues 27 Troubleshooting Wired Internet Connectivity...

User Manual
Page 3
Recommended Apps 39 Installing an App Using the e-Manual 41 Launching the e-Manual 41 Additional e-Manual Features 42 Accessing the Menu from the e-Manual 42 Loading Reference Pages 42 Updating the e-Manual to a Samsung Account 36 Deleting a Samsung Account from Favorite List Channels Only Editing a Favorites List 70 Edit Favorites Screen Menu Items Making Sports Programs More Realistic...
Recommended Apps 39 Installing an App Using the e-Manual 41 Launching the e-Manual 41 Additional e-Manual Features 42 Accessing the Menu from the e-Manual 42 Loading Reference Pages 42 Updating the e-Manual to a Samsung Account 36 Deleting a Samsung Account from Favorite List Channels Only Editing a Favorites List 70 Edit Favorites Screen Menu Items Making Sports Programs More Realistic...

User Manual
Page 4
...+ (HDMI-CEC) 95 Setting Up Anynet+ (HDMI-CEC) 96 Using Anynet+ (HDMI-CEC) Updating the TV's Software 97 Update now 97 Online 98 Manually, Using a USB Flash Drive 99 Enabling Automatic Software Updates Protecting the TV from Hacking and malicious code 99 Checking the TV and Connected Storage Media...the Smart Hub's Focus Area 102 Enjoying Rich Colors and Superior Picture Quality (BD Wise) 102 Locking/Unlocking the Panel Keys 102 Showing/Hiding the Samsung Logo while Booting 102 Enabling Game Mode 103 Registering the TV as a DivX-Certified Device (To Watch For Pay DivX Movies) 104 Restoring the...
...+ (HDMI-CEC) 95 Setting Up Anynet+ (HDMI-CEC) 96 Using Anynet+ (HDMI-CEC) Updating the TV's Software 97 Update now 97 Online 98 Manually, Using a USB Flash Drive 99 Enabling Automatic Software Updates Protecting the TV from Hacking and malicious code 99 Checking the TV and Connected Storage Media...the Smart Hub's Focus Area 102 Enjoying Rich Colors and Superior Picture Quality (BD Wise) 102 Locking/Unlocking the Panel Keys 102 Showing/Hiding the Samsung Logo while Booting 102 Enabling Game Mode 103 Registering the TV as a DivX-Certified Device (To Watch For Pay DivX Movies) 104 Restoring the...
User Manual
Page 6
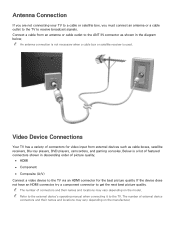
... the TV via an HDMI connector for video input from an antenna or cable outlet to receive broadcast signals. "" Refer to the external device's operating manual when connecting it to get the next best picture quality. Below is used. "" An antenna connection is not necessary when a cable box or satellite receiver...
... the TV via an HDMI connector for video input from an antenna or cable outlet to receive broadcast signals. "" Refer to the external device's operating manual when connecting it to get the next best picture quality. Below is used. "" An antenna connection is not necessary when a cable box or satellite receiver...

User Manual
Page 10
... the TV's speakers, set TV Sound Output (Sound > Speaker Settings > TV Sound Output) to something other than TV Speaker. "" Refer to the external device's operating manual when connecting it to digital audio. "" Connecting a device using an optical cable does not automatically turn off the TV speakers. "" An unusual noise coming from...
... the TV's speakers, set TV Sound Output (Sound > Speaker Settings > TV Sound Output) to something other than TV Speaker. "" Refer to the external device's operating manual when connecting it to digital audio. "" Connecting a device using an optical cable does not automatically turn off the TV speakers. "" An unusual noise coming from...
User Manual
Page 19
... Quickly access and play the content shared on the mobile device on the TV. Connect both the TV and the mobile device to enter a name manually. 2. You can occur. Alternatively, select User Input to the same router or AP.
... Quickly access and play the content shared on the mobile device on the TV. Connect both the TV and the mobile device to enter a name manually. 2. You can occur. Alternatively, select User Input to the same router or AP.
User Manual
Page 26
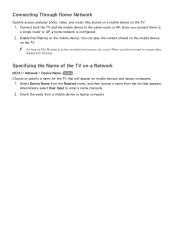
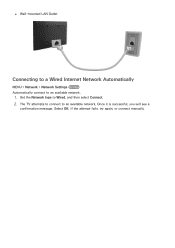
The TV attempts to connect to an available network. 1. If the attempt fails, try again, or connect manually. ●● Wall-mounted LAN Outlet Connecting to a Wired Internet Network Automatically MENU > Network > Network Settings Try Now Automatically connect to an available network. Once it is successful, you will see a confirmation message. Select OK. Set the Network type to Wired, and then select Connect. 2.
The TV attempts to connect to an available network. 1. If the attempt fails, try again, or connect manually. ●● Wall-mounted LAN Outlet Connecting to a Wired Internet Network Automatically MENU > Network > Network Settings Try Now Automatically connect to an available network. Once it is successful, you will see a confirmation message. Select OK. Set the Network type to Wired, and then select Connect. 2.
User Manual
Page 27
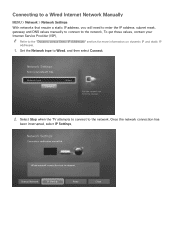
... on dynamic IP and static IP addresses. 1. Once the network connection has been interrupted, select IP Settings. Connecting to a Wired Internet Network Manually MENU > Network > Network Settings With networks that require a static IP address, you will need to enter the IP address, subnet mask, gateway..., and DNS values manually to connect to the network. Select Stop when the TV attempts to connect to the network. Change Network IP Settings Retry Close Network Settings...
... on dynamic IP and static IP addresses. 1. Once the network connection has been interrupted, select IP Settings. Connecting to a Wired Internet Network Manually MENU > Network > Network Settings With networks that require a static IP address, you will need to enter the IP address, subnet mask, gateway..., and DNS values manually to connect to the network. Select Stop when the TV attempts to connect to the network. Change Network IP Settings Retry Close Network Settings...
User Manual
Page 28
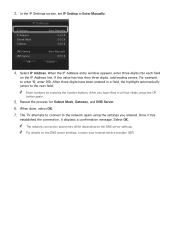
... on the DNS server settings, contact your Internet service provider (ISP). When done, select OK. 7. IP Settings IP Setting IP Address Subnet Mask Gateway Enter Manually 0.0.0.0 0.0.0.0 0.0.0.0 DNS Setting DNS Server OK Enter Manually 0.0.0.0 Cancel 4. For example, to Enter Manually. In the IP Settings screen, set IP Setting to enter 10, enter 010.
... on the DNS server settings, contact your Internet service provider (ISP). When done, select OK. 7. IP Settings IP Setting IP Address Subnet Mask Gateway Enter Manually 0.0.0.0 0.0.0.0 0.0.0.0 DNS Setting DNS Server OK Enter Manually 0.0.0.0 Cancel 4. For example, to Enter Manually. In the IP Settings screen, set IP Setting to enter 10, enter 010.

User Manual
Page 29
... it , select Show Password. 4. To view the password as you want doesn't appear in the list, select Add Network, and enter the network's SSID (name) manually. 3. Select the 123#& key to connect right away. -- If the attempt fails, try again or connect...
... it , select Show Password. 4. To view the password as you want doesn't appear in the list, select Add Network, and enter the network's SSID (name) manually. 3. Select the 123#& key to connect right away. -- If the attempt fails, try again or connect...

User Manual
Page 30
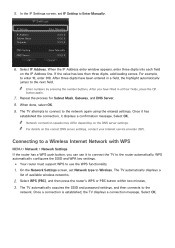
...stopped. To view the security password as you want doesn't appear in the list, select Add Network, and enter the network's SSID (name) manually. 3. Network Settings Select your Internet Service Provider (ISP). To get the IP address, subnet mask, gateway and DNS values, contact your network...Wireless network connection test is not security-enabled, the TV will need to enter the IP address, subnet mask, gateway, and DNS values manually to connect to connect right away. -- On the Network Settings screen, set Network type to the internet. Network type Wireless Wireless network ...
...stopped. To view the security password as you want doesn't appear in the list, select Add Network, and enter the network's SSID (name) manually. 3. Network Settings Select your Internet Service Provider (ISP). To get the IP address, subnet mask, gateway and DNS values, contact your network...Wireless network connection test is not security-enabled, the TV will need to enter the IP address, subnet mask, gateway, and DNS values manually to connect to connect right away. -- On the Network Settings screen, set Network type to the internet. Network type Wireless Wireless network ...
User Manual
Page 31
... of available wireless networks. 2. 5. IP Settings IP Setting IP Address Subnet Mask Gateway Enter Manually 0.0.0.0 0.0.0.0 0.0.0.0 DNS Setting DNS Server OK Enter Manually 0.0.0.0 Cancel 6. Select OK. After three digits have filled in a field, the highlight automatically jumps to Enter Manually. After you can use the WPS functionality. 1. When the IP Address entry window appears...
... of available wireless networks. 2. 5. IP Settings IP Setting IP Address Subnet Mask Gateway Enter Manually 0.0.0.0 0.0.0.0 0.0.0.0 DNS Setting DNS Server OK Enter Manually 0.0.0.0 Cancel 6. Select OK. After three digits have filled in a field, the highlight automatically jumps to Enter Manually. After you can use the WPS functionality. 1. When the IP Address entry window appears...
User Manual
Page 32
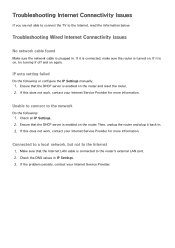
... the router. Unable to connect to the Internet 1. Connected to a local network, but not to the network Do the following or configure the IP Settings manually. 1. Troubleshooting Internet Connectivity Issues If you are not able to connect the TV to the router's external LAN port. 2. If it is enabled on again...
... the router. Unable to connect to the Internet 1. Connected to a local network, but not to the network Do the following or configure the IP Settings manually. 1. Troubleshooting Internet Connectivity Issues If you are not able to connect the TV to the router's external LAN port. 2. If it is enabled on again...

User Manual
Page 33
... setting failed Do the following : 1. Enter the correct password if required. 3. Unable to connect to the network Do the following or configure the IP Settings manually. 1. Enter the correct password if required. 3. Unable to connect to Network Settings and select the correct router. If it is, turn it back in. 2. Make...
... setting failed Do the following : 1. Enter the correct password if required. 3. Unable to connect to the network Do the following or configure the IP Settings manually. 1. Enter the correct password if required. 3. Unable to connect to Network Settings and select the correct router. If it is, turn it back in. 2. Make...
User Manual
Page 46
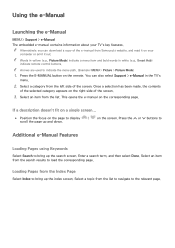
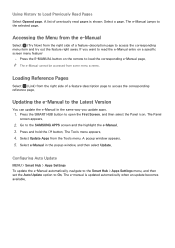
...Once a selection has been made, the contents of the screen. 3. Using the e-Manual Launching the e-Manual MENU > Support > e-Manual The embedded e-manual contains information about your computer or print it on the screen. Press the E-MANUAL button on the right side of the selected category appears on the remote. Select an ...item from the search results to indicate the menu path. (Example: MENU > Picture > Picture Mode) 1. This opens the e-manual on the corresponding page. Select an item from the list. Select a topic from Samsung's website, and read it out.
...Once a selection has been made, the contents of the screen. 3. Using the e-Manual Launching the e-Manual MENU > Support > e-Manual The embedded e-manual contains information about your computer or print it on the screen. Press the E-MANUAL button on the right side of the selected category appears on the remote. Select an ...item from the search results to indicate the menu path. (Example: MENU > Picture > Picture Mode) 1. This opens the e-manual on the corresponding page. Select an item from the list. Select a topic from Samsung's website, and read it out.
User Manual
Page 47
... Update MENU > Smart Hub > Apps Settings To update the e-Manual automatically, navigate to the Smart Hub > Apps Settings menu, and then set the Auto Update option to the SAMSUNG APPS screen and the highlight the e-Manual. 3. "" The e-Manual cannot be accessed from the right side of previously read the... e-Manual entry on the remote to access the corresponding reference page. Press and hold ...
... Update MENU > Smart Hub > Apps Settings To update the e-Manual automatically, navigate to the Smart Hub > Apps Settings menu, and then set the Auto Update option to the SAMSUNG APPS screen and the highlight the e-Manual. 3. "" The e-Manual cannot be accessed from the right side of previously read the... e-Manual entry on the remote to access the corresponding reference page. Press and hold ...

User Manual
Page 65
... move to schedule. Press the RETURN button on the screen. 4. On the Schedule Manager screen, select Schedule. Move to schedule. 2. If you select manual, you must also highlight and select the days you only receive your remote. Move right to the Time field, and then select it up or... broadcasts. Set the hours by using the Up/Down directional buttons to know the channel, day or days of the Schedule Viewing screen. Select Once, Manual, Sat~Sun, Mon~Fri, or Everyday. Scroll it . "" If you want. 6. The Program Info Screen To set up a scheduled viewing for an analog ...
... move to schedule. Press the RETURN button on the screen. 4. On the Schedule Manager screen, select Schedule. Move to schedule. 2. If you select manual, you must also highlight and select the days you only receive your remote. Move right to the Time field, and then select it up or... broadcasts. Set the hours by using the Up/Down directional buttons to know the channel, day or days of the Schedule Viewing screen. Select Once, Manual, Sat~Sun, Mon~Fri, or Everyday. Scroll it . "" If you want. 6. The Program Info Screen To set up a scheduled viewing for an analog ...
User Manual
Page 95
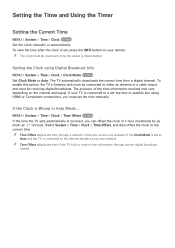
... Mode to the correct time. To enable this option, the TV's Antenna jack must be receiving digital broadcasts. If the Clock is set the time manually. Setting the Time and Using the Timer Setting the Current Time MENU > System > Time > Clock Try Now Set the clock... manually or automatically. MENU > System > Time > Clock > Time Offset Try Now If the time the TV sets automatically is incorrect, you must be reset every time ...
... Mode to the correct time. To enable this option, the TV's Antenna jack must be receiving digital broadcasts. If the Clock is set the time manually. Setting the Time and Using the Timer Setting the Current Time MENU > System > Time > Clock Try Now Set the clock... manually or automatically. MENU > System > Time > Clock > Time Offset Try Now If the time the TV sets automatically is incorrect, you must be reset every time ...
User Manual
Page 96
... then the year field and set them in the same fashion. Set Clock Mode to set the timer up appears. 3. Use the < and > buttons to Manual, and then select Clock Set. 2. You can set the hour. 5. When done, press the RETURN button on your remote. 4. Setting the Clock... Manually MENU > System > Time > Clock > Clock Set Try Now To enter the time and date manually, follow these steps. 1. The date entry pop-up to change the month. Use the < and > buttons to 180...
... then the year field and set them in the same fashion. Set Clock Mode to set the timer up appears. 3. Use the < and > buttons to Manual, and then select Clock Set. 2. You can set the hour. 5. When done, press the RETURN button on your remote. 4. Setting the Clock... Manually MENU > System > Time > Clock > Clock Set Try Now To enter the time and date manually, follow these steps. 1. The date entry pop-up to change the month. Use the < and > buttons to 180...

