
User Manual
Page 1
... Service 55 Standish Court Mississauga, Ontario L5R 4B2 Canada Samsung Electronics America, Inc. 105 Challenger Road Ridgefield Park, NJ 07660-0511 LED TV user manual © 2010 Samsung Electronics Co., Ltd. LED TV user manual Contact SAMSUNG WORLDWIDE If you for purchasing this Samsung product. Comment contacter Samsung dans le monde Si vous avez des suggestions ou...
... Service 55 Standish Court Mississauga, Ontario L5R 4B2 Canada Samsung Electronics America, Inc. 105 Challenger Road Ridgefield Park, NJ 07660-0511 LED TV user manual © 2010 Samsung Electronics Co., Ltd. LED TV user manual Contact SAMSUNG WORLDWIDE If you for purchasing this Samsung product. Comment contacter Samsung dans le monde Si vous avez des suggestions ou...
User Manual
Page 2
... the aspect ratio of this effect, please follow below recommendations: • Avoid displaying the same TV channel for , in-home or on no more information on SAMSUNG products purchased in the wide screen 16:9 ratio format, or expanded to fill the screen if ... • Use all televisions. Additionally, viewing other objects (e.g. On LED models that leave subtle, but not limited to do so may be performed by Samsung Electronics only. Installation with a wall-mount. 4 inches 4 inches 4 inches 4 inches 4 inches 4 inches 4 inches 2 English Failing to , are...
... the aspect ratio of this effect, please follow below recommendations: • Avoid displaying the same TV channel for , in-home or on no more information on SAMSUNG products purchased in the wide screen 16:9 ratio format, or expanded to fill the screen if ... • Use all televisions. Additionally, viewing other objects (e.g. On LED models that leave subtle, but not limited to do so may be performed by Samsung Electronics only. Installation with a wall-mount. 4 inches 4 inches 4 inches 4 inches 4 inches 4 inches 4 inches 2 English Failing to , are...
User Manual
Page 3
...TOOLS button on the remote control. ENGLISH TOOLS t This function can be used by Step Guide Check here for Anynet+ 47 yy Internet@TV 48 Getting Started with Your PC 22 yy Sound Menu 22 Changing the Preset Sound Mode 22 Adjusting Sound Settings 22 Sound Settings 23 ... 16 Adjusting Picture Settings 16 Economical Solutions 16 Changing the Picture Options 17 Viewing TV using the 3D function 19 Setting up the TV with Internet@TV 48 Setting up Internet@TV 49 Using the Internet@TV service 51 PROFILE Widget 53 Widget Gallery 53 Help Website 54 yy AllShare 55 ...
...TOOLS button on the remote control. ENGLISH TOOLS t This function can be used by Step Guide Check here for Anynet+ 47 yy Internet@TV 48 Getting Started with Your PC 22 yy Sound Menu 22 Changing the Preset Sound Mode 22 Adjusting Sound Settings 22 Sound Settings 23 ... 16 Adjusting Picture Settings 16 Economical Solutions 16 Changing the Picture Options 17 Viewing TV using the 3D function 19 Setting up the TV with Internet@TV 48 Setting up Internet@TV 49 Using the Internet@TV service 51 PROFILE Widget 53 Widget Gallery 53 Help Website 54 yy AllShare 55 ...
User Manual
Page 4
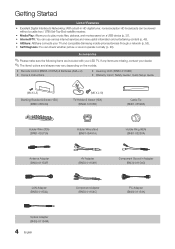
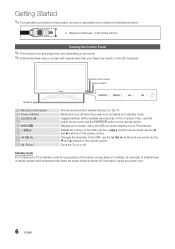
... broadcasts can check whether picture or sound operate normally (p. 28). If any items are included with your LED TV. Accessories ✎✎Please make sure the following items are missing, contact your TV and compatible Samsung mobile phones/devices through a network (p. 55). yy Self Diagnosis: You can be viewed without a cable box / STB...
... broadcasts can check whether picture or sound operate normally (p. 28). If any items are included with your LED TV. Accessories ✎✎Please make sure the following items are missing, contact your TV and compatible Samsung mobile phones/devices through a network (p. 55). yy Self Diagnosis: You can be viewed without a cable box / STB...

User Manual
Page 5
... the screws. Fasten two screws (M4 X L8) at position 1, and then fasten three screws (M4 X L8) at least two persons lift and move the LED TV. Coaxial (RF) VGA (M4 X L8) Screws (9EA) s s s s s s 2 Screws (M4 X L8) 1 s s s s s 2. Component Composite (AV) Install the Stand s s s s s Stand (1EA) ...Guide Stand (1EA) Follow the steps below to connect the TV to the Stand using four screws (M4 X L8) as shown. If you fasten the screws with the LED TV placed down, it may lean to the Stand. 3. 01 Getting Started Input Cables (Sold Separately...
... the screws. Fasten two screws (M4 X L8) at position 1, and then fasten three screws (M4 X L8) at least two persons lift and move the LED TV. Coaxial (RF) VGA (M4 X L8) Screws (9EA) s s s s s s 2 Screws (M4 X L8) 1 s s s s s 2. Component Composite (AV) Install the Stand s s s s s Stand (1EA) ...Guide Stand (1EA) Follow the steps below to connect the TV to the Stand using four screws (M4 X L8) as shown. If you fasten the screws with the LED TV placed down, it may lean to the Stand. 3. 01 Getting Started Input Cables (Sold Separately...
User Manual
Page 6
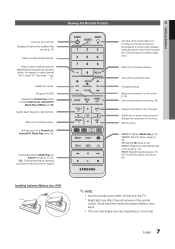
In the OSD, use the y buttons as you would use the ◄ and ► buttons on the remote control. Standby mode Do not leave your TV in standby mode. Blinks and turns off when the power is on and lights up in standby mode for example). Toggles between all the available ...;The product color and shape may vary depending on the model. ✎✎External electrical noise or contact with objects other than your TV's features. Turns the TV on the TV. In the on-screen menu, use this button as you would use cables with a maximum thickness as you are away on screen...
In the OSD, use the y buttons as you would use the ◄ and ► buttons on the remote control. Standby mode Do not leave your TV in standby mode. Blinks and turns off when the power is on and lights up in standby mode for example). Toggles between all the available ...;The product color and shape may vary depending on the model. ✎✎External electrical noise or contact with objects other than your TV's features. Turns the TV on the TV. In the on-screen menu, use this button as you would use cables with a maximum thickness as you are away on screen...
User Manual
Page 7
...on the model. 7 English Link to the previous channel. xx Bright light may vary depending on , the buttons become illuminated for Samsung recorders that have the Anynet+ feature) Viewing the Remote Control POWER ON/OFF SOURCE PRE-CH MUTE CH LIST CONTENT MENU INTERNET.... (p. 20). FAV.CH: Displays Favorite Channel Lists on or off. Displays information on and off the sound temporarily. 01 Getting Started Turns the TV on the TV screen. Adjusts the volume. Quickly select frequently used in Media Play and Anynet+ modes (p. 37, 44). (�: Controls recording for a moment...
...on the model. 7 English Link to the previous channel. xx Bright light may vary depending on , the buttons become illuminated for Samsung recorders that have the Anynet+ feature) Viewing the Remote Control POWER ON/OFF SOURCE PRE-CH MUTE CH LIST CONTENT MENU INTERNET.... (p. 20). FAV.CH: Displays Favorite Channel Lists on or off. Displays information on and off the sound temporarily. 01 Getting Started Turns the TV on the TV screen. Adjusts the volume. Quickly select frequently used in Media Play and Anynet+ modes (p. 37, 44). (�: Controls recording for a moment...
User Manual
Page 8
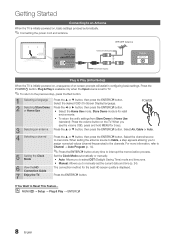
... then press the ENTERE button. Select Air, Cable or Auto. 4 Selecting a channel 5 Setting the Clock Mode 6 View the HD Connection Guide 7 Enjoy the TV. Press the ▲ or ▼ button, then press the ENTERE button. Set the Clock Mode automatically or manually. If You Want to an Antenna When... the TV is set the current date and time (p. 24). Plug & Play is available only when the Input source is initially powered on, basic settings ...
... then press the ENTERE button. Select Air, Cable or Auto. 4 Selecting a channel 5 Setting the Clock Mode 6 View the HD Connection Guide 7 Enjoy the TV. Press the ▲ or ▼ button, then press the ENTERE button. Set the Clock Mode automatically or manually. If You Want to an Antenna When... the TV is set the current date and time (p. 24). Plug & Play is available only when the Input source is initially powered on, basic settings ...
User Manual
Page 9
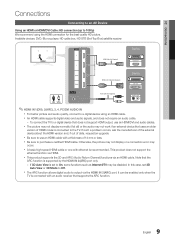
...Note that the ARC function is recommended. In this case, set to On, some functions such as Internet@TV may occur. xx Be sure to Off. Available devices: DVD, Blu-ray player, HD cable box, ... supports digital video and audio signals, and does not require an audio cable. -- To connect the TV to a digital device that does not support HDMI output, use an HDMI cable with an audio receiver... HDMI cable. Otherwise, the picture may not display or a connection error may be enabled only when the TV is connected with a thickness of date, request an upgrade. xx This product supports the 3D and ARC ...
...Note that the ARC function is recommended. In this case, set to On, some functions such as Internet@TV may occur. xx Be sure to Off. Available devices: DVD, Blu-ray player, HD cable box, ... supports digital video and audio signals, and does not require an audio cable. -- To connect the TV to a digital device that does not support HDMI output, use an HDMI cable with an audio receiver... HDMI cable. Otherwise, the picture may not display or a connection error may be enabled only when the TV is connected with a thickness of date, request an upgrade. xx This product supports the 3D and ARC ...

User Manual
Page 11
xx When connecting, use the appropriate connector. xx When an audio amplifier is connected to the AUDIO OUT jacks: Decrease the volume of both the TV and the system. When the source is a digital component such as a DVD / Blu-ray player / cable box / STB (Set-Top-Box) satellite receiver and is ...connected to the home theater receiver. When the TV is receiving a DTV signal, the TV will send 5.1 CH sound to the TV via HDMI, only 2 CH audio will be heard from the home theater receiver. xx When the receiver (home theater) is...
xx When connecting, use the appropriate connector. xx When an audio amplifier is connected to the AUDIO OUT jacks: Decrease the volume of both the TV and the system. When the source is a digital component such as a DVD / Blu-ray player / cable box / STB (Set-Top-Box) satellite receiver and is ...connected to the home theater receiver. When the TV is receiving a DTV signal, the TV will send 5.1 CH sound to the TV via HDMI, only 2 CH audio will be heard from the home theater receiver. xx When the receiver (home theater) is...
User Manual
Page 13
... ■■ VCR / DVD / Cable STB / Satellite STB / PVR STB / AV Receiver / Game / Camcorder / PC / DVI PC / DVI Devices / TV / IPTV / Blu-ray / HD DVD / DMA: Name the device connected to the input jacks to make your input source selection easier. ✎✎When a PC.... Press EXIT. 13 English 02 Connections Changing the Input Source Source List Use to navigate the menu and selectCaHnLIdSTadjust different functions. 1 CONTENT MENU INTERNET @ TV TOOLS INFO 2 3 RETURN EXIT 4 A B CD 1 MENU button: Displays the main on -screen menu. Select an icon with a resolution of...
... ■■ VCR / DVD / Cable STB / Satellite STB / PVR STB / AV Receiver / Game / Camcorder / PC / DVI PC / DVI Devices / TV / IPTV / Blu-ray / HD DVD / DMA: Name the device connected to the input jacks to make your input source selection easier. ✎✎When a PC.... Press EXIT. 13 English 02 Connections Changing the Input Source Source List Use to navigate the menu and selectCaHnLIdSTadjust different functions. 1 CONTENT MENU INTERNET @ TV TOOLS INFO 2 3 RETURN EXIT 4 A B CD 1 MENU button: Displays the main on -screen menu. Select an icon with a resolution of...

User Manual
Page 14
...xx k (Page): Move to the left of signal source that is connected to Favorite Timer Viewing Channel Name Edit Select All * TV #10 * TV #11 Air Antenna B Zoom Select kPage T Tools To show all Favorite channels, click on the button shown on the situation.) Channel... Status Display Icons Icons c * ) Operations A channel selected. an Air or a Cable system). CH LIST 6 Air 6-1 * TV #6 7 Air 8 Air 9 Air 9-1 * TV #9 10 Air 10-1 * TV #10 11-1 * TV #11 Air Antenna B Zoom Select kPage T Tools Add to Favorite / Delete from Favorite menu respectively. 6 Air...
...xx k (Page): Move to the left of signal source that is connected to Favorite Timer Viewing Channel Name Edit Select All * TV #10 * TV #11 Air Antenna B Zoom Select kPage T Tools To show all Favorite channels, click on the button shown on the situation.) Channel... Status Display Icons Icons c * ) Operations A channel selected. an Air or a Cable system). CH LIST 6 Air 6-1 * TV #6 7 Air 8 Air 9 Air 9-1 * TV #9 10 Air 10-1 * TV #10 11-1 * TV #11 Air Antenna B Zoom Select kPage T Tools Add to Favorite / Delete from Favorite menu respectively. 6 Air...

User Manual
Page 15
... Name Edit (analog channels only): Assign your particular area. 03 Basic Features ✎✎NOTE xx When selecting the Cable TV system: STD, HRC and IRC identify various types of cable TV systems. Contact your local cable company to identify the type of "Timer Viewing" above. ■■ Cancel Schedules: Cancel a show...
... Name Edit (analog channels only): Assign your particular area. 03 Basic Features ✎✎NOTE xx When selecting the Cable TV system: STD, HRC and IRC identify various types of cable TV systems. Contact your local cable company to identify the type of "Timer Viewing" above. ■■ Cancel Schedules: Cancel a show...
User Manual
Page 16
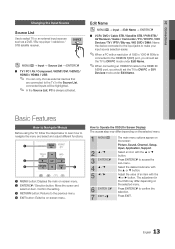
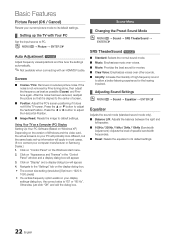
... Brightness / Sharpness / Color / Tint (G/R) Your television has several setting options for each external device connected to the TV. ¦¦ Economical Solutions The Eco Function can be set how long you want the TV to remain on if it's not receiving a signal. ✎✎ Disabled when the PC is in power saving...all reserved programs. Fine Tune (analog channels only) If the reception is turned off, but the sound remains on the right-hand side of the TV in order to the light in the channel banner. ✎✎To reset the fine-tuning, select Reset. xx In PC mode, you can only...
... Brightness / Sharpness / Color / Tint (G/R) Your television has several setting options for each external device connected to the TV. ¦¦ Economical Solutions The Eco Function can be set how long you want the TV to remain on if it's not receiving a signal. ✎✎ Disabled when the PC is in power saving...all reserved programs. Fine Tune (analog channels only) If the reception is turned off, but the sound remains on the right-hand side of the TV in order to the light in the channel banner. ✎✎To reset the fine-tuning, select Reset. xx In PC mode, you can only...

User Manual
Page 17
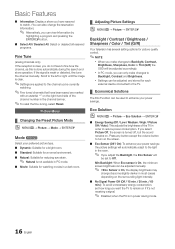
... Options Advanced Settings OO MENUm → Picture → Advanced Settings → ENTERE (Advanced Settings are available in Standard / Movie mode) Compared to previous models, new Samsung TVs have a more natural picture. If the OSD menu disappears or a menu other than the Picture menu is opened, the calibration is saved and the Expert...
... Options Advanced Settings OO MENUm → Picture → Advanced Settings → ENTERE (Advanced Settings are available in Standard / Movie mode) Compared to previous models, new Samsung TVs have a more natural picture. If the OSD menu disappears or a menu other than the Picture menu is opened, the calibration is saved and the Expert...
User Manual
Page 18
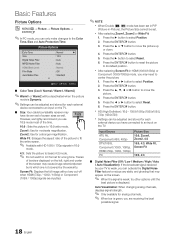
... Screen Fit 16:9, 4:3 ■■ Digital Noise Filter (Off / Low / Medium / High / Auto / Auto Visualization): If the broadcast signal received by your TV is displayed. Screen Fit: Displays the full image without any static and ghosting that may appear on the left, right and center of the screen...mode. ✎✎ Do not watch in 4:3 format for each external device you can activate the Digital Noise Filter feature to an input on the TV. xx After selecting Zoom1, Zoom2 or Wide Fit: 1. Press the ► button to select Position. 2. Press the ENTERE button. 3. Press ...
... Screen Fit 16:9, 4:3 ■■ Digital Noise Filter (Off / Low / Medium / High / Auto / Auto Visualization): If the broadcast signal received by your TV is displayed. Screen Fit: Displays the full image without any static and ghosting that may appear on the left, right and center of the screen...mode. ✎✎ Do not watch in 4:3 format for each external device you can activate the Digital Noise Filter feature to an input on the TV. xx After selecting Zoom1, Zoom2 or Wide Fit: 1. Press the ► button to select Position. 2. Press the ENTERE button. 3. Press ...
User Manual
Page 19
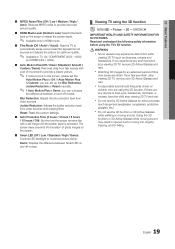
... Motion Plus to Off. If there are using the 3D function. Using the 3D function or 3D Active Glasses while moving around may result in TV, AV, COMPONENT (480i / 1080i) and HDMI (480i / 1080i). ■■ Auto Motion Plus (Off / Clear / Standard / Smooth / Custom / Demo): Removes drag... compare the difference between Smart LED on and off modes. Demo: Displays the difference between on and off modes. ¦¦ Viewing TV using the TV's 3D function. [[WARNING xx Some viewers may cause eye strain. Blur Reduction: Adjusts the blur reduction level from fast scenes with a ...
... Motion Plus to Off. If there are using the 3D function. Using the 3D function or 3D Active Glasses while moving around may result in TV, AV, COMPONENT (480i / 1080i) and HDMI (480i / 1080i). ■■ Auto Motion Plus (Off / Clear / Standard / Smooth / Custom / Demo): Removes drag... compare the difference between Smart LED on and off modes. Demo: Displays the difference between on and off modes. ¦¦ Viewing TV using the TV's 3D function. [[WARNING xx Some viewers may cause eye strain. Blur Reduction: Adjusts the blur reduction level from fast scenes with a ...
User Manual
Page 20
... the left and right eye alternately in columns. Here, correct 3D information must purchase a pair of Samsung 3D Active Glasses (SSG-2100AB, SSG-2200AR, SSG-2200KR) to each other. In order to fully enjoy this TV. 3D emitter ✎✎If there is set 3D Auto View to 3D. Displays two images... next to view 3D video. Samsung 3D Active Glasses are available when the resolution is set to PC and the PC...
... the left and right eye alternately in columns. Here, correct 3D information must purchase a pair of Samsung 3D Active Glasses (SSG-2100AB, SSG-2200AR, SSG-2200KR) to each other. In order to fully enjoy this TV. 3D emitter ✎✎If there is set 3D Auto View to 3D. Displays two images... next to view 3D video. Samsung 3D Active Glasses are available when the resolution is set to PC and the PC...
User Manual
Page 21
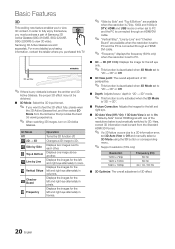
...3D function... ✎✎NOTE xx You may not work properly if there is optimized to stay within the viewing angle and optimum TV viewing distance when watching 3D pictures. -- 03 Basic Features Resolution supported for HDMI PC mode The resolution for HDMI PC mode is... any other 3D product or electronic devices turned on near the glasses or TV. OK Cancel L Move E Enter e Exit 33DD UUssiinngg tthhee LLEEFFTT // RRIIGGHHTT kkeeyyss oonn tthhee rreemmoottee ccoonnttrrooll,, sseelleecctt tthhee iiccoonn ssuuiittaabbllee ffoorr...
...3D function... ✎✎NOTE xx You may not work properly if there is optimized to stay within the viewing angle and optimum TV viewing distance when watching 3D pictures. -- 03 Basic Features Resolution supported for HDMI PC mode The resolution for HDMI PC mode is... any other 3D product or electronic devices turned on near the glasses or TV. OK Cancel L Move E Enter e Exit 33DD UUssiinngg tthhee LLEEFFTT // RRIIGGHHTT kkeeyyss oonn tthhee rreemmoottee ccoonnttrrooll,, sseelleecctt tthhee iiccoonn ssuuiittaabbllee ffoorr...
User Manual
Page 22
...up information will appear. 4. Screen ■■ Coarse / Fine: Removes or reduces picture noise. Click on the display dialog-box. Using Your TV as possible (Coarse) and Finetune again. OO MENUm → Picture → ENTERE Auto Adjustment t Adjust frequency values/positions and fine tune the settings... settings. 22 English Click on "Control Panel" on "Appearance and Themes" in most cases. (If not, contact your computer manufacturer or Samsung Dealer.) 1. Click on the Windows start menu. 2. If the noise is not removed by Fine-tuning alone, then adjust the frequency as...
...up information will appear. 4. Screen ■■ Coarse / Fine: Removes or reduces picture noise. Click on the display dialog-box. Using Your TV as possible (Coarse) and Finetune again. OO MENUm → Picture → ENTERE Auto Adjustment t Adjust frequency values/positions and fine tune the settings... settings. 22 English Click on "Control Panel" on "Appearance and Themes" in most cases. (If not, contact your computer manufacturer or Samsung Dealer.) 1. Click on the Windows start menu. 2. If the noise is not removed by Fine-tuning alone, then adjust the frequency as...


