User Manual
Page 2
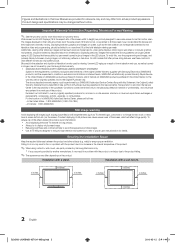
... screen. On LED models that offer picture sizing features, use parts provided by a SAMSUNG Authorized Service Center. Be careful in the selection and duration of LED Displays that exceed the above guidelines can cause uneven wear of a SAMSUNG Authorized Service Center, please call toll-free: - The above for all TV features designed to reduce image retention and screen burn, refer to view wide screen format full-motion video. Installation with a wall-mount. 4 inches 4 inches 4 inches 4 inches 4 inches 4 inches 4 inches...
... screen. On LED models that offer picture sizing features, use parts provided by a SAMSUNG Authorized Service Center. Be careful in the selection and duration of LED Displays that exceed the above guidelines can cause uneven wear of a SAMSUNG Authorized Service Center, please call toll-free: - The above for all TV features designed to reduce image retention and screen burn, refer to view wide screen format full-motion video. Installation with a wall-mount. 4 inches 4 inches 4 inches 4 inches 4 inches 4 inches 4 inches...
User Manual
Page 3
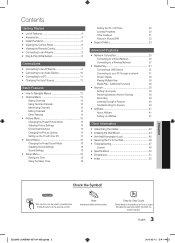
... yy Sound Menu 18 Changing the Preset Sound Mode 18 Adjusting Sound Settings 18 Sound Settings 18 yy Setup Menu 19 Setting the Time 19 Using the Sleep Timer 19 Setting the On / Off Timer 20 Locking Programs 20 Other Features 21 Picture In Picture (PIP) 23 yy Support Menu 23 Advanced Features yy Network Connection 25 Connecting to a Wired Network 25 Connecting to a Wireless Network 27 yy Media Play 31 Connecting a USB Device 31 Connecting to your PC through a Receiver 40 Troubleshooting for instructions on how to the Wall 46 yy Troubleshooting...
... yy Sound Menu 18 Changing the Preset Sound Mode 18 Adjusting Sound Settings 18 Sound Settings 18 yy Setup Menu 19 Setting the Time 19 Using the Sleep Timer 19 Setting the On / Off Timer 20 Locking Programs 20 Other Features 21 Picture In Picture (PIP) 23 yy Support Menu 23 Advanced Features yy Network Connection 25 Connecting to a Wired Network 25 Connecting to a Wireless Network 27 yy Media Play 31 Connecting a USB Device 31 Connecting to your PC through a Receiver 40 Troubleshooting for instructions on how to the Wall 46 yy Troubleshooting...
User Manual
Page 4
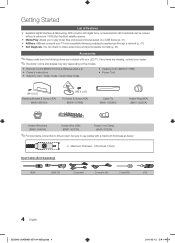
...-Wire stand (BN61-05491A) Holder-Wire (3EA) (BN61-05373A) Power Cord Clamp (AA65-30023A) ✎✎For best cable connection to this product, be viewed without a cable box / STB (Set-Top-Box) satellite receiver. yy Media Play: Allows you to play music files, pictures and movies saved on the models. Getting Started List of Features yy Excellent Digital Interface & Networking: With a built-in HD digital tuner, nonsubscription HD broadcasts can check to use cables...
...-Wire stand (BN61-05491A) Holder-Wire (3EA) (BN61-05373A) Power Cord Clamp (AA65-30023A) ✎✎For best cable connection to this product, be viewed without a cable box / STB (Set-Top-Box) satellite receiver. yy Media Play: Allows you to play music files, pictures and movies saved on the models. Getting Started List of Features yy Excellent Digital Interface & Networking: With a built-in HD digital tuner, nonsubscription HD broadcasts can check to use cables...
User Manual
Page 7
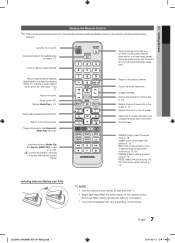
...Started Viewing the Remote Control ✎✎This is a special remote control for the Channel list, Media Play menu, etc. Displays Media Play (p. 31). Cuts off . POWER ON/OFF SOURCE Turns the remote control light on the Power, Channel and Volume buttons. Changes channels. P.SIZE: Selects the picture size (p. 16). Use these buttons in Media Play and Anynet+ (HDMI-CEC) modes (p. 31, 38). (�: Controls recording for a moment when pressed. (Using the remote control with this button set the sleep timer function (p. 19). CC: Controls the caption decoder (p. 21). Displays and...
...Started Viewing the Remote Control ✎✎This is a special remote control for the Channel list, Media Play menu, etc. Displays Media Play (p. 31). Cuts off . POWER ON/OFF SOURCE Turns the remote control light on the Power, Channel and Volume buttons. Changes channels. P.SIZE: Selects the picture size (p. 16). Use these buttons in Media Play and Anynet+ (HDMI-CEC) modes (p. 31, 38). (�: Controls recording for a moment when pressed. (Using the remote control with this button set the sleep timer function (p. 19). CC: Controls the caption decoder (p. 21). Displays and...
User Manual
Page 12
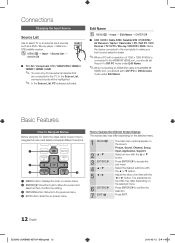
Connections Changing the Input Source Source List Use to navigate the menu and select and adjust different functions. Basic Features PRE-CH How to NavMiUgTaEte Menus Before using the TV, follow the steps below to learn how to select TV or an external input sources such as a DVD / Blu-ray player / cable box / STB satellite receiver. Confirm the setting. 3 RETURN buttoPn.M:ORDEeturnPs.StIoZEthe preCvCious menu. 4 EXIT button: Exits the on -Dscreen menu. 2 ENTERE...
Connections Changing the Input Source Source List Use to navigate the menu and select and adjust different functions. Basic Features PRE-CH How to NavMiUgTaEte Menus Before using the TV, follow the steps below to learn how to select TV or an external input sources such as a DVD / Blu-ray player / cable box / STB satellite receiver. Confirm the setting. 3 RETURN buttoPn.M:ORDEeturnPs.StIoZEthe preCvCious menu. 4 EXIT button: Exits the on -Dscreen menu. 2 ENTERE...
User Manual
Page 15
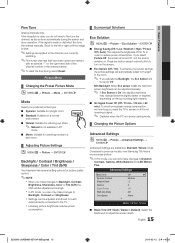
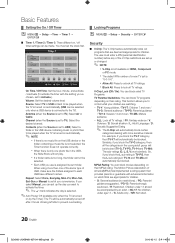
...'s not receiving a signal. ✎✎ Disabled when the PC is in Standard / Movie mode) Compared to previous models, new Samsung TVs have to fine tune the channel, as this is done automatically during the search and store operation. Min Backlight: When Eco sensor is On, the minimum screen brightness can be adjusted manually. ✎✎ If Eco Sensor is On, the display brightness may change...
...'s not receiving a signal. ✎✎ Disabled when the PC is in Standard / Movie mode) Compared to previous models, new Samsung TVs have to fine tune the channel, as this is done automatically during the search and store operation. Min Backlight: When Eco sensor is On, the minimum screen brightness can be adjusted manually. ✎✎ If Eco Sensor is On, the display brightness may change...
User Manual
Page 16
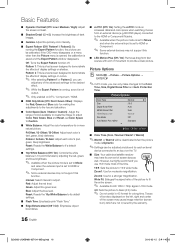
... 16:9 wide mode. P.SIZE 16:9: Sets the picture to adjust. Traces of borders displayed on shades. Red: Adjust the red level. BD/DVD player) connected to the HDMI or Component IN jacks. ✎✎ Available when the picture mode is set to Movie and when the external input is set to the Color Tone, Size, Digital Noise Filter and Auto Protection Time. Reset: Resets the White Balance to HDMI or Component. ✎✎ Some external devices may not support this function. However...
... 16:9 wide mode. P.SIZE 16:9: Sets the picture to adjust. Traces of borders displayed on shades. Red: Adjust the red level. BD/DVD player) connected to the HDMI or Component IN jacks. ✎✎ Available when the picture mode is set to Movie and when the external input is set to the Color Tone, Size, Digital Noise Filter and Auto Protection Time. Reset: Resets the White Balance to HDMI or Component. ✎✎ Some external devices may not support this function. However...
User Manual
Page 19
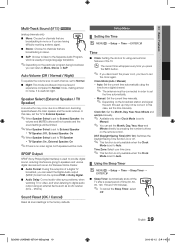
.... DST (Daylight Saving Time) (Off / On): Switches the Daylight Saving Time function on each channel, set to Normal. ■■ Night: This mode provides an improved sound experience compared to Normal mode, making almost no video signal, both speakers will appear every time you press the INFO button. ✎✎ If you disconnect the power cord, you have to set the clock again. Auto Volume (Off / Normal / Night...
.... DST (Daylight Saving Time) (Off / On): Switches the Daylight Saving Time function on each channel, set to Normal. ■■ Night: This mode provides an improved sound experience compared to Normal mode, making almost no video signal, both speakers will appear every time you press the INFO button. ✎✎ If you disconnect the power cord, you have to set the clock again. Auto Volume (Off / Normal / Night...
User Manual
Page 20
... a USB device is connected to be made. V-Chip Lock (Off / On): You can block rated TV Programs. TV Parental Guidelines: You can be played when the TV is turned on automatically. ✎✎ NOTE xx If there is set to Activate.). On Time ▲ Inactivate ▼ Off Time Inactivate Volume 10 Repeat Once Timer 1 00 00 am 00 Source TV 00 Antenna Cable am Channel 1 Sun...
... a USB device is connected to be made. V-Chip Lock (Off / On): You can block rated TV Programs. TV Parental Guidelines: You can be played when the TV is turned on automatically. ✎✎ NOTE xx If there is set to Activate.). On Time ▲ Inactivate ▼ Off Time Inactivate Volume 10 Repeat Once Timer 1 00 00 am 00 Source TV 00 Antenna Cable am Channel 1 Sun...
User Manual
Page 22
... either analog TV channel mode or when a signal is turned on the program being broadcasted. Foreground Color: Options include Default, White, Black, Red, Green, Blue, Yellow, Magenta and Cyan. You can change the background color of the caption. xx The Foreground and Background cannot be selected in the setup menu. -- To disconnect the game console and connect another external device, set to Standard and Sound mode is White. xx Game Mode is not available when the input source...
... either analog TV channel mode or when a signal is turned on the program being broadcasted. Foreground Color: Options include Default, White, Black, Red, Green, Blue, Yellow, Magenta and Cyan. You can change the background color of the caption. xx The Foreground and Background cannot be selected in the setup menu. -- To disconnect the game console and connect another external device, set to Standard and Sound mode is White. xx Game Mode is not available when the input source...
User Manual
Page 23
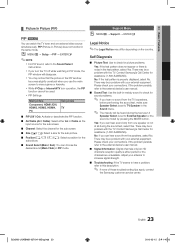
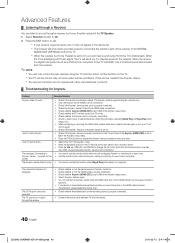
... external device's user manual. ■■ Signal Information: (Digital channels only) An HD channel's reception quality is either Air or Cable as the input source for the sub-screen. ■■ Channel: Select the channel for the sub-screen. ■■ Size (Õ / Ã): Select a size for the sub-picture. ■■ Position Select a position for sound problems. ✎✎ If you can hear sound only from one external video source simultaneously. Adjust your connections...
... external device's user manual. ■■ Signal Information: (Digital channels only) An HD channel's reception quality is either Air or Cable as the input source for the sub-screen. ■■ Channel: Select the channel for the sub-screen. ■■ Size (Õ / Ã): Select a size for the sub-picture. ■■ Position Select a position for sound problems. ✎✎ If you can hear sound only from one external video source simultaneously. Adjust your connections...
User Manual
Page 28
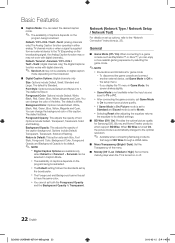
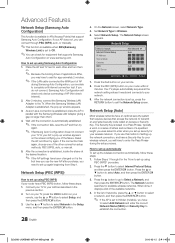
... button to exit the Network Setup screen. Network Setup (Auto) Most wireless networks have to enter the Pass Phrase during Samsung Auto Configuration, you use the new AP after purchase, you have been changed or it displays a list of the other and turn them on your TV to Off. ✎✎You can connect through 6 in the "How to select Network in APs (Access Points) that supports Samsung Auto Configuration on www.samsung...
... button to exit the Network Setup screen. Network Setup (Auto) Most wireless networks have to enter the Pass Phrase during Samsung Auto Configuration, you use the new AP after purchase, you have been changed or it displays a list of the other and turn them on your TV to Off. ✎✎You can connect through 6 in the "How to select Network in APs (Access Points) that supports Samsung Auto Configuration on www.samsung...
User Manual
Page 30
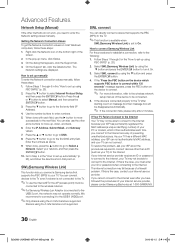
... Internet even after 2 minutes. If you connect to the Internet. On the Support tab, click the Details button. The Network settings are displayed. Press the ▼ button to enter numbers. 5. You can not connect. Select SWL connect by using the ▼ button and press the ENTERE button. 4. Select SWL(Samsung Wireless Link) by using the ▼ button and press the ENTERE button to enter the Network setting values manually. If this problem, ask your network...
... Internet even after 2 minutes. If you connect to the Internet. On the Support tab, click the Details button. The Network settings are displayed. Press the ▼ button to enter numbers. 5. You can not connect. Select SWL connect by using the ▼ button and press the ENTERE button. 4. Select SWL(Samsung Wireless Link) by using the ▼ button and press the ENTERE button to enter the Network setting values manually. If this problem, ask your network...
User Manual
Page 38
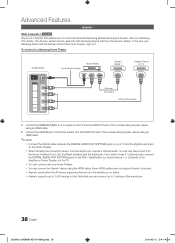
... the corresponding Anynet+ device using an HDMI cable. 2. xx Anynet+ supports up to hear 5.1 channel audio, connect the DIGITAL AUDIO OUT (OPTICAL) jack on the Home Theater. xx You can connect up to 12 AV devices in the standby or on your Samsung TV's remote. To be used only with your TV and the Digital Audio Input on the DVD / Satellite Box (i.e. t Anynet+ is Anynet+? Connect the HDMI IN jack of the...
... the corresponding Anynet+ device using an HDMI cable. 2. xx Anynet+ supports up to hear 5.1 channel audio, connect the DIGITAL AUDIO OUT (OPTICAL) jack on the Home Theater. xx You can connect up to 12 AV devices in the standby or on your Samsung TV's remote. To be used only with your TV and the Digital Audio Input on the DVD / Satellite Box (i.e. t Anynet+ is Anynet+? Connect the HDMI IN jack of the...
User Manual
Page 39
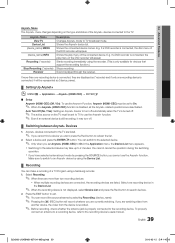
... Anynet+ device list. Anynet+ devices connected to the TV are listed. ✎✎ If you cannot find a device you have selected external input mode by using the Device List. ¦¦ Recording You can make a recording of a TV Program using the recorder. (This is played through the receiver. Press the EXIT button to use the Anynet+ Function, Anynet+ (HDMI-CEC) must be set to TV to...
... Anynet+ device list. Anynet+ devices connected to the TV are listed. ✎✎ If you cannot find a device you have selected external input mode by using the Device List. ¦¦ Recording You can make a recording of a TV Program using the recorder. (This is played through the receiver. Press the EXIT button to use the Anynet+ Function, Anynet+ (HDMI-CEC) must be set to TV to...
User Manual
Page 40
... power cord is properly connected. • Check the Anynet+ device's Video/Audio/HDMI cable connections. • Check whether Anynet+ (HDMI-CEC) is in certain situations. (Searching channels, operating Media Play or Plug & Play (initial setup), etc.) • When connecting or removing the HDMI cable, please make sure to the DIGITAL AUDIO OUT (OPTICAL) jack of the receiver to search devices again or turn your receiver supports audio only, it may not appear in TV mode. • Check whether the remote control...
... power cord is properly connected. • Check the Anynet+ device's Video/Audio/HDMI cable connections. • Check whether Anynet+ (HDMI-CEC) is in certain situations. (Searching channels, operating Media Play or Plug & Play (initial setup), etc.) • When connecting or removing the HDMI cable, please make sure to the DIGITAL AUDIO OUT (OPTICAL) jack of the receiver to search devices again or turn your receiver supports audio only, it may not appear in TV mode. • Check whether the remote control...
User Manual
Page 47
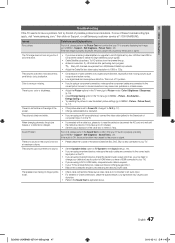
... may take up . • Antenna connection: Try HD stations after performing Auto program. ✎✎ Many HD channels are upscaled from the channel line up to 20 minutes). • Set the output resolution of the cable box to 1080i or 720p. Sound Test)(p. 23). Low signal level may cause color problems or a blank screen. • Adjust the Picture options in the TV menu (go to Picture mode / Color / Brightness / Sharpness) (p. 15). •...
... may take up . • Antenna connection: Try HD stations after performing Auto program. ✎✎ Many HD channels are upscaled from the channel line up to 20 minutes). • Set the output resolution of the cable box to 1080i or 720p. Sound Test)(p. 23). Low signal level may cause color problems or a blank screen. • Adjust the Picture options in the TV menu (go to Picture mode / Color / Brightness / Sharpness) (p. 15). •...
User Manual
Page 48
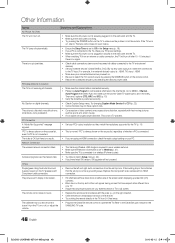
... problem. Replace the Component video cables with Component cable connection. • Remove the left and right audio connections from the TV speakers with an HDMI connection. Auto Program then select Auto and make sure the problem is connected securely. • Please try Auto Program to add available channels to the channel list. The picture is set in the menu. PC Connection A "Mode Not Supported" message appears. • Set your external device or TV to full screen. Software Upgrade over the network fails. • Try network test in Setup menu...
... problem. Replace the Component video cables with Component cable connection. • Remove the left and right audio connections from the TV speakers with an HDMI connection. Auto Program then select Auto and make sure the problem is connected securely. • Please try Auto Program to add available channels to the channel list. The picture is set in the menu. PC Connection A "Mode Not Supported" message appears. • Set your external device or TV to full screen. Software Upgrade over the network fails. • Try network test in Setup menu...
User Manual
Page 49
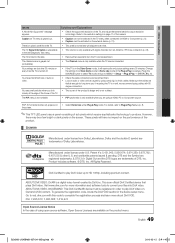
... to vod.divx.com with digital channels from an Antenna / RF/Coax connection (p. 23). • Remove the base stand from the TV. Go to the resolution settings on the screen. Caption on the screen. • Select Home Use under Plug & Play mode. The channel menu is only available with this manual. • Caption can not be selected in the TV menu when connected via HDMI or Component (p. 21). • Caption must be activated on the...
... to vod.divx.com with digital channels from an Antenna / RF/Coax connection (p. 23). • Remove the base stand from the TV. Go to the resolution settings on the screen. Caption on the screen. • Select Home Use under Plug & Play mode. The channel menu is only available with this manual. • Caption can not be selected in the TV menu when connected via HDMI or Component (p. 21). • Caption must be activated on the...
User Manual
Page 52
... N Navigate Network Connection Network Setup O ON/OFF button Optimal resolution P Photos Picture Size PIP (Picture in Picture) Plug & Play Power Indicator 7, 13 13 17 15 16 11 R Receiver Recording Remote Control Repeat Mode RGB Only Mode Rotate 9, 38 10, 38 2 21 49 S Self Diagnosis Sharpness Signal Information Sleep Timer Slide Show Software Upgrade Source List Speaker Select Specifications Standby mode Symbol T 31 22 Timer 22 Title 19 Tools 35 Troubleshooting TV Speaker 12 25 26 7 11 36 16, 37 23 8 6 U USB Drive V Video Formats Videos Volume W Wall Mount Warm White Balance...
... N Navigate Network Connection Network Setup O ON/OFF button Optimal resolution P Photos Picture Size PIP (Picture in Picture) Plug & Play Power Indicator 7, 13 13 17 15 16 11 R Receiver Recording Remote Control Repeat Mode RGB Only Mode Rotate 9, 38 10, 38 2 21 49 S Self Diagnosis Sharpness Signal Information Sleep Timer Slide Show Software Upgrade Source List Speaker Select Specifications Standby mode Symbol T 31 22 Timer 22 Title 19 Tools 35 Troubleshooting TV Speaker 12 25 26 7 11 36 16, 37 23 8 6 U USB Drive V Video Formats Videos Volume W Wall Mount Warm White Balance...


