
User Manual Ver.1.0 (English)
Page 98
... button and the mute function. Select Sound > Speaker Settings > TV Sound Output, and then select the speakers from the list. Choose between Wall Mount and Stand to the TV via a digital optical cable.
... button and the mute function. Select Sound > Speaker Settings > TV Sound Output, and then select the speakers from the list. Choose between Wall Mount and Stand to the TV via a digital optical cable.
User Manual Ver.1.0 (English)
Page 113
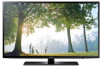
Enabling BD Wise automatically optimizes the TV's resolution. "" DRM stands for the LED 6203 series models. "" Visit the DivX website (http://www.divx.com) and log into the TV. 777 Run the [device_name.divx] file ... the TV as a DivX-certified device. "" You can watch DivX DRM protected movies on the TV to protect the copyright of the content provider. Connecting a Samsung DVD player, Blu-ray player, or home theater system that you do not have free DivX movies without registration. Enjoying Rich Colors and Superior Picture...
Enabling BD Wise automatically optimizes the TV's resolution. "" DRM stands for the LED 6203 series models. "" Visit the DivX website (http://www.divx.com) and log into the TV. 777 Run the [device_name.divx] file ... the TV as a DivX-certified device. "" You can watch DivX DRM protected movies on the TV to protect the copyright of the content provider. Connecting a Samsung DVD player, Blu-ray player, or home theater system that you do not have free DivX movies without registration. Enjoying Rich Colors and Superior Picture...
User Manual Ver.1.0 (English)
Page 123
.... The TV is dissipated through internal vents running along the top of time causes the panel to the touch after extended use. Remove the base stand from the panel is tilted to the TV via HDMI or Component. Black bars will dissipate over time. The heat from the TV and reassemble...
.... The TV is dissipated through internal vents running along the top of time causes the panel to the touch after extended use. Remove the base stand from the panel is tilted to the TV via HDMI or Component. Black bars will dissipate over time. The heat from the TV and reassemble...
Quick Guide Ver.1.0 (English)
Page 16
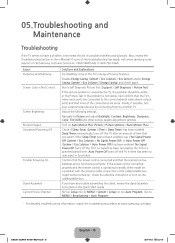
...Auto Program. (Go to MENU > Broadcasting > Auto Program). ‐‐ For detailed troubleshooting information, watch the troubleshooting videos at 1-800-SAMSUNG (1-800-726-7864). Confirm that the power cord is connected and that you have a problem, first review this list of the TV's energy... Section in four hours. 05.Troubleshooting and Maintenance Troubleshooting If the TV seems to have any trouble assembling the stand, review the stand assembly instruction in the Quick Start Guide. Issues Flickering and Dimming Screen Color is Not Correct Screen Brightness Blurred ...
...Auto Program. (Go to MENU > Broadcasting > Auto Program). ‐‐ For detailed troubleshooting information, watch the troubleshooting videos at 1-800-SAMSUNG (1-800-726-7864). Confirm that the power cord is connected and that you have a problem, first review this list of the TV's energy... Section in four hours. 05.Troubleshooting and Maintenance Troubleshooting If the TV seems to have any trouble assembling the stand, review the stand assembly instruction in the Quick Start Guide. Issues Flickering and Dimming Screen Color is Not Correct Screen Brightness Blurred ...

Quick Guide Ver.1.0 (English)
Page 23
... Resolution Environmental Considerations Operating Temperature Operating Humidity Storage Temperature Storage Humidity Stand Swivel (Left / Right) Model Name Screen Size (Diagonal) Sound (Output) Dimensions (W x H x D) Body With stand Weight Without Stand With Stand Model Name Screen Size (Diagonal) Sound (Output) Dimensions (W x H x D) Body With stand Weight Without Stand With Stand 1920 x 1080 50°F to 104°F (10°C to...
... Resolution Environmental Considerations Operating Temperature Operating Humidity Storage Temperature Storage Humidity Stand Swivel (Left / Right) Model Name Screen Size (Diagonal) Sound (Output) Dimensions (W x H x D) Body With stand Weight Without Stand With Stand Model Name Screen Size (Diagonal) Sound (Output) Dimensions (W x H x D) Body With stand Weight Without Stand With Stand 1920 x 1080 50°F to 104°F (10°C to...

Quick Guide Ver.1.0 (English)
Page 24
Model Name Screen Size (Diagonal) Sound (Output) Dimensions (W x H x D) Body With stand Weight Without Stand With Stand Model Name Screen Size (Diagonal) Sound (Output) Dimensions (W x H x D) Body With stand Weight Without Stand With Stand Model Name Screen Size (Diagonal) Sound (Output) Dimensions (W x H x D) Body With stand Weight Without Stand With Stand UN40H6203 40˝ Class (40.0" measured diagonally) UN46H6201 / UN46H6203 46˝ Class...
Model Name Screen Size (Diagonal) Sound (Output) Dimensions (W x H x D) Body With stand Weight Without Stand With Stand Model Name Screen Size (Diagonal) Sound (Output) Dimensions (W x H x D) Body With stand Weight Without Stand With Stand Model Name Screen Size (Diagonal) Sound (Output) Dimensions (W x H x D) Body With stand Weight Without Stand With Stand UN40H6203 40˝ Class (40.0" measured diagonally) UN46H6201 / UN46H6203 46˝ Class...
Quick Guide Ver.1.0 (English)
Page 28
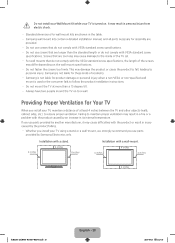
... tilt. ‐‐ Always have two people mount the TV on to a wall. Installation with a stand. 4 inches 4 inches 4 inches Installation with the product or result in its internal temperature. Samsung is not liable for product damage or personal injury when a non-VESA or non-specified wall mount is ...turned on. Providing Proper Ventilation for Your TV When you use parts provided by Samsung Electronics only. Do not install your Wall Mount Kit while your TV, maintain a distance of the screws may differ depending on the ...
... tilt. ‐‐ Always have two people mount the TV on to a wall. Installation with a stand. 4 inches 4 inches 4 inches Installation with the product or result in its internal temperature. Samsung is not liable for product damage or personal injury when a non-VESA or non-specified wall mount is ...turned on. Providing Proper Ventilation for Your TV When you use parts provided by Samsung Electronics only. Do not install your Wall Mount Kit while your TV, maintain a distance of the screws may differ depending on the ...
Installation Guide Ver.1.0 (English)
Page 1
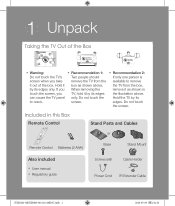
... when you can cause the TV panel to remove the TV from the box as shown in this Box Remote Control Stand Parts and Cables or Remote Control Batteries (2 AAA) Base Stand Mount Also included •• User manual •• Regulatory guide Screws (x8) Cable Holder Power Cord IR Extender Cable...
... when you can cause the TV panel to remove the TV from the box as shown in this Box Remote Control Stand Parts and Cables or Remote Control Batteries (2 AAA) Base Stand Mount Also included •• User manual •• Regulatory guide Screws (x8) Cable Holder Power Cord IR Extender Cable...
Installation Guide Ver.1.0 (English)
Page 2
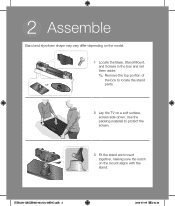
Use the packing material to locate the stand or parts. 2 Lay the TV on the mount aligns with the stand. [UH6203-QSG]BN68-06331A-00ENG.indb 2 2014-05-09 1:01:24 2 Assemble Stand and styrofoam shape may vary differ depending on the model. 1 Locate the Base, Stand Mount, and Screws in the box and set them aside. ✎✎ Remove the top portion of the box to protect the screen. 3 Fit the stand and mount together, making sure the notch on a soft surface, screen side down.
Use the packing material to locate the stand or parts. 2 Lay the TV on the mount aligns with the stand. [UH6203-QSG]BN68-06331A-00ENG.indb 2 2014-05-09 1:01:24 2 Assemble Stand and styrofoam shape may vary differ depending on the model. 1 Locate the Base, Stand Mount, and Screws in the box and set them aside. ✎✎ Remove the top portion of the box to protect the screen. 3 Fit the stand and mount together, making sure the notch on a soft surface, screen side down.
Installation Guide Ver.1.0 (English)
Page 3
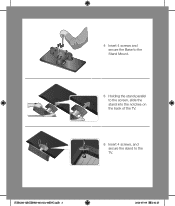
4 Insert 4 screws and secure the Base to the Stand Mount. 5 Holding the stand parallel to the screen, slide the stand into the notches on the back of the TV. 6 Insert 4 screws, and secure the stand to the TV. [UH6203-QSG]BN68-06331A-00ENG.indb 3 2014-05-09 1:01:25
4 Insert 4 screws and secure the Base to the Stand Mount. 5 Holding the stand parallel to the screen, slide the stand into the notches on the back of the TV. 6 Insert 4 screws, and secure the stand to the TV. [UH6203-QSG]BN68-06331A-00ENG.indb 3 2014-05-09 1:01:25
Installation Guide Ver.1.0 (English)
Page 8
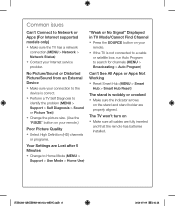
... > Broadcasting > Auto Program) Can't See All Apps or Apps Not Working •• Reset Smart Hub (MENU > Smart Hub > Smart Hub Reset) The stand is wobbly or crooked •• Make sure the indicator arrows on •• Make sure all cables are properly aligned. No Picture/Sound or...sure the TV has a network connection (MENU > Network > Network Status) •• Contact your Internet service provider. The TV won't turn on the stand and stand holder are fully inserted and that the remote has batteries installed. [UH6203-QSG]BN68-06331A-00ENG.indb 8 2014-05-09 1:01:28
... > Broadcasting > Auto Program) Can't See All Apps or Apps Not Working •• Reset Smart Hub (MENU > Smart Hub > Smart Hub Reset) The stand is wobbly or crooked •• Make sure the indicator arrows on •• Make sure all cables are properly aligned. No Picture/Sound or...sure the TV has a network connection (MENU > Network > Network Status) •• Contact your Internet service provider. The TV won't turn on the stand and stand holder are fully inserted and that the remote has batteries installed. [UH6203-QSG]BN68-06331A-00ENG.indb 8 2014-05-09 1:01:28


