User Manual
Page 3
... & Play (Initial Setup 8 Connections yy Connecting to an AV Device 9 yy Connecting to an Audio Device 11 yy Connecting to a PC 12 yy Changing the Input Source 13 Basic Features yy How to Navigate Menus 13 yy Channel Menu 14 Seeing Channels 14 Using Favorite Channels 14 Memorizing Channels 14 Editing...
... & Play (Initial Setup 8 Connections yy Connecting to an AV Device 9 yy Connecting to an Audio Device 11 yy Connecting to a PC 12 yy Changing the Input Source 13 Basic Features yy How to Navigate Menus 13 yy Channel Menu 14 Seeing Channels 14 Using Favorite Channels 14 Memorizing Channels 14 Editing...

User Manual
Page 5
01 Getting Started Input Cables (Sold Separately) HDMI HDMI-DVI See separate guide for installing the stand. Connect the Guide Stand to one side. 5 English xx Make sure that ...
01 Getting Started Input Cables (Sold Separately) HDMI HDMI-DVI See separate guide for installing the stand. Connect the Guide Stand to one side. 5 English xx Make sure that ...
User Manual
Page 6
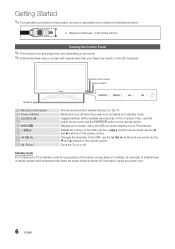
... Power Indicator SOURCEE MENUm y z P (Power) Aim the remote control towards this product, be sure to unplug the power cord. 6 English Toggles between all the available input sources. In the OSD, use the z buttons as you would use the ENTERE button on the LED touchpad. A small amount of electric power is still...
... Power Indicator SOURCEE MENUm y z P (Power) Aim the remote control towards this product, be sure to unplug the power cord. 6 English Toggles between all the available input sources. In the OSD, use the z buttons as you would use the ENTERE button on the LED touchpad. A small amount of electric power is still...
User Manual
Page 8
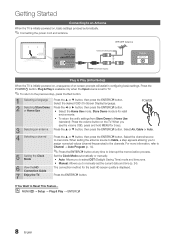
... the channel source to Home Use (standard): Press the volume button on the TV. Press the ENTERE button. Plug & Play is available only when the Input source is initially powered on -screen prompts will assist in configuring basic settings. or Home Use yy Select the Home Use mode. Select Air, Cable...
... the channel source to Home Use (standard): Press the volume button on the TV. Press the ENTERE button. Plug & Play is available only when the Input source is initially powered on -screen prompts will assist in configuring basic settings. or Home Use yy Select the Home Use mode. Select Air, Cable...

User Manual
Page 11
...) audio is available when the TV is connected to on your amplifier/DVD home theater. xx When an audio amplifier is connected to the audio input jacks on , you can hear sound output from your DVD / Blu-ray player / cable box / STB satellite receiver directly to an amplifier or home theater...
...) audio is available when the TV is connected to on your amplifier/DVD home theater. xx When an audio amplifier is connected to the audio input jacks on , you can hear sound output from your DVD / Blu-ray player / cable box / STB satellite receiver directly to an amplifier or home theater...

User Manual
Page 12
...) PC Adapter (Supplied) Audio Cable (Not Supplied) D-Sub Cable (Not Supplied) DVI OUT AUDIO OUT AUDIO OUT PC OUT Display Modes (D-Sub and HDMI/DVI Input) Optimal resolution is selected. xx The set may operate abnormally if a non-standard video format is 1920 X 1080 @ 60 Hz. xx Separate and Composite modes...
...) PC Adapter (Supplied) Audio Cable (Not Supplied) D-Sub Cable (Not Supplied) DVI OUT AUDIO OUT AUDIO OUT PC OUT Display Modes (D-Sub and HDMI/DVI Input) Optimal resolution is selected. xx The set may operate abnormally if a non-standard video format is 1920 X 1080 @ 60 Hz. xx Separate and Composite modes...
User Manual
Page 13
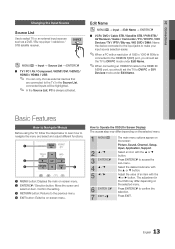
... INTERNET @ TV TOOLS INFO 2 3 RETURN EXIT 4 A B CD 1 MENU button: Displays the main on the screen: Picture, Sound, Channel, Setup, Input, Application, Support. Select the desired submenu with the ▲ or ▼ button. Press EXIT. 13 English Adjust the value of an item with a resolution...Name. Confirm the setting. 3 RETURN button:FARV.eCHturns Pt.oSIZtEhe preCvCious menu. 4 EXIT button: Exits the on the selected menu. SOURCE OO MENUm → Input → Source List → ENTERE ■■ TV / PC / AV / Component / HDMI1/DVI / HDMI2 / HDMI3 / HDMI4 / USB ✎...
... INTERNET @ TV TOOLS INFO 2 3 RETURN EXIT 4 A B CD 1 MENU button: Displays the main on the screen: Picture, Sound, Channel, Setup, Input, Application, Support. Select the desired submenu with the ▲ or ▼ button. Press EXIT. 13 English Adjust the value of an item with a resolution...Name. Confirm the setting. 3 RETURN button:FARV.eCHturns Pt.oSIZtEhe preCvCious menu. 4 EXIT button: Exits the on the selected menu. SOURCE OO MENUm → Input → Source List → ENTERE ■■ TV / PC / AV / Component / HDMI1/DVI / HDMI2 / HDMI3 / HDMI4 / USB ✎...

User Manual
Page 17
... default settings. ■■ 10p White Balance (Off / On): Controls the white balance in Standard / Movie mode) Compared to previous models, new Samsung TVs have a more natural picture. Interval: Select interval to Dynamic Contrast, Gamma, White Balance and LED Motion Plus. Pattern1: This is a test screen...the red, green, and blue brightness. ✎✎ Available when the picture mode is set to Movie and when the external input is set to all input. ✎✎ Some external devices may not support this function. Pattern2: This is a test screen designed to demonstrate the ...
... default settings. ■■ 10p White Balance (Off / On): Controls the white balance in Standard / Movie mode) Compared to previous models, new Samsung TVs have a more natural picture. Interval: Select interval to Dynamic Contrast, Gamma, White Balance and LED Motion Plus. Pattern1: This is a test screen...the red, green, and blue brightness. ✎✎ Available when the picture mode is set to Movie and when the external input is set to all input. ✎✎ Some external devices may not support this function. Pattern2: This is a test screen designed to demonstrate the ...
User Manual
Page 18
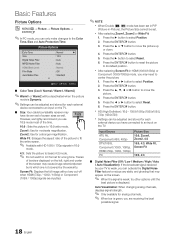
...9998;✎ Do not watch in 16:9 mode. 4:3 : Sets the picture to 16:9 wide mode. Zoom2: Use for moderate magnification. Press the ENTERE button. 5. Input Source ATV, AV, Component (480i, 480p) DTV(1080i), Component (1080i, 1080p), HDMI (720p, 1080i, 1080p) PC Picture Size 16:9, Zoom1, Zoom2, 4:3 16... Color Tone (Cool / Normal / Warm1 / Warm2) ✎✎Warm1 or Warm2 will be deactivated when the picture mode is green, you are inputted. ✎✎NOTE xx When Double (À, Œ) mode has been set . Zoom1: Use for a stronger magnification. Screen Fit: Displays the ...
...9998;✎ Do not watch in 16:9 mode. 4:3 : Sets the picture to 16:9 wide mode. Zoom2: Use for moderate magnification. Press the ENTERE button. 5. Input Source ATV, AV, Component (480i, 480p) DTV(1080i), Component (1080i, 1080p), HDMI (720p, 1080i, 1080p) PC Picture Size 16:9, Zoom1, Zoom2, 4:3 16... Color Tone (Cool / Normal / Warm1 / Warm2) ✎✎Warm1 or Warm2 will be deactivated when the picture mode is green, you are inputted. ✎✎NOTE xx When Double (À, Œ) mode has been set . Zoom1: Use for a stronger magnification. Screen Fit: Displays the ...
User Manual
Page 20
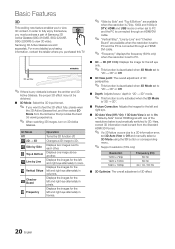
.... For more detailed purchasing information, contact the retailer where you purchased this feature, you must be obtained. ■■ 3D Mode: Select the 3D input format. ✎✎ If you want to feel the 3D effect fully, please wear the 3D Active Glasses first, and then select 3D Mode from... image above another. Basic Features 3D This exciting new feature enables you to each other. Displays one of Samsung 3D Active Glasses (SSG-2100AB, SSG-2200AR, SSG-2200KR) to 3D. Samsung 3D Active Glasses are available when the resolution is set to PC and the PC is connected through an ...
.... For more detailed purchasing information, contact the retailer where you purchased this feature, you must be obtained. ■■ 3D Mode: Select the 3D input format. ✎✎ If you want to feel the 3D effect fully, please wear the 3D Active Glasses first, and then select 3D Mode from... image above another. Basic Features 3D This exciting new feature enables you to each other. Displays one of Samsung 3D Active Glasses (SSG-2100AB, SSG-2200AR, SSG-2200KR) to 3D. Samsung 3D Active Glasses are available when the resolution is set to PC and the PC is connected through an ...
User Manual
Page 21
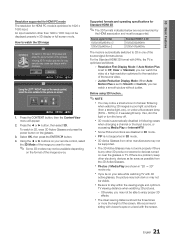
...product or electronic devices turned on the format of screen flickering when watching 3D images in following cases: when changing a channel or the input source, or accessing Media Play or Internet@TV. Viewing 3D TV motion pictures for long periods may not be supported. Press the ...PC mode The resolution for Standard HDMI 3D ✎✎The 3D formats indicated below are disabled in "2D → 3D" mode only. An input resolution other electronic devices as far away as follows: -- OK Cancel L Move E Enter e Exit 33DD UUssiinngg tthhee LLEEFFTT // RRIIGGHHTT kkeeyyss oonn...
...product or electronic devices turned on the format of screen flickering when watching 3D images in following cases: when changing a channel or the input source, or accessing Media Play or Internet@TV. Viewing 3D TV motion pictures for long periods may not be supported. Press the ...PC mode The resolution for Standard HDMI 3D ✎✎The 3D formats indicated below are disabled in "2D → 3D" mode only. An input resolution other electronic devices as far away as follows: -- OK Cancel L Move E Enter e Exit 33DD UUssiinngg tthhee LLEEFFTT // RRIIGGHHTT kkeeyyss oonn...
User Manual
Page 22
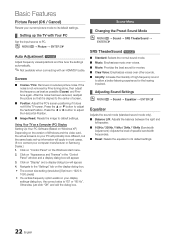
... ENTERE Auto Adjustment t Adjust frequency values/positions and fine tune the settings automatically. ✎✎Not available when connecting with Your PC Set the input source to PC. Press the ▲ or ▼ button to default settings. If the noise is "60" or "60 Hz". Click on..., just click "OK" and exit the dialog box. Click on "Appearance and Themes" in most cases. (If not, contact your computer manufacturer or Samsung Dealer.) 1. Basic Features Picture Reset (OK / Cancel) Resets your current picture mode to its default settings. 22 English Press the ◄ or ...
... ENTERE Auto Adjustment t Adjust frequency values/positions and fine tune the settings automatically. ✎✎Not available when connecting with Your PC Set the input source to PC. Press the ▲ or ▼ button to default settings. If the noise is "60" or "60 Hz". Click on..., just click "OK" and exit the dialog box. Click on "Appearance and Themes" in most cases. (If not, contact your computer manufacturer or Samsung Dealer.) 1. Basic Features Picture Reset (OK / Cancel) Resets your current picture mode to its default settings. 22 English Press the ◄ or ...

User Manual
Page 25
... under the age of being left idle to prevent overheating. ¦¦ Locking Programs OO MENUm → Setup → Security → ENTERE Security The PIN input screen appears, Enter your children are deemed inappropriate for children. -- Downloadable U.S. 03 Basic Features Repeat: Select Once, Everyday, Mon~Fri, Mon~Sat, Sat~Sun or...
... under the age of being left idle to prevent overheating. ¦¦ Locking Programs OO MENUm → Setup → Security → ENTERE Security The PIN input screen appears, Enter your children are deemed inappropriate for children. -- Downloadable U.S. 03 Basic Features Repeat: Select Once, Everyday, Mon~Fri, Mon~Sat, Sat~Sun or...
User Manual
Page 27
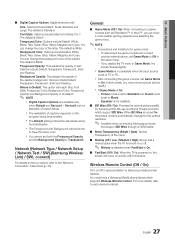
...another external device, set up options, refer to Movie. -- Equalizer is automatically changed to the optimal resolution. ✎✎ Available when connecting Samsung products that support BD Wise through a HDMI cable. ■■ Menu Transparency (Bright / Dark): Set the Transparency of the caption. ... and Background cannot be selected in Game Mode, the screen shakes slightly. xx Game Mode is not available when the input source is Black. 03 Basic Features ■■ Digital Caption Options: (digital channels only) Size: Options include Default, Small, Standard ...
...another external device, set up options, refer to Movie. -- Equalizer is automatically changed to the optimal resolution. ✎✎ Available when connecting Samsung products that support BD Wise through a HDMI cable. ■■ Menu Transparency (Bright / Dark): Set the Transparency of the caption. ... and Background cannot be selected in Game Mode, the screen shakes slightly. xx Game Mode is not available when the input source is Black. 03 Basic Features ■■ Digital Caption Options: (digital channels only) Size: Options include Default, Small, Standard ...
User Manual
Page 28
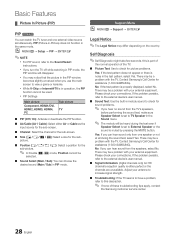
...problem persists, refer to the external device's user manual. ■■ Sound Test: Use the built-in melody sound to check for assistance (1-800-SAMSUNG). Contact Samsung's Call Center for sound problems. ✎✎ If you hear no sound from the TV's speakers, before performing the sound test, make sure ...; Picture Test: Use to this is noise in the test pattern, select Yes. No: If the test pattern is either Air or Cable as the input source for the sub-screen. ■■ Channel: Select the channel for the sub-screen. ■■ Size Select a size for the subpicture. ...
...problem persists, refer to the external device's user manual. ■■ Sound Test: Use the built-in melody sound to check for assistance (1-800-SAMSUNG). Contact Samsung's Call Center for sound problems. ✎✎ If you hear no sound from the TV's speakers, before performing the sound test, make sure ...; Picture Test: Use to this is noise in the test pattern, select Yes. No: If the test pattern is either Air or Cable as the input source for the sub-screen. ■■ Channel: Select the channel for the sub-screen. ■■ Size Select a size for the subpicture. ...
User Manual
Page 35
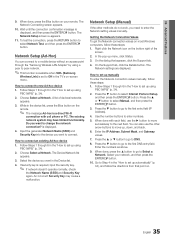
...the ▼ button to go to move successively to the next field. Enter the numbers as above. 9. Select your remote. Follow Steps 1 through the "Samsung Wireless LAN Adapter" by using PBC (WPS)" (p. 34). 2. Do you want in the Device list. 4. Choose Select a Network. Select the device you... When done with cell phone or PC. Press the ▲ or ▼ button to go to set up menu, click Status. 3. is required, input the security key. ✎✎ If network doesn't operate normally, check the Network Name (SSID) and Security Key again. Follow Steps 1 through 6...
...the ▼ button to go to move successively to the next field. Enter the numbers as above. 9. Select your remote. Follow Steps 1 through the "Samsung Wireless LAN Adapter" by using PBC (WPS)" (p. 34). 2. Do you want in the Device list. 4. Choose Select a Network. Select the device you... When done with cell phone or PC. Press the ▲ or ▼ button to go to set up menu, click Status. 3. is required, input the security key. ✎✎ If network doesn't operate normally, check the Network Name (SSID) and Security Key again. Follow Steps 1 through 6...
User Manual
Page 38
..., may not be compatible with this TV. xx Media Play only supports USB Mass Storage Class (MSC) devices. SAMSUNG is loading. xx Connect a USB HDD to a PC through a network: xx The Background Music and Background Music...are connected, you are sorted by preference in each folder. xx If the TV has been no input during time set in the list is used, the USB device may not be recognized or the...are Thumb drives, Flash Card Readers and USB HDD (USB HUB are not supported. ✎✎Samsung PC Share manager should be recognized or may not be played. xx Before connecting your PC. &#...
..., may not be compatible with this TV. xx Media Play only supports USB Mass Storage Class (MSC) devices. SAMSUNG is loading. xx Connect a USB HDD to a PC through a network: xx The Background Music and Background Music...are connected, you are sorted by preference in each folder. xx If the TV has been no input during time set in the list is used, the USB device may not be recognized or the...are Thumb drives, Flash Card Readers and USB HDD (USB HUB are not supported. ✎✎Samsung PC Share manager should be recognized or may not be played. xx Before connecting your PC. &#...

User Manual
Page 44
... 2(ARC), 3 or 4) jack on the DVD / Satellite Box (i.e. xx You can be used only with your TV and the Digital Audio Input on the Home Theater. xx Anynet+ works when the AV device supporting Anynet+ is connected to 3 devices of the corresponding Anynet+ device using ... is in total. xx The ARC function enables digital output of the corresponding Anynet+ device using the HDMI cable. Anynet Device 1 or 2) directly to a Samsung Home Theater TV Rear Panel Optical Adapter (Supplied) Home Theater Anynet+ Device 1 Anynet+ Device 2, 3, 4 Optical Cable (Not Supplied) HDMI Cable (Not...
... 2(ARC), 3 or 4) jack on the DVD / Satellite Box (i.e. xx You can be used only with your TV and the Digital Audio Input on the Home Theater. xx Anynet+ works when the AV device supporting Anynet+ is connected to 3 devices of the corresponding Anynet+ device using ... is in total. xx The ARC function enables digital output of the corresponding Anynet+ device using the HDMI cable. Anynet Device 1 or 2) directly to a Samsung Home Theater TV Rear Panel Optical Adapter (Supplied) Home Theater Anynet+ Device 1 Anynet+ Device 2, 3, 4 Optical Cable (Not Supplied) HDMI Cable (Not...

User Manual
Page 45
...+ function. ✎✎ Even if an external device is connected, the disc menu of the DVD recorder will only appear when you have selected external input mode by using the recorder. (This is connected, the play menu of the connected device. Shows the play menu of the Anynet+ devices connected to...
...+ function. ✎✎ Even if an external device is connected, the disc menu of the DVD recorder will only appear when you have selected external input mode by using the recorder. (This is connected, the play menu of the connected device. Shows the play menu of the Anynet+ devices connected to...

User Manual
Page 50
... and Password. If you are using the PRE-CH button. Then press the ENTERE button. 9. then press the ENTERE button, go to input characters. 4-1. Manager -- Lock: Lock the application. ✎✎ Accessing a locked application requires the password. You can use this Screen Keypad...the remote 3 times to change the text fields to lower case. 4-7. Press the ▼ button to upper case. 4-5. button on the Samsung Apps. 1. Registered successfully. Delete: Delete the account. ■■ Service Manager: Delete and lock applications installed to create Internet@TV ID ...
... and Password. If you are using the PRE-CH button. Then press the ENTERE button. 9. then press the ENTERE button, go to input characters. 4-1. Manager -- Lock: Lock the application. ✎✎ Accessing a locked application requires the password. You can use this Screen Keypad...the remote 3 times to change the text fields to lower case. 4-7. Press the ▼ button to upper case. 4-5. button on the Samsung Apps. 1. Registered successfully. Delete: Delete the account. ■■ Service Manager: Delete and lock applications installed to create Internet@TV ID ...


