User Manual
Page 2
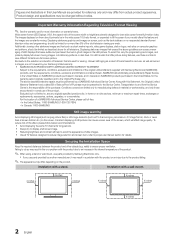
... selection and duration of television formats used for viewing. In the United States: 1-800-SAMSUNG (1-800-726-7864) - walls) to view different formats as TV channel logos, panorama or 4:3 image format, stock or news bars at screen bottom etc.) on no more information on -site services, minimum or maximum repair times, exchanges or replacements, accessories, options, upgrades, or consumables. Installation with a wall-mount. 4 inches 4 inches 4 inches 4 inches 4 inches 4 inches 4 inches 2 English Installation with a stand. To avoid this Statement...
... selection and duration of television formats used for viewing. In the United States: 1-800-SAMSUNG (1-800-726-7864) - walls) to view different formats as TV channel logos, panorama or 4:3 image format, stock or news bars at screen bottom etc.) on no more information on -site services, minimum or maximum repair times, exchanges or replacements, accessories, options, upgrades, or consumables. Installation with a wall-mount. 4 inches 4 inches 4 inches 4 inches 4 inches 4 inches 4 inches 2 English Installation with a stand. To avoid this Statement...
User Manual
Page 3
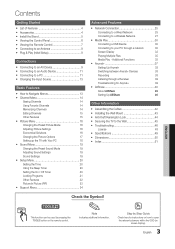
... yy Sound Menu 19 Changing the Preset Sound Mode 19 Adjusting Sound Settings 19 Sound Settings 19 yy Setup Menu 20 Setting the Time 20 Using the Sleep Timer 20 Setting the On / Off Timer 20 Locking Programs 21 Other Features 22 Picture In Picture (PIP) 23 yy Support Menu 24 Advanced Features yy Network Connection 25 Connecting to a Wired Network 25 Connecting to a Wireless Network 27 yy Media Play 30 Connecting a USB Device 30 Connecting to your PC through a Receiver 39 Troubleshooting for instructions on how to the Wall 45 yy Troubleshooting...
... yy Sound Menu 19 Changing the Preset Sound Mode 19 Adjusting Sound Settings 19 Sound Settings 19 yy Setup Menu 20 Setting the Time 20 Using the Sleep Timer 20 Setting the On / Off Timer 20 Locking Programs 21 Other Features 22 Picture In Picture (PIP) 23 yy Support Menu 24 Advanced Features yy Network Connection 25 Connecting to a Wired Network 25 Connecting to a Wireless Network 27 yy Media Play 30 Connecting a USB Device 30 Connecting to your PC through a Receiver 39 Troubleshooting for instructions on how to the Wall 45 yy Troubleshooting...

User Manual
Page 7
... time (p. 20). Changes channels. Selects the on-screen menu items and changes the values seen on the screen (p. 14). S.MODE: Press to directly access channels. P.SIZE: Selects the picture size (p. 17). Avoid use when nearby fluorescent lights or neon signs. xx The color and shape may affect the performance of the remote control. Buttons used functions. Exits the menu. Displays Favorite Channel Lists on the TV screen. Press to select the sound mode (p. 19). POWER ON/OFF SOURCE Turns the remote control light...
... time (p. 20). Changes channels. Selects the on-screen menu items and changes the values seen on the screen (p. 14). S.MODE: Press to directly access channels. P.SIZE: Selects the picture size (p. 17). Avoid use when nearby fluorescent lights or neon signs. xx The color and shape may affect the performance of the remote control. Buttons used functions. Exits the menu. Displays Favorite Channel Lists on the TV screen. Press to select the sound mode (p. 19). POWER ON/OFF SOURCE Turns the remote control light...

User Manual
Page 13
...;/► 6 ENTER E 7 EXIT e The main menu options appear on the screen: Picture, Sound, Channel, Setup, Input, Application, Support. 03 Basic Features Changing the Input Source Source List Use to DVI PC or DVI Devices mode under Edit Name. ✎✎When connecting an HDMI/DVI cable to the HDMI IN 1(DVI) port, you should set to select TV or an external input sources such as a DVD / Blu-ray player / cable box / STB satellite receiver. Basic Features PRE-CH How...
...;/► 6 ENTER E 7 EXIT e The main menu options appear on the screen: Picture, Sound, Channel, Setup, Input, Application, Support. 03 Basic Features Changing the Input Source Source List Use to DVI PC or DVI Devices mode under Edit Name. ✎✎When connecting an HDMI/DVI cable to the HDMI IN 1(DVI) port, you should set to select TV or an external input sources such as a DVD / Blu-ray player / cable box / STB satellite receiver. Basic Features PRE-CH How...
User Manual
Page 17
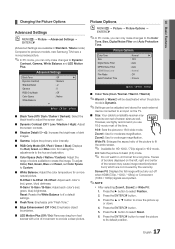
... color's (red, green, blue) darkness. Traces of borders displayed on the TV. ■■ Size: Your cable box/satellite receiver may cause image retention(screen burn) which are not covered by the warranty. Picture Options OO MENUm → Picture → Picture Options → ENTERE ✎✎In PC mode, you use 16:9 mode most of the time. Press the ► button to 16:9 wide mode. To adjust Color, Red, Green, Blue and Reset, set of screen sizes...
... color's (red, green, blue) darkness. Traces of borders displayed on the TV. ■■ Size: Your cable box/satellite receiver may cause image retention(screen burn) which are not covered by the warranty. Picture Options OO MENUm → Picture → Picture Options → ENTERE ✎✎In PC mode, you use 16:9 mode most of the time. Press the ► button to 16:9 wide mode. To adjust Color, Red, Green, Blue and Reset, set of screen sizes...

User Manual
Page 18
Input Source ATV, AV, Component (480i, 480p) DTV(1080i), Component (1080i, 1080p), HDMI (720p, 1080i, 1080p) PC Picture Size 16:9, Zoom1, Zoom2, 4:3 16:9, 4:3, Wide Fit, Screen Fit 16:9, 4:3 ■■ Digital Noise Filter (Off / Low / Medium / High / Auto / Auto Visualisation): If the broadcast signal received by Fine-tuning alone, then adjust the frequency as best as a Computer (PC) Display Setting Up Your PC Software (Based on Windows XP) Depending on...
Input Source ATV, AV, Component (480i, 480p) DTV(1080i), Component (1080i, 1080p), HDMI (720p, 1080i, 1080p) PC Picture Size 16:9, Zoom1, Zoom2, 4:3 16:9, 4:3, Wide Fit, Screen Fit 16:9, 4:3 ■■ Digital Noise Filter (Off / Low / Medium / High / Auto / Auto Visualisation): If the broadcast signal received by Fine-tuning alone, then adjust the frequency as best as a Computer (PC) Display Setting Up Your PC Software (Based on Windows XP) Depending on...
User Manual
Page 20
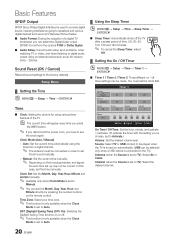
...; Time → Sleep Timer → ENTERE ■■ Sleep Timer: Automatically shuts off timer settings can be selected only when a USB device is connected to the TV) Antenna (when the Source is set to Auto. Basic Features SPDIF Output SPDIF (Sony Philips Digital Interface) is set to Manual. ✎✎ You can set the Month, Day, Year, Hour and Minute directly by pressing the number buttons on the remote control. Clock Mode (Auto / Manual) -- Clock Set: Set...
...; Time → Sleep Timer → ENTERE ■■ Sleep Timer: Automatically shuts off timer settings can be selected only when a USB device is connected to the TV) Antenna (when the Source is set to Auto. Basic Features SPDIF Output SPDIF (Sony Philips Digital Interface) is set to Manual. ✎✎ You can set the Month, Day, Year, Hour and Minute directly by pressing the number buttons on the remote control. Clock Mode (Auto / Manual) -- Clock Set: Set...

User Manual
Page 21
... in HDMI, Component or PC mode. The user must enter a PIN (personal identification number) before any of the V-Chip restrictions are watching. -- xx The default PIN number of a new TV set up the day you want to activate the timer. ✎✎ The c mark indicates the day is selected. ✎✎Auto Power Off (available only when the TV is turned on...
... in HDMI, Component or PC mode. The user must enter a PIN (personal identification number) before any of the V-Chip restrictions are watching. -- xx The default PIN number of a new TV set up the day you want to activate the timer. ✎✎ The c mark indicates the day is selected. ✎✎Auto Power Off (available only when the TV is turned on...

User Manual
Page 23
... have the same color. Foreground Color: Options include Default, White, Black, Red, Green, Blue, Yellow, Magenta and Cyan. xx Selecting Reset after adjusting the equalizer returns the equalizer to the "Network Connection" instructions (p. 25). xx If you display the TV menu in PIP mode. 23 English Network (Network Type / Network Setup / Network Test ) For details on the program being broadcasted. xx Game Mode is not available when the input source is White. The default is in operation, the PIP function cannot...
... have the same color. Foreground Color: Options include Default, White, Black, Red, Green, Blue, Yellow, Magenta and Cyan. xx Selecting Reset after adjusting the equalizer returns the equalizer to the "Network Connection" instructions (p. 25). xx If you display the TV menu in PIP mode. 23 English Network (Network Type / Network Setup / Network Test ) For details on the program being broadcasted. xx Game Mode is not available when the input source is White. The default is in operation, the PIP function cannot...

User Manual
Page 24
... properly displayed, select No. By USB ► By Online Alternative Software 2010/01/15_00000 U Move E Enter R Return Installing the Latest Version ■■ By USB: Insert a USB drive TV Rear Panel containing the firmware upgrade file, downloaded from "www. USB Drive The TV will return to External Speaker or the sound is upgraded, video and audio settings you can be turned off and on using the Internet. ✎✎ First, configure your external equipment. Software Upgrade Software Upgrade...
... properly displayed, select No. By USB ► By Online Alternative Software 2010/01/15_00000 U Move E Enter R Return Installing the Latest Version ■■ By USB: Insert a USB drive TV Rear Panel containing the firmware upgrade file, downloaded from "www. USB Drive The TV will return to External Speaker or the sound is upgraded, video and audio settings you can be turned off and on using the Internet. ✎✎ First, configure your external equipment. Software Upgrade Software Upgrade...
User Manual
Page 29
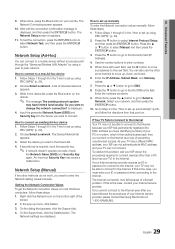
... arrow buttons to set up using a peer to connect. To resolve this problem, ask your Internet service provider, please contact Samsung Electronics at 1-800-SAMSUNG. 29 English If your Internet service provider requires an ID or password to connect to the Internet, your TV may fail because of devices/networks appears. 3. Input the generated Network Name (SSID) and Security Key into the device you need to select Internet Protocol Setup...
... arrow buttons to set up using a peer to connect. To resolve this problem, ask your Internet service provider, please contact Samsung Electronics at 1-800-SAMSUNG. 29 English If your Internet service provider requires an ID or password to connect to the Internet, your TV may fail because of devices/networks appears. 3. Input the generated Network Name (SSID) and Security Key into the device you need to select Internet Protocol Setup...

User Manual
Page 37
... to a Samsung Home Theater TV Rear Panel Optical Cable (Not Supplied) Home Theater Anynet+ Device 1 Anynet+ Device 2, 3, 4 HDMI cable (Not Supplied) HDMI cable (Not Supplied) HDMI cable (Not Supplied) 1. The Anynet+ system can connect an Anynet+ device using an HDMI cable. 2. xx Anynet+ supports up to control all connected Samsung devices that support Anynet+ with Samsung devices that have the Anynet+ feature. You will only hear sound from the Home Theater's Front, Left and Right speakers and...
... to a Samsung Home Theater TV Rear Panel Optical Cable (Not Supplied) Home Theater Anynet+ Device 1 Anynet+ Device 2, 3, 4 HDMI cable (Not Supplied) HDMI cable (Not Supplied) HDMI cable (Not Supplied) 1. The Anynet+ system can connect an Anynet+ device using an HDMI cable. 2. xx Anynet+ supports up to control all connected Samsung devices that support Anynet+ with Samsung devices that have the Anynet+ feature. You will only hear sound from the Home Theater's Front, Left and Right speakers and...

User Manual
Page 38
...+ (HDMI-CEC) function is not displayed, select Device List and press the Red button to 2 minutes. Press the EXIT button to exit. ✎✎ You can switch to the selected device. ✎✎ Only when you set to the recording device. Shows the play menu of the connected device. E.g. You can record the source streams by pressing the SOURCE button, you have selected external input mode by...
...+ (HDMI-CEC) function is not displayed, select Device List and press the Red button to 2 minutes. Press the EXIT button to exit. ✎✎ You can switch to the selected device. ✎✎ Only when you set to the recording device. Shows the play menu of the connected device. E.g. You can record the source streams by pressing the SOURCE button, you have selected external input mode by...
User Manual
Page 39
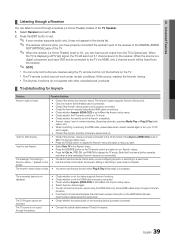
... out 5.1 channel sound to search devices again or turn your receiver supports audio only, it may not appear in certain situations. (Searching channels, operating Media Play or Plug & Play (initial setup), etc.) • When connecting or removing the HDMI cable, please make sure to the receiver. The connected device is set to On, you are configuring Anynet+ or switching to a view mode. • Use the remote control when the Anynet+ setting or switching to view mode is displaying a DTV (air) signal, the...
... out 5.1 channel sound to search devices again or turn your receiver supports audio only, it may not appear in certain situations. (Searching channels, operating Media Play or Plug & Play (initial setup), etc.) • When connecting or removing the HDMI cable, please make sure to the receiver. The connected device is set to On, you are configuring Anynet+ or switching to a view mode. • Use the remote control when the Anynet+ setting or switching to view mode is displaying a DTV (air) signal, the...
User Manual
Page 40
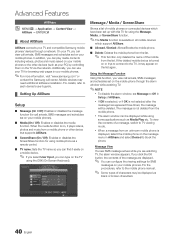
... your PC) by controlling them on your TV and compatible Samsung mobile phones/ devices through a network. Mobile devices may be displayed while using mobile phone as your mobile phones. On your TV, you can play media contents including videos, photos and music saved on a mobile device. ✎✎ If you select User Input, you can configure the viewing settings for using some applications such...
... your PC) by controlling them on your TV and compatible Samsung mobile phones/ devices through a network. Mobile devices may be displayed while using mobile phone as your mobile phones. On your TV, you can play media contents including videos, photos and music saved on a mobile device. ✎✎ If you select User Input, you can configure the viewing settings for using some applications such...
User Manual
Page 41
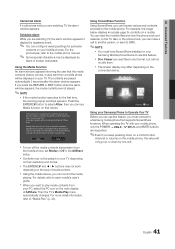
...'s user's guide. For example, the image below displays an access page for schedule contents on their resolution and format. When operating the TV with your Samsung Mobile phone/device to Off in the AllShare setup. Allow Deny xx To turn off the media contents transmission from a mobile phone will only go up or down on a control button (channel or volume) on your mobile phones. Using ScreenShare...
...'s user's guide. For example, the image below displays an access page for schedule contents on their resolution and format. When operating the TV with your Samsung Mobile phone/device to Off in the AllShare setup. Allow Deny xx To turn off the media contents transmission from a mobile phone will only go up or down on a control button (channel or volume) on your mobile phones. Using ScreenShare...
User Manual
Page 46
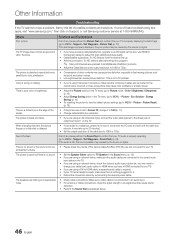
... problems and solutions. Use HDMI or Component cables to deliver HD (high definition) picture quality. • Cable/Satellite subscribers: Try HD stations from SD(Standard Definition) contents. • Adjust the Cable/Sat box video output resolution to 1080i or 720p. When changing channels, the picture freezes or is properly operating. (go to MENU - Sound Test) (p. 24) If the audio is nothing plugged into it. • Reboot the connected device by the source or signal...
... problems and solutions. Use HDMI or Component cables to deliver HD (high definition) picture quality. • Cable/Satellite subscribers: Try HD stations from SD(Standard Definition) contents. • Adjust the Cable/Sat box video output resolution to 1080i or 720p. When changing channels, the picture freezes or is properly operating. (go to MENU - Sound Test) (p. 24) If the audio is nothing plugged into it. • Reboot the connected device by the source or signal...
User Manual
Page 47
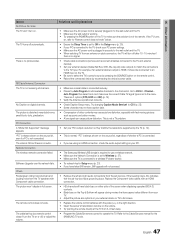
... the wall outlet is working. • Try pressing the POWER button on the TV to make sure the correct Cable TV signal type is connected securely. • Please try Auto Program to add available channels to the channel list. Refer to MENU - If the TV turns on, refer to "Remote control does not work . • Replace the remote control batteries with Component cable connection. • Remove the left and right audio connections from your TV. • Adjust the picture size...
... the wall outlet is working. • Try pressing the POWER button on the TV to make sure the correct Cable TV signal type is connected securely. • Please try Auto Program to add available channels to the channel list. Refer to MENU - If the TV turns on, refer to "Remote control does not work . • Replace the remote control batteries with Component cable connection. • Remove the left and right audio connections from your TV. • Adjust the picture size...
User Manual
Page 48
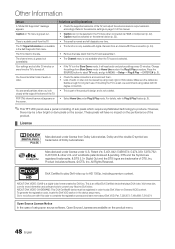
....com with digital channels from an Antenna/RF/Coax connection (p. 24). • Remove the base stand from Store Demo mode to complete the registration process and learn more information and software tools to MENU → Setup → Plug & Play → ENTERE (p. 8). • Check the cable connections and reconnect them. • Loss of audio or video can not be selected in the TV menu when connected via HDMI or Component (p. 22). • Caption must...
....com with digital channels from an Antenna/RF/Coax connection (p. 24). • Remove the base stand from Store Demo mode to complete the registration process and learn more information and software tools to MENU → Setup → Plug & Play → ENTERE (p. 8). • Check the cable connections and reconnect them. • Loss of audio or video can not be selected in the TV menu when connected via HDMI or Component (p. 22). • Caption must...
User Manual
Page 51
... M Media Play Melody Menu Transparency Mono Music N Navigate Network Connection Network Setup O ON/OFF button Optimal resolution P Photos Picture Size PIP (Picture in Picture) Plug & Play Power Indicator 7, 14 14 18 16 17 12 R Receiver Recording Remote Control Repeat Mode RGB Only Mode Rotate 9, 37 11, 37 2 22 48 S Select All Self Diagnosis Sharpness Signal Information Sleep Timer Slide Show Software Upgrade Source List Speaker Select Specifications Standby mode Symbol 30 T 23 23 Timer 19 Title 34 Tools Troubleshooting TV Speaker 13 U 25 26 USB Drive V 7 Video Formats 12 Videos Volume...
... M Media Play Melody Menu Transparency Mono Music N Navigate Network Connection Network Setup O ON/OFF button Optimal resolution P Photos Picture Size PIP (Picture in Picture) Plug & Play Power Indicator 7, 14 14 18 16 17 12 R Receiver Recording Remote Control Repeat Mode RGB Only Mode Rotate 9, 37 11, 37 2 22 48 S Select All Self Diagnosis Sharpness Signal Information Sleep Timer Slide Show Software Upgrade Source List Speaker Select Specifications Standby mode Symbol 30 T 23 23 Timer 19 Title 34 Tools Troubleshooting TV Speaker 13 U 25 26 USB Drive V 7 Video Formats 12 Videos Volume...


