

Open Source Guide (ENGLISH)
Page 1
... to incorporate parts of free software, we speak of the Program into another work not based on the Program is not allowed. ❑ Preamble The licenses for a fee, you must cause any work that you distribute or publish, that users may copy and distribute verbatim copies of the Program's source code as a whole at least three years, to address new problems or concerns...
... to incorporate parts of free software, we speak of the Program into another work not based on the Program is not allowed. ❑ Preamble The licenses for a fee, you must cause any work that you distribute or publish, that users may copy and distribute verbatim copies of the Program's source code as a whole at least three years, to address new problems or concerns...

Open Source Guide (ENGLISH)
Page 2
... "copyright" line and a pointer to the library. and each source file to the public, we recommend making it free software that everyone can do so by permitting redistribution under the terms of warranty; 16. You can redistribute and change. IN NO EVENT UNLESS REQUIRED BY APPLICABLE LAW OR AGREED TO ...CONSEQUENTIAL DAMAGES ARISING OUT OF THE USE OR INABILITY TO USE THE LIBRARY (INCLUDING BUT NOT LIMITED TO LOSS OF DATA OR DATA BEING RENDERED INACCURATE OR LOSSES SUSTAINED BY YOU OR THIRD PARTIES OR A FAILURE OF THE LIBRARY TO OPERATE WITH ANY OTHER SOFTWARE), EVEN IF SUCH HOLDER OR ...
... "copyright" line and a pointer to the library. and each source file to the public, we recommend making it free software that everyone can do so by permitting redistribution under the terms of warranty; 16. You can redistribute and change. IN NO EVENT UNLESS REQUIRED BY APPLICABLE LAW OR AGREED TO ...CONSEQUENTIAL DAMAGES ARISING OUT OF THE USE OR INABILITY TO USE THE LIBRARY (INCLUDING BUT NOT LIMITED TO LOSS OF DATA OR DATA BEING RENDERED INACCURATE OR LOSSES SUSTAINED BY YOU OR THIRD PARTIES OR A FAILURE OF THE LIBRARY TO OPERATE WITH ANY OTHER SOFTWARE), EVEN IF SUCH HOLDER OR ...

User Manual (user Manual) (ver.1.0) (English)
Page 3
... 17 Connecting a DVD Player 17 Connecting a Camcorder 18 Installing Batteries in the Remote Control 19 Chapter 3: Operation 20 Turning the TV On and Off 20 Plug & Play Feature 20 Viewing the Menus and On-Screen Displays 22 Viewing the Menus 22 Viewing the Display 22 Selecting a Menu Language 23 Memorizing the Channels 24 Selecting the Video Signal-source 24 Storing Channels in Memory (Automatic Method 25 Adding and Erasing Channels (Manual Method 26 Changing Channels 27 Using the Channel Buttons...
... 17 Connecting a DVD Player 17 Connecting a Camcorder 18 Installing Batteries in the Remote Control 19 Chapter 3: Operation 20 Turning the TV On and Off 20 Plug & Play Feature 20 Viewing the Menus and On-Screen Displays 22 Viewing the Menus 22 Viewing the Display 22 Selecting a Menu Language 23 Memorizing the Channels 24 Selecting the Video Signal-source 24 Storing Channels in Memory (Automatic Method 25 Adding and Erasing Channels (Manual Method 26 Changing Channels 27 Using the Channel Buttons...
User Manual (user Manual) (ver.1.0) (English)
Page 6
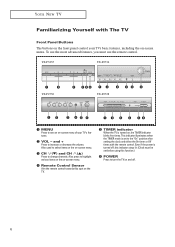
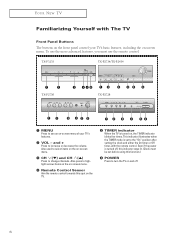
... Panel Buttons The buttons on the front panel control your TV's features. ´ VOL - Also press to highlight various items on the on-screen menu. ¨ Remote Control Sensor Aim the remote control towards this function.) Ø POWER Press to change channels. This indicator illuminates when the TIMER mode is turned on and off. 6 Even if the power is turned off, this indicator stays lit. (Clock must use the remote control. TX-P3235 TX-P2734 TX-P2730 TX...
... Panel Buttons The buttons on the front panel control your TV's features. ´ VOL - Also press to highlight various items on the on-screen menu. ¨ Remote Control Sensor Aim the remote control towards this function.) Ø POWER Press to change channels. This indicator illuminates when the TIMER mode is turned on and off. 6 Even if the power is turned off, this indicator stays lit. (Clock must use the remote control. TX-P3235 TX-P2734 TX-P2730 TX...
User Manual (user Manual) (ver.1.0) (English)
Page 8
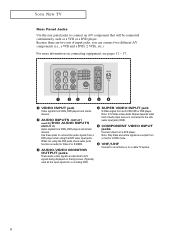
... or a DVD player. YOUR NEW TV Rear Panel Jacks Use the rear panel jacks to a cable TV system. 8 Note: Only black and white signals are two sets of audio input source is connected to A/V signals being displayed on connecting equipment, see pages 11 - 17. Œ VIDEO INPUT jack Video signals from VCRs, DVD players and similar devices. ´ AUDIO INPUTS (INPUT1 and 2)/DVD AUDIO INPUTS (INPUT 2) Audio signals from a DVD player. Because there are output from a monitor in DVD mode. Ø VHF/UHF Connect to an antenna or to connect an A/V component that...
... or a DVD player. YOUR NEW TV Rear Panel Jacks Use the rear panel jacks to a cable TV system. 8 Note: Only black and white signals are two sets of audio input source is connected to A/V signals being displayed on connecting equipment, see pages 11 - 17. Œ VIDEO INPUT jack Video signals from VCRs, DVD players and similar devices. ´ AUDIO INPUTS (INPUT1 and 2)/DVD AUDIO INPUTS (INPUT 2) Audio signals from a DVD player. Because there are output from a monitor in DVD mode. Ø VHF/UHF Connect to an antenna or to connect an A/V component that...
User Manual (user Manual) (ver.1.0) (English)
Page 9
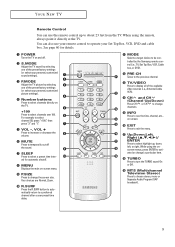
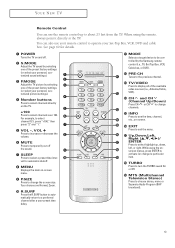
..., customized sound settings). ˇ P.MODE Adjust the TV picture by the Samsung remote control (i.e., TV, Set Top Box, VCR, Cable box, or DVD). PRE-CH Tunes to the previous channel. Ò TV/VIDEO Press to display all of the preset factory settings (or select your Set-Top Box, VCR, DVD and cable box. You can use your remote control to operate your personal, customized picture settings). ¨ Number buttons Press to select channels directly on -screen. ı EXIT Press to exit the menu...
..., customized sound settings). ˇ P.MODE Adjust the TV picture by the Samsung remote control (i.e., TV, Set Top Box, VCR, Cable box, or DVD). PRE-CH Tunes to the previous channel. Ò TV/VIDEO Press to display all of the preset factory settings (or select your Set-Top Box, VCR, DVD and cable box. You can use your remote control to operate your personal, customized picture settings). ¨ Number buttons Press to select channels directly on -screen. ı EXIT Press to exit the menu...

User Manual (user Manual) (ver.1.0) (English)
Page 15
... yet connected to an antenna or a cable system. 1 Unplug the cable or antenna from the back of the TV. 2 Connect the cable or antenna to view your VCR tape. 15 Incoming Cable or Antenna VCR Rear Panel 3 Connect a coaxial cable between the ANTENNA OUT terminal on the VCR and the antenna terminal on the back of the VCR. VCR Rear Panel Video Cable TV Rear Panel Follow the instructions in "Viewing an External Signal Source" to the ANTENNA IN...
... yet connected to an antenna or a cable system. 1 Unplug the cable or antenna from the back of the TV. 2 Connect the cable or antenna to view your VCR tape. 15 Incoming Cable or Antenna VCR Rear Panel 3 Connect a coaxial cable between the ANTENNA OUT terminal on the VCR and the antenna terminal on the back of the VCR. VCR Rear Panel Video Cable TV Rear Panel Follow the instructions in "Viewing an External Signal Source" to the ANTENNA IN...
User Manual (user Manual) (ver.1.0) (English)
Page 17
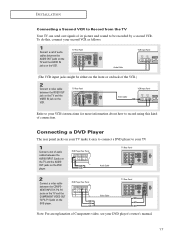
DVD Player Rear Panel Video Cable TV Rear Panel Note: For an explanation of Component video, see your TV. 1 Connect a set of audio cables between the AUDIO OUT jacks on the TV and the AUDIO IN jacks on the DVD player. INSTALLATION Connecting a Second VCR to Record from the TV Your TV can send out signals of its picture and sound to be either on the front or on back of the VCR.) 2 Connect a video cable between...
DVD Player Rear Panel Video Cable TV Rear Panel Note: For an explanation of Component video, see your TV. 1 Connect a set of audio cables between the AUDIO OUT jacks on the TV and the AUDIO IN jacks on the DVD player. INSTALLATION Connecting a Second VCR to Record from the TV Your TV can send out signals of its picture and sound to be either on the front or on back of the VCR.) 2 Connect a video cable between...
User Manual (user Manual) (ver.1.0) (English)
Page 20
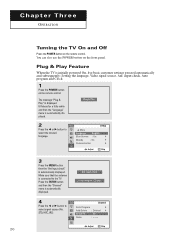
..., Video signal source, Ant. Plug & Play 2 Press the œ or √ button to select signal source (Air, STD, HRC, IRC). Setup L More Language : English Blue Screen : On √ Melody : On √ Demonstration √ Adjust Skip 3 Press the MENU button then the "Ant Input check" is automatically displayed. Press the ENTER button and then the "Channel" menu is automatically displayed. C h a pOtPEeRArTIOTN h r e e OPERATION Turning the TV On and Off Press the POWER button on the remote control...
..., Video signal source, Ant. Plug & Play 2 Press the œ or √ button to select signal source (Air, STD, HRC, IRC). Setup L More Language : English Blue Screen : On √ Melody : On √ Demonstration √ Adjust Skip 3 Press the MENU button then the "Ant Input check" is automatically displayed. Press the ENTER button and then the "Channel" menu is automatically displayed. C h a pOtPEeRArTIOTN h r e e OPERATION Turning the TV On and Off Press the POWER button on the remote control...
User Manual (user Manual) (ver.1.0) (English)
Page 22
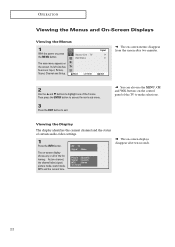
... the control panel of the TV to exit. Its left side has five icons: Input, Picture, Sound, Channel and Setup. Viewing the Display The display identifies the current channel and the status of certain audio-video settings. 1 Press the INFO button. The on , press the MENU button. OPERATION Viewing the Menus and On-Screen Displays Viewing the Menus 1 With the power on -screen display shows any or all of the following: Active channel, the channel label, signal, picture mode, sound mode, MTS...
... the control panel of the TV to exit. Its left side has five icons: Input, Picture, Sound, Channel and Setup. Viewing the Display The display identifies the current channel and the status of certain audio-video settings. 1 Press the INFO button. The on , press the MENU button. OPERATION Viewing the Menus and On-Screen Displays Viewing the Menus 1 With the power on -screen display shows any or all of the following: Active channel, the channel label, signal, picture mode, sound mode, MTS...
User Manual (user Manual) (ver.1.0) (English)
Page 49
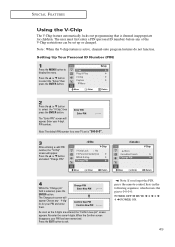
..., press the ENTER button. Time Plug & Play V-Chip Caption M More Move Enter Setup Return 2 Press the L or M button to 0-0-0-0: POWER OFF ➜ MUTE ➜ 8 ➜ 2 ➜ 4 ➜ POWER ON. 49 Choose any of the V-Chip restrictions can be set is deemed inappropriate for a new TV set up or changed. As soon as the 4 digits are entered, the "Confirm new pin" screen appears. Press the...
..., press the ENTER button. Time Plug & Play V-Chip Caption M More Move Enter Setup Return 2 Press the L or M button to 0-0-0-0: POWER OFF ➜ MUTE ➜ 8 ➜ 2 ➜ 4 ➜ POWER ON. 49 Choose any of the V-Chip restrictions can be set is deemed inappropriate for a new TV set up or changed. As soon as the 4 digits are entered, the "Confirm new pin" screen appears. Press the...
User Manual (user Manual) (ver.1.0) (English)
Page 60
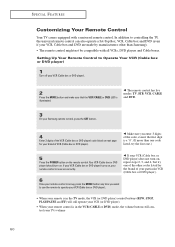
... the MODE button any time you enter 3 digits of the code, even if the first digit is illuminated. œ The remote control has five modes: TV, STB, VCR, CABLE and DVD. 3 On your Samsung remote control, press the SET button. 4 Enter 3 digits of the VCR (Cable box or DVD player) code listed on next page for the brand of your particular VCR (Cable box or DVD player). 6 Once your TV's volume 60 Setting Up Your Remote Control to operate your VCR (Cable box or DVD player...
... the MODE button any time you enter 3 digits of the code, even if the first digit is illuminated. œ The remote control has five modes: TV, STB, VCR, CABLE and DVD. 3 On your Samsung remote control, press the SET button. 4 Enter 3 digits of the VCR (Cable box or DVD player) code listed on next page for the brand of your particular VCR (Cable box or DVD player). 6 Once your TV's volume 60 Setting Up Your Remote Control to operate your VCR (Cable box or DVD player...
User Manual (user Manual) (ver.1.0) (English)
Page 3
... 17 Connecting a DVD Player 17 Connecting a Camcorder 18 Installing Batteries in the Remote Control 19 Chapter 3: Operation 20 Turning the TV On and Off 20 Plug & Play Feature 20 Viewing the Menus and On-Screen Displays 22 Viewing the Menus 22 Viewing the Display 22 Selecting a Menu Language 23 Memorizing the Channels 24 Selecting the Video Signal-source 24 Storing Channels in Memory (Automatic Method 25 Adding and Erasing Channels (Manual Method 26 Changing Channels 27 Using the Channel Buttons...
... 17 Connecting a DVD Player 17 Connecting a Camcorder 18 Installing Batteries in the Remote Control 19 Chapter 3: Operation 20 Turning the TV On and Off 20 Plug & Play Feature 20 Viewing the Menus and On-Screen Displays 22 Viewing the Menus 22 Viewing the Display 22 Selecting a Menu Language 23 Memorizing the Channels 24 Selecting the Video Signal-source 24 Storing Channels in Memory (Automatic Method 25 Adding and Erasing Channels (Manual Method 26 Changing Channels 27 Using the Channel Buttons...
User Manual (user Manual) (ver.1.0) (English)
Page 6
... lit. (Clock must use the more advanced features, you must be set to increase or decrease the volume. and + Press to the "On" position after setting the clock and either the On timer or Off timer, with The TV Front Panel Buttons The buttons on the front panel control your TV's features. ´ VOL - Even if the power is turned on -screen menu. To use the remote control.
... lit. (Clock must use the more advanced features, you must be set to increase or decrease the volume. and + Press to the "On" position after setting the clock and either the On timer or Off timer, with The TV Front Panel Buttons The buttons on the front panel control your TV's features. ´ VOL - Even if the power is turned on -screen menu. To use the remote control.

User Manual (user Manual) (ver.1.0) (English)
Page 8
... two sets of audio input source is connected to connect the audio signals from Note: Only black and white signals are identical to connect an A/V component that will be connected continuously, such as audio for a recording VCR.) 8 devices. YOUR NEW TV Rear Panel Jacks Use the rear panel jacks to A/V signals being displayed on connecting equipment, see pages 11 - 17. Œ VIDEO INPUT jack ¨ SUPER VIDEO INPUT jack Video signals from VCRs, DVD players and similar S-Video signal from a DVD player. When not using the DVD video input...
... two sets of audio input source is connected to connect the audio signals from Note: Only black and white signals are identical to connect an A/V component that will be connected continuously, such as audio for a recording VCR.) 8 devices. YOUR NEW TV Rear Panel Jacks Use the rear panel jacks to A/V signals being displayed on connecting equipment, see pages 11 - 17. Œ VIDEO INPUT jack ¨ SUPER VIDEO INPUT jack Video signals from VCRs, DVD players and similar S-Video signal from a DVD player. When not using the DVD video input...
User Manual (user Manual) (ver.1.0) (English)
Page 9
... the preset factory settings (or select your personal, customized sound settings). ˇ P.MODE Adjust the TV picture by the Samsung remote control (i.e., TV, Set Top Box, VCR, Cable box, or DVD). PRE-CH Tunes to the previous channel. Ò TV/VIDEO Press to display all of the preset factory settings (or select your personal, customized picture settings). ¨ Number buttons Press to select channels directly on -screen. ı EXIT Press to exit the menu. ˜ Up...
... the preset factory settings (or select your personal, customized sound settings). ˇ P.MODE Adjust the TV picture by the Samsung remote control (i.e., TV, Set Top Box, VCR, Cable box, or DVD). PRE-CH Tunes to the previous channel. Ò TV/VIDEO Press to display all of the preset factory settings (or select your personal, customized picture settings). ¨ Number buttons Press to select channels directly on -screen. ı EXIT Press to exit the menu. ˜ Up...

User Manual (user Manual) (ver.1.0) (English)
Page 15
VCR Rear Panel TV Rear Panel Audio Cable 5 Connect a video cable between the VIDEO OUT jack on the VCR and the VIDEO jack on the TV. Skip step 1 if you have not yet connected to an antenna or a cable system. 1 Unplug the cable or antenna from the back of the TV. 2 Connect the cable or antenna to view your VCR tape. 15 VCR Rear Panel Video Cable TV Rear Panel Follow the instructions in "Viewing an External Signal Source" to the ANTENNA IN...
VCR Rear Panel TV Rear Panel Audio Cable 5 Connect a video cable between the VIDEO OUT jack on the VCR and the VIDEO jack on the TV. Skip step 1 if you have not yet connected to an antenna or a cable system. 1 Unplug the cable or antenna from the back of the TV. 2 Connect the cable or antenna to view your VCR tape. 15 VCR Rear Panel Video Cable TV Rear Panel Follow the instructions in "Viewing an External Signal Source" to the ANTENNA IN...

User Manual (user Manual) (ver.1.0) (English)
Page 17
... the AUDIO IN jacks on the DVD player. INSTALLATION Connecting a Second VCR to Record from the TV Your TV can send out signals of its picture and sound to be either on the front or on back of the VCR.) 2 Connect a video cable between the VIDEO OUT jack on the TV and the VIDEO IN jack on the VCR. DVD Player Rear Panel Audio Cable TV Rear Panel 2 Connect a video cable between the COMPONENT INPUT (Y, Pb...
... the AUDIO IN jacks on the DVD player. INSTALLATION Connecting a Second VCR to Record from the TV Your TV can send out signals of its picture and sound to be either on the front or on back of the VCR.) 2 Connect a video cable between the VIDEO OUT jack on the TV and the VIDEO IN jack on the VCR. DVD Player Rear Panel Audio Cable TV Rear Panel 2 Connect a video cable between the COMPONENT INPUT (Y, Pb...

User Manual (user Manual) (ver.1.0) (English)
Page 22
..., signal, picture mode, sound mode, MTS and the current time. M M The on the control panel of certain audio-video settings. 1 Press the INFO button. Air 10 Signal : Mono Picture : Dynamic Sound : Custom MTS : Stereo 12 : 00 am M The on -screen display shows any or all of the 5 icons. The main menu appears on , press the MENU button. Its left side has five icons: Input, Picture, Sound, Channel and Setup. The on -screen displays disappear after two minutes. Viewing...
..., signal, picture mode, sound mode, MTS and the current time. M M The on the control panel of certain audio-video settings. 1 Press the INFO button. Air 10 Signal : Mono Picture : Dynamic Sound : Custom MTS : Stereo 12 : 00 am M The on -screen display shows any or all of the 5 icons. The main menu appears on , press the MENU button. Its left side has five icons: Input, Picture, Sound, Channel and Setup. The on -screen displays disappear after two minutes. Viewing...

User Manual (user Manual) (ver.1.0) (English)
Page 60
..., CABLE and DVD. 3 On your Samsung remote control, press the SET button. 4 Enter 3 digits of the VCR (Cable box or DVD player) code listed on next page for the brand of your particular VCR (Cable box or DVD player). 6 Once your remote control is set up, press the MODE button any time you enter 3 digits of VCR (Cable box or DVD player). œ Make sure you want to use the remote to controlling the TV, the universal remote control can also operate a Set-Top Box, VCR, Cable box and DVD (even...
..., CABLE and DVD. 3 On your Samsung remote control, press the SET button. 4 Enter 3 digits of the VCR (Cable box or DVD player) code listed on next page for the brand of your particular VCR (Cable box or DVD player). 6 Once your remote control is set up, press the MODE button any time you enter 3 digits of VCR (Cable box or DVD player). œ Make sure you want to use the remote to controlling the TV, the universal remote control can also operate a Set-Top Box, VCR, Cable box and DVD (even...


