User Manual
Page 4
This product is not responsible for any damage to accommodate upgrades in firmware and/or software. Also, the specifications and/or design of the product. This product must be installed by the user is prohibited. the manufacturer is ...
This product is not responsible for any damage to accommodate upgrades in firmware and/or software. Also, the specifications and/or design of the product. This product must be installed by the user is prohibited. the manufacturer is ...
User Manual
Page 6
... Setup 77 5.1. Turning On/Off Beep 78 5.1.3. HDD Check ...81 5.1.7. Monitoring ...33 4.4.1. Splitting Screen and Changing Channels 33 4.4.2. User Setup ...72 4.7.4. Relay Off ...79 5.1.4. Checking Firmware Version 78 5.1.2. Initializing Settings 80 5.1.6. System Requirements 31 4.2. Playback ...37 4.5.1. System Log ...69 4.7.3. Video Control ...34 4.4.3. HDD Setup ...53 4.6.6. Operation 31 4.1. Camera Setup ...49 4.6.5. System...
... Setup 77 5.1. Turning On/Off Beep 78 5.1.3. HDD Check ...81 5.1.7. Monitoring ...33 4.4.1. Splitting Screen and Changing Channels 33 4.4.2. User Setup ...72 4.7.4. Relay Off ...79 5.1.4. Checking Firmware Version 78 5.1.2. Initializing Settings 80 5.1.6. System Requirements 31 4.2. Playback ...37 4.5.1. System Log ...69 4.7.3. Video Control ...34 4.4.3. HDD Setup ...53 4.6.6. Operation 31 4.1. Camera Setup ...49 4.6.5. System...
User Manual
Page 14
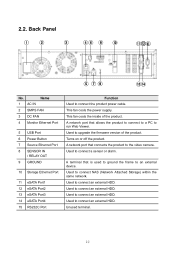
A network port that connects the product to the video camera. A network port that allows the product to connect to a PC to upgrade the firmware version of the product. Used to connect an external HDD. This fan cools the inside of the product. Turns on or off the product. Used ...
A network port that connects the product to the video camera. A network port that allows the product to connect to a PC to upgrade the firmware version of the product. Used to connect an external HDD. This fan cools the inside of the product. Turns on or off the product. Used ...
User Manual
Page 27
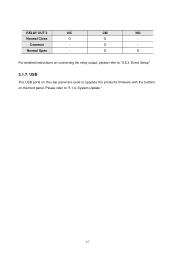
O - O O For detailed instructions on the front panel. CM NO O - Event Setup" 3.1.7. USB The USB ports on the rear panel are used to upgrade the product's firmware with the buttons on connecting the relay output, please refer to "5.1.4. System Update " 25 RELAY OUT 2 NC Normal Close O Common - Please refer to "4.6.3. Normal Open -
O - O O For detailed instructions on the front panel. CM NO O - Event Setup" 3.1.7. USB The USB ports on the rear panel are used to upgrade the product's firmware with the buttons on connecting the relay output, please refer to "5.1.4. System Update " 25 RELAY OUT 2 NC Normal Close O Common - Please refer to "4.6.3. Normal Open -
User Manual
Page 69
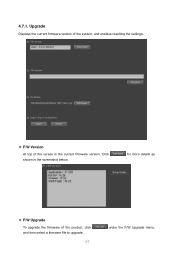
for more details as ™ F/W Upgrade To upgrade the firmware of the screen is the current firmware version. Click shown in the screenshot below. Upgrade Displays the current firmware version of the system, and enables resetting the settings. ™ F/W Version At top of the product, click and then select a firmware file to upgrade. 67 under the F/W Upgrade menu, 4.7.1.
for more details as ™ F/W Upgrade To upgrade the firmware of the screen is the current firmware version. Click shown in the screenshot below. Upgrade Displays the current firmware version of the system, and enables resetting the settings. ™ F/W Version At top of the product, click and then select a firmware file to upgrade. 67 under the F/W Upgrade menu, 4.7.1.

User Manual
Page 70
Selecting a firmware file activates file. Click it to "2.3. To save the product's current settings as a file, click the button, and then set the filename and path. Upon ... Record, Event, Camera, and User menu. For more information about the default settings value, please refer to begin upgrading the Note To download the latest firmware files, please visit Support > Download Center at www.samsungcctv.com.
Selecting a firmware file activates file. Click it to "2.3. To save the product's current settings as a file, click the button, and then set the filename and path. Upon ... Record, Event, Camera, and User menu. For more information about the default settings value, please refer to begin upgrading the Note To download the latest firmware files, please visit Support > Download Center at www.samsungcctv.com.
User Manual
Page 72
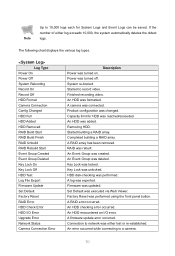
... RAID Build Finish RAID Unbuild RAID Rebuild Start Event Group Created Event Group Deleted Key Lock On Key Lock Off HDD Test Log File Export Firmware Update Set Default Factory Reset RAID Error HDD Check Error HDD I /O error. Started building a RAID array. A RAID array has been ... Product configuration was created. An HDD checking error occurred. If the number of either lost or re-established. An Event Group was changed. Firmware was rebuilt. RAID was updated. Key Lock was formatted. System re-booted. An HDD was unlocked. Factory Reset was either log exceeds 10...
... RAID Build Finish RAID Unbuild RAID Rebuild Start Event Group Created Event Group Deleted Key Lock On Key Lock Off HDD Test Log File Export Firmware Update Set Default Factory Reset RAID Error HDD Check Error HDD I /O error. Started building a RAID array. A RAID array has been ... Product configuration was created. An HDD checking error occurred. If the number of either lost or re-established. An Event Group was changed. Firmware was rebuilt. RAID was updated. Key Lock was formatted. System re-booted. An HDD was unlocked. Factory Reset was either log exceeds 10...
User Manual
Page 80
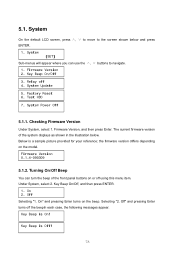
... turn the beep of the system displays as shown in the illustration below and press ENTER. 1. System Update 5. Checking Firmware Version Under System, select 1. Firmware Version, and then press Enter. Off Selecting "1. System Power Off 5.1.1. Selecting "2. Key Beep On/Off, and then press...use the ∧, ∨ buttons to the screen shown below . Firmware Version 2. Factory Reset 6. The current firmware version of the front panel buttons on or off 4. Key Beep is Off! 78 Firmware Version 0.1.4-090309 5.1.2. Off" and pressing Enter turns off the beepIn each ...
... turn the beep of the system displays as shown in the illustration below and press ENTER. 1. System Update 5. Checking Firmware Version Under System, select 1. Firmware Version, and then press Enter. Off Selecting "1. System Power Off 5.1.1. Selecting "2. Key Beep On/Off, and then press...use the ∧, ∨ buttons to the screen shown below . Firmware Version 2. Factory Reset 6. The current firmware version of the front panel buttons on or off 4. Key Beep is Off! 78 Firmware Version 0.1.4-090309 5.1.2. Off" and pressing Enter turns off the beepIn each ...
User Manual
Page 81
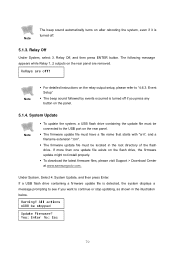
... the USB port on the panel. 5.1.4. System Update, and then press Enter. Relay Off Under System, select 3. If a USB flash drive containing a firmware update file is turned off if you want to continue or stop updating, as shown in the root directory of the flash drive. Yes: Enter... to see if you press any button on the rear panel. ƒ The firmware update file must have a file name that starts with "srn", and a filename extension ".bin". ƒ The firmware update file must be stopped Update Firmware? All actions will be located in the illustration below. Relay Off, and then ...
... the USB port on the panel. 5.1.4. System Update, and then press Enter. Relay Off Under System, select 3. If a USB flash drive containing a firmware update file is turned off if you want to continue or stop updating, as shown in the root directory of the flash drive. Yes: Enter... to see if you press any button on the rear panel. ƒ The firmware update file must have a file name that starts with "srn", and a filename extension ".bin". ƒ The firmware update file must be stopped Update Firmware? All actions will be located in the illustration below. Relay Off, and then ...
User Manual
Page 82
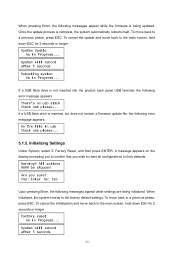
... hold down ESC for 2 seconds or longer. System will reboot after 5 seconds Rebooting system is inserted, but does not contain a firmware update file, the following messages appear while settings are being updated. Initializing Settings Under System, select 5. Factory Reset, and then press ENTER.... When initialized, the system reverts to their defaults. When pressing Enter, the following messages appear while the firmware is complete, the system automatically reboots itself. Once the update process is being initialized. All actions Will be stopped Are you ...
... hold down ESC for 2 seconds or longer. System will reboot after 5 seconds Rebooting system is inserted, but does not contain a firmware update file, the following messages appear while settings are being updated. Initializing Settings Under System, select 5. Factory Reset, and then press ENTER.... When initialized, the system reverts to their defaults. When pressing Enter, the following messages appear while the firmware is complete, the system automatically reboots itself. Once the update process is being initialized. All actions Will be stopped Are you ...

User Manual
Page 102
..., NO/NC Screw terminal 2 relay outputs, NO/NC Notification via e-mail 3 (RJ-45 100/1000 Base-T), 1 (RJ-45 100Base-T) RS-232C 2 USB 2.0 ports (firmware upgrade) 4 External SATA ports Samsung Techwin network products, AXIS network cameras (VAPIX,MPEG4 Modes, limited some functions) 100 ~ 240 V AC ±10%, 50/60 Hz, Auto ranging Max...
..., NO/NC Screw terminal 2 relay outputs, NO/NC Notification via e-mail 3 (RJ-45 100/1000 Base-T), 1 (RJ-45 100Base-T) RS-232C 2 USB 2.0 ports (firmware upgrade) 4 External SATA ports Samsung Techwin network products, AXIS network cameras (VAPIX,MPEG4 Modes, limited some functions) 100 ~ 240 V AC ±10%, 50/60 Hz, Auto ranging Max...

