
User Manual
Page 3
Table of Contents General Information Your New Plasma Display Panel 6 Remote Control Buttons 8 Wall Installation Instructions 10 How to assemble the Stand-Base 14 Connections Connecting VHF and UHF Antennas 16 Connecting Cable TV 17 Connecting a ... Player 21 Connecting a DTV Receiver 22 Operation Turning the PDP On and Off 24 Plug & Play Feature 26 Memorizing the Channels 29 Setting Up Your Remote Control 34 Viewing an External Signal Source 36 Picture Control Customizing the Picture 40 Using Automatic Picture Settings 41 Selecting the Color Tone 42 DNIe...
Table of Contents General Information Your New Plasma Display Panel 6 Remote Control Buttons 8 Wall Installation Instructions 10 How to assemble the Stand-Base 14 Connections Connecting VHF and UHF Antennas 16 Connecting Cable TV 17 Connecting a ... Player 21 Connecting a DTV Receiver 22 Operation Turning the PDP On and Off 24 Plug & Play Feature 26 Memorizing the Channels 29 Setting Up Your Remote Control 34 Viewing an External Signal Source 36 Picture Control Customizing the Picture 40 Using Automatic Picture Settings 41 Selecting the Color Tone 42 DNIe...

User Manual
Page 4
PLASMA DISPLAY PANEL General Information Your New Plasma Display Panel 6 Remote Control Buttons 8 Wall Installation Instructions 10 How to assemble the Stand-Base 14
PLASMA DISPLAY PANEL General Information Your New Plasma Display Panel 6 Remote Control Buttons 8 Wall Installation Instructions 10 How to assemble the Stand-Base 14

User Manual
Page 5
... ) button Press to increase or decrease the volume. Also used to display all the parts shown here. Sold Separately Owner's Instructions (BN68-00618A) Remote Control/AAA Batteries (BN59-00377D) S-VIDEO Cable DVI Cable Component Cables (RCA) Power Cord (3903-000144) Antenna Cable (BN39-00333A) 6 PC ...Cable PC Audio Cable Your New Plasma Display Panel Front Panel Speakers Remote Control Signal Receiver Aim the remote control towards this spot on -screen menu. I/ Press to make sure that you have unpacked your dealer. If any ...
... ) button Press to increase or decrease the volume. Also used to display all the parts shown here. Sold Separately Owner's Instructions (BN68-00618A) Remote Control/AAA Batteries (BN59-00377D) S-VIDEO Cable DVI Cable Component Cables (RCA) Power Cord (3903-000144) Antenna Cable (BN39-00333A) 6 PC ...Cable PC Audio Cable Your New Plasma Display Panel Front Panel Speakers Remote Control Signal Receiver Aim the remote control towards this spot on -screen menu. I/ Press to make sure that you have unpacked your dealer. If any ...

User Manual
Page 7
..., PC, DVI). ˜ CH (Channel) buttons Use it to adjust volume. ∏ SLEEP button Press to be controlled by the Samsung remote control (ie., VCR, Cable, DVD players or STB). Remote Control Buttons Remote Control Œ POWER button Turns the PDP on and off. ´ ASPECT button Press to change modes, the new mode...
..., PC, DVI). ˜ CH (Channel) buttons Use it to adjust volume. ∏ SLEEP button Press to be controlled by the Samsung remote control (ie., VCR, Cable, DVD players or STB). Remote Control Buttons Remote Control Œ POWER button Turns the PDP on and off. ´ ASPECT button Press to change modes, the new mode...

User Manual
Page 8
...automatically cycles through all of the available channels and stores them in memory. ± ADD/DEL button Press to open the battery compartment of this Samsung remote control, so that it will work compatibly with other devices (VCR, cable box, DVD) ÷ PIP control buttons SWAP : Exchanges the video...take out the batteries and press the reset button for about 2~3 seconds. CAPTION button Controls the caption decoder. - Installing the Batteries in Your Remote Control 1 Slide the back cover to add or delete channels in the PIP window. Make sure to make the PIP window Large, Small or...
...automatically cycles through all of the available channels and stores them in memory. ± ADD/DEL button Press to open the battery compartment of this Samsung remote control, so that it will work compatibly with other devices (VCR, cable box, DVD) ÷ PIP control buttons SWAP : Exchanges the video...take out the batteries and press the reset button for about 2~3 seconds. CAPTION button Controls the caption decoder. - Installing the Batteries in Your Remote Control 1 Slide the back cover to add or delete channels in the PIP window. Make sure to make the PIP window Large, Small or...

User Manual
Page 22
PLASMA DISPLAY PANEL Operation Turning the PDP On and Off 24 Plug & Play Feature 26 Memorizing the Channels 29 Setting Up Your Remote Control 34 Viewing an External Signal Source 36
PLASMA DISPLAY PANEL Operation Turning the PDP On and Off 24 Plug & Play Feature 26 Memorizing the Channels 29 Setting Up Your Remote Control 34 Viewing an External Signal Source 36

User Manual
Page 23
...to use menu system that appears on the front of your PDP isn't turned on the remote control. On screen menus disappear from the screen automatically after about thirty seconds, or you display... its features. Press the œ /√/ENTER buttons to display, change, or use features on your remote control to exit the menu. Viewing the Menus 1 With the power on, press the MENU button on... been chosen ( ). Notes: • If your PDP's features. The main menu appears on the remote control. Your PDP also lets you can also use the POWER ( )button on the PDP screen. Turning...
...to use menu system that appears on the front of your PDP isn't turned on the remote control. On screen menus disappear from the screen automatically after about thirty seconds, or you display... its features. Press the œ /√/ENTER buttons to display, change, or use features on your remote control to exit the menu. Viewing the Menus 1 With the power on, press the MENU button on... been chosen ( ). Notes: • If your PDP's features. The main menu appears on the remote control. Your PDP also lets you can also use the POWER ( )button on the PDP screen. Turning...

User Manual
Page 24
Displaying Status Information Press the INFO button on the remote control. Air 4 Mono V-Chip CC Picture Sound MTS Clock : Custom : Custom : Stereo : 12 : 00 am 25 The PDP will display the Picture mode, Sound mode, MTS, Caption, and Clock.
Displaying Status Information Press the INFO button on the remote control. Air 4 Mono V-Chip CC Picture Sound MTS Clock : Custom : Custom : Stereo : 12 : 00 am 25 The PDP will display the Picture mode, Sound mode, MTS, Caption, and Clock.

User Manual
Page 25
... & Play Check antenna input. Enter Skip 26 The following settings are available. 1 If the television is in Standby mode, press the POWER button on the remote control. ➤ The message Start Plug & Play is displayed.
... & Play Check antenna input. Enter Skip 26 The following settings are available. 1 If the television is in Standby mode, press the POWER button on the remote control. ➤ The message Start Plug & Play is displayed.

User Manual
Page 29
.... 30 After all the available channels are stored, the Auto program menu reappears. button on previous page. Storing Channels in memory. See steps on the remote control. 3 Press the ENTER button.
.... 30 After all the available channels are stored, the Auto program menu reappears. button on previous page. Storing Channels in memory. See steps on the remote control. 3 Press the ENTER button.

User Manual
Page 30
Add/Delete Air 4 Deleted Add Change Enter Exit Note • You can view any channel (including an erased channel) by using the number buttons on the remote control. 31 Ex) Channel "4" Air 4 2 Press the ADD/DEL button, then press the ENTER button. Adding and Erasing Channels (Manual Method) 1 Use the number buttons to exit. Repeatedly pressing this button will alternate between "Add" and "Delete". 3 Press the MENU button to directly select the channel that will be added or deleted.
Add/Delete Air 4 Deleted Add Change Enter Exit Note • You can view any channel (including an erased channel) by using the number buttons on the remote control. 31 Ex) Channel "4" Air 4 2 Press the ADD/DEL button, then press the ENTER button. Adding and Erasing Channels (Manual Method) 1 Use the number buttons to exit. Repeatedly pressing this button will alternate between "Add" and "Delete". 3 Press the MENU button to directly select the channel that will be added or deleted.

User Manual
Page 33
...through 077, DVD player: 000 through 008). Setting Up Your Remote Control This PDP's remote control can only operate STB made by Samsung. Note : ● The remote control may not be compatible with all DVD Players, VCRs, Cable boxes. ● The remote control can operate almost any VCR, cable box or DVD. ... brand of the other codes are pre-programmed. 34 If no other codes listed for Samsung STBs as the codes are listed, try the first one.) 5 Press the POWER button on the remote control allows you to switch between these modes, and control whichever piece of equipment you ...
...through 077, DVD player: 000 through 008). Setting Up Your Remote Control This PDP's remote control can only operate STB made by Samsung. Note : ● The remote control may not be compatible with all DVD Players, VCRs, Cable boxes. ● The remote control can operate almost any VCR, cable box or DVD. ... brand of the other codes are pre-programmed. 34 If no other codes listed for Samsung STBs as the codes are listed, try the first one.) 5 Press the POWER button on the remote control allows you to switch between these modes, and control whichever piece of equipment you ...

User Manual
Page 35
... Input Source List : TV √ Edit Name √ Move Enter Return 2 Press the ENTER button to select "Input". Viewing an External Signal Source Use the remote control to switch between the following sets of jacks: AV1, AV2, AV3, S-Video1, S-Video2, Component1, Component2, Monitor Out, PC or DVI on the PDP's rear...
... Input Source List : TV √ Edit Name √ Move Enter Return 2 Press the ENTER button to select "Input". Viewing an External Signal Source Use the remote control to switch between the following sets of jacks: AV1, AV2, AV3, S-Video1, S-Video2, Component1, Component2, Monitor Out, PC or DVI on the PDP's rear...

User Manual
Page 39
... ▼ button to select "Picture", then press the ENTER button. ➤ Quick way to access the picture setting: Just press the "P.MODE" button on the remote control. 2 Press the ENTER button to select "Mode". 3 Press the ▲ or ▼ button to select "Dynamic", "Standard", "Movie", "Custom" picture setting. • You can...
... ▼ button to select "Picture", then press the ENTER button. ➤ Quick way to access the picture setting: Just press the "P.MODE" button on the remote control. 2 Press the ENTER button to select "Mode". 3 Press the ▲ or ▼ button to select "Dynamic", "Standard", "Movie", "Custom" picture setting. • You can...
User Manual
Page 41
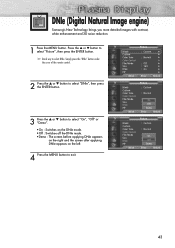
DNIe (Digital Natural Image engine) Samsung's New Technology brings you more detailed images with contrast, white enhancement and 3D noise reduction. 1 Press the MENU button. TV Picture Mode Custom Color Tone ...; button to select "Picture", then press the ENTER button. ➤ Quick way to select DNIe: Simply press the "DNIe" button under the cover of the remote control. 2 Press the ▲ or ▼ button to select "DNIe", then press the ENTER button. 3 Press the ▲ or ▼ button to select "On", "Off...
DNIe (Digital Natural Image engine) Samsung's New Technology brings you more detailed images with contrast, white enhancement and 3D noise reduction. 1 Press the MENU button. TV Picture Mode Custom Color Tone ...; button to select "Picture", then press the ENTER button. ➤ Quick way to select DNIe: Simply press the "DNIe" button under the cover of the remote control. 2 Press the ▲ or ▼ button to select "DNIe", then press the ENTER button. 3 Press the ▲ or ▼ button to select "On", "Off...

User Manual
Page 42
...; Move Enter Return TV Size 16 : 9 Panorama Zoom 4 : 3 4 Press the MENU button to access the Screen Size menu : Just press the "ASPECT" button on the remote control. 1 Press the MENU button. Changing the Screen Size Screen size selection depends on the type of video input (DVD, PC etc.). ➤ Quick way...
...; Move Enter Return TV Size 16 : 9 Panorama Zoom 4 : 3 4 Press the MENU button to access the Screen Size menu : Just press the "ASPECT" button on the remote control. 1 Press the MENU button. Changing the Screen Size Screen size selection depends on the type of video input (DVD, PC etc.). ➤ Quick way...

User Manual
Page 44
Press again to freeze a moving picture. Freezing the Picture Still Press the STILL button on the remote control to cancel. 46
Press again to freeze a moving picture. Freezing the Picture Still Press the STILL button on the remote control to cancel. 46

User Manual
Page 45
... ▼ button to select "Picture", then press the ENTER button. ➤ Quick way to access the PIP mode: Just press the "PIP" button on the remote control. 2 Press the ▲ or ▼ button to Off and try it again. Note • Check if the V-Chip Lock (refer to On. TV PIP...
... ▼ button to select "Picture", then press the ENTER button. ➤ Quick way to access the PIP mode: Just press the "PIP" button on the remote control. 2 Press the ▲ or ▼ button to Off and try it again. Note • Check if the V-Chip Lock (refer to On. TV PIP...

User Manual
Page 47
... swapping: Just press the "SWAP" button under the cover of the PIP Image and Main Image 1 Press the MENU button. Swapping the Contents of the remote control. 2 Press the ▲ or ▼ button to select "PIP", then press the ENTER button. 3 Press the ▲ or ▼ button to select "Swap", then...
... swapping: Just press the "SWAP" button under the cover of the PIP Image and Main Image 1 Press the MENU button. Swapping the Contents of the remote control. 2 Press the ▲ or ▼ button to select "PIP", then press the ENTER button. 3 Press the ▲ or ▼ button to select "Swap", then...

User Manual
Page 48
... TV PIP PIP Source Swap Size Position Air/CATV Channel Sound Select Move : On : TV : : : Air :4 : Main Enter Return 50 Changing the Size of the remote control. 2 Press the ▲ or ▼ button to select "PIP", then press the ENTER button. 3 Press the ▲ or ▼ button to select "Size", then...
... TV PIP PIP Source Swap Size Position Air/CATV Channel Sound Select Move : On : TV : : : Air :4 : Main Enter Return 50 Changing the Size of the remote control. 2 Press the ▲ or ▼ button to select "PIP", then press the ENTER button. 3 Press the ▲ or ▼ button to select "Size", then...


