User Manual (ENGLISH)
Page 2
... Installation and Basic Adjustments Installation and Turning On 14 Zooming and Focus Adjustment 16 Leveling with Adjustable Feet 17 Using the Lens Shift Dial 18 Screen Size and Projection Distance 19 Connections and Source Setup Before Connections 22 Connecting to Video Equipment Connecting to VCR/Camcorder/Cable Box ..........23 Connecting to DVD 24 Connecting to the Digital TV Receiver 25 Setting up the External Input Source 26 Naming the External Connections 27 Picture Adjustment Selecting Picture Mode 30 Custom Settings of the Picture 31 Changing the Color...
... Installation and Basic Adjustments Installation and Turning On 14 Zooming and Focus Adjustment 16 Leveling with Adjustable Feet 17 Using the Lens Shift Dial 18 Screen Size and Projection Distance 19 Connections and Source Setup Before Connections 22 Connecting to Video Equipment Connecting to VCR/Camcorder/Cable Box ..........23 Connecting to DVD 24 Connecting to the Digital TV Receiver 25 Setting up the External Input Source 26 Naming the External Connections 27 Picture Adjustment Selecting Picture Mode 30 Custom Settings of the Picture 31 Changing the Color...
User Manual (ENGLISH)
Page 4
User adjustments I This unit allows adjustment of 1024x576 resolution I 5X-speed color wheel designed to reduce digital artifacts I 250W Lamp designed to external peripherals. Preparation Features and Design Features and Design Optical engine adopting advanced DLP technology I SP-H700/SP-H710: DLPTM HD2+ DMD panel capable of 1280x720 resolution I SP-H500: DLPTM ED2+ DMD panel capable of each input port. I The airflow and fan installation structure are optimized to...
User adjustments I This unit allows adjustment of 1024x576 resolution I 5X-speed color wheel designed to reduce digital artifacts I 250W Lamp designed to external peripherals. Preparation Features and Design Features and Design Optical engine adopting advanced DLP technology I SP-H700/SP-H710: DLPTM HD2+ DMD panel capable of 1280x720 resolution I SP-H500: DLPTM ED2+ DMD panel capable of each input port. I The airflow and fan installation structure are optimized to...
User Manual (ENGLISH)
Page 5
... eyes.) I Turn off . I You can check the lamp use , if the problem is due to purchase a lamp for replacement. (Ultra violets from the lamp can be offered within 300 hours of picture quality. Caution on Lamp Replacement I Unplug the power cord before replacement or repair. (Due to the high-pressure of the lamp before replacing the lamp. Preparation Caution on Lamp Use and Replacement Caution on Lamp Use and Replacement Projector Lamp I The Projector lamp changes in nature depending on the remote control.
... eyes.) I Turn off . I You can check the lamp use , if the problem is due to purchase a lamp for replacement. (Ultra violets from the lamp can be offered within 300 hours of picture quality. Caution on Lamp Replacement I Unplug the power cord before replacement or repair. (Due to the high-pressure of the lamp before replacing the lamp. Preparation Caution on Lamp Use and Replacement Caution on Lamp Use and Replacement Projector Lamp I The Projector lamp changes in nature depending on the remote control.

User Manual (ENGLISH)
Page 8
... and down the adjustable feet. 6 Zoom Knob Used to enlarge or reduce image size. 6 4 5 7 MENU Used to open the on-screen Menu. 8 POWER Used to turn the projector on or off. 9 SOURCE Used to select input signals from the external sources. 10 Select and Move Button Used to select an menu item, and to move the cursor. 11 LENS SHIFT Dial You can adjust screen images up and down within the lens range. Accessories Remote Control/ 2 Batteries Power Cable Owner's Instructions 8 TEMP (Red LED) - LAMP (Blue LED) - PROJECTOR AND ACCESSORIES...
... and down the adjustable feet. 6 Zoom Knob Used to enlarge or reduce image size. 6 4 5 7 MENU Used to open the on-screen Menu. 8 POWER Used to turn the projector on or off. 9 SOURCE Used to select input signals from the external sources. 10 Select and Move Button Used to select an menu item, and to move the cursor. 11 LENS SHIFT Dial You can adjust screen images up and down within the lens range. Accessories Remote Control/ 2 Batteries Power Cable Owner's Instructions 8 TEMP (Red LED) - LAMP (Blue LED) - PROJECTOR AND ACCESSORIES...
User Manual (ENGLISH)
Page 9
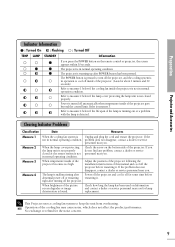
... Indicator Information : Turned On : Flashing : Turned Off TEMP LAMP STANDBY Information If you . If the not in normal operation condition. NOTE Operation of the projector. Refer to measure 2 below if the life span of the projector becomes too high. Check the screw on the remote control or projector, the screen appears within 30 seconds. problem does not disappear, contact a dealer or service personnel near you . When temperature inside of the picture screen degrades or image...
... Indicator Information : Turned On : Flashing : Turned Off TEMP LAMP STANDBY Information If you . If the not in normal operation condition. NOTE Operation of the projector. Refer to measure 2 below if the life span of the projector becomes too high. Check the screw on the remote control or projector, the screen appears within 30 seconds. problem does not disappear, contact a dealer or service personnel near you . When temperature inside of the picture screen degrades or image...
User Manual (ENGLISH)
Page 10
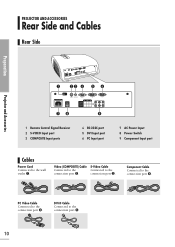
... Cable Connected to the connection port ´. Video (COMPOSITE) Cable S-Video Cable Connected to the connection port '. Component Cable Connected to the connection port ˇ. PC Video Cable Connected to the wall outlet ∏. PROJECTOR AND ACCESSORIES Rear Side and Cables Rear Side Preparation Projector and Accessories 1 23 4 56 78 9 1 Remote Control Signal Receiver 2 S-VIDEO Input port 3 COMPOSITE Input ports 4 RS-232C port 5 DVI Input port 6 PC Input port 7 AC Power Input 8 Power Switch 9 Component Input port Cables Power Cord Connected to the connection...
... Cable Connected to the connection port ´. Video (COMPOSITE) Cable S-Video Cable Connected to the connection port '. Component Cable Connected to the connection port ˇ. PC Video Cable Connected to the wall outlet ∏. PROJECTOR AND ACCESSORIES Rear Side and Cables Rear Side Preparation Projector and Accessories 1 23 4 56 78 9 1 Remote Control Signal Receiver 2 S-VIDEO Input port 3 COMPOSITE Input ports 4 RS-232C port 5 DVI Input port 6 PC Input port 7 AC Power Input 8 Power Switch 9 Component Input port Cables Power Cord Connected to the connection...
User Manual (ENGLISH)
Page 11
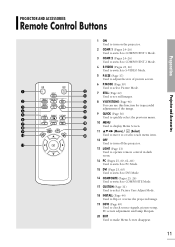
PROJECTOR AND ACCESSORIES Remote Control Buttons Preparation Projector and Accessories 1 ON Used to turn on the projector. 2 COMP.1 (Pages 24~26) Used to switch to COMPONENT 1 Mode. 3 COMP.2 (Pages 24~26) Used to switch to COMPONENT 2 Mode. 4 S-VIDEO (Pages 23, 26) Used to switch to S-VIDEO Mode. 5 P.SIZE (Page 37) Used to adjust the size of picture screen. 6 P.MODE (Page 30) Used to select Picture Mode. 1 12 7 STILL (Page 42) 13 Used to see still images. 2 14 8 V.KEYSTONE (Page 46) 3 15 You can...
PROJECTOR AND ACCESSORIES Remote Control Buttons Preparation Projector and Accessories 1 ON Used to turn on the projector. 2 COMP.1 (Pages 24~26) Used to switch to COMPONENT 1 Mode. 3 COMP.2 (Pages 24~26) Used to switch to COMPONENT 2 Mode. 4 S-VIDEO (Pages 23, 26) Used to switch to S-VIDEO Mode. 5 P.SIZE (Page 37) Used to adjust the size of picture screen. 6 P.MODE (Page 30) Used to select Picture Mode. 1 12 7 STILL (Page 42) 13 Used to see still images. 2 14 8 V.KEYSTONE (Page 46) 3 15 You can...
User Manual (ENGLISH)
Page 13
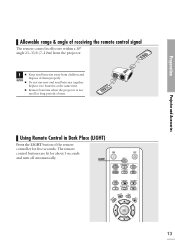
.... LIGHT 13 Preparation Projector and Accessories Allowable range & angle of receiving the remote control signal The remote control is not used for about 5 seconds and turn off automatically. I Do not use new and used batteries away from the projector. Replace two batteries at the same time. The remote control buttons are lit for long periods of the remote controller for five seconds. Using Remote Control in Dark Place (LIGHT) Press the LIGHT button of time. CAUTION I Keep used batteries...
.... LIGHT 13 Preparation Projector and Accessories Allowable range & angle of receiving the remote control signal The remote control is not used for about 5 seconds and turn off automatically. I Do not use new and used batteries away from the projector. Replace two batteries at the same time. The remote control buttons are lit for long periods of the remote controller for five seconds. Using Remote Control in Dark Place (LIGHT) Press the LIGHT button of time. CAUTION I Keep used batteries...
User Manual (ENGLISH)
Page 14
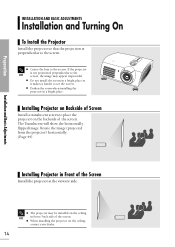
Rotate the image (projected from the projector) horizontally. (Page 44) Installation and Basic Adjustments Installing Projector in a bright place as it makes it harder to the screen. I The projector may appear trapezoidal. I Center the lens to the screen. Preparation INSTALLATION AND BASIC ADJUSTMENTS Installation and Turning On To Install the Projector Install the projector so that the projection is not positioned perpendicular to the NOTE screen, the image may be installed on the ceiling NOTE in...
Rotate the image (projected from the projector) horizontally. (Page 44) Installation and Basic Adjustments Installing Projector in a bright place as it makes it harder to the screen. I The projector may appear trapezoidal. I Center the lens to the screen. Preparation INSTALLATION AND BASIC ADJUSTMENTS Installation and Turning On To Install the Projector Install the projector so that the projection is not positioned perpendicular to the NOTE screen, the image may be installed on the ceiling NOTE in...
User Manual (ENGLISH)
Page 15
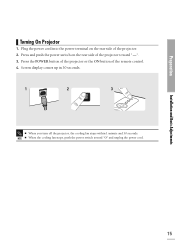
Preparation Turning On Projector 1. Screen display comes up in 30 seconds. 1 2 3 I When the cooling fan stops, push the power switch toward "-". 3. Press and push the power switch on the rear side of the projector. 2. Press the POWER button of the projector or the ON button of the projector toward "O" and unplug the power cord. NOTE I When you turn off the projector, the cooling fan stops within 1 minute and 30 seconds. Installation and Basic Adjustments 15 Plug the power cord into the power terminal on the rear side of the remote control. 4.
Preparation Turning On Projector 1. Screen display comes up in 30 seconds. 1 2 3 I When the cooling fan stops, push the power switch toward "-". 3. Press and push the power switch on the rear side of the projector. 2. Press the POWER button of the projector or the ON button of the projector toward "O" and unplug the power cord. NOTE I When you turn off the projector, the cooling fan stops within 1 minute and 30 seconds. Installation and Basic Adjustments 15 Plug the power cord into the power terminal on the rear side of the remote control. 4.
User Manual (ENGLISH)
Page 23
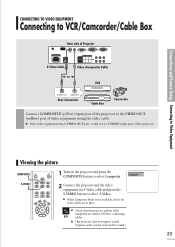
... S-VIDEO OUT port, connect it to the VIDEO OUT (yellow) port of the projector. Connections and Source Setup Connecting to Video Equipment CONNECTING TO VIDEO EQUIPMENT Connecting to VCR/Camcorder/Cable Box Rear side of Projector S-Video Cable Video (Composite) Cable or VCR Rear Connection Cable Box Camcorder Connect COMPOSITE (yellow) input port of the projector to S-VIDEO input port of video equipment using the video cable. I This projector does not support sound. (Separate audio system is not available, check the video cables are turned off before connecting NOTE cables.
... S-VIDEO OUT port, connect it to the VIDEO OUT (yellow) port of the projector. Connections and Source Setup Connecting to Video Equipment CONNECTING TO VIDEO EQUIPMENT Connecting to VCR/Camcorder/Cable Box Rear side of Projector S-Video Cable Video (Composite) Cable or VCR Rear Connection Cable Box Camcorder Connect COMPOSITE (yellow) input port of the projector to S-VIDEO input port of video equipment using the video cable. I This projector does not support sound. (Separate audio system is not available, check the video cables are turned off before connecting NOTE cables.
User Manual (ENGLISH)
Page 33
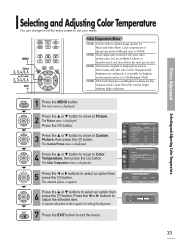
... it is manufactured, and may deliver the most video productions. The Color Temperature menu is suitable for black-and-white films. Color temperature of the picture mode of the entire screen to Picture. It is set to 5500K. 6500K This temperature is used in bright ambient light conditions. 1 Press the MENU button. The main menu is applied to select an option then press the button. The selected option is displayed.
... it is manufactured, and may deliver the most video productions. The Color Temperature menu is suitable for black-and-white films. Color temperature of the picture mode of the entire screen to Picture. It is set to 5500K. 6500K This temperature is used in bright ambient light conditions. 1 Press the MENU button. The main menu is applied to select an option then press the button. The selected option is displayed.

User Manual (ENGLISH)
Page 47
...The Red/Green/Blue colors of the projector. Setup Install Light Setting V-Keystone Test Pattern PC Factory Default Information : Front-Floor √ : Theater √ Move Enter Return Test Pattern Crosshatch Screen Size Color Standard Red Green Blue † More Move Enter Return Test Pattern ... Setup Test Patterns MENU 1 Select 2, 3, 4 .../† 2, 3, 4 EXIT 5 1 Press the MENU button. Red Red Screen, only for color adjustment. The Test Pattern menu is displayed. 5 Press the EXIT button to page 32. Screen Size You can check whether the picture is...
...The Red/Green/Blue colors of the projector. Setup Install Light Setting V-Keystone Test Pattern PC Factory Default Information : Front-Floor √ : Theater √ Move Enter Return Test Pattern Crosshatch Screen Size Color Standard Red Green Blue † More Move Enter Return Test Pattern ... Setup Test Patterns MENU 1 Select 2, 3, 4 .../† 2, 3, 4 EXIT 5 1 Press the MENU button. Red Red Screen, only for color adjustment. The Test Pattern menu is displayed. 5 Press the EXIT button to page 32. Screen Size You can check whether the picture is...
User Manual (ENGLISH)
Page 58
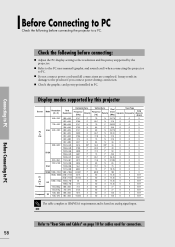
... before connecting: I Check the graphic card port type installed in damage to the product if you connect power during connection. It may result in PC. I Refer to the PC user manual (graphic and sound card) when connecting the projector to "Rear Side and Cables" on analog signal input. NOTE Refer to PC. Display modes supported by the projector. Before Connecting to PC Check the following before connecting the projector to a PC. I Adjust the PC display setting...
... before connecting: I Check the graphic card port type installed in damage to the product if you connect power during connection. It may result in PC. I Refer to the PC user manual (graphic and sound card) when connecting the projector to "Rear Side and Cables" on analog signal input. NOTE Refer to PC. Display modes supported by the projector. Before Connecting to PC Check the following before connecting the projector to a PC. I Adjust the PC display setting...

User Manual (ENGLISH)
Page 60
... 59) 3 Adjust the screen. (Pages 62~65) I If PC Mode is not available, check PC video cable is needed for Windows XP. Use DVD-D cable. NOTE Viewing the PC Screen PC 1 1 Turn on the rear side of the projector to the monitor output port 1 of PC using DVI-D cable (supports digital signals only) NOTE instead of the projector. I DVI-I Sound comes out from PC speakers. 60 Connecting to PC You can connect a PC...
... 59) 3 Adjust the screen. (Pages 62~65) I If PC Mode is not available, check PC video cable is needed for Windows XP. Use DVD-D cable. NOTE Viewing the PC Screen PC 1 1 Turn on the rear side of the projector to the monitor output port 1 of PC using DVI-D cable (supports digital signals only) NOTE instead of the projector. I DVI-I Sound comes out from PC speakers. 60 Connecting to PC You can connect a PC...
User Manual (ENGLISH)
Page 68
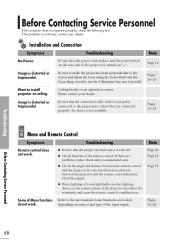
... Zoom Knob and the Focus Ring. Be sure that the proper external source is no obstacle between the remote control and the projector. Page 26 Page 12 Page 13 Some of 3-way light bulbs or other lighting device on "-". Troubleshooting Before Contacting Service Personnel If this projector does not operate properly, check the following first. Image is a problem, replace them with recommended ones. I Be sure that the connection cable (video...
... Zoom Knob and the Focus Ring. Be sure that the proper external source is no obstacle between the remote control and the projector. Page 26 Page 12 Page 13 Some of 3-way light bulbs or other lighting device on "-". Troubleshooting Before Contacting Service Personnel If this projector does not operate properly, check the following first. Image is a problem, replace them with recommended ones. I Be sure that the connection cable (video...

User Manual (ENGLISH)
Page 69
... white or odd color/screen is selected. I Be sure that the Color, Brightness settings are not clear. Be sure to defective parts. I Adjust the focus. I Check that the power cord of the projector. Lines appear on the screen. Page 9 Page 63 Green appears on screen. I Check the Remote Control batteries. I Be sure that the projection distance is on lamp and repair. Strange noise. Adjust the Color and Brightness. Contact your video card on the advanced display...
... white or odd color/screen is selected. I Be sure that the Color, Brightness settings are not clear. Be sure to defective parts. I Adjust the focus. I Check that the power cord of the projector. Lines appear on the screen. Page 9 Page 63 Green appears on screen. I Check the Remote Control batteries. I Be sure that the projection distance is on lamp and repair. Strange noise. Adjust the Color and Brightness. Contact your video card on the advanced display...
User Manual (ENGLISH)
Page 77
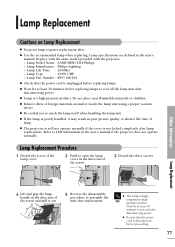
... the user's manual. Lamp Manufacture : Philips Lighting - I Projector lamp requires replacement after lamp replacement. Other Information Lamp Replacement 4 Lift and grip the lamp handle in the direction of lamp. Lamp Replacement Cautions on Lamp Replacement I Remove dirts or foreign materials around or inside the lamp unit using a proper vacuum device. Lamp specifications are defined in the user's manual if the projector does not operate normally. Lamp Model Name : LAMP-MERCURY-Philips - Lamp Part Number : BP47-00010A I Be sure that the power cord is not locked...
... the user's manual. Lamp Manufacture : Philips Lighting - I Projector lamp requires replacement after lamp replacement. Other Information Lamp Replacement 4 Lift and grip the lamp handle in the direction of lamp. Lamp Replacement Cautions on Lamp Replacement I Remove dirts or foreign materials around or inside the lamp unit using a proper vacuum device. Lamp specifications are defined in the user's manual if the projector does not operate normally. Lamp Model Name : LAMP-MERCURY-Philips - Lamp Part Number : BP47-00010A I Be sure that the power cord is not locked...
User Manual (ENGLISH)
Page 79
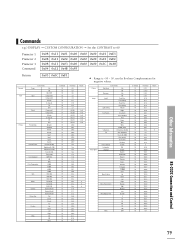
... values. Picture Setup Menu Option Control Items Film Mode On Off Overscan On Off Install Front-Floor Front-Ceiling Rear-Floor Rear-Ceiling Light Setting Theater Bright Test Pattern Crosshatch Color Standard Red Green Blue White 6500K_White V-Keystone V-Keystone (-50~50) PC Auto Adjustment Coarse (0~2000) Fine (0~255) Zoom (0~3) PC Reset Factory Default Confirm Information OK Language English Deutsch Nederlands Español Français Italiano Svenska Português Menu Position Menu Translucency Menu Display Time Menu Up...
... values. Picture Setup Menu Option Control Items Film Mode On Off Overscan On Off Install Front-Floor Front-Ceiling Rear-Floor Rear-Ceiling Light Setting Theater Bright Test Pattern Crosshatch Color Standard Red Green Blue White 6500K_White V-Keystone V-Keystone (-50~50) PC Auto Adjustment Coarse (0~2000) Fine (0~255) Zoom (0~3) PC Reset Factory Default Confirm Information OK Language English Deutsch Nederlands Español Français Italiano Svenska Português Menu Position Menu Translucency Menu Display Time Menu Up...
User Manual (ENGLISH)
Page 80
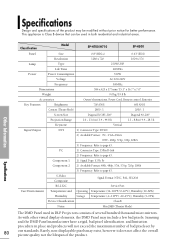
... Panel Size 0.8"(HD2+) 0.63"(ED2) Resolution 1280 x 720 1024 x 576 Lamp Type Life Time 250W UHP 2000Hrs Power Power Consumption 350W Voltage Frequency AC 100-240V 50/60Hz Dimensions 384 x 425 x 177 mm / 15.1" x 16.7" x 7.0" Weight Accessories 9.0 kg / 19.8 lb Owner's Instructions, Power Cord, Remote control, Batteries Key Features Brightness 700 ANSI 600 ANSI Contrast (Theatre Mode) Screen Size 2800 : 1 Diagonal 30.385~300" 2000 : 1 Diagonal 40~200" Projection...
... Panel Size 0.8"(HD2+) 0.63"(ED2) Resolution 1280 x 720 1024 x 576 Lamp Type Life Time 250W UHP 2000Hrs Power Power Consumption 350W Voltage Frequency AC 100-240V 50/60Hz Dimensions 384 x 425 x 177 mm / 15.1" x 16.7" x 7.0" Weight Accessories 9.0 kg / 19.8 lb Owner's Instructions, Power Cord, Remote control, Batteries Key Features Brightness 700 ANSI 600 ANSI Contrast (Theatre Mode) Screen Size 2800 : 1 Diagonal 30.385~300" 2000 : 1 Diagonal 40~200" Projection...


