
Owners Instructions
Page 1
DLP TV SP42L6HX SP46L6HX SP50L6HX SP56L6HX SP61L6HX Owner's Instructions Before operating the unit, please read this manual thoroughly, and retain it for future reference. Picture In Picture (PIP) Colour Weakness Enhancement Mode My Colour Control SRS TruSurroundXT Digital Natural Image engine This device is a Class B digital apparatus. Register your product at www.samsung.com/global/register
DLP TV SP42L6HX SP46L6HX SP50L6HX SP56L6HX SP61L6HX Owner's Instructions Before operating the unit, please read this manual thoroughly, and retain it for future reference. Picture In Picture (PIP) Colour Weakness Enhancement Mode My Colour Control SRS TruSurroundXT Digital Natural Image engine This device is a Class B digital apparatus. Register your product at www.samsung.com/global/register
Owners Instructions
Page 5
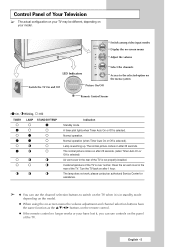
...Adjust the volume LED Indicators Switch the TV On and Off Picture On/Off Select the channels Access to switch on the TV when it is in the rear of the TV is warming up. Normal operation (when ...Timer Auto On or Off is selected. Clean the air vent cover in the rear of the TV is selected) Air vent cover in standby mode depending on the model. ◆ When...Auto On or Off is over normal. English - 5 Lamp is not properly installed. Inside temperature of the TV. Control Panel of Your Television ➢ The actual configuration on your model. The lamp does not work, ...
...Adjust the volume LED Indicators Switch the TV On and Off Picture On/Off Select the channels Access to switch on the TV when it is in the rear of the TV is warming up. Normal operation (when ...Timer Auto On or Off is selected. Clean the air vent cover in the rear of the TV is selected) Air vent cover in standby mode depending on the model. ◆ When...Auto On or Off is over normal. English - 5 Lamp is not properly installed. Inside temperature of the TV. Control Panel of Your Television ➢ The actual configuration on your model. The lamp does not work, ...
Owners Instructions
Page 6
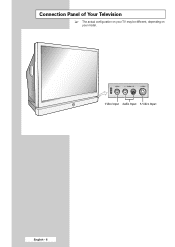
Connection Panel of Your Television ➢ The actual configuration on your TV may be different, depending on your model. Video Input Audio Input S-Video Input English - 6
Connection Panel of Your Television ➢ The actual configuration on your TV may be different, depending on your model. Video Input Audio Input S-Video Input English - 6

Owners Instructions
Page 7
.../ AUDIO L/R) Connect to the PC audio/video outputs. Ø DVI IN (AUDIO L/R) Connect to the audio output jacks for repairs and software upgrades. Rear of the TV Œ ANT IN Coaxial connector for aerial or cable network. ´ EXT 1, EXT 2, EXT 3 Inputs or outputs for external devices, such as VCR... the external audio amplifier. ¨ COMPONENT IN Connect to the audio and video outputs of Your Television (continued) ➢ The actual configuration on your TV may be different, depending on your model. English - 7 " SERVICE It is for device with DVI output. ∏ HDMI/DVI IN Connect to...
.../ AUDIO L/R) Connect to the PC audio/video outputs. Ø DVI IN (AUDIO L/R) Connect to the audio output jacks for repairs and software upgrades. Rear of the TV Œ ANT IN Coaxial connector for aerial or cable network. ´ EXT 1, EXT 2, EXT 3 Inputs or outputs for external devices, such as VCR... the external audio amplifier. ¨ COMPONENT IN Connect to the audio and video outputs of Your Television (continued) ➢ The actual configuration on your TV may be different, depending on your model. English - 7 " SERVICE It is for device with DVI output. ∏ HDMI/DVI IN Connect to...
Owners Instructions
Page 8
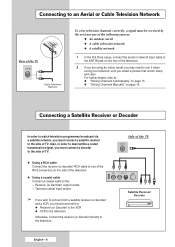
... network ◆ A satellite network 1 In the first three cases, connect the aerial or network input cable to the ANT IN jack on the rear of the television. 2 If you are using an indoor aerial, you may need to turn it when tuning your television until you obtain a picture... aerial input socket. ➢ If you must connect a satellite receiver to the side of TV. English - 8 Side of the TV Satellite Receiver/ Decoder Connecting to an Aerial or Cable Television Network Rear of the TV or Cable Television Network To view television channels correctly, a signal must be received by the set...
... network ◆ A satellite network 1 In the first three cases, connect the aerial or network input cable to the ANT IN jack on the rear of the television. 2 If you are using an indoor aerial, you may need to turn it when tuning your television until you obtain a picture... aerial input socket. ➢ If you must connect a satellite receiver to the side of TV. English - 8 Side of the TV Satellite Receiver/ Decoder Connecting to an Aerial or Cable Television Network Rear of the TV or Cable Television Network To view television channels correctly, a signal must be received by the set...

Owners Instructions
Page 9
...time. REWIND (REW) - PLAY/PAUSE - WHEN YOU PRESS A BUTTON , ' ' APPEARS ALONG WITH SELECTED MODE (TV, VCR, CATV, DVD OR STB) AND REMAINING BATTERIES ON LCD MAKE THE REMOTE CONTROL WORKS FOR TV, VCR, CABLE-BOX (CATV), DVD PLAYER, OR SET-TOP BOX (STB) SWITCH REPEATEDLY BETWEEN THE LAST TWO...NORMAL BROADCAST AUTOMATIC SWITCH-OFF/ TELETEXT CANCEL DNIe ON/DEMO/OFF/ TELETEXT SIZE SELECTION SET THE MBR CODE OF REMOTE CONTROL FOR THE PRODUCTS EXCEPT SAMSUNG PRODUCT (OPTION) IF YOUR REMOTE CONTROL IS NOT FUNCTIONING PROPERLY, TAKE OUT THE BATTERIES AND PRESS THE RESET BUTTON FOR ABOUT 2~3 SECONDS. ...
...time. REWIND (REW) - PLAY/PAUSE - WHEN YOU PRESS A BUTTON , ' ' APPEARS ALONG WITH SELECTED MODE (TV, VCR, CATV, DVD OR STB) AND REMAINING BATTERIES ON LCD MAKE THE REMOTE CONTROL WORKS FOR TV, VCR, CABLE-BOX (CATV), DVD PLAYER, OR SET-TOP BOX (STB) SWITCH REPEATEDLY BETWEEN THE LAST TWO...NORMAL BROADCAST AUTOMATIC SWITCH-OFF/ TELETEXT CANCEL DNIe ON/DEMO/OFF/ TELETEXT SIZE SELECTION SET THE MBR CODE OF REMOTE CONTROL FOR THE PRODUCTS EXCEPT SAMSUNG PRODUCT (OPTION) IF YOUR REMOTE CONTROL IS NOT FUNCTIONING PROPERLY, TAKE OUT THE BATTERIES AND PRESS THE RESET BUTTON FOR ABOUT 2~3 SECONDS. ...

Owners Instructions
Page 11
... your television. 1 Plug the mains lead into an appropriate socket. ➢ The main voltage is indicated on the rear of the television and the frequency is 50 or 60Hz. 2 Press the power switch on the side of the television toward "OFF" (O). Placing Your Television ... - 11 Refer to unplug the set . Result: The programme that you have not yet stored any channels, No clear picture TV appears. selected automatically. ➢ If you were watching last is best to "Storing Channels Automatically" on page 15 or "Storing Channels Manually" on page 16. 4 ...
... your television. 1 Plug the mains lead into an appropriate socket. ➢ The main voltage is indicated on the rear of the television and the frequency is 50 or 60Hz. 2 Press the power switch on the side of the television toward "OFF" (O). Placing Your Television ... - 11 Refer to unplug the set . Result: The programme that you have not yet stored any channels, No clear picture TV appears. selected automatically. ➢ If you were watching last is best to "Storing Channels Automatically" on page 15 or "Storing Channels Manually" on page 16. 4 ...

Owners Instructions
Page 13
... Language Move Enter Skip Plug & Play Check antenna input. or † button. OK English - 13 Plug & Play Feature When the television is connected to the TV, and then press the ENTER button.
... Language Move Enter Skip Plug & Play Check antenna input. or † button. OK English - 13 Plug & Play Feature When the television is connected to the TV, and then press the ENTER button.

Owners Instructions
Page 14
... using your choice. or † button to reset this feature... 1 Press the MENU button. Press the ENTER button. Plug & Play Feature (continued) TV Setup Plug & Play √ Language : English √ Time √ Blue Screen : Off √ Melody : On √ Colour Weakness : ...AV Setup √ Move Enter Return If you want to select Setup. Result: The main menu is displayed. 2 Press the ... Choosing Your Language TV Setup Plug & Play √ Language : English √ Time √ Blue Screen : Off √ Melody : On √ Colour Weakness :...
... using your choice. or † button to reset this feature... 1 Press the MENU button. Press the ENTER button. Plug & Play Feature (continued) TV Setup Plug & Play √ Language : English √ Time √ Blue Screen : Off √ Melody : On √ Colour Weakness : ...AV Setup √ Move Enter Return If you want to select Setup. Result: The main menu is displayed. 2 Press the ... Choosing Your Language TV Setup Plug & Play √ Language : English √ Time √ Blue Screen : Off √ Melody : On √ Colour Weakness :...

Owners Instructions
Page 15
...9670; Activate/deactivate the LNA (Low Noise Amplifier) feature (see page 23) ◆ Activate/deactivate the Digital NR (Noise Reduction) feature (see page 28) TV Channel Auto Store √ Manual Store √ Add/Delete √ Sort √ Child Lock √ Name √ Fine Tune √ † ... Store Area Search : Asia/WAu.Esutrriaope Belgium √ Croatia Denmark Finland France Germany Iceland Ireland † Move Enter Return TV Auto Store Area : Austria √ Search √ Move Enter Return Search Press ENTER to start the search, select the ...
...9670; Activate/deactivate the LNA (Low Noise Amplifier) feature (see page 23) ◆ Activate/deactivate the Digital NR (Noise Reduction) feature (see page 28) TV Channel Auto Store √ Manual Store √ Add/Delete √ Sort √ Child Lock √ Name √ Fine Tune √ † ... Store Area Search : Asia/WAu.Esutrriaope Belgium √ Croatia Denmark Finland France Germany Iceland Ireland † Move Enter Return TV Auto Store Area : Austria √ Search √ Move Enter Return Search Press ENTER to start the search, select the ...

Owners Instructions
Page 16
... in the Channel group are displayed in the following order. (depending on the model). or † button. Press the ENTER button. BG - Storing Channels Manually TV Channel Auto Store √ Manual Store √ Add/Delete √ Sort √ Child Lock √ Name √ Fine Tune √ † More Move Enter Return...
... in the Channel group are displayed in the following order. (depending on the model). or † button. Press the ENTER button. BG - Storing Channels Manually TV Channel Auto Store √ Manual Store √ Add/Delete √ Sort √ Child Lock √ Name √ Fine Tune √ † More Move Enter Return...

Owners Instructions
Page 18
... Press the ENTER button to select Add/Delete. Ch. 1 ----- * 2 ----- * 3 ----- * 4 ----- * 5 ----- * Deleted Deleted Deleted Deleted Deleted Move Enter Return TV Add/Delete Prog. Ch. 1 ----- * 2 ----- * 3 ----- * 4 ----- * 5 ----- * Deleted Deleted Added Deleted Deleted Adjust Enter Return You can exclude the channels of... Result: The options available in the Channel group are displayed during scanning. 1 Press the MENU button. Skipping Unwanted Channels TV Channel Auto Store √ Manual Store √ Add/Delete √ Sort √ Child Lock √ Name √...
... Press the ENTER button to select Add/Delete. Ch. 1 ----- * 2 ----- * 3 ----- * 4 ----- * 5 ----- * Deleted Deleted Deleted Deleted Deleted Move Enter Return TV Add/Delete Prog. Ch. 1 ----- * 2 ----- * 3 ----- * 4 ----- * 5 ----- * Deleted Deleted Added Deleted Deleted Adjust Enter Return You can exclude the channels of... Result: The options available in the Channel group are displayed during scanning. 1 Press the MENU button. Skipping Unwanted Channels TV Channel Auto Store √ Manual Store √ Add/Delete √ Sort √ Child Lock √ Name √...

Owners Instructions
Page 19
...main menu is moved to the required programme numbers. Result: The Sort menu is to move by pressing the ... or † button. TV Channel Auto Store √ Manual Store √ Add/Delete √ Sort √ Child Lock √ Name √ Fine Tune &#...the ENTER button. 4 Press the ... Result: The channel is displayed. 2 Press the ... Ch. 1 ----- * 2 ----- * 3 ----- * 4 ----- * 5 ----- * Move Enter Return TV Sort Prog. Result: The options available in the Channel group are shifted accordingly. 7 Repeat Steps 5 to 6 until you do not want to select Channel. This...
...main menu is moved to the required programme numbers. Result: The Sort menu is to move by pressing the ... or † button. TV Channel Auto Store √ Manual Store √ Add/Delete √ Sort √ Child Lock √ Name √ Fine Tune &#...the ENTER button. 4 Press the ... Result: The channel is displayed. 2 Press the ... Ch. 1 ----- * 2 ----- * 3 ----- * 4 ----- * 5 ----- * Move Enter Return TV Sort Prog. Result: The options available in the Channel group are shifted accordingly. 7 Repeat Steps 5 to 6 until you do not want to select Channel. This...

Owners Instructions
Page 20
... ENTER button. or † button to select the channel to confirm. Ch. 1 ----- * 2 ----- * 3 ----- * 4 ----- * 5 ----- * Lock Unlocked Unlocked Unlocked Unlocked Unlocked Move Enter Return TV Child Lock Prog. Activating the Child Lock TV Channel Auto Store √ Manual Store √ Add/Delete √ Sort √ Child Lock √ Name √ Fine Tune √ † More...
... ENTER button. or † button to select the channel to confirm. Ch. 1 ----- * 2 ----- * 3 ----- * 4 ----- * 5 ----- * Lock Unlocked Unlocked Unlocked Unlocked Unlocked Move Enter Return TV Child Lock Prog. Activating the Child Lock TV Channel Auto Store √ Manual Store √ Add/Delete √ Sort √ Child Lock √ Name √ Fine Tune √ † More...

Owners Instructions
Page 21
...Channel group are displayed around the name box. 6 Press the ... Ch. 2 ----3 ----4 ----5 ----6 ----- Name * * * * * Move Enter Return TV Name Prog. or † button. or † button to confirm the name. Press the ENTER button. Press the ENTER button. Ch. 2 ----3 ----4...a number (0~9) or a symbol (space, ., -). Result: The Name menu is displayed with the current channel automatically is displayed. 2 Press the ... TV Channel Auto Store √ Manual Store √ Add/Delete √ Sort √ Child Lock √ Name √ Fine Tune √ &#...
...Channel group are displayed around the name box. 6 Press the ... Ch. 2 ----3 ----4 ----5 ----6 ----- Name * * * * * Move Enter Return TV Name Prog. or † button. or † button to confirm the name. Press the ENTER button. Press the ENTER button. Ch. 2 ----3 ----4...a number (0~9) or a symbol (space, ., -). Result: The Name menu is displayed with the current channel automatically is displayed. 2 Press the ... TV Channel Auto Store √ Manual Store √ Add/Delete √ Sort √ Child Lock √ Name √ Fine Tune √ &#...
Owners Instructions
Page 22
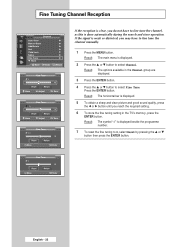
or † button to select Fine Tune. Result: The options available in the TV's memory, press the ENTER button. or † button to select Channel. Fine Tuning Channel Reception TV Channel Auto Store √ Manual Store √ Add/Delete √ Sort √ Child Lock √ Name √ Fine Tune √ † More Move...
or † button to select Fine Tune. Result: The options available in the TV's memory, press the ENTER button. or † button to select Channel. Fine Tuning Channel Reception TV Channel Auto Store √ Manual Store √ Add/Delete √ Sort √ Child Lock √ Name √ Fine Tune √ † More Move...
Owners Instructions
Page 23
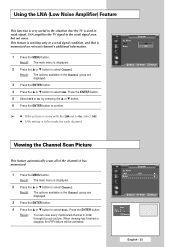
...Picture This feature automatically scans all of the channels it has memorized. 1 Press the MENU button. or † button to select LNA. TV Channel ... This feature is working only in the weak signal area, but not noise. Result: You can view every memorized channel in the... the ENTER button. 4 Press the ... Result: The main menu is to On, select Off. ◆ LNA setting is displayed. 2 Press the ... TV ... or † button to select Channel. When viewing has finished or stopped, the PIP feature will be made for each channel. Result: The options available...
...Picture This feature automatically scans all of the channels it has memorized. 1 Press the MENU button. or † button to select LNA. TV Channel ... This feature is working only in the weak signal area, but not noise. Result: You can view every memorized channel in the... the ENTER button. 4 Press the ... Result: The main menu is to On, select Off. ◆ LNA setting is displayed. 2 Press the ... TV ... or † button to select Channel. When viewing has finished or stopped, the PIP feature will be made for each channel. Result: The options available...

Owners Instructions
Page 24
TV Freezing the Current Picture You can view the channel information and setting status you select by pressing the "STILL" button. To return to the selected ...
TV Freezing the Current Picture You can view the channel information and setting status you select by pressing the "STILL" button. To return to the selected ...

Owners Instructions
Page 25
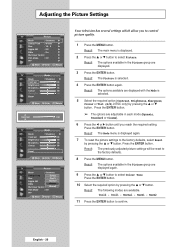
...are available. Select the required option by pressing the P.MODE (Picture Mode) button. Result: The following modes are displayed. 3 Press the ENTER button. TV Picture Mode : Standard √ Colour Tone : Warm1 √ Size : 16 : 9 √ Digital NR : Off √ DNIe : On... √ My Colour Control √ Film Mode : Off √ PIP √ Move Enter Return TV Mode Contrast Brightness Sharpness Colour Tint (G/R) Reset Mode : StaDnydnaardmic Standard100 Cinema 50 65 50 50 Move Enter Return English - 25 Result: The main menu...
...are available. Select the required option by pressing the P.MODE (Picture Mode) button. Result: The following modes are displayed. 3 Press the ENTER button. TV Picture Mode : Standard √ Colour Tone : Warm1 √ Size : 16 : 9 √ Digital NR : Off √ DNIe : On... √ My Colour Control √ Film Mode : Off √ PIP √ Move Enter Return TV Mode Contrast Brightness Sharpness Colour Tint (G/R) Reset Mode : StaDnydnaardmic Standard100 Cinema 50 65 50 50 Move Enter Return English - 25 Result: The main menu...
Owners Instructions
Page 26
...: 9 √ Digital NR : Off √ DNIe : On √ My Colour Control √ Film Mode : Off √ PIP √ Move Enter Return TV Mode Contrast Brightness Sharpness Colour Tint (G/R) Reset Mode : Standard √ 100 50 65 50 50 Move Enter Return Contrast 100... TV Mode Contrast Brightness Sharpness Colour Tint (G/R) Reset Mode : Standard √ 100 50 65 50 50 Move Enter Return TV Picture Mode : Standard Colour Tone : WarmC1ool2 Size : 16 : 9Cool1 Digital NR : Off...
...: 9 √ Digital NR : Off √ DNIe : On √ My Colour Control √ Film Mode : Off √ PIP √ Move Enter Return TV Mode Contrast Brightness Sharpness Colour Tint (G/R) Reset Mode : Standard √ 100 50 65 50 50 Move Enter Return Contrast 100... TV Mode Contrast Brightness Sharpness Colour Tint (G/R) Reset Mode : Standard √ 100 50 65 50 50 Move Enter Return TV Picture Mode : Standard Colour Tone : WarmC1ool2 Size : 16 : 9Cool1 Digital NR : Off...


