Owners Instructions
Page 2
Table of Contents Preparation Features and Design...4 Caution on Lamp Use and Replacement ...5 Projector and Accessories Front/Upper Side and Accessories ...8 Rear Side and Cables ...10 Remote Control Buttons ...11 Operating the Remote Control...12 Installation and Basic Adjustments ...
Table of Contents Preparation Features and Design...4 Caution on Lamp Use and Replacement ...5 Projector and Accessories Front/Upper Side and Accessories ...8 Rear Side and Cables ...10 Remote Control Buttons ...11 Operating the Remote Control...12 Installation and Basic Adjustments ...

Owners Instructions
Page 5
Caution on Lamp Use and Replacement Projector Lamp
Caution on Lamp Use and Replacement Projector Lamp

Owners Instructions
Page 7
V I S U A L R E A L I S M Preparation Projector and Accessories ...8 Installation and Basic Adjustments ...14
V I S U A L R E A L I S M Preparation Projector and Accessories ...8 Installation and Basic Adjustments ...14

Owners Instructions
Page 8
LAMP (Blue LED) - Zoom Knob Used to turn the projector on or off. Remote Control Signal Receiver Focus Ring Used for details. STAND BY (Blue LED) Refer to page 9 for Focus Adjustment. 7 6 MENU Use... Remote Control/ 2 Batteries Power Cable Owner's Instructions 8 TEMP (Red LED) - POWER Used to enlarge or reduce image size. 6 11 10 9 8 7 1 2 3 4 5 Indicators - PROJECTOR AND ACCESSORIES Front/Upper Side and Accessories Front/Upper Side Preparation Projector and Accessories 1 2 3 4 5 Lens Adjustable Feet You can adjust screen images up and down within the lens range.
LAMP (Blue LED) - Zoom Knob Used to turn the projector on or off. Remote Control Signal Receiver Focus Ring Used for details. STAND BY (Blue LED) Refer to page 9 for Focus Adjustment. 7 6 MENU Use... Remote Control/ 2 Batteries Power Cable Owner's Instructions 8 TEMP (Red LED) - POWER Used to enlarge or reduce image size. 6 11 10 9 8 7 1 2 3 4 5 Indicators - PROJECTOR AND ACCESSORIES Front/Upper Side and Accessories Front/Upper Side Preparation Projector and Accessories 1 2 3 4 5 Lens Adjustable Feet You can adjust screen images up and down within the lens range.
Owners Instructions
Page 9
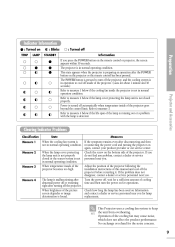
... 4 below if the cooling fan inside of the cooling fan may cause noise, which does not affect the product performance. Preparation Projector and Accessories Clearing Indicator Problems Classification Measure 1 Measure 2 State Measures If the symptom remains even after turning off or restarting right after...the POWER button on again, contact your product provider or our service center. No exchange or refund for a sufficient amount of the projector goes beyond the control limit. Refer to measure 2 below if the lamp cover protecting the lamp unit is in operation to measure...
... 4 below if the cooling fan inside of the cooling fan may cause noise, which does not affect the product performance. Preparation Projector and Accessories Clearing Indicator Problems Classification Measure 1 Measure 2 State Measures If the symptom remains even after turning off or restarting right after...the POWER button on again, contact your product provider or our service center. No exchange or refund for a sufficient amount of the projector goes beyond the control limit. Refer to measure 2 below if the lamp cover protecting the lamp unit is in operation to measure...

Owners Instructions
Page 10
... DVI-D Cable (Optional Parts) Connected to the connection port ˇ. PC Video Cable (Optional Parts) Connected to the wall outlet ∏. PROJECTOR AND ACCESSORIES Rear Side and Cables Rear Side Preparation 1 2 3 4 5 6 Projector and Accessories 7 8 9 1 2 3 Remote Control Signal Receiver S-VIDEO Input port COMPOSITE Input ports 4 5 6 RS-232C port DVI Input port PC Input...
... DVI-D Cable (Optional Parts) Connected to the connection port ˇ. PC Video Cable (Optional Parts) Connected to the wall outlet ∏. PROJECTOR AND ACCESSORIES Rear Side and Cables Rear Side Preparation 1 2 3 4 5 6 Projector and Accessories 7 8 9 1 2 3 Remote Control Signal Receiver S-VIDEO Input port COMPOSITE Input ports 4 5 6 RS-232C port DVI Input port PC Input...

Owners Instructions
Page 11
... 5 6 7 8 9 10 11 12 13 14 15 16 17 18 19 20 9 8 7 ON Used to turn off the projector. 13 LIGHT (Page 13) Used to operate remote control in dark room. 14 PC (Pages 25, 64, 66~70) Used to switch... to make Menu Screen disappear. 11 S-VIDEO (Pages 23, 26) Used to switch to COMPONENT 2 Mode. Projector and Accessories 10 MENU Used to display Menu Screen. 11 Move) / (Select) Used to move to or ...select each menu item. 12 OFF Used to turn on the projector. Preparation COMP.2 (Pages 24~27) Used to switch to S-VIDEO Mode. QUICK (Page 60) Used to COMPONENT ...
... 5 6 7 8 9 10 11 12 13 14 15 16 17 18 19 20 9 8 7 ON Used to turn off the projector. 13 LIGHT (Page 13) Used to operate remote control in dark room. 14 PC (Pages 25, 64, 66~70) Used to switch... to make Menu Screen disappear. 11 S-VIDEO (Pages 23, 26) Used to switch to COMPONENT 2 Mode. Projector and Accessories 10 MENU Used to display Menu Screen. 11 Move) / (Select) Used to move to or ...select each menu item. 12 OFF Used to turn on the projector. Preparation COMP.2 (Pages 24~27) Used to switch to S-VIDEO Mode. QUICK (Page 60) Used to COMPONENT ...

Owners Instructions
Page 12
Close the lid. 12 Setting the Adjustment (left), or move to remove it. 2. Press on the Move Menu Item (Up) Move Menu Item (Down) Setting the Adjustment (right), or move to upper item Select the current setting Inserting Batteries into Remote Control part of the lid to lower item. Insert two AAA-sized 1.5V batteries by matching +/-. 3. PROJECTOR AND ACCESSORIES Operating the Remote Control Operating Move/Select Button Preparation Projector and Accessories 1.
Close the lid. 12 Setting the Adjustment (left), or move to remove it. 2. Press on the Move Menu Item (Up) Move Menu Item (Down) Setting the Adjustment (right), or move to upper item Select the current setting Inserting Batteries into Remote Control part of the lid to lower item. Insert two AAA-sized 1.5V batteries by matching +/-. 3. PROJECTOR AND ACCESSORIES Operating the Remote Control Operating Move/Select Button Preparation Projector and Accessories 1.

Owners Instructions
Page 13
Allowable range & angle of receiving the remote control signal The remote control is effective within a 30° angle 7~10m from the projector. Preparation
Allowable range & angle of receiving the remote control signal The remote control is effective within a 30° angle 7~10m from the projector. Preparation

Owners Instructions
Page 14
Preparation Installation and Basic Adjustments INSTALLATION AND BASIC ADJUSTMENTS Installation To Install the Projector Install the projector so that the projection is perpendicular to the screen.
Preparation Installation and Basic Adjustments INSTALLATION AND BASIC ADJUSTMENTS Installation To Install the Projector Install the projector so that the projection is perpendicular to the screen.

Owners Instructions
Page 15
INSTALLATION AND BASIC ADJUSTMENTS Turning ON/OFF Turning On Projector 1. Plug the power cord into the power terminal on the rear side of the projector toward "-". 3. Press and push the power switch on the screen in approximately 30 seconds. A picture will be displayed on the rear side of the projector. 2. Press the POWER button of the projector or the ON button of the remote control. 4. Preparation 1 2 3 Installation and Basic Adjustments
INSTALLATION AND BASIC ADJUSTMENTS Turning ON/OFF Turning On Projector 1. Plug the power cord into the power terminal on the rear side of the projector toward "-". 3. Press and push the power switch on the screen in approximately 30 seconds. A picture will be displayed on the rear side of the projector. 2. Press the POWER button of the projector or the ON button of the remote control. 4. Preparation 1 2 3 Installation and Basic Adjustments

Owners Instructions
Page 16
Preparation Installation and Basic Adjustments 1 2 Zoom Knob Focus Ring Focus may appear dim if the projector is installed at a shorter than recommended distance. (Page 19) NOTE 16 Focus the picture on the screen using the Focus Ring. INSTALLATION AND BASIC ADJUSTMENTS Zoom and Focus Adjustment Using the Zoom Knob and the Focus Ring 1. You can adjust the size of image within zoom range by manipulating the Zoom Knob. 2.
Preparation Installation and Basic Adjustments 1 2 Zoom Knob Focus Ring Focus may appear dim if the projector is installed at a shorter than recommended distance. (Page 19) NOTE 16 Focus the picture on the screen using the Focus Ring. INSTALLATION AND BASIC ADJUSTMENTS Zoom and Focus Adjustment Using the Zoom Knob and the Focus Ring 1. You can adjust the size of image within zoom range by manipulating the Zoom Knob. 2.

Owners Instructions
Page 17
Preparation Installation and Basic Adjustments Adjustable Feet INSTALLATION AND BASIC ADJUSTMENTS Leveling with Adjustable Feet For level placing of the projector, adjust the Adjustable Feet of the projector.
Preparation Installation and Basic Adjustments Adjustable Feet INSTALLATION AND BASIC ADJUSTMENTS Leveling with Adjustable Feet For level placing of the projector, adjust the Adjustable Feet of the projector.

Owners Instructions
Page 18
INSTALLATION AND BASIC ADJUSTMENTS Using the Lens Shift Dial Using the Lens Shift Dial Move the picture projected on the screen up and down within the lens range by turning the Lens Shift Dial on the top side of the projector with your fingers. Preparation Lens Shift Dial Installation and Basic Adjustments UP DOWN 18
INSTALLATION AND BASIC ADJUSTMENTS Using the Lens Shift Dial Using the Lens Shift Dial Move the picture projected on the screen up and down within the lens range by turning the Lens Shift Dial on the top side of the projector with your fingers. Preparation Lens Shift Dial Installation and Basic Adjustments UP DOWN 18

Owners Instructions
Page 19
... 7.3 6.2 5.2 4.5 4.2 3.4 3.2 Installation and Basic Adjustments NOTE This projector is designed to show images optimally on a flat, even surface and level the projector using the Zoom Knob or Focus Ring, or move the projector forward and backward. INSTALLATION AND BASIC ADJUSTMENTS Screen Size and Projection Distance Install ...the projector on a 80 to realize optimal picture quality...
... 7.3 6.2 5.2 4.5 4.2 3.4 3.2 Installation and Basic Adjustments NOTE This projector is designed to show images optimally on a flat, even surface and level the projector using the Zoom Knob or Focus Ring, or move the projector forward and backward. INSTALLATION AND BASIC ADJUSTMENTS Screen Size and Projection Distance Install ...the projector on a 80 to realize optimal picture quality...
Owners Instructions
Page 22
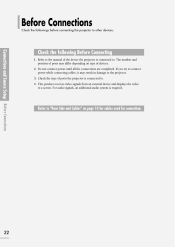
...This product receives video signals from an external device and displays the video to other devices. Before Connections Check the followings before connecting the projector to a screen. Refer to . 4. For audio signals, an additional audio system is required. Refer to "Rear Side and Cables" ...on type of the device the projector is connected to the manual of devices. 2. Do not connect power until all the connections are completed. Connections and Source Setup Before Connections...
...This product receives video signals from an external device and displays the video to other devices. Before Connections Check the followings before connecting the projector to a screen. Refer to . 4. For audio signals, an additional audio system is required. Refer to "Rear Side and Cables" ...on type of the device the projector is connected to the manual of devices. 2. Do not connect power until all the connections are completed. Connections and Source Setup Before Connections...

Owners Instructions
Page 23
CONNECTING TO VIDEO EQUIPMENT Connecting to VCR/Camcorder/Cable Box Rear side of Projector Connections and Source Setup Connecting to Video Equipment S-Video Cable or Video Cable VCR Rear Connection Cable Box Camcorder 1 Connect COMPOSITE (yellow) input port of the projector to S-VIDEO input port of video equipment using the video cable. If the video equipment has S-VIDEO OUT port, connect it to the VIDEO (yellow) OUT port of the projector.
CONNECTING TO VIDEO EQUIPMENT Connecting to VCR/Camcorder/Cable Box Rear side of Projector Connections and Source Setup Connecting to Video Equipment S-Video Cable or Video Cable VCR Rear Connection Cable Box Camcorder 1 Connect COMPOSITE (yellow) input port of the projector to S-VIDEO input port of video equipment using the video cable. If the video equipment has S-VIDEO OUT port, connect it to the VIDEO (yellow) OUT port of the projector.

Owners Instructions
Page 24
... back of the DVD with the component cable. 2 When finishing connecting the devices, connect the power of the projector to select Component1. CONNECTING TO VIDEO EQUIPMENT Connecting to DVD Rear side of Projector Connections and Source Setup Connecting to Video Equipment 24 Component Cable DVD S-VIDEO OUT COMPONENT VIDEO OUT AUDIO OUT... Rear Connection 1 Connect the COMPONENT 1 (Y/Pb/Pr) or COMPONENT 2 (Y/Pb/Pr) input port at the back of the projector and the DVD. Press the COMP.2 button to select 2 Component2 if COMPONENT2 is connected.
... back of the DVD with the component cable. 2 When finishing connecting the devices, connect the power of the projector to select Component1. CONNECTING TO VIDEO EQUIPMENT Connecting to DVD Rear side of Projector Connections and Source Setup Connecting to Video Equipment 24 Component Cable DVD S-VIDEO OUT COMPONENT VIDEO OUT AUDIO OUT... Rear Connection 1 Connect the COMPONENT 1 (Y/Pb/Pr) or COMPONENT 2 (Y/Pb/Pr) input port at the back of the projector and the DVD. Press the COMP.2 button to select 2 Component2 if COMPONENT2 is connected.
Owners Instructions
Page 25
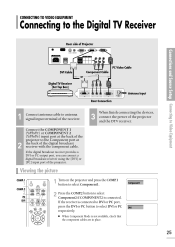
...receiver provides a DVI or PC output port, you can connect a digital broadcast receiver using the [DVI] or [PC] input port of the projector. 3 When finish connecting the devices, connect the power of the receiver. If the receiver is connected. CONNECTING TO VIDEO EQUIPMENT Connecting to the... Digital TV Receiver Rear side of Projector Connections and Source Setup Connecting to Video Equipment PC Video Cable DVI Cable or Digital TV Receiver (Set-Top Box) Antenna Input Rear...
...receiver provides a DVI or PC output port, you can connect a digital broadcast receiver using the [DVI] or [PC] input port of the projector. 3 When finish connecting the devices, connect the power of the receiver. If the receiver is connected. CONNECTING TO VIDEO EQUIPMENT Connecting to the... Digital TV Receiver Rear side of Projector Connections and Source Setup Connecting to Video Equipment PC Video Cable DVI Cable or Digital TV Receiver (Set-Top Box) Antenna Input Rear...

Owners Instructions
Page 26
Component1 Connections and Source Setup Setting up the External Input Source You can not switch to the mode if the projector is not connected to the respective mode. One Touch MENU Pressing a button switches to the respective device. Press the desired source button (COMP.1/ COMP.2/ S-VIDEO/COMPOSITE/ PC/DVI). You can select a device connected to the projector to display. Setting up the External Input Source 26 1 2, 3, 4 .../
Component1 Connections and Source Setup Setting up the External Input Source You can not switch to the mode if the projector is not connected to the respective mode. One Touch MENU Pressing a button switches to the respective device. Press the desired source button (COMP.1/ COMP.2/ S-VIDEO/COMPOSITE/ PC/DVI). You can select a device connected to the projector to display. Setting up the External Input Source 26 1 2, 3, 4 .../


