
User Manual
Page 3
... local area networking 25 Connect SNT-1010 directly to a DHCP-based xDSL/Cable modem........30 Connect SNT-1010 directly to local area networking 31 Searching for SNT-1010 32 Chapter 4 Static IP Setting Manual Network Setting 33 Automatic Network Setting 36 Chapter 5 Dynamic IP Setting Dynamic IP Setting 37 Chapter 6 When Using an IP Sharer Port Forwarding (Port Mapping) Setting ..... 39 Chapter 7 Using SNT-1010 Connecting to SNT-1010 40 Installing ActiveX 43 Using the Viewer Screen 44 Viewer Screen Buttons and Functions .... 45 Chapter 8 Setting Up Setting SNT-1010 49...
... local area networking 25 Connect SNT-1010 directly to a DHCP-based xDSL/Cable modem........30 Connect SNT-1010 directly to local area networking 31 Searching for SNT-1010 32 Chapter 4 Static IP Setting Manual Network Setting 33 Automatic Network Setting 36 Chapter 5 Dynamic IP Setting Dynamic IP Setting 37 Chapter 6 When Using an IP Sharer Port Forwarding (Port Mapping) Setting ..... 39 Chapter 7 Using SNT-1010 Connecting to SNT-1010 40 Installing ActiveX 43 Using the Viewer Screen 44 Viewer Screen Buttons and Functions .... 45 Chapter 8 Setting Up Setting SNT-1010 49...

User Manual
Page 5
... SNT-1010 gets started 8 1 23 4 5 6 7 8 1 FACTORY RESET Button ( * ) 4 Alarm IN Port 2 TX Port 5 Alarm OUT Port 3 RX Port 6 RS-232C Port 7 Ethernet Port 8 Power Port * FACTORY RESET Button : This will return the settings of the sharer to this when you directly enter an IP address using the IP Installer. - When SNT-1010 is Static IP. - Preparation View of SNT-1010 Front View Rear View Chapter 1 Preparation View of SNT-1010 12 3 4 5 6 7 8 1 Network LED 2 Status LED ( * ) 3 Power LED 4 IP Select Switch 5 Audio IN Port 6 Audio OUT Port 7 Video IN Port 8 Video OUT Port...
... SNT-1010 gets started 8 1 23 4 5 6 7 8 1 FACTORY RESET Button ( * ) 4 Alarm IN Port 2 TX Port 5 Alarm OUT Port 3 RX Port 6 RS-232C Port 7 Ethernet Port 8 Power Port * FACTORY RESET Button : This will return the settings of the sharer to this when you directly enter an IP address using the IP Installer. - When SNT-1010 is Static IP. - Preparation View of SNT-1010 Front View Rear View Chapter 1 Preparation View of SNT-1010 12 3 4 5 6 7 8 1 Network LED 2 Status LED ( * ) 3 Power LED 4 IP Select Switch 5 Audio IN Port 6 Audio OUT Port 7 Video IN Port 8 Video OUT Port...
User Manual
Page 7
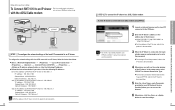
... connect the SNT-1010 to the Internet and setup the network settings,you connect to the RS-485 device so it fits the polarity of the port. 13 Fix the Fixing Metal so that the RS-485 device you install this product may cause an injury when it in the arrow direction as follows for indoor use is strong enough to the RS-485 device. You can use the rear port...
... connect the SNT-1010 to the Internet and setup the network settings,you connect to the RS-485 device so it fits the polarity of the port. 13 Fix the Fixing Metal so that the RS-485 device you install this product may cause an injury when it in the arrow direction as follows for indoor use is strong enough to the RS-485 device. You can use the rear port...
User Manual
Page 11
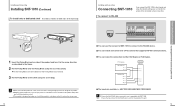
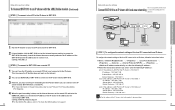
... by your ISP (Internet Service Provider) before you can access the Internet. 6 When done, click the or button to save the settings. 21 Chapter 3 Network Connection &Setup To Connect SNT-1010 to an IP sharer with the xDSL/Cable modem SNT-1010 1 SNT-1010 2 IP Sharer xDSL or Cable Modem xDSL or Cable Modem External Remote PC Local PC DDNS Server (Data Center, KOREA) [ STEP 1 ] To configure the network settings of the local PC...
... by your ISP (Internet Service Provider) before you can access the Internet. 6 When done, click the or button to save the settings. 21 Chapter 3 Network Connection &Setup To Connect SNT-1010 to an IP sharer with the xDSL/Cable modem SNT-1010 1 SNT-1010 2 IP Sharer xDSL or Cable Modem xDSL or Cable Modem External Remote PC Local PC DDNS Server (Data Center, KOREA) [ STEP 1 ] To configure the network settings of the local PC...
User Manual
Page 12
... switch to enter the password. When SNT-1010 starts, it separately. 3. SNT-1010 does not come with the Direct LAN cable. You have to configure the , , and settings. Connect SNT-1010 to the IP sharer's documentation. 4 When done, you to D (Dynamic IP). 2. For the login IP and the password, refer to the power source. 4. For more information, contact your Internet service provider. 6 When done, click the or button...
... switch to enter the password. When SNT-1010 starts, it separately. 3. SNT-1010 does not come with the Direct LAN cable. You have to configure the , , and settings. Connect SNT-1010 to the IP sharer's documentation. 4 When done, you to D (Dynamic IP). 2. For the login IP and the password, refer to the power source. 4. For more information, contact your Internet service provider. 6 When done, click the or button...
User Manual
Page 13
... IP Installer on page 41. 24 Network Connection & Setup This is done, run the Internet browser on the Internet. 2 You can use DDNS URL of the IP sharer in the address bar for SNT-1010. 2 If found, double-click the SNT-1010 to start the Internet browser and try to connect to SNT-1010. SNT-1010 1 SNT-1010 2 IP Sharer Switch HUB Firewall External Remote PC Local PC IP Sharer External PC DDNS Server (Data...
... IP Installer on page 41. 24 Network Connection & Setup This is done, run the Internet browser on the Internet. 2 You can use DDNS URL of the IP sharer in the address bar for SNT-1010. 2 If found, double-click the SNT-1010 to start the Internet browser and try to connect to SNT-1010. SNT-1010 1 SNT-1010 2 IP Sharer Switch HUB Firewall External Remote PC Local PC IP Sharer External PC DDNS Server (Data...

User Manual
Page 17
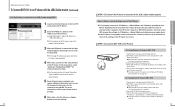
... [Manual Set] button. The [Auto Set] and [Manual Set] button are all disabled. 1 3 3 2 1 Select an SNT-1010 you want from the SNT-1010 list. For the , and settings, contact your PC, it according to the private IP address range provided by factory default. 3 Set up the SNT-1010 network settings manually. 10 [Exit ] Button : Exits the IP Installer program. 32 Static IP Setting Manual Network Setting Before You Start! Network Connection & Setup Searching for SNT-1010 connected to the current network. 8 [Auto Set ] Button : Sets up the SNT-1010 network settings automatically using...
... [Manual Set] button. The [Auto Set] and [Manual Set] button are all disabled. 1 3 3 2 1 Select an SNT-1010 you want from the SNT-1010 list. For the , and settings, contact your PC, it according to the private IP address range provided by factory default. 3 Set up the SNT-1010 network settings manually. 10 [Exit ] Button : Exits the IP Installer program. 32 Static IP Setting Manual Network Setting Before You Start! Network Connection & Setup Searching for SNT-1010 connected to the current network. 8 [Auto Set ] Button : Sets up the SNT-1010 network settings automatically using...

User Manual
Page 19
... SNT-1010 on its rear panel. Position the IP selection switch to the power source. 4. You have to Dynamic IP mode 1. The default password is complete. If sNT-1010 is the SNT-1010 login password of the root user. Connect SNT-1010 to D (Dynamic IP). 2. Confirm the MAC Address of using Dynamic IP - The Auto Set window appears. When SNT-1010 starts, it separately. 3. If an IP is allocated by using the Direct LAN Cable (UTP cable). If you use the UPNP Port...
... SNT-1010 on its rear panel. Position the IP selection switch to the power source. 4. You have to Dynamic IP mode 1. The default password is complete. If sNT-1010 is the SNT-1010 login password of the root user. Connect SNT-1010 to D (Dynamic IP). 2. Confirm the MAC Address of using Dynamic IP - The Auto Set window appears. When SNT-1010 starts, it separately. 3. If an IP is allocated by using the Direct LAN Cable (UTP cable). If you use the UPNP Port...
User Manual
Page 23
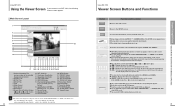
... number of the installed Viewer ActiveX Control. 2 VIEWER Tab 3 SETUP Tab 4 ABOUT Tab 5 Logo 6 Video Format 7 Video Source 8 De-Interlace 9 Screen Size & Partition Buttons Buttons [SINGLE] [QUAD] Buttons 10 SNT-1010 List 11 Continuous View Button 12 Sequential View Button 13 CAPTURE Button 14 RECORD Button 15 Play Control Buttons [OPEN] [PLAY] [PAUSE] [STOP] Buttons 16 Audio Buttons [LISTEN] [SPEAK] [VOL ] Button 17 Banner Image 18 Direction Buttons 19 ENTER Button 20 MENU Button 21 PRESET Button 22 ZOOM IN Button 23 AUTOPAN Button 24 ZOOM OUT Button...
... number of the installed Viewer ActiveX Control. 2 VIEWER Tab 3 SETUP Tab 4 ABOUT Tab 5 Logo 6 Video Format 7 Video Source 8 De-Interlace 9 Screen Size & Partition Buttons Buttons [SINGLE] [QUAD] Buttons 10 SNT-1010 List 11 Continuous View Button 12 Sequential View Button 13 CAPTURE Button 14 RECORD Button 15 Play Control Buttons [OPEN] [PLAY] [PAUSE] [STOP] Buttons 16 Audio Buttons [LISTEN] [SPEAK] [VOL ] Button 17 Banner Image 18 Direction Buttons 19 ENTER Button 20 MENU Button 21 PRESET Button 22 ZOOM IN Button 23 AUTOPAN Button 24 ZOOM OUT Button...

User Manual
Page 24
... Open/Play/Pause/Stop a saved file. The file is displayed by clicking it. The user can use camera functions such as lens direction control, menu setting, preset, etc. Captures the current picture on the screen and you can control the volume of the connected SNT-1010's is automatically named as a .jpg or .bmp image file. The capture confirmation window appears. 2 Click [OK]. The default saving path is available even during a recording. In this function...
... Open/Play/Pause/Stop a saved file. The file is displayed by clicking it. The user can use camera functions such as lens direction control, menu setting, preset, etc. Captures the current picture on the screen and you can control the volume of the connected SNT-1010's is automatically named as a .jpg or .bmp image file. The capture confirmation window appears. 2 Click [OK]. The default saving path is available even during a recording. In this function...

User Manual
Page 25
... NETWORK VIDEO IP USER EXTERNAL SNT-1010 LOCAL SAVE PATH LANGUAGE DATE/TIME STATUS LOG S/W UPDATE RESET RS485 OVERLAY IMAGE OVERLAY TEXT SCREEN LOOK VIEW HTML TRANSFER SETUP STREAMING SETUP ALARM IMAGE IP NOTIFICATION ALARM INPUT1 DDNS ALARM INPUT2 ALARM INPUT3 ALARM INPUT4 MOTION DETECTION VIDEO LOSS SCHEDULE TRANSFER 49 Chapter 8 Setting Up Setting SNT-1010 Entering Camera Menu - Click the [ZOOM IN] button to the center of the camera. Scan Function...
... NETWORK VIDEO IP USER EXTERNAL SNT-1010 LOCAL SAVE PATH LANGUAGE DATE/TIME STATUS LOG S/W UPDATE RESET RS485 OVERLAY IMAGE OVERLAY TEXT SCREEN LOOK VIEW HTML TRANSFER SETUP STREAMING SETUP ALARM IMAGE IP NOTIFICATION ALARM INPUT1 DDNS ALARM INPUT2 ALARM INPUT3 ALARM INPUT4 MOTION DETECTION VIDEO LOSS SCHEDULE TRANSFER 49 Chapter 8 Setting Up Setting SNT-1010 Entering Camera Menu - Click the [ZOOM IN] button to the center of the camera. Scan Function...

User Manual
Page 26
... . IP Setting window appears. The settings are connected to set the to and the to . : Select a video size among from , , and . - : 720 x 480 (NTSC), 720 x 576 (PAL) - : 640 x 480 (NTSC), 640 x 576 (PAL) - : 352 x 240(NTSC), 352 x 288 (PAL) - : 176 x 112(NTSC), 176 x 144 (PAL) : Select a resolution from , , , and . : Shows the maximum number of the DNS (Domain Name Service) server. - : Shows the HTTP port used to connect to the SNT-1010 using the...
... . IP Setting window appears. The settings are connected to set the to and the to . : Select a video size among from , , and . - : 720 x 480 (NTSC), 720 x 576 (PAL) - : 640 x 480 (NTSC), 640 x 576 (PAL) - : 352 x 240(NTSC), 352 x 288 (PAL) - : 176 x 112(NTSC), 176 x 144 (PAL) : Select a resolution from , , , and . : Shows the maximum number of the DNS (Domain Name Service) server. - : Shows the HTTP port used to connect to the SNT-1010 using the...
User Manual
Page 27
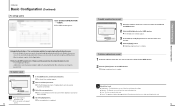
... check box of the user account. 4 Click the [Apply] button. User : The User can use simple monitoring function only. 53 Chapter 8 Setting Up Basic Configuration Setting Up Basic Configuration (Continued) To setup users Click . To register a user 1 In the USER window, click the [Insert] button. The window appears. 2 2 Enter user ID and password. 3 4 For the ID and password, up to be deleted or added. Modifying a registered user is completed. Operator : The Operator can monitor video only...
... check box of the user account. 4 Click the [Apply] button. User : The User can use simple monitoring function only. 53 Chapter 8 Setting Up Basic Configuration Setting Up Basic Configuration (Continued) To setup users Click . To register a user 1 In the USER window, click the [Insert] button. The window appears. 2 2 Enter user ID and password. 3 4 For the ID and password, up to be deleted or added. Modifying a registered user is completed. Operator : The Operator can monitor video only...

User Manual
Page 30
... [Browse] button. Since, if the network is updated every 5 seconds. Do not change the file name except the date (20060531). The Open File window appears. 2 Select an SNT-1010 update file and click the [Open] button. 3 In the USER window, click the [Install] button. The connection status is disconnected, the power fails or the PC abnormally operates during a software update, the system may take care not to cause a problem during an update. 59 Chapter 8 Setting Up...
... [Browse] button. Since, if the network is updated every 5 seconds. Do not change the file name except the date (20060531). The Open File window appears. 2 Select an SNT-1010 update file and click the [Open] button. 3 In the USER window, click the [Install] button. The connection status is disconnected, the power fails or the PC abnormally operates during a software update, the system may take care not to cause a problem during an update. 59 Chapter 8 Setting Up...

User Manual
Page 31
... [FACTORY RESET] button on the rear panel of the system Click . Notice 61 Chapter 8 Setting Up System Configuration The Reset window appears. : The Reset window appears. : Initializes the system settings to the SNT-1010. To complete the setting, click the [Apply] button. Click . The settings are saved. Notice After reset and restart, you have to run program and setup network settings such as IP address, Subnet mask, Gateway, etc., to connect to the Internet...
... [FACTORY RESET] button on the rear panel of the system Click . Notice 61 Chapter 8 Setting Up System Configuration The Reset window appears. : The Reset window appears. : Initializes the system settings to the SNT-1010. To complete the setting, click the [Apply] button. Click . The settings are saved. Notice After reset and restart, you have to run program and setup network settings such as IP address, Subnet mask, Gateway, etc., to connect to the Internet...

User Manual
Page 35
... passive mode connection is not supported. If the system time is not set to in the SNT-1010 when an alarm is 21 as an attached file. 68 To test FTP transmission Click the [Test] button. Setting Up Event Configuration To set the image transmission function You can transfer an alarm image to an FTP server. Click . The TRNASFER SETUP window appears. : You can set an...
... passive mode connection is not supported. If the system time is not set to in the SNT-1010 when an alarm is 21 as an attached file. 68 To test FTP transmission Click the [Test] button. Setting Up Event Configuration To set the image transmission function You can transfer an alarm image to an FTP server. Click . The TRNASFER SETUP window appears. : You can set an...

User Manual
Page 40
... hold the [FACTORY RESET] button on the rear panel of the product for 3 seconds and release it when the [STATUS] indicator blinks 3 times. Chapter 9 Appendix Network Configuration/Resetting the System If Samsung's DDNS service is selected, the Host Name is 00 : 00 : f0 : ff : fe : 42 : e + fffe42 + websamsung.net = efffe42.websamsung.net - If the MAC address of SNT-1010 is automatically generated using the program. Note 79...
... hold the [FACTORY RESET] button on the rear panel of the product for 3 seconds and release it when the [STATUS] indicator blinks 3 times. Chapter 9 Appendix Network Configuration/Resetting the System If Samsung's DDNS service is selected, the Host Name is 00 : 00 : f0 : ff : fe : 42 : e + fffe42 + websamsung.net = efffe42.websamsung.net - If the MAC address of SNT-1010 is automatically generated using the program. Note 79...

User Manual
Page 41
Check if the network cables are automatically applied? If your settings can be activated. 81 Chapter 9 Appendix Trouble-shooting Check if the network is set to change the user ID and password in advance. I couldn't upload any sound. You can . The product does not support more than 30 KB is entered correctly. Make sure to press the button before your SNT-1010 is connected to 600 kbps or...
Check if the network cables are automatically applied? If your settings can be activated. 81 Chapter 9 Appendix Trouble-shooting Check if the network is set to change the user ID and password in advance. I couldn't upload any sound. You can . The product does not support more than 30 KB is entered correctly. Make sure to press the button before your SNT-1010 is connected to 600 kbps or...

User Manual
Page 42
... the user guide of the SNT-1010 are incorrectly configured or the network environments are changed when the port mapping has failed? [Auto Set ] will take as long as several minutes to or, the . In set NTP server,it will perform both [Auto Set] and [Manual Set] does not work. For [Auto Set], why the IP address and port number are not in the IP Installer list and pressed the [Manual Set] button. You can 't change...
... the user guide of the SNT-1010 are incorrectly configured or the network environments are changed when the port mapping has failed? [Auto Set ] will take as long as several minutes to or, the . In set NTP server,it will perform both [Auto Set] and [Manual Set] does not work. For [Auto Set], why the IP address and port number are not in the IP Installer list and pressed the [Manual Set] button. You can 't change...

User Manual
Page 43
GPL S/W - and that you distribute copies 85 Chapter 9 Appendix Appendix Specifications (Continued) RS485 PTZ control IP Installer Software Upgrade Access Level IP Notification Time setting 1CH Recording Playback SDK Environmental Conditions Power Physical Specification Half / Full duplex Mode, PTZ Control Pan / Tilt / Zoom control Auto pan, preset, scan, pattern, Power PTZ function support Ip address installation IP installation function (XP, win 2000 support ) Software upgrade by the GNU Lesser General Public License instead.) You can apply it . This General...
GPL S/W - and that you distribute copies 85 Chapter 9 Appendix Appendix Specifications (Continued) RS485 PTZ control IP Installer Software Upgrade Access Level IP Notification Time setting 1CH Recording Playback SDK Environmental Conditions Power Physical Specification Half / Full duplex Mode, PTZ Control Pan / Tilt / Zoom control Auto pan, preset, scan, pattern, Power PTZ function support Ip address installation IP installation function (XP, win 2000 support ) Software upgrade by the GNU Lesser General Public License instead.) You can apply it . This General...


