User Manual
Page 11
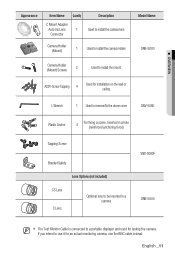
... the wall or ceiling L Wrench 1 Used to remove/fix the dome cover SNV-5080 Plastic Anchor 4 For fixing a screw, Inserted in a hole (reinforced anchoring force) Tapping Screw Bracket Safety Lens Options (not included) CS Lens C Lens Optional lens to be inserted in a camera SND-5080F SNB-5000 M The Test Monitor Cable is connected...
... the wall or ceiling L Wrench 1 Used to remove/fix the dome cover SNV-5080 Plastic Anchor 4 For fixing a screw, Inserted in a hole (reinforced anchoring force) Tapping Screw Bracket Safety Lens Options (not included) CS Lens C Lens Optional lens to be inserted in a camera SND-5080F SNB-5000 M The Test Monitor Cable is connected...
User Manual
Page 26
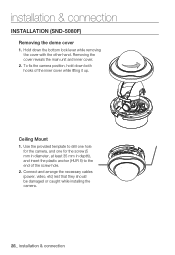
... insert the plastic anchor (HUR 5) to the end of the inner cover while lifting it up. Ceiling Mount 1. installation & connection INSTALLATION (SND-5080F) Removing the dome cover 1. To fix the camera position, hold down the bottom lock lever while removing the cover with the other hand. Removing the cover reveals the main unit...
... insert the plastic anchor (HUR 5) to the end of the inner cover while lifting it up. Ceiling Mount 1. installation & connection INSTALLATION (SND-5080F) Removing the dome cover 1. To fix the camera position, hold down the bottom lock lever while removing the cover with the other hand. Removing the cover reveals the main unit...
User Manual
Page 27
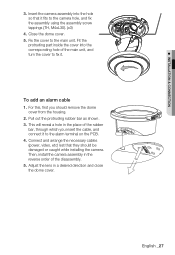
... protruding part inside the cover into the hole so that they should remove the dome cover from the housing. 2. English _27 Close the dome cover. 5. Connect and arrange the necessary cables (power, video, etc) lest that it to the camera hole, and fix the assembly using the assembly screw tappings (TH, M4xL30). (x3... insert the cable, and connect it fits to the alarm terminal on the PCB. 4. This will reveal a hole in a desired direction and close the dome cover. Insert the camera assembly into the corresponding hole of the disassembly. 5.
... protruding part inside the cover into the hole so that they should remove the dome cover from the housing. 2. English _27 Close the dome cover. 5. Connect and arrange the necessary cables (power, video, etc) lest that it to the camera hole, and fix the assembly using the assembly screw tappings (TH, M4xL30). (x3... insert the cable, and connect it fits to the alarm terminal on the PCB. 4. This will reveal a hole in a desired direction and close the dome cover. Insert the camera assembly into the corresponding hole of the disassembly. 5.
User Manual
Page 29
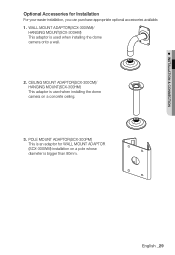
English _29 CEILING MOUNT ADAPTOR(SCX-300CM)/ HANGING MOUNT(SCX-300HM) This adaptor is used when installing the dome camera onto a wall. 2. POLE MOUNT ADAPTOR(SCX-300PM) This is used when installing the dome camera on a pole whose diameter is bigger than 80mm. WALL MOUNT ADAPTOR(SCX-300WM)/ HANGING MOUNT(SCX-300HM) This adaptor is an adaptor for Installation For your easier installation, you can purchase appropriate optional accessories available. 1. M INSTALLATION & CONNECTION Optional Accessories for WALL MOUNT ADAPTOR (SCX-300WM) installation on a concrete ceiling. 3.
English _29 CEILING MOUNT ADAPTOR(SCX-300CM)/ HANGING MOUNT(SCX-300HM) This adaptor is used when installing the dome camera onto a wall. 2. POLE MOUNT ADAPTOR(SCX-300PM) This is used when installing the dome camera on a pole whose diameter is bigger than 80mm. WALL MOUNT ADAPTOR(SCX-300WM)/ HANGING MOUNT(SCX-300HM) This adaptor is an adaptor for Installation For your easier installation, you can purchase appropriate optional accessories available. 1. M INSTALLATION & CONNECTION Optional Accessories for WALL MOUNT ADAPTOR (SCX-300WM) installation on a concrete ceiling. 3.
User Manual
Page 30
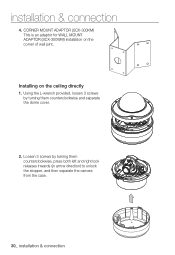
Using the L-wrench provided, loosen 3 screws by turning them counterclockwise and separate the dome cover. 2. Loosen 3 screws by turning them counterclockwise, press both left and right lock releases inwards (in arrow direction) to unlock the stopper, and then separate the camera from the case. 30_ installation & connection installation & connection 4. CORNER MOUNT ADAPTOR (SCX-300KM) This is an adaptor for WALL MOUNT ADAPTOR (SCX-300WM) installation on the ceiling directly 1. Installing on the corner of wall joint.
Using the L-wrench provided, loosen 3 screws by turning them counterclockwise and separate the dome cover. 2. Loosen 3 screws by turning them counterclockwise, press both left and right lock releases inwards (in arrow direction) to unlock the stopper, and then separate the camera from the case. 30_ installation & connection installation & connection 4. CORNER MOUNT ADAPTOR (SCX-300KM) This is an adaptor for WALL MOUNT ADAPTOR (SCX-300WM) installation on the ceiling directly 1. Installing on the corner of wall joint.
User Manual
Page 31
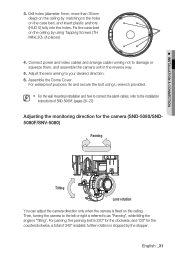
...counterclockwise, a total of 340° enabled; English _31 Fix the case bed on the ceiling by matching to your desired direction. 6. Assemble the Dome Cover. For panning, the panning limit is "Tilting". M INSTALLATION & CONNECTION 3. Drill holes (diameter 5mm, more than 35mm deep) on the...176; for the clockwise, and 120° for the camera (SND-5080/SND5080F/SNV-5080) Panning Tilting Lens rotation You can adjust the camera direction only when the camera is stopped by using L-wrench provided. Then, turning the camera to the left or right is referred to damage or squeeze...
...counterclockwise, a total of 340° enabled; English _31 Fix the case bed on the ceiling by matching to your desired direction. 6. Assemble the Dome Cover. For panning, the panning limit is "Tilting". M INSTALLATION & CONNECTION 3. Drill holes (diameter 5mm, more than 35mm deep) on the...176; for the clockwise, and 120° for the camera (SND-5080/SND5080F/SNV-5080) Panning Tilting Lens rotation You can adjust the camera direction only when the camera is stopped by using L-wrench provided. Then, turning the camera to the left or right is referred to damage or squeeze...


