User Guide
Page 2
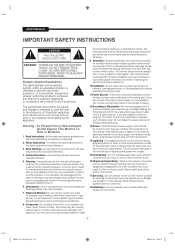
...cleaning. Cleaning : Unplug this monitor during a lightning storm or when it is not intended to be adhered to the appliance. Do not use a mounting accessory recommended by Samsung, or sold with a 3-wire grounding-type plug having a third(grounding) pin. SMT-1723-1923-Eng.indd 1:2 2008-8-20... 13:56:27 Heed Warnings : All warnings on the making label. The monitor may expose you are provided for cleaning or...
...cleaning. Cleaning : Unplug this monitor during a lightning storm or when it is not intended to be adhered to the appliance. Do not use a mounting accessory recommended by Samsung, or sold with a 3-wire grounding-type plug having a third(grounding) pin. SMT-1723-1923-Eng.indd 1:2 2008-8-20... 13:56:27 Heed Warnings : All warnings on the making label. The monitor may expose you are provided for cleaning or...

User Guide
Page 3
... 20.Replacement Parts : When replacement parts are covered by the operating instructions as the original parts. SMT-1723-1923-Eng.indd 1:3 - 3 - 2008-8-20 13:56:28 If the monitor does not operate normally by following conditions. a. If liquid has been spilled or objects have the ...are required, be sure the service technician has used replacement parts specified by Samsung or have fallen into the monitor. If the monitor has been exposed to its normal operation. c. d. e. When the monitor exhibits a distinct change in damage and require extensive work by a qualified technician...
... 20.Replacement Parts : When replacement parts are covered by the operating instructions as the original parts. SMT-1723-1923-Eng.indd 1:3 - 3 - 2008-8-20 13:56:28 If the monitor does not operate normally by following conditions. a. If liquid has been spilled or objects have the ...are required, be sure the service technician has used replacement parts specified by Samsung or have fallen into the monitor. If the monitor has been exposed to its normal operation. c. d. e. When the monitor exhibits a distinct change in damage and require extensive work by a qualified technician...

User Guide
Page 5
...Auto button with blue when the power is turned off by pressing the power switch again and the power LED goes off . TFT-LCD MONITOR REMOTE & BATTERIES VGA SIGNAL CABLE POWER CORD Viewing the Control Panels Front View ADAPTER USER'S MANUAL IR Sensor Remote controller sensor. The power... is turned on or off . ENTER / SOURCE Selects input source, activates a highlighted menu item. (POWER) ON/OFF Turns the power on . SMT-1723-1923-Eng.indd 1:5 2008-8-20 13:56:28 Also, activates Auto adjustment function in the VGA Mode. Check whether all the following devices and accessories are...
...Auto button with blue when the power is turned off by pressing the power switch again and the power LED goes off . TFT-LCD MONITOR REMOTE & BATTERIES VGA SIGNAL CABLE POWER CORD Viewing the Control Panels Front View ADAPTER USER'S MANUAL IR Sensor Remote controller sensor. The power... is turned on or off . ENTER / SOURCE Selects input source, activates a highlighted menu item. (POWER) ON/OFF Turns the power on . SMT-1723-1923-Eng.indd 1:5 2008-8-20 13:56:28 Also, activates Auto adjustment function in the VGA Mode. Check whether all the following devices and accessories are...
User Guide
Page 7
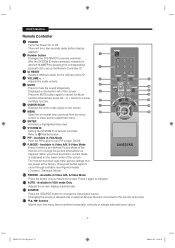
...ID of the screen. Available in external devices that are connected to another horizontally, vertically or adjusts selected menu values. - 7 - The monitor has three auto matic picture settings that are preset at the time. / buttons Moves from the menu screen or close screen adjustment menu. ...ID. With the SYSTEM ID button pressed, entered the desired NUMBER by pressing the corresponding button(0~9) to change the input signal source. SMT-1723-1923-Eng.indd 1:7 2008-8-20 13:56:36 USER'S MANUAL Remote Controller POWER Turns the Power On or Off. Displayed on the screen....
...ID of the screen. Available in external devices that are connected to another horizontally, vertically or adjusts selected menu values. - 7 - The monitor has three auto matic picture settings that are preset at the time. / buttons Moves from the menu screen or close screen adjustment menu. ...ID. With the SYSTEM ID button pressed, entered the desired NUMBER by pressing the corresponding button(0~9) to change the input signal source. SMT-1723-1923-Eng.indd 1:7 2008-8-20 13:56:36 USER'S MANUAL Remote Controller POWER Turns the Power On or Off. Displayed on the screen....

User Guide
Page 9
The product can be connected to External Devices. CAMERA DVR EXTERNAL MONITOR VCR SMT-1723-1923-Eng.indd 1:9 - 9 - 2008-8-20 13:56:45 USER'S MANUAL Connecting to an external device such as Camera, DVR,VCR, External Monitor, etc.
The product can be connected to External Devices. CAMERA DVR EXTERNAL MONITOR VCR SMT-1723-1923-Eng.indd 1:9 - 9 - 2008-8-20 13:56:45 USER'S MANUAL Connecting to an external device such as Camera, DVR,VCR, External Monitor, etc.
User Guide
Page 11
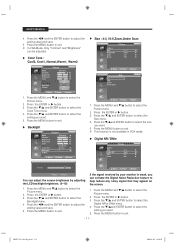
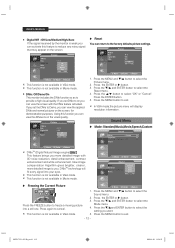
... you want . 5. Press the MENU button to select the Picture menu. 2. In VGA Mode, Only "Contrast" and "Brightness" can adjust the screen brightness by your monitor is not available in VGA mode. Press the ENTER or button. 3. Press the / and ENTER button to exit. Press the / and ENTER button to adjust... activate the Digital Noise Reduction feature to exit. - 11 - Press the MENU button to help reduce any noisy signal that may appear on the screen. 1. SMT-1723-1923-Eng.indd 1:11 2008-8-20 13:56:54
... you want . 5. Press the MENU button to select the Picture menu. 2. In VGA Mode, Only "Contrast" and "Brightness" can adjust the screen brightness by your monitor is not available in VGA mode. Press the ENTER or button. 3. Press the / and ENTER button to exit. Press the / and ENTER button to adjust... activate the Digital Noise Reduction feature to exit. - 11 - Press the MENU button to help reduce any noisy signal that may appear on the screen. 1. SMT-1723-1923-Eng.indd 1:11 2008-8-20 13:56:54
User Guide
Page 12
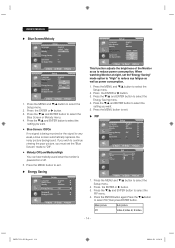
... gives brighter, clearer, more detailed image with the DNIe feature activated. Press the / and ENTER button to select the Reset menu . 4. SMT-1723-1923-Eng.indd 1:12 2008-8-20 13:56:55 If you set DNIe to on,you can view the screen with 3D noise reduction, detail enhancement...Standard Equalizer Music Audio for demonstration purposes. USER'S MANUAL • Digital NR : Off/Low/Medium/High/Auto If the signal received by the monitor is weak,you can activate this function,you can return to the factory defaults picture settings. This function is not available in VGA mode. Picture...
... gives brighter, clearer, more detailed image with the DNIe feature activated. Press the / and ENTER button to select the Reset menu . 4. SMT-1723-1923-Eng.indd 1:12 2008-8-20 13:56:55 If you set DNIe to on,you can view the screen with 3D noise reduction, detail enhancement...Standard Equalizer Music Audio for demonstration purposes. USER'S MANUAL • Digital NR : Off/Low/Medium/High/Auto If the signal received by the monitor is weak,you can activate this function,you can return to the factory defaults picture settings. This function is not available in VGA mode. Picture...
User Guide
Page 14
... 1. Press the MENU and / button to select "On",then press ENTER button. Main picture Sub picture PC Video A,Video B, S-Video - 14 - SMT-1723-1923-Eng.indd 1:14 2008-8-20 13:56:59 Press the / and ENTER button to select the Blue Screen or Melody menu. 4. Press the / and ...System ID No Signal OSD : English : Off : Medium : Off Low : Medium : High Auto Move Enter Return This function adjusts the brightness of the Monitor so as power consumption. 1. Press the MENU and / button to select the Setup menu. 2. Press the MENU and / button to select the Setup menu. ...
... 1. Press the MENU and / button to select "On",then press ENTER button. Main picture Sub picture PC Video A,Video B, S-Video - 14 - SMT-1723-1923-Eng.indd 1:14 2008-8-20 13:56:59 Press the / and ENTER button to select the Blue Screen or Melody menu. 4. Press the / and ...System ID No Signal OSD : English : Off : Medium : Off Low : Medium : High Auto Move Enter Return This function adjusts the brightness of the Monitor so as power consumption. 1. Press the MENU and / button to select the Setup menu. 2. Press the MENU and / button to select the Setup menu. ...
User Guide
Page 15
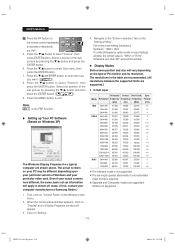
... 15 - Press the / button to select Size menu, then press the ENTER button . 7. SOG is selected. SMT-1723-1923-Eng.indd 1:15 2008-8-20 13:57:00 Select a source of PC monitor and its resolution. Press the / button to select "Position", then press the ENTER button. Even if your actual ...supported. 1. Otherwise, just click "OK" and exit the window. The resolutions in almost all cases. (If not, contact your computer manufacturer or Samsung Dealer.) 4. When the control panel window appears, click on "Display" and a Display Properies window will vary depending on your PC may be ...
... 15 - Press the / button to select Size menu, then press the ENTER button . 7. SOG is selected. SMT-1723-1923-Eng.indd 1:15 2008-8-20 13:57:00 Select a source of PC monitor and its resolution. Press the / button to select "Position", then press the ENTER button. Even if your actual ...supported. 1. Otherwise, just click "OK" and exit the window. The resolutions in almost all cases. (If not, contact your computer manufacturer or Samsung Dealer.) 4. When the control panel window appears, click on "Display" and a Display Properies window will vary depending on your PC may be ...
User Guide
Page 16
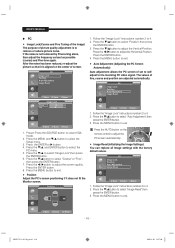
.... 3. Press the MENU button to exit. Press the MENU button to exit. Move Enter Return - 16 - Position 1. Press the / button to 4. 2. SMT-1723-1923-Eng.indd 1:16 2008-8-20 13:57:00 PC Image Lock Position Auto Adjustment Image Reset Move Enter Coarse Fine Image Lock Return 50 45... Position Auto Adjustment Image Reset Move Enter Return 1. After the noise has been reduced, re-adjust the picture so that it does not fit the Monitor screen. Press the / button to 4. 2. Press the / button to remove or reduce picture noise. USER'S MANUAL PC • Image Lock(Coarse ...
.... 3. Press the MENU button to exit. Press the MENU button to exit. Move Enter Return - 16 - Position 1. Press the / button to 4. 2. SMT-1723-1923-Eng.indd 1:16 2008-8-20 13:57:00 PC Image Lock Position Auto Adjustment Image Reset Move Enter Coarse Fine Image Lock Return 50 45... Position Auto Adjustment Image Reset Move Enter Return 1. After the noise has been reduced, re-adjust the picture so that it does not fit the Monitor screen. Press the / button to 4. 2. Press the / button to remove or reduce picture noise. USER'S MANUAL PC • Image Lock(Coarse ...


