User Guide
Page 2
...or any heat sources such as radiators, heat registers,stoves, or other similar surface. bracket or table recommended by Samsung. 9. Use only with liquids on the monitor and in the cabinet are unable to constitute a risk of important operating and maintenance (servicing) instructions in a ...the outlet, contact your electrician to unplugging the monitor in the cleaning description otherwise required in a risk of fire of electric shock. 16.Object and liquid Entry : Never push objects of an authorization code for cleaning. SMT-1723-1923-Eng.indd 1:2 2008-8-20 13:56:27...
...or any heat sources such as radiators, heat registers,stoves, or other similar surface. bracket or table recommended by Samsung. 9. Use only with liquids on the monitor and in the cabinet are unable to constitute a risk of important operating and maintenance (servicing) instructions in a ...the outlet, contact your electrician to unplugging the monitor in the cleaning description otherwise required in a risk of fire of electric shock. 16.Object and liquid Entry : Never push objects of an authorization code for cleaning. SMT-1723-1923-Eng.indd 1:2 2008-8-20 13:56:27...

User Guide
Page 3
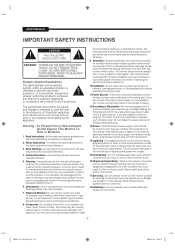
... service personnel under the following the operating instructions. b. Unauthorized substitutions may result in proper operating condition. a. If the monitor has been exposed to rain or water. SMT-1723-1923-Eng.indd 1:3 - 3 - 2008-8-20 13:56:28 f. When the power-supply cord or plug is in ...damage and require extensive work by Samsung or have fallen into the monitor. If the monitor has been dropped or the cabinet has been damaged...
... service personnel under the following the operating instructions. b. Unauthorized substitutions may result in proper operating condition. a. If the monitor has been exposed to rain or water. SMT-1723-1923-Eng.indd 1:3 - 3 - 2008-8-20 13:56:28 f. When the power-supply cord or plug is in ...damage and require extensive work by Samsung or have fallen into the monitor. If the monitor has been dropped or the cabinet has been damaged...

User Guide
Page 5
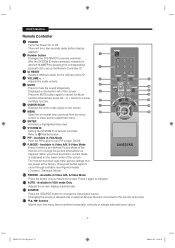
... power switch again and the power LED goes off . / PIP Increases the level of active function and move to the previous menu. SMT-1723-1923-Eng.indd 1:5 2008-8-20 13:56:28 Check whether all the following devices and accessories are included with blue when the power is turned... a highlighted menu item. (POWER) ON/OFF Turns the power on a flat and secure surface or in the VGA Mode. Speaker - 5 - TFT-LCD MONITOR REMOTE & BATTERIES VGA SIGNAL CABLE POWER CORD Viewing the Control Panels Front View ADAPTER USER'S MANUAL IR Sensor Remote controller sensor. The power is no...
... power switch again and the power LED goes off . / PIP Increases the level of active function and move to the previous menu. SMT-1723-1923-Eng.indd 1:5 2008-8-20 13:56:28 Check whether all the following devices and accessories are included with blue when the power is turned... a highlighted menu item. (POWER) ON/OFF Turns the power on a flat and secure surface or in the VGA Mode. Speaker - 5 - TFT-LCD MONITOR REMOTE & BATTERIES VGA SIGNAL CABLE POWER CORD Viewing the Control Panels Front View ADAPTER USER'S MANUAL IR Sensor Remote controller sensor. The power is no...
User Guide
Page 7
... - 7 - Press the MUTE button again to set up the Remote Controller ID ID RESET Resets 01(default value) for remote controller. The monitor has three auto matic picture settings that are preset at the time. / buttons Moves from the menu screen or close screen adjustment menu. Then ...push button again to cancel the Mute function. SOURCE Press the 'SOURCE' button to select a pre-defined Picture Mode of the screen. SMT-1723-1923-Eng.indd 1:7 2008-8-20 13:56:36 There will be a few seconds delay before display appears. VOLUME +, Adjusts the audio volume. or +...
... - 7 - Press the MUTE button again to set up the Remote Controller ID ID RESET Resets 01(default value) for remote controller. The monitor has three auto matic picture settings that are preset at the time. / buttons Moves from the menu screen or close screen adjustment menu. Then ...push button again to cancel the Mute function. SOURCE Press the 'SOURCE' button to select a pre-defined Picture Mode of the screen. SMT-1723-1923-Eng.indd 1:7 2008-8-20 13:56:36 There will be a few seconds delay before display appears. VOLUME +, Adjusts the audio volume. or +...

User Guide
Page 9
The product can be connected to External Devices. CAMERA DVR EXTERNAL MONITOR VCR SMT-1723-1923-Eng.indd 1:9 - 9 - 2008-8-20 13:56:45 USER'S MANUAL Connecting to an external device such as Camera, DVR,VCR, External Monitor, etc.
The product can be connected to External Devices. CAMERA DVR EXTERNAL MONITOR VCR SMT-1723-1923-Eng.indd 1:9 - 9 - 2008-8-20 13:56:45 USER'S MANUAL Connecting to an external device such as Camera, DVR,VCR, External Monitor, etc.
User Guide
Page 11
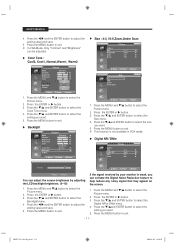
... MANUAL 4. Press the / and the ENTER button to exit. In VGA Mode, Only "Contrast" and "Brightness" can adjust the screen brightness by your monitor is not available in VGA mode. Press the MENU button to adjust the setting value and save . 5. Press the / and ENTER button to select the...Return Adjust Return You can be adjusted. Press the / and ENTER button to help reduce any noisy signal that may appear on the screen. 1. SMT-1723-1923-Eng.indd 1:11 2008-8-20 13:56:54 Color Tone : Cool2, Cool1, Normal,Warm1, Warm2 Mode Contrast Brightness Sharpness Color Tint Color Tone Backlight...
... MANUAL 4. Press the / and the ENTER button to exit. In VGA Mode, Only "Contrast" and "Brightness" can adjust the screen brightness by your monitor is not available in VGA mode. Press the MENU button to adjust the setting value and save . 5. Press the / and ENTER button to select the...Return Adjust Return You can be adjusted. Press the / and ENTER button to help reduce any noisy signal that may appear on the screen. 1. SMT-1723-1923-Eng.indd 1:11 2008-8-20 13:56:54 Color Tone : Cool2, Cool1, Normal,Warm1, Warm2 Mode Contrast Brightness Sharpness Color Tint Color Tone Backlight...
User Guide
Page 12
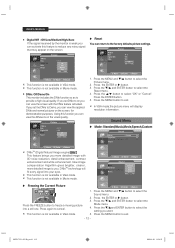
... - Press the MENU button to select the Sound menu. 2. USER'S MANUAL • Digital NR : Off/Low/Medium/High/Auto If the signal received by the monitor is weak,you can activate this function,you can view the difference in Movie mode. • DNIe: Off/Demo/On This... . New image compensation Algorithm gives brighter, clearer, more detailed image with the DNIe feature activated. This function is not available in the visual quality. SMT-1723-1923-Eng.indd 1:12 2008-8-20 13:56:55 This function is not available in VGA mode. Press the / and ENTER button to you want. 5. Using...
... - Press the MENU button to select the Sound menu. 2. USER'S MANUAL • Digital NR : Off/Low/Medium/High/Auto If the signal received by the monitor is weak,you can activate this function,you can view the difference in Movie mode. • DNIe: Off/Demo/On This... . New image compensation Algorithm gives brighter, clearer, more detailed image with the DNIe feature activated. This function is not available in the visual quality. SMT-1723-1923-Eng.indd 1:12 2008-8-20 13:56:55 This function is not available in VGA mode. Press the / and ENTER button to you want. 5. Using...
User Guide
Page 14
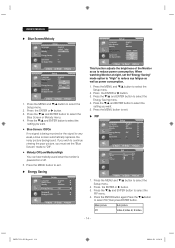
... Off Low : Medium High : 1 : On Move Enter Return 1. Press the ENTER or button. 3. When watching Monitor at night, set the "Blue Screen" mode to select the Setup menu. 2. Energy Saving Setup Language Blue Screen Melody...: Medium : Off Low : Medium : High Auto Move Enter Return This function adjusts the brightness of the Monitor so as power consumption. 1. Press the MENU and / button to "Off". • Melody:Off/Low/Medium/...On Move Enter PIP Source Size Position PIP : On : Video A : : Return Move Enter Return 1. SMT-1723-1923-Eng.indd 1:14 2008-8-20 13:56:59
... Off Low : Medium High : 1 : On Move Enter Return 1. Press the ENTER or button. 3. When watching Monitor at night, set the "Blue Screen" mode to select the Setup menu. 2. Energy Saving Setup Language Blue Screen Melody...: Medium : Off Low : Medium : High Auto Move Enter Return This function adjusts the brightness of the Monitor so as power consumption. 1. Press the MENU and / button to "Off". • Melody:Off/Low/Medium/...On Move Enter PIP Source Size Position PIP : On : Video A : : Return Move Enter Return 1. SMT-1723-1923-Eng.indd 1:14 2008-8-20 13:56:59
User Guide
Page 15
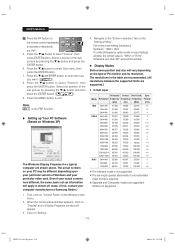
...the position of PC monitor and its resolution. Note: is not supported. 1. Otherwise, just click "OK" and exit the window. The set -up Your PC Software (Based on Windows XP) The Windows Display Properies for a typical computer are supported. SOG is the PBP function. SMT-1723-1923-Eng.indd 1:15....175 +/- 720×400 31.469 70.087 28.322 -/+ 640×480 31.469 59.940 25.175 -/- Even if your computer manufacturer or Samsung Dealer.) 4. Press the / button to select "Source", then press ENTER button. First, click on "Control Panel" on "Setting" . - 15 - Click...
...the position of PC monitor and its resolution. Note: is not supported. 1. Otherwise, just click "OK" and exit the window. The set -up Your PC Software (Based on Windows XP) The Windows Display Properies for a typical computer are supported. SOG is the PBP function. SMT-1723-1923-Eng.indd 1:15....175 +/- 720×400 31.469 70.087 28.322 -/+ 640×480 31.469 59.940 25.175 -/- Even if your computer manufacturer or Samsung Dealer.) 4. Press the / button to select "Source", then press ENTER button. First, click on "Control Panel" on "Setting" . - 15 - Click...
User Guide
Page 16
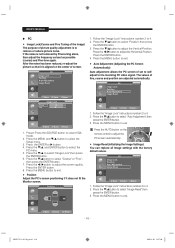
...of fine, coarse and position are adjusted automatically. Press the MENU button to 4. 2. Follow the "Image Lock" instructions number 2 to exit. SMT-1723-1923-Eng.indd 1:16 2008-8-20 13:57:00 Press the ENTER button. 8. Press the ENTER button. 4. Press the MENU button to exit. • ...Lock",then press the ENTER button. 6. After the noise has been reduced, re-adjust the picture so that it does not fit the Monitor screen. PC Image Lock Position Auto Adjustment Image Reset Move Enter Return 1. Press the / button to remove or reduce picture noise. USER'S ...
...of fine, coarse and position are adjusted automatically. Press the MENU button to 4. 2. Follow the "Image Lock" instructions number 2 to exit. SMT-1723-1923-Eng.indd 1:16 2008-8-20 13:57:00 Press the ENTER button. 8. Press the ENTER button. 4. Press the MENU button to exit. • ...Lock",then press the ENTER button. 6. After the noise has been reduced, re-adjust the picture so that it does not fit the Monitor screen. PC Image Lock Position Auto Adjustment Image Reset Move Enter Return 1. Press the / button to remove or reduce picture noise. USER'S ...


