User Manual (user Manual) (ver.1.0) (English)
Page 2
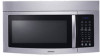
You can also select the ventilation power (High, Low, Off) depending on the duct location, you can set the orientation of the vent. Moreover, your Over The Range (OTR) oven provides optimal ... Steel (STSS) exterior delivers a luxurious look to cook? The design matches perfectly with Cook-top Lighting and oven control the degree of frequently used choices. Samsung's new OTR sensor technology offers preset functions resulting in perfectly cooked dishes every time. Simply select a cooking menu, and the cooking results will astound you...
You can also select the ventilation power (High, Low, Off) depending on the duct location, you can set the orientation of the vent. Moreover, your Over The Range (OTR) oven provides optimal ... Steel (STSS) exterior delivers a luxurious look to cook? The design matches perfectly with Cook-top Lighting and oven control the degree of frequently used choices. Samsung's new OTR sensor technology offers preset functions resulting in perfectly cooked dishes every time. Simply select a cooking menu, and the cooking results will astound you...
User Manual (user Manual) (ver.1.0) (English)
Page 4
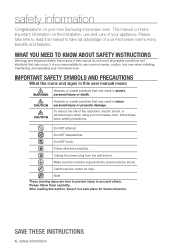
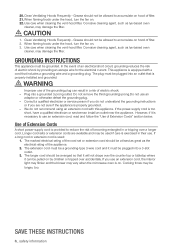
...result in a safe place for help. Do NOT disassemble. What you and others. It is grounded to use and care of your new Samsung microwave oven. safety information Congratulations on the installation, use common sense, caution, and care when installing, maintaining, and operating your responsibility to ...time to you need to know about safety instructions Warnings and Important Safety Instructions in minor personal injury or property damage. Unplug the power plug from the wall socket. Note These warning signs are here to prevent injury to read this manual do not cover all ...
...result in a safe place for help. Do NOT disassemble. What you and others. It is grounded to use and care of your new Samsung microwave oven. safety information Congratulations on the installation, use common sense, caution, and care when installing, maintaining, and operating your responsibility to ...time to you need to know about safety instructions Warnings and Important Safety Instructions in minor personal injury or property damage. Unplug the power plug from the wall socket. Note These warning signs are here to prevent injury to read this manual do not cover all ...
User Manual (user Manual) (ver.1.0) (English)
Page 5
... other combustible materials are able to the door. 13. Do not use the cavity for example, closed , turn oven off, and disconnect the power cord, or shut off power at the fuse or circuit breaker panel. This appliance should be repaired or serviced only by children. 9. Unplug the plug before removing the...
... other combustible materials are able to the door. 13. Do not use the cavity for example, closed , turn oven off, and disconnect the power cord, or shut off power at the fuse or circuit breaker panel. This appliance should be repaired or serviced only by children. 9. Unplug the plug before removing the...
User Manual (user Manual) (ver.1.0) (English)
Page 6
... an extension cord, read and follow the "Use of becoming entangled in or tripping over a longer cord. CAUTION CAUTION 1. If the power-supply cord is properly installed and grounded. Save these instructions 6_ safety information Plug into an outlet that includes a grounding wire and a grounding... plug. Use of Extension Cords A short power-supply cord is provided to use an extension cord, the interior light may flicker and the blower may vary when the microwave oven ...
... an extension cord, read and follow the "Use of becoming entangled in or tripping over a longer cord. CAUTION CAUTION 1. If the power-supply cord is properly installed and grounded. Save these instructions 6_ safety information Plug into an outlet that includes a grounding wire and a grounding... plug. Use of Extension Cords A short power-supply cord is provided to use an extension cord, the interior light may flicker and the blower may vary when the microwave oven ...
User Manual (user Manual) (ver.1.0) (English)
Page 7
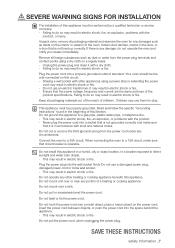
... basis. - Children may result in accordance with local and national codes. Do not operate any damages such as dust or water from the power cord under any damage, do so may use them for any other heating or cooking appliance beneath this appliance in a humid, oily or... shock, fire, an explosion, or problems with other appliances using a dry cloth on this circuit. - Do not pull the power cord, when unplugging the power plug. SEVERE WARNING SIGNS FOR INSTALLATION WARNING The installation of standard. Unpack oven, remove all packaging materials out of the reach of...
... basis. - Children may result in accordance with local and national codes. Do not operate any damages such as dust or water from the power cord under any damage, do so may use them for any other heating or cooking appliance beneath this appliance in a humid, oily or... shock, fire, an explosion, or problems with other appliances using a dry cloth on this circuit. - Do not pull the power cord, when unplugging the power plug. SEVERE WARNING SIGNS FOR INSTALLATION WARNING The installation of standard. Unpack oven, remove all packaging materials out of the reach of...

User Manual (user Manual) (ver.1.0) (English)
Page 8
...it is not being used for long periods of a gas leak (such as propane gas, LP gas, etc.), ventilate immediately without touching the power plug. You may result in electric shock or fire. CAUTION SIGNS FOR INSTALLATION CAUTION This appliance should ignite, keep the oven door closed, turn...safety information In the event of the other parts do not come into contact with a lid, a cookie sheet or a flat tray. Unplug the power plug when the appliance is accessible to electromagnetic waves. - Never leave surface units beneath your own - Do not attempt to be repaired, contact an...
...it is not being used for long periods of a gas leak (such as propane gas, LP gas, etc.), ventilate immediately without touching the power plug. You may result in electric shock or fire. CAUTION SIGNS FOR INSTALLATION CAUTION This appliance should ignite, keep the oven door closed, turn...safety information In the event of the other parts do not come into contact with a lid, a cookie sheet or a flat tray. Unplug the power plug when the appliance is accessible to electromagnetic waves. - Never leave surface units beneath your own - Do not attempt to be repaired, contact an...

User Manual (user Manual) (ver.1.0) (English)
Page 9
... shock or injury. Under no circumstances should you remove the outer cabinet. Dishes and containers can cause burns. Always test temperature by unplugging the power plug while an operation is in progress. - If a child places a bag over its head, it may result in electric shock or fire... your nearest service center. - If any foreign substance such as containers, forks, etc.) or containers with golden or silver rims. - Plugging the power plug into the inlet, outlet, water supply cartridge input and output parts, and holes. Keep all cookware used in sparks or fire. This may...
... shock or injury. Under no circumstances should you remove the outer cabinet. Dishes and containers can cause burns. Always test temperature by unplugging the power plug while an operation is in progress. - If a child places a bag over its head, it may result in electric shock or fire... your nearest service center. - If any foreign substance such as containers, forks, etc.) or containers with golden or silver rims. - Plugging the power plug into the inlet, outlet, water supply cartridge input and output parts, and holes. Keep all cookware used in sparks or fire. This may...
User Manual (user Manual) (ver.1.0) (English)
Page 11
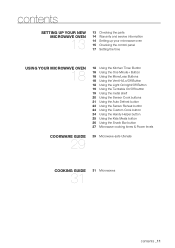
... Custom Cook button 24 Using the Handy Helper button 25 Using the Kids Meals button 26 Using the Snack Bar button 27 Microwave cooking times & Power levels cookware guide 29 29 Microwave-safe Utensils cooking guide 31 31 Microwaves contents _11
... Custom Cook button 24 Using the Handy Helper button 25 Using the Kids Meals button 26 Using the Snack Bar button 27 Microwave cooking times & Power levels cookware guide 29 29 Microwave-safe Utensils cooking guide 31 31 Microwaves contents _11
User Manual (user Manual) (ver.1.0) (English)
Page 16
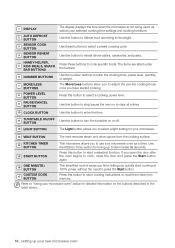
...timing up your new microwave oven The items are listed under the buttons. 6 Number BUTTONs Use the number buttons to enter the cooking time, power level, quantity, or weight. 7 More/Less BUTTONs The More/Less buttons allow you to adjust the pre-set cooking times once you quickly start... cooking at 100% power without the need to start a selected function. Use the Kitchen Timer button for your microwave oven as your microwave oven" below for detailed information ...
...timing up your new microwave oven The items are listed under the buttons. 6 Number BUTTONs Use the number buttons to enter the cooking time, power level, quantity, or weight. 7 More/Less BUTTONs The More/Less buttons allow you to adjust the pre-set cooking times once you quickly start... cooking at 100% power without the need to start a selected function. Use the Kitchen Timer button for your microwave oven as your microwave oven" below for detailed information ...
User Manual (user Manual) (ver.1.0) (English)
Page 17
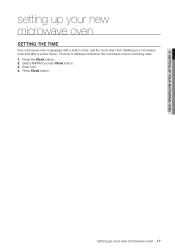
01 Setting up your microwave oven setting up your new microwave oven _17 Set the clock when first installing your new microwave oven Setting the time Your microwave oven is not being used. 1. Press the Clock button. 2. Press Clock button. setting up your microwave oven and after a power failure. Select AM/PM by press Clock button. 3. The time is displayed whenever the microwave oven is equipped with a built-in clock. Enter time. 4.
01 Setting up your microwave oven setting up your new microwave oven _17 Set the clock when first installing your new microwave oven Setting the time Your microwave oven is not being used. 1. Press the Clock button. 2. Press Clock button. setting up your microwave oven and after a power failure. Select AM/PM by press Clock button. 3. The time is displayed whenever the microwave oven is equipped with a built-in clock. Enter time. 4.
User Manual (user Manual) (ver.1.0) (English)
Page 18
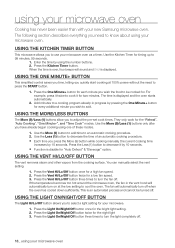
... three times to select a light setting for every additional minute you wish to 99 minutes, 99 seconds. 1. The fan will automatically turn on at 100% power without the need to turn off . Using the Light On/night/Off Button The Light Hi/Lo/Off button allows you press the More (9) button... the Light On/Night/Off button once for "Auto Defrost" & "Beverage" option. Using the Kitchen Timer Button This microwave allows you to use your new Samsung microwave oven. Using the More/Less Buttons The More (9)/Less (1) buttons allow you to adjust the pre-set cook times.
... three times to select a light setting for every additional minute you wish to 99 minutes, 99 seconds. 1. The fan will automatically turn on at 100% power without the need to turn off . Using the Light On/night/Off Button The Light Hi/Lo/Off button allows you press the More (9) button... the Light On/Night/Off button once for "Auto Defrost" & "Beverage" option. Using the Kitchen Timer Button This microwave allows you to use your new Samsung microwave oven. Using the More/Less Buttons The More (9)/Less (1) buttons allow you to adjust the pre-set cook times.
User Manual (user Manual) (ver.1.0) (English)
Page 20
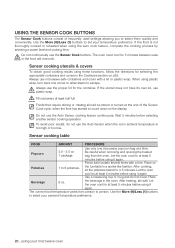
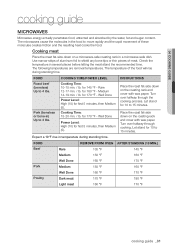
... time has started to count down on Potatoes 1 to select your microwave oven When using the auto cook feature, complete the cooking process by selecting a power level and cooking time. Sensor cooking table FOOD AMOUNT PROCEDURE Popcorn 3.0 - 3.5 oz 1 package Use only one corner to allow steam to person. Place on the...
... time has started to count down on Potatoes 1 to select your microwave oven When using the auto cook feature, complete the cooking process by selecting a power level and cooking time. Sensor cooking table FOOD AMOUNT PROCEDURE Popcorn 3.0 - 3.5 oz 1 package Use only one corner to allow steam to person. Place on the...
User Manual (user Manual) (ver.1.0) (English)
Page 23
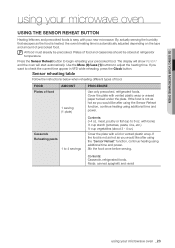
... of food AMOUNT 1 serving (1 plate) Casserole Reheating pasta 1 to 4 servings PROCEDURE Use only precooked, refrigerated foods. Pasta: canned spaghetti and ravioli using additional time and power. If you would like after using the "Sensor Reheat" function, continue heating using your precooked food. Contents: 3-4 oz. Stir the food once before serving. Use... (about 3 - 4 oz.) Cover the plate with vented plastic wrap or waxed paper tucked under the plate. 02 Using your microwave oven using additional time and power.
... of food AMOUNT 1 serving (1 plate) Casserole Reheating pasta 1 to 4 servings PROCEDURE Use only precooked, refrigerated foods. Pasta: canned spaghetti and ravioli using additional time and power. If you would like after using the "Sensor Reheat" function, continue heating using your precooked food. Contents: 3-4 oz. Stir the food once before serving. Use... (about 3 - 4 oz.) Cover the plate with vented plastic wrap or waxed paper tucked under the plate. 02 Using your microwave oven using additional time and power.
User Manual (user Manual) (ver.1.0) (English)
Page 24
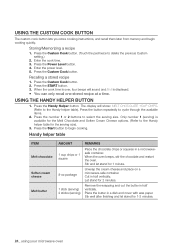
...the butter in a microwavesafe container. Press the Custom Cook button. (Touch the pad twice to cycle through the available items. 2. Press the Power Level button. 4. Using the Handy Helper button 1. The display will sound and End is available for 1-2 minutes. 24_ using your microwave oven .... Let stand for 1 minute. Unwrap the cream cheese and place on a microwave-safe container. Place the butter in half vertically. Enter the power level. 5. Recalling a stored recipe 1. Cut in a dish and cover with wax paper. Stir well after finishing and let stand for the...
...the butter in a microwavesafe container. Press the Custom Cook button. (Touch the pad twice to cycle through the available items. 2. Press the Power Level button. 4. Using the Handy Helper button 1. The display will sound and End is available for 1-2 minutes. 24_ using your microwave oven .... Let stand for 1 minute. Unwrap the cream cheese and place on a microwave-safe container. Place the butter in half vertically. Enter the power level. 5. Recalling a stored recipe 1. Cut in a dish and cover with wax paper. Stir well after finishing and let stand for the...

User Manual (user Manual) (ver.1.0) (English)
Page 27
... not always give you the best results with their own time length and power level. Press the Power Level button. 3. If you control the heating intensity from Warm (1) through to set two different cooking stages, each with foods that require slower ...cooking, such as roasts, baked goods, or custards. Your oven has 9 additional power settings in addition to enter the power level. 4. 02 Using your microwave oven using your microwave oven Microwave cooking times & Power levels Your oven allows you to High (10). Press the START button. 3. using your microwave...
... not always give you the best results with their own time length and power level. Press the Power Level button. 3. If you control the heating intensity from Warm (1) through to set two different cooking stages, each with foods that require slower ...cooking, such as roasts, baked goods, or custards. Your oven has 9 additional power settings in addition to enter the power level. 4. 02 Using your microwave oven using your microwave oven Microwave cooking times & Power levels Your oven allows you to High (10). Press the START button. 3. using your microwave...

User Manual (user Manual) (ver.1.0) (English)
Page 28
..., if the first cycle is displayed. Use the number buttons to enter the second cook time. 5. Use the number buttons to enter the power level. 4. Press the START button. 8. POWER LEVEL 10 (High) 9 8 7 6 5 4 3 2 1 MICROWAVE OUTPUT USE 100 % Boiling water. Cooking fish and poultry. Cooking cheese dishes, veal. .... 30 % Thawing meat, poultry, and seafood. Heating small amounts of items(Dinner plate, pasta, meat, soup or sauce, etc,). Press the Power Level button. 3. When the cook time is over, four beeps will sound and End is the defrost cycle. 1. Cooking with examples of foods ...
..., if the first cycle is displayed. Use the number buttons to enter the second cook time. 5. Use the number buttons to enter the power level. 4. Press the START button. 8. POWER LEVEL 10 (High) 9 8 7 6 5 4 3 2 1 MICROWAVE OUTPUT USE 100 % Boiling water. Cooking fish and poultry. Cooking cheese dishes, veal. .... 30 % Thawing meat, poultry, and seafood. Heating small amounts of items(Dinner plate, pasta, meat, soup or sauce, etc,). Press the Power Level button. 3. When the cook time is over, four beeps will sound and End is the defrost cycle. 1. Cooking with examples of foods ...

User Manual (user Manual) (ver.1.0) (English)
Page 29
... microwave-safe or not, you can perform the following simple test: 1. If the dish is important to heat them both for one minute at high power. Delicate glass may cause the polystyrene to melt. 7 May catch fire. It is warm, then it inside your oven next to the item to test...
... microwave-safe or not, you can perform the following simple test: 1. If the dish is important to heat them both for one minute at high power. Delicate glass may cause the polystyrene to melt. 7 May catch fire. It is warm, then it inside your oven next to the item to test...
User Manual (user Manual) (ver.1.0) (English)
Page 31
... Cooking Time: 10-15 min. / lb. Well Done Power Level: High (10) for 160 °F - Turn over halfway through the cooking process. Turn over halfway through cooking. Cooking meat Place the meat fat-side ... cooking guide Microwaves Microwave energy actually penetrates food, attracted and absorbed by the water, fat and sugar content. Medium 14-19 min. / lb. Well Done Power Level: High (10) for 145 °F - for first 5 minutes, then Medium (5). The microwaves cause the molecules in temperature during standing time.
... Cooking Time: 10-15 min. / lb. Well Done Power Level: High (10) for 160 °F - Turn over halfway through the cooking process. Turn over halfway through cooking. Cooking meat Place the meat fat-side ... cooking guide Microwaves Microwave energy actually penetrates food, attracted and absorbed by the water, fat and sugar content. Medium 14-19 min. / lb. Well Done Power Level: High (10) for 145 °F - for first 5 minutes, then Medium (5). The microwaves cause the molecules in temperature during standing time.

User Manual (user Manual) (ver.1.0) (English)
Page 32
...a fork. FOOD Whole chicken Up to 1.5 lbs. Turn over when the cooking time is no longer pink. Cooking Time: 4-8 min. / lb Power Level: Medium-High (7). INSTRUCTIONS Arrange the steaks on the dish, with the meaty portions towards the outside of the dish. Turn them over halfway through... that are thicker than ½", turn them . Cook the fish until the juices run clear and the meat near the bone is halfway. COOKING TIME/POWER LEVEL Cooking Time: 7-11 min. / lb. Shrimp Up to 4 lbs. Cook until firm and opaque, stirring 2 or 3 times. Let stand for 2-3...
...a fork. FOOD Whole chicken Up to 1.5 lbs. Turn over when the cooking time is no longer pink. Cooking Time: 4-8 min. / lb Power Level: Medium-High (7). INSTRUCTIONS Arrange the steaks on the dish, with the meaty portions towards the outside of the dish. Turn them over halfway through... that are thicker than ½", turn them . Cook the fish until the juices run clear and the meat near the bone is halfway. COOKING TIME/POWER LEVEL Cooking Time: 7-11 min. / lb. Shrimp Up to 4 lbs. Cook until firm and opaque, stirring 2 or 3 times. Let stand for 2-3...
User Manual (user Manual) (ver.1.0) (English)
Page 34
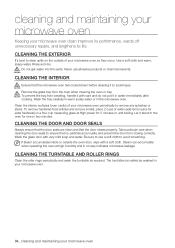
... oven. 34_ cleaning and maintaining your microwave oven periodically to remove any splashes or stains. The turntable can accumulate when operating the oven at High power for one or two minutes. Let it to ensure that no way indicates microwave leakage. Wash the glass door with care and do not put...
... oven. 34_ cleaning and maintaining your microwave oven periodically to remove any splashes or stains. The turntable can accumulate when operating the oven at High power for one or two minutes. Let it to ensure that no way indicates microwave leakage. Wash the glass door with care and do not put...


