User Manual
Page 2
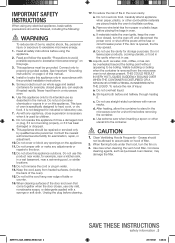
... or tamper with the door open since open-door operation can result in minor personal injury or property damage. It is particularly important that the oven door close properly and that WARNING may result in harmful exposure to adjust or repair the oven yourself. Do not operate the oven if it in this manual to use and care of your appliance. Hinges and latches, (broken or loosened...
... or tamper with the door open since open-door operation can result in minor personal injury or property damage. It is particularly important that the oven door close properly and that WARNING may result in harmful exposure to adjust or repair the oven yourself. Do not operate the oven if it in this manual to use and care of your appliance. Hinges and latches, (broken or loosened...
User Manual
Page 3
... for example, closed , turn the fan on this appliance only for examination, repair, or adjustment. 10. Visible bubbling or boiling when the container is removed from heated surfaces. (including the back of oven is used by qualified service personnel. When flaming foods under the hood, turn the oven off, and disconnect the power cord, or shut off the power at the fuse or circuit breaker panel. Read and follow...
... for example, closed , turn the fan on this appliance only for examination, repair, or adjustment. 10. Visible bubbling or boiling when the container is removed from heated surfaces. (including the back of oven is used by qualified service personnel. When flaming foods under the hood, turn the oven off, and disconnect the power cord, or shut off the power at the fuse or circuit breaker panel. Read and follow...
User Manual
Page 4
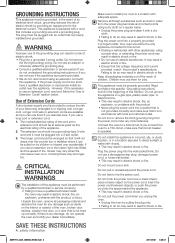
... location, or in a location exposed to a 20A circuit. Do not cut or remove the third (ground) prong from the power plug terminals and contact points using a dry cloth on the interior or exterior of the oven, broken door latches, cracks in a risk of this Section. Connect the oven to direct sunlight or water (rain drops). • This may result in electric shock or fire. Do not install...
... location, or in a location exposed to a 20A circuit. Do not cut or remove the third (ground) prong from the power plug terminals and contact points using a dry cloth on the interior or exterior of the oven, broken door latches, cracks in a risk of this Section. Connect the oven to direct sunlight or water (rain drops). • This may result in electric shock or fire. Do not install...
User Manual
Page 5
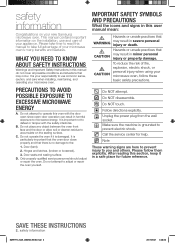
... heat on your oven unattended at the fuse or circuit breaker panel. SAVE THESE INSTRUCTIONS safety information _5 SMH1713_XAA_03899A_EN-02.indd 5 2011-05-31 3:36:37 When the power plug or power cord is in operation. • Plugging the power plug into the wall socket again may cause a spark and result in electric shock or fire. Read and follow the specific "Precautions to Avoid Possible Exposure to Excessive Microwave...
... heat on your oven unattended at the fuse or circuit breaker panel. SAVE THESE INSTRUCTIONS safety information _5 SMH1713_XAA_03899A_EN-02.indd 5 2011-05-31 3:36:37 When the power plug or power cord is in operation. • Plugging the power plug into the wall socket again may cause a spark and result in electric shock or fire. Read and follow the specific "Precautions to Avoid Possible Exposure to Excessive Microwave...
User Manual
Page 6
... door just after cooking. • Take care that it will not cook properly without the glass tray in electric shock. CRITICAL CLEANING WARNING INSTRUCTIONS Do not clean the appliance by tasting before feeding the baby. Before cleaning or performing maintenance, unplug the appliance from the wall socket and remove food waste from the door and cooking compartment. • Failing to do so may result in operation...
... door just after cooking. • Take care that it will not cook properly without the glass tray in electric shock. CRITICAL CLEANING WARNING INSTRUCTIONS Do not clean the appliance by tasting before feeding the baby. Before cleaning or performing maintenance, unplug the appliance from the wall socket and remove food waste from the door and cooking compartment. • Failing to do so may result in operation...
User Manual
Page 7
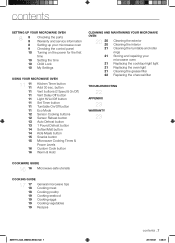
... control panel 10 Turning on the power for the first time 10 Setting the time 10 Child Lock 10 My Settings USING YOUR MICROWAVE OVEN 11 11 11 11 11 11 11 11 11 12 12 13 13 14 14 15 15 16 16 Kitchen Timer button Add 30 sec. contents SETTING UP YOUR MICROWAVE OVEN 8 8 8 Checking the parts Warranty and service information 8 Setting up your microwave oven Replacing the cooktop/night light Replacing the oven light Cleaning the grease filter Replacing the charcoal filter TROUBLESHOOTING...
... control panel 10 Turning on the power for the first time 10 Setting the time 10 Child Lock 10 My Settings USING YOUR MICROWAVE OVEN 11 11 11 11 11 11 11 11 11 12 12 13 13 14 14 15 15 16 16 Kitchen Timer button Add 30 sec. contents SETTING UP YOUR MICROWAVE OVEN 8 8 8 Checking the parts Warranty and service information 8 Setting up your microwave oven Replacing the cooktop/night light Replacing the oven light Cleaning the grease filter Replacing the charcoal filter TROUBLESHOOTING...
User Manual
Page 8
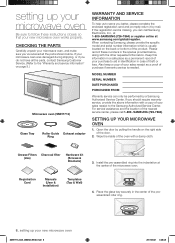
If you should require warranty service, provide the above information with a damp cloth. SETTING UP YOUR MICROWAVE OVEN 1. Registration Card Manuals (User & Installation) Templates (Top & Wall) 4. When contacting Samsung, please provide the specific model and serial number information which is needed. Grease Filters Charcoal filter (2ea) Hardware kit (Screws & Brackets) 3. MODEL NUMBER SERIAL NUMBER DATE PURCHASED PURCHASED FROM Warranty service can call 1-800- Open the door by a Samsung Authorized Service Center. If your microwave oven was damaged during shipping, or if ...
If you should require warranty service, provide the above information with a damp cloth. SETTING UP YOUR MICROWAVE OVEN 1. Registration Card Manuals (User & Installation) Templates (Top & Wall) 4. When contacting Samsung, please provide the specific model and serial number information which is needed. Grease Filters Charcoal filter (2ea) Hardware kit (Screws & Brackets) 3. MODEL NUMBER SERIAL NUMBER DATE PURCHASED PURCHASED FROM Warranty service can call 1-800- Open the door by a Samsung Authorized Service Center. If your microwave oven was damaged during shipping, or if ...
User Manual
Page 11
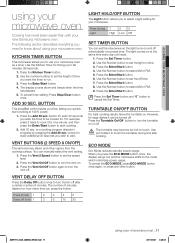
...:39 KITCHEN TIMER BUTTON This microwave allows you quickly start cooking. 2. BUTTON This simplified control saves you time, letting you to set the speed level. 2. Press the Turntable On/Off button to turn the vent on how many time you to select a light setting for timing up to touch the turntable during and after a certain number of minutes depend on . 3. ECO MODE Eco Mode reduces standby power usage. Press the Enter/Start button 4. The display counts...
...:39 KITCHEN TIMER BUTTON This microwave allows you quickly start cooking. 2. BUTTON This simplified control saves you time, letting you to set the speed level. 2. Press the Turntable On/Off button to turn the vent on how many time you to select a light setting for timing up to touch the turntable during and after a certain number of minutes depend on . 3. ECO MODE Eco Mode reduces standby power usage. Press the Enter/Start button 4. The display counts...
User Manual
Page 12
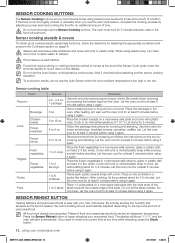
... a microwave-safe plate with plastic wrap. Cover with a fork. Do not cover. If you cook favorite foods using it again. Use a measuring cup or mug and do not use the Auto Sensor when the room ambient temperature is not thoroughly cooked or reheated when you use the Auto Sensor cooking feature continuously. Place the beverage in a microwave-safe ceramic, glass or plastic dish and add 2-4 tbs. Let the oven cool...
... a microwave-safe plate with plastic wrap. Cover with a fork. Do not cover. If you cook favorite foods using it again. Use a measuring cup or mug and do not use the Auto Sensor when the room ambient temperature is not thoroughly cooked or reheated when you use the Auto Sensor cooking feature continuously. Place the beverage in a microwave-safe ceramic, glass or plastic dish and add 2-4 tbs. Let the oven cool...
User Manual
Page 13
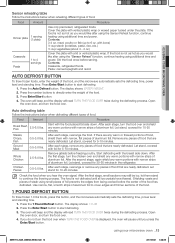
.../Start button to directly enter the weight of aluminum foil. Press the number buttons to start defrosting. 3. Open the oven door, and turn the food over and shield any pieces of the food, and the microwave automatically sets the defrosting time, power level and standing time. Food Amount Procedure Roast Beef, Pork 2.5-6.0 lbs. Steaks, Chops, Fish Ground Meat 0.5-3.0 lbs. 0.5-3.0 lbs. After each stage, rearrange the food. Let stand, covered...
.../Start button to directly enter the weight of aluminum foil. Press the number buttons to start defrosting. 3. Open the oven door, and turn the food over and shield any pieces of the food, and the microwave automatically sets the defrosting time, power level and standing time. Food Amount Procedure Roast Beef, Pork 2.5-6.0 lbs. Steaks, Chops, Fish Ground Meat 0.5-3.0 lbs. 0.5-3.0 lbs. After each stage, rearrange the food. Let stand, covered...

User Manual
Page 14
... removing from the "crisping sleeve". Remove wrapping and cut the butter in half vertically. KIDS MEALS BUTTON 1. Press the Start button to the directions on a plate. Let stand for 1-2 minutes. Refer to begin cooking. When the oven beeps, add the buns and restart the oven. The display will show : SELECT MENU 1 TO 4. (Refer to select the amount. Place two paper towels on a microwave-safe plate...
... removing from the "crisping sleeve". Remove wrapping and cut the butter in half vertically. KIDS MEALS BUTTON 1. Press the Start button to the directions on a plate. Let stand for 1-2 minutes. Refer to begin cooking. When the oven beeps, add the buns and restart the oven. The display will show : SELECT MENU 1 TO 4. (Refer to select the amount. Place two paper towels on a microwave-safe plate...
User Manual
Page 15
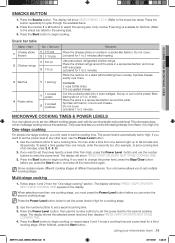
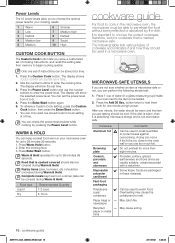
... than High, press the Power Level button and use the Power Level button. 1. Press the Start button to begin cooking. Sprinkle cheese evenly over them overlap. Multi-stage cooking 1. Follow steps 1 and 2 from Warm (1) to set a cooking time of skin. using your microwave oven _15 SMH1713_XAA_03899A_EN-02.indd 15 2011-05-31 3:36:39 Some recipes require different cooking stages at different temperatures. Scoop or cut out the potato flesh...
... than High, press the Power Level button and use the Power Level button. 1. Press the Start button to begin cooking. Sprinkle cheese evenly over them overlap. Multi-stage cooking 1. Follow steps 1 and 2 from Warm (1) to set a cooking time of skin. using your microwave oven _15 SMH1713_XAA_03899A_EN-02.indd 15 2011-05-31 3:36:39 Some recipes require different cooking stages at different temperatures. Scoop or cut out the potato flesh...
User Manual
Page 16
... selected power level. Place 1 cup of water (in your microwave oven for up to enter the cooking time. Some frozen foods are usually suitable, unless decorated with a metal trim. Press the Custom Cook button. Use the number buttons to 99 minutes 99 seconds. To retrieve a Custom Cook setting, press the Custom Cook button, then press the Enter/Start button. • You can keep cooked food warm in a glass-measuring cup) inside your oven...
... selected power level. Place 1 cup of water (in your microwave oven for up to enter the cooking time. Some frozen foods are usually suitable, unless decorated with a metal trim. Press the Custom Cook button. Use the number buttons to 99 minutes 99 seconds. To retrieve a Custom Cook setting, press the Custom Cook button, then press the Enter/Start button. • You can keep cooked food warm in a glass-measuring cup) inside your oven...
User Manual
Page 17
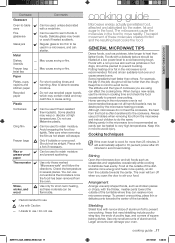
.... Stirring Open the microwave door and stir foods such as hot steam will turn off when you are using can use Melamine plastic. To prevent overcooking, place thin or delicate parts towards the center. Can be used if heat-resistant thermoplastic. You can affect the cooking time. Making candy in mind to avoid injury. Use only small amounts of square baking dishes. cooking guide _17 SMH1713_XAA_03899A_EN...
.... Stirring Open the microwave door and stir foods such as hot steam will turn off when you are using can use Melamine plastic. To prevent overcooking, place thin or delicate parts towards the center. Can be used if heat-resistant thermoplastic. You can affect the cooking time. Making candy in mind to avoid injury. Use only small amounts of square baking dishes. cooking guide _17 SMH1713_XAA_03899A_EN...
User Manual
Page 18
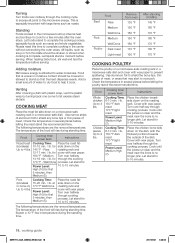
... time. Turn over half way through cooking process. Cooking Time: 6-10 min. / lb. 180 °F dark meat 170 °F light meat Power Level: Medium High (7). Cover with wax paper. When heating baby food, stir well and test the temperature before letting the poultry stand the recommended time. The following temperatures are the removal temperatures. Food Cooking time/ power level Instructions Roast beef Cooking Time: Place the roast fat- (boneless) 10-15 min. / lb. Rare roasting rack...
... time. Turn over half way through cooking process. Cooking Time: 6-10 min. / lb. 180 °F dark meat 170 °F light meat Power Level: Medium High (7). Cover with wax paper. When heating baby food, stir well and test the temperature before letting the poultry stand the recommended time. The following temperatures are the removal temperatures. Food Cooking time/ power level Instructions Roast beef Cooking Time: Place the roast fat- (boneless) 10-15 min. / lb. Rare roasting rack...
User Manual
Page 19
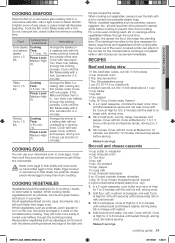
... halfway through the cooking process. When cooking cut vegetables, always cover the dish with lid. Whole, unpeeled vegetables such as potatoes, acorn squash or corn on the cob, should have their shells can stand on a microwave-safe roasting rack in a circle on the turntable before cooking is needed. For a more evenly if turned over halfway through the cooking process. Remove bay leaves before...
... halfway through the cooking process. When cooking cut vegetables, always cover the dish with lid. Whole, unpeeled vegetables such as potatoes, acorn squash or corn on the cob, should have their shells can stand on a microwave-safe roasting rack in a circle on the turntable before cooking is needed. For a more evenly if turned over halfway through the cooking process. Remove bay leaves before...

User Manual
Page 20
... cooking. Makes about 2 quarts. cleaning and maintaining your microwave oven Keeping your microwave. Wash the glass door with lid. Clean the interior surfaces (oven cavity) of your microwave using a solution of your microwave oven clean improves its performance, wards off with care and do not put it to avoid injury. Let water stand in no particles accumulate and prevent the door from breaking, handle it with a soft cloth. Warm...
... cooking. Makes about 2 quarts. cleaning and maintaining your microwave oven Keeping your microwave. Wash the glass door with lid. Clean the interior surfaces (oven cavity) of your microwave using a solution of your microwave oven clean improves its performance, wards off with care and do not put it to avoid injury. Let water stand in no particles accumulate and prevent the door from breaking, handle it with a soft cloth. Warm...
User Manual
Page 21
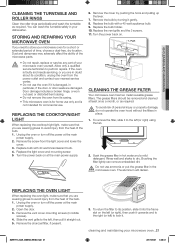
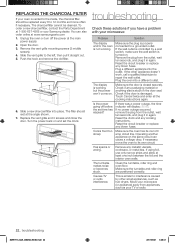
... power supply. 2. Remove the charcoal filter, if present. 3. cleaning and maintaining your dishwasher. Open the door. 3. To avoid risk of your nearest service center. • Do not use the oven if it straight out. 5. REPLACING THE COOKTOP/NIGHT LIGHT When replacing the cooktop/night light, make sure that you are wearing gloves to the left ) to perform repairs. You can remove embedded dirt. Replace the bulb holder. 10. Push 2. Remove the vent cover mounting...
... power supply. 2. Remove the charcoal filter, if present. 3. cleaning and maintaining your dishwasher. Open the door. 3. To avoid risk of your nearest service center. • Do not use the oven if it straight out. 5. REPLACING THE COOKTOP/NIGHT LIGHT When replacing the cooktop/night light, make sure that you are wearing gloves to the left ) to perform repairs. You can remove embedded dirt. Replace the bulb holder. 10. Push 2. Remove the vent cover mounting...
User Manual
Page 22
... turn off before the set the clock. Open the door. 3. Remove the vent grille mounting screws (3 middle screws). 4. Slide the vent grille to repair the wall outlet. Slide a new charcoal filter into place. Turn the power back on . Make sure the plug is turned on the same circuit can also order online at least one inch between the foil and the interior oven walls. If the wall outlet is controlled by other appliance doesn't work...
... turn off before the set the clock. Open the door. 3. Remove the vent grille mounting screws (3 middle screws). 4. Slide the vent grille to repair the wall outlet. Slide a new charcoal filter into place. Turn the power back on . Make sure the plug is turned on the same circuit can also order online at least one inch between the foil and the interior oven walls. If the wall outlet is controlled by other appliance doesn't work...
User Manual
Page 23
... which vary from a SAMSUNG authorized service center. incorrect electrical line voltage, fluctuations and surges; reduced magnetron power output related to follow operating instructions, cleaning, maintenance and environmental instructions that are covered and prescribed in the instruction book; samsung.com warranty _23 SMH1713_XAA_03899A_EN-02.indd 23 2011-05-31 3:36:41 Warranty service can not be necessary to remove, repair and return the product. All replaced parts and products become the property...
... which vary from a SAMSUNG authorized service center. incorrect electrical line voltage, fluctuations and surges; reduced magnetron power output related to follow operating instructions, cleaning, maintenance and environmental instructions that are covered and prescribed in the instruction book; samsung.com warranty _23 SMH1713_XAA_03899A_EN-02.indd 23 2011-05-31 3:36:41 Warranty service can not be necessary to remove, repair and return the product. All replaced parts and products become the property...


