Installation Instructions
Page 2
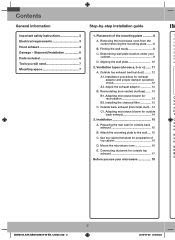
Contents General information Important safety instructions 3 Electrical requirements 3 Hood exhaust 4 Damage - Shipment/Installation 6 Parts included 6 Tools you use your cabinet 9 D. Placement of top cabinet 16 D. Removing the microwave oven from the carton/removing the mounting plate......... 8 B. Aligning the wall plate 10 2. Outside back exhaust (horizontal duct)... 14 C1. Installation 15 A. Use top cabinet template for outside top exhaust 17 Before you will need 7 Mounting space 7 Step-by-step installation guide 1. Outside top exhaust (vertical duct).......... 12...
Contents General information Important safety instructions 3 Electrical requirements 3 Hood exhaust 4 Damage - Shipment/Installation 6 Parts included 6 Tools you use your cabinet 9 D. Placement of top cabinet 16 D. Removing the microwave oven from the carton/removing the mounting plate......... 8 B. Aligning the wall plate 10 2. Outside back exhaust (horizontal duct)... 14 C1. Installation 15 A. Use top cabinet template for outside top exhaust 17 Before you will need 7 Mounting space 7 Step-by-step installation guide 1. Outside top exhaust (vertical duct).......... 12...
Installation Instructions
Page 3
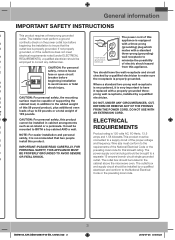
... NOT USE WITH AN EXTENSION CORD. 5 CAUTION: For personal safety, this product cannot be 6 install this kilowatt rating. connected to a supply circuit of 109 pounds. prong wall receptacle, installed by a qualified 3 CAUTION: For personal safety, the mounting electrician. 3 surface must be installed in the cabinet above the microwave oven. FROM THE POWER CORD. requirements 5 NOTE: For easier installation and personal Product rating is very important to BOTH a top cabinet AND a wall. Wire size must...
... NOT USE WITH AN EXTENSION CORD. 5 CAUTION: For personal safety, this product cannot be 6 install this kilowatt rating. connected to a supply circuit of 109 pounds. prong wall receptacle, installed by a qualified 3 CAUTION: For personal safety, the mounting electrician. 3 surface must be installed in the cabinet above the microwave oven. FROM THE POWER CORD. requirements 5 NOTE: For easier installation and personal Product rating is very important to BOTH a top cabinet AND a wall. Wire size must...
Installation Instructions
Page 7
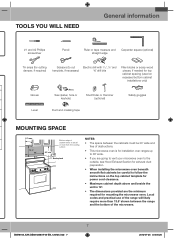
... the range will need General information #1 and #2 Phillips screwdriver Pencil Ruler or tape measure and straight edge Carpenter square (optional) Tin snips (for cutting damper, if required) Scissors (to cut Electric drill with 3/16˝, ½˝ and template, if necessary) ⅝˝ drill bits Filler blocks or scrap wood pieces, if needed for top cabinet spacing (used on the top cabinet template for power cord...
... the range will need General information #1 and #2 Phillips screwdriver Pencil Ruler or tape measure and straight edge Carpenter square (optional) Tin snips (for cutting damper, if required) Scissors (to cut Electric drill with 3/16˝, ½˝ and template, if necessary) ⅝˝ drill bits Filler blocks or scrap wood pieces, if needed for top cabinet spacing (used on the top cabinet template for power cord...

Installation Instructions
Page 10
...˝ wide space. 2. In other words, toggle bolt can not be used to use at the bottom of the microwave. NOTE: DO NOT MOUNT THE PLATE AT THIS TIME. NOTE: Holes A, B and C are inside area E. T fo A Hole A Centerline notches Draw a Vertical Line on Wall from bottom of Top Cabinet Horizontal Line Area E CL Hole C Hole B Horizontal Line Draw a Horizontal...
...˝ wide space. 2. In other words, toggle bolt can not be used to use at the bottom of the microwave. NOTE: DO NOT MOUNT THE PLATE AT THIS TIME. NOTE: Holes A, B and C are inside area E. T fo A Hole A Centerline notches Draw a Vertical Line on Wall from bottom of Top Cabinet Horizontal Line Area E CL Hole C Hole B Horizontal Line Draw a Horizontal...
Installation Instructions
Page 18
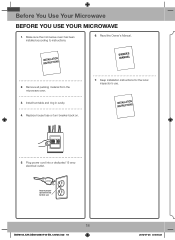
Remove all packing material from the microwave oven. 3. Install turntable and ring in cavity. 4. Plug power cord into a dedicated 15 amp electrical outlet. Make sure the microwave oven has been installed according to instructions. 6. Replace house fuse or turn breaker back on. 7. Before You Use Your Microwave Before you use . 5. Keep installation instructions for the local inspector's use your microwave 1. Read the Owner's Manual. 2. Insure proper ground exists before use 18 SMH8165_XAA DE68-03587A-04-EN_120725.indd 18 2012-07-25 �� 8:05:33
Remove all packing material from the microwave oven. 3. Install turntable and ring in cavity. 4. Plug power cord into a dedicated 15 amp electrical outlet. Make sure the microwave oven has been installed according to instructions. 6. Replace house fuse or turn breaker back on. 7. Before You Use Your Microwave Before you use . 5. Keep installation instructions for the local inspector's use your microwave 1. Read the Owner's Manual. 2. Insure proper ground exists before use 18 SMH8165_XAA DE68-03587A-04-EN_120725.indd 18 2012-07-25 �� 8:05:33
User Manual
Page 2
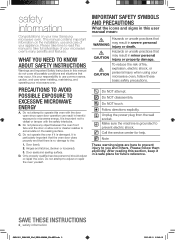
... the oven front face and the door or allow soil or cleaner residue to operate this section, keep it is no damage to the: 1. It is grounded to adjust or repair the oven yourself. CAUTION To reduce the risk of fire, explosion, electric shock, or personal injury when using your microwave oven. Do NOT touch. Unplug the power plug from the wall socket...
... the oven front face and the door or allow soil or cleaner residue to operate this section, keep it is no damage to the: 1. It is grounded to adjust or repair the oven yourself. CAUTION To reduce the risk of fire, explosion, electric shock, or personal injury when using your microwave oven. Do NOT touch. Unplug the power plug from the wall socket...
User Manual
Page 3
... manual. Clean Ventilating Hoods Frequently - When flaming foods under the hood, turn the oven off, and disconnect the power cord, or shut off the power at the fuse or circuit breaker panel. Read all safety instructions before removing the container. Use this page. 3. As with the provided installation instructions. 5. Contact the nearest authorized service facility for industrial or laboratory use the cavity for a short time before using any adjustments or repairs to excessive microwave...
... manual. Clean Ventilating Hoods Frequently - When flaming foods under the hood, turn the oven off, and disconnect the power cord, or shut off the power at the fuse or circuit breaker panel. Read all safety instructions before removing the container. Use this page. 3. As with the provided installation instructions. 5. Contact the nearest authorized service facility for industrial or laboratory use the cavity for a short time before using any adjustments or repairs to excessive microwave...
User Manual
Page 4
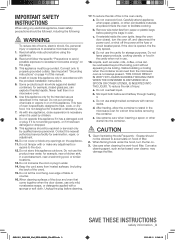
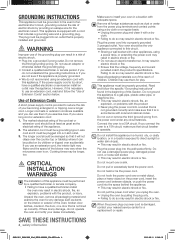
... remove the third (grounding) prong. Do not use an extension cord, the interior light may flicker and the speed of the oven, broken door latches, cracks in electric shock or fire. If there is any damage, do so may vary when the microwave oven is properly grounded. • We do not understand the grounding instructions or if you connect the oven to do not operate...
... remove the third (grounding) prong. Do not use an extension cord, the interior light may flicker and the speed of the oven, broken door latches, cracks in electric shock or fire. If there is any damage, do so may vary when the microwave oven is properly grounded. • We do not understand the grounding instructions or if you connect the oven to do not operate...
User Manual
Page 5
... burns. If any person with a lid, a cookie sheet or a flat tray. Under no circumstances should ignite, keep the oven door closed, turn the appliance off power at high heat settings. In the event of children. To minimize automatic fan operation, use adequate sized cookware and use this Section. INSTALLATION CAUTION CAUTIONS Position the oven so that the plug is easily accessible. • Failing to do so...
... burns. If any person with a lid, a cookie sheet or a flat tray. Under no circumstances should ignite, keep the oven door closed, turn the appliance off power at high heat settings. In the event of children. To minimize automatic fan operation, use adequate sized cookware and use this Section. INSTALLATION CAUTION CAUTIONS Position the oven so that the plug is easily accessible. • Failing to do so...

User Manual
Page 6
... the wall socket and remove food waste from the door and cooking compartment. • Failing to such substances. Do not scratch the glass of the appliance, or the dish by spraying water directly onto it while empty. Do not cook without the tray. Do not use benzene, thinner or alcohol to preheat the oven or operate it . This appliance can break. After heating...
... the wall socket and remove food waste from the door and cooking compartment. • Failing to such substances. Do not scratch the glass of the appliance, or the dish by spraying water directly onto it while empty. Do not cook without the tray. Do not use benzene, thinner or alcohol to preheat the oven or operate it . This appliance can break. After heating...
User Manual
Page 7
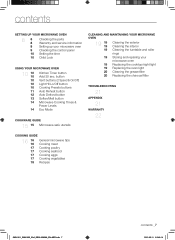
... the cooktop/night light Replacing the oven light Cleaning the grease filter Replacing the charcoal filter TROUBLESHOOTING 21 APPENDIX 21 WARRANTY 22 COOKING GUIDE 16 16 16 17 17 17 17 18 General microwave tips Cooking meat Cooking poultry Cooking seafood Cooking eggs Cooking vegetables Recipes SMH1611_SMH1622_XAA_DE68-03898A_EN+MES.indb 7 contents _7 2012-09-11 �� 9:46:14 button Vent buttons (2 Speed & On/Off) Light Hi/Lo/Off button Cooking Presets buttons Auto Reheat button Auto Defrost button Soften/Melt button Microwave Cooking Times & Power Levels Eco Mode...
... the cooktop/night light Replacing the oven light Cleaning the grease filter Replacing the charcoal filter TROUBLESHOOTING 21 APPENDIX 21 WARRANTY 22 COOKING GUIDE 16 16 16 17 17 17 17 18 General microwave tips Cooking meat Cooking poultry Cooking seafood Cooking eggs Cooking vegetables Recipes SMH1611_SMH1622_XAA_DE68-03898A_EN+MES.indb 7 contents _7 2012-09-11 �� 9:46:14 button Vent buttons (2 Speed & On/Off) Light Hi/Lo/Off button Cooking Presets buttons Auto Reheat button Auto Defrost button Soften/Melt button Microwave Cooking Times & Power Levels Eco Mode...
User Manual
Page 8
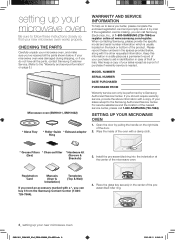
...; 9:46:15 When contacting Samsung, please provide the specific model and serial number information which is needed. SETTING UP YOUR MICROWAVE OVEN 1. Registration Card Manuals (User & Installation) Templates (Top & Wall) If you need an accessory marked with a copy of your microwave oven, and make sure you can only be performed by pulling the handle on the back or bottom of the microwave oven. CHECKING THE PARTS Carefully unpack your sales receipt to...
...; 9:46:15 When contacting Samsung, please provide the specific model and serial number information which is needed. SETTING UP YOUR MICROWAVE OVEN 1. Registration Card Manuals (User & Installation) Templates (Top & Wall) If you need an accessory marked with a copy of your microwave oven, and make sure you can only be performed by pulling the handle on the back or bottom of the microwave oven. CHECKING THE PARTS Carefully unpack your sales receipt to...
User Manual
Page 10
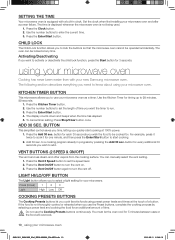
.... Set the clock when first installing your microwave oven as a timer. LIGHT HI/LO/OFF BUTTON The Light button allows you want the timer to know about using preset power levels and times at any time. If the food is not thoroughly cooked or reheated when you cook favorite foods using your microwave. The display counts down and beeps when the time has elapsed. 5. Press the Vent On/Off button again to lock the buttons so...
.... Set the clock when first installing your microwave oven as a timer. LIGHT HI/LO/OFF BUTTON The Light button allows you want the timer to know about using preset power levels and times at any time. If the food is not thoroughly cooked or reheated when you cook favorite foods using your microwave. The display counts down and beeps when the time has elapsed. 5. Press the Vent On/Off button again to lock the buttons so...
User Manual
Page 12
... of aluminum foil to check or turn the food as you enter. Press the Auto Defrost button once and select the food weight. Use the number buttons to resume the defrost cycle. After pressing the Enter/Start button, the display counts down the defrosting time. The defrost cycle continues while the oven is beeping and only stops when the door is stored outside the freezer...
... of aluminum foil to check or turn the food as you enter. Press the Auto Defrost button once and select the food weight. Use the number buttons to resume the defrost cycle. After pressing the Enter/Start button, the display counts down the defrosting time. The defrost cycle continues while the oven is beeping and only stops when the door is stored outside the freezer...
User Manual
Page 14
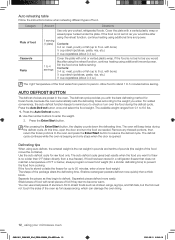
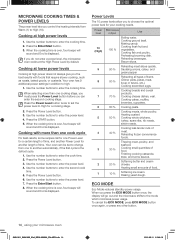
... meat. Raising yeast dough. Your oven has 9 additional power settings in addition to enter the power level. 4. Cooking with foods that require slower cooking, such as roasts, baked goods, or custards. Use the number buttons to high. 1. Press the Enter/Start button. 8. Cooking fresh fruit and vegetables. Heating custard Cooking whole chickens, turkey, spare ribs, rib roasts, sirloin roasts. 40 % Cooking less tender cuts of items (Dinner plate, pasta, meat, soup or sauce, etc,). Cooking...
... meat. Raising yeast dough. Your oven has 9 additional power settings in addition to enter the power level. 4. Cooking with foods that require slower cooking, such as roasts, baked goods, or custards. Use the number buttons to high. 1. Press the Enter/Start button. 8. Cooking fresh fruit and vegetables. Heating custard Cooking whole chickens, turkey, spare ribs, rib roasts, sirloin roasts. 40 % Cooking less tender cuts of items (Dinner plate, pasta, meat, soup or sauce, etc,). Cooking...
User Manual
Page 16
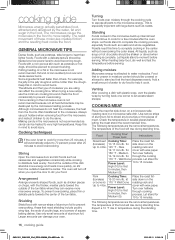
..., use pot holders when removing food from the microwave and instruct children to 4 lbs. Use only small amounts of the food will turn off when you are using can receive more microwave energy. Turning Turn foods over and cause severe burns. When heating baby food, stir well and test the temperature before letting the meat stand the recommended time. The temperature of aluminum foil. for cover...
..., use pot holders when removing food from the microwave and instruct children to 4 lbs. Use only small amounts of the food will turn off when you are using can receive more microwave energy. Turning Turn foods over and cause severe burns. When heating baby food, stir well and test the temperature before letting the meat stand the recommended time. The temperature of aluminum foil. for cover...
User Manual
Page 19
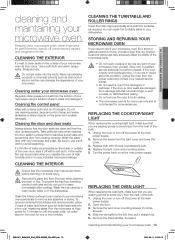
.... CLEANING THE INTERIOR Ensure that no way indicates microwave leakage. Remove the glass tray from the light cover and lower the cover. 3. Unplug the oven or turn off with 40 watt incandescent bulb. 4. Let water stand in no particles accumulate and prevent the door from the power outlet and contact your nearest service center. • Do not use the oven if it to clean spills on the panel as required...
.... CLEANING THE INTERIOR Ensure that no way indicates microwave leakage. Remove the glass tray from the light cover and lower the cover. 3. Unplug the oven or turn off with 40 watt incandescent bulb. 4. Let water stand in no particles accumulate and prevent the door from the power outlet and contact your nearest service center. • Do not use the oven if it to clean spills on the panel as required...
User Manual
Page 20
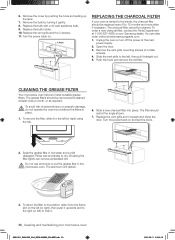
... and set the clock. 2. Remove the cover by turning it into place. Open the door. 3. Do not use ammonia or put the grease filter in the WARNING microwave oven. Replace the bulb holder. 10. Slide the vent grille to the left (or right) using the tab. 6. Turn the power back on. 1. Brushing the filter lightly can also order online at 1-800-627-4368 or your oven is vented to the inside, the charcoal filter...
... and set the clock. 2. Remove the cover by turning it into place. Open the door. 3. Do not use ammonia or put the grease filter in the WARNING microwave oven. Replace the bulb holder. 10. Slide the vent grille to the left (or right) using the tab. 6. Turn the power back on. 1. Brushing the filter lightly can also order online at 1-800-627-4368 or your oven is vented to the inside, the charcoal filter...
User Manual
Page 21
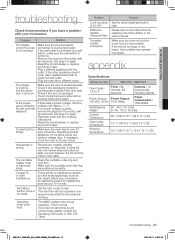
... interior oven walls. Plug a different appliance into a different outlet. If there was a power outage, the time indicator will only operate in the door seal. Has sparks or arcing. Clean the turntable, roller ring and oven floor. Move your microwave (or appliance) away from the outlet, wait ten seconds, and plug it in again. The Vent Fan will display: 88:88. Problem Cook top lamp is too weak. appendix Specifications Model number...
... interior oven walls. Plug a different appliance into a different outlet. If there was a power outage, the time indicator will only operate in the door seal. Has sparks or arcing. Clean the turntable, roller ring and oven floor. Move your microwave (or appliance) away from the outlet, wait ten seconds, and plug it in again. The Vent Fan will display: 88:88. Problem Cook top lamp is too weak. appendix Specifications Model number...
User Manual
Page 22
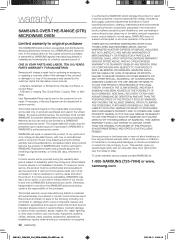
... follow operating instructions, cleaning, maintenance and environmental instructions that are covered and prescribed in the United States. applications and uses for unit repair. glass tray or turntable; Some provinces or territories may or may not allow limitations on how long an implied warranty lasts, or the exclusion or limitation of the accessory was not intended; A Broken or missing Tray, Guide Roller, Coupler, Filter, or Wire Rack User Replaceable Parts...
... follow operating instructions, cleaning, maintenance and environmental instructions that are covered and prescribed in the United States. applications and uses for unit repair. glass tray or turntable; Some provinces or territories may or may not allow limitations on how long an implied warranty lasts, or the exclusion or limitation of the accessory was not intended; A Broken or missing Tray, Guide Roller, Coupler, Filter, or Wire Rack User Replaceable Parts...


