Quick Guide (ENGLISH)
Page 10
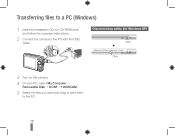
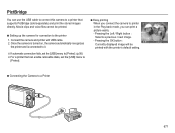
Transferring files to a PC (Windows) 1 Insert the installation CD in a CD-ROM drive and follow the onscreen instructions. 2 Connect the camera to the PC. 10 Disconnecting safely (for Windows XP) Click ▼ Click 3 Turn on the camera. 4 On your PC, select My Computer → Removable Disk → DCIM → 100SSCAM. 5 Select the files you want and drag or save them to the PC with the USB cable.
Transferring files to a PC (Windows) 1 Insert the installation CD in a CD-ROM drive and follow the onscreen instructions. 2 Connect the camera to the PC. 10 Disconnecting safely (for Windows XP) Click ▼ Click 3 Turn on the camera. 4 On your PC, select My Computer → Removable Disk → DCIM → 100SSCAM. 5 Select the files you want and drag or save them to the PC with the USB cable.
User Manual (ENGLISH)
Page 2
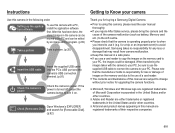
...Disk]. (p.92) Thank you for buying a Samsung Digital Camera. å Prior to using this camera, please read the user manual thoroughly. å If you require After Sales service, please bring the camera and the cause of the camera malfunction (such as battery, Memory card etc... picture Take a picture. (p.20) Insert the USB cable Insert the supplied USB cable into the PC's USB port and the camera's USB connection terminal. (p.91) Check the camera's power Check the camera's power. Samsung takes no responsibility for upgrading the camera functions. Ä Microsoft, Windows and Windows logo...
...Disk]. (p.92) Thank you for buying a Samsung Digital Camera. å Prior to using this camera, please read the user manual thoroughly. å If you require After Sales service, please bring the camera and the cause of the camera malfunction (such as battery, Memory card etc... picture Take a picture. (p.20) Insert the USB cable Insert the supplied USB cable into the PC's USB port and the camera's USB connection terminal. (p.91) Check the camera's power Check the camera's power. Samsung takes no responsibility for upgrading the camera functions. Ä Microsoft, Windows and Windows logo...
User Manual (ENGLISH)
Page 4
...229; Avoid obstructing the lens or the flash when you may experience the following. Failure to do so may damage the cords or cables and cause a fire or electric shock. å Take care not to touch the lens or lens cover to use the Scene modes... 008 Identification of features 008 Front & Top 009 Back 010 Bottom 010 5 Function button 011 Self-timer lamp 011 Camera Status Lamp 011 Mode icon 012 Connecting to the USB port of computer malfunction. Caution Contents CAUTION indicates a potentially hazardous situation which, if not avoided, may result in a...
...229; Avoid obstructing the lens or the flash when you may experience the following. Failure to do so may damage the cords or cables and cause a fire or electric shock. å Take care not to touch the lens or lens cover to use the Scene modes... 008 Identification of features 008 Front & Top 009 Back 010 Bottom 010 5 Function button 011 Self-timer lamp 011 Camera Status Lamp 011 Mode icon 012 Connecting to the USB port of computer malfunction. Caution Contents CAUTION indicates a potentially hazardous situation which, if not avoided, may result in a...
User Manual (ENGLISH)
Page 8
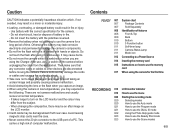
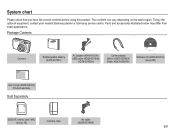
...AC adapter (AD44-00131A) / USB cable (AD39-00164A, AD39-00165A) Camera strap (Silver: AD63-02596A/ Black: AD63-02604A) Software CD (AD46-00241A) (see p.88) User manual (AD68-03970A), Product warranty Sold Separately SD/SDHC memory card / MMC (see p.16) Camera case AV cable (AD39-00146A) 007 System ...chart Please check that you have the correct contents before using this product. The contents can vary depending on the sales region. To buy the optional equipment, contact your nearest Samsung dealer or Samsung service centre. ...
...AC adapter (AD44-00131A) / USB cable (AD39-00164A, AD39-00165A) Camera strap (Silver: AD63-02596A/ Black: AD63-02604A) Software CD (AD46-00241A) (see p.88) User manual (AD68-03970A), Product warranty Sold Separately SD/SDHC memory card / MMC (see p.16) Camera case AV cable (AD39-00146A) 007 System ...chart Please check that you have the correct contents before using this product. The contents can vary depending on the sales region. To buy the optional equipment, contact your nearest Samsung dealer or Samsung service centre. ...
User Manual (ENGLISH)
Page 12
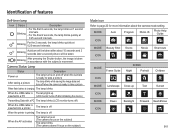
...The lamp blinks (The camera doesn't focus on the subject) Mode icon Refer to page 20 for more information about 10 seconds and 2 seconds later a second picture will be taken after initializing the device) Transmitting Data with a PC The lamp blinks (LCD monitor turns off) When the USB cable is inserted into a ...The lamp turns on and off when the camera is ready to take a picture The lamp blinks while saving the image data and turns off when the camera is ready to take a picture When flash battery is charging The lamp blinks When the USB cable is The lamp lights up Text Sunset ...
...The lamp blinks (The camera doesn't focus on the subject) Mode icon Refer to page 20 for more information about 10 seconds and 2 seconds later a second picture will be taken after initializing the device) Transmitting Data with a PC The lamp blinks (LCD monitor turns off) When the USB cable is inserted into a ...The lamp turns on and off when the camera is ready to take a picture The lamp blinks while saving the image data and turns off when the camera is ready to take a picture When flash battery is charging The lamp blinks When the USB cable is The lamp lights up Text Sunset ...

User Manual (ENGLISH)
Page 13
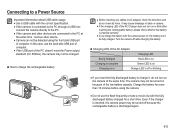
...reduced battery life. å Batteries will not be used as a power cable. - You can charge the rechargeable battery with the USB cable can lose power over time and are measured under Samsung's standard conditions and shooting conditions and may become warm. Movie Using the ...fully charged battery Approx. 130 MIN 640x480 image size 30fps frame rate Ä These figures are prone to charge the battery before using the camera...
...reduced battery life. å Batteries will not be used as a power cable. - You can charge the rechargeable battery with the USB cable can lose power over time and are measured under Samsung's standard conditions and shooting conditions and may become warm. Movie Using the ...fully charged battery Approx. 130 MIN 640x480 image size 30fps frame rate Ä These figures are prone to charge the battery before using the camera...
User Manual (ENGLISH)
Page 14
... fully charged. Connecting to a Power Source Important information about USB cable usage. å Use a USB cable with the correct specification. å If the camera is connected to the PC through a USB hub : connect the camera directly to the PC. å If the camera and other device. å Camera can not be charged. Ê How to charge the...
... fully charged. Connecting to a Power Source Important information about USB cable usage. å Use a USB cable with the correct specification. å If the camera is connected to the PC through a USB hub : connect the camera directly to the PC. å If the camera and other device. å Camera can not be charged. Ê How to charge the...
User Manual (ENGLISH)
Page 57
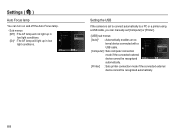
... automatically to a PC or a printer using a USB cable, you can turn on and off the Auto Focus lamp. - Video Out AF Lamp USB Back :NTSC Off :On On :Auto Set Setting the USB If the camera is set [Computer] or [Printer]. -[USB] sub menus: [Auto]* : Automatically enables an ...external device connected with a USB cable. [Computer] : Sets computer connection Video Out AF Lamp USB :NTSC :On Auto:Auto Computer...
... automatically to a PC or a printer using a USB cable, you can turn on and off the Auto Focus lamp. - Video Out AF Lamp USB Back :NTSC Off :On On :Auto Set Setting the USB If the camera is set [Computer] or [Printer]. -[USB] sub menus: [Auto]* : Automatically enables an ...external device connected with a USB cable. [Computer] : Sets computer connection Video Out AF Lamp USB :NTSC :On Auto:Auto Computer...

User Manual (ENGLISH)
Page 66
... On Auto Off On Yes No Secondary Menu Page p.78 p.79 - Ä Menus are subject to the camera, sold separately) with a USB cable. Setting up the play back function using the LCD monitor This menu is available while the camera is connected to a PictBridge supporting printer (direct connection to change without prior notice. 065
... On Auto Off On Yes No Secondary Menu Page p.78 p.79 - Ä Menus are subject to the camera, sold separately) with a USB cable. Setting up the play back function using the LCD monitor This menu is available while the camera is connected to a PictBridge supporting printer (direct connection to change without prior notice. 065
User Manual (ENGLISH)
Page 78
... Print Menu the printer and is turned on, the camera automatically recognizes Currently displayed image will be printed. in the Play back mode, you connect the camera to a Printer 077 printed with USB cable. - Connect the camera and printer with the printer's default setting. Ä... If automatic connection fails, set the [USB] menu to [Printer]. (p.56) Ä For a printer that ...
... Print Menu the printer and is turned on, the camera automatically recognizes Currently displayed image will be printed. in the Play back mode, you connect the camera to a Printer 077 printed with USB cable. - Connect the camera and printer with the printer's default setting. Ä... If automatic connection fails, set the [USB] menu to [Printer]. (p.56) Ä For a printer that ...
User Manual (ENGLISH)
Page 81
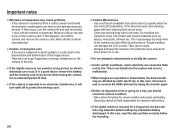
...turn the camera off and wait for an extended period of the lens. å If the digital camera is dispersed. If the lens is not used for testing the camera condition ..., the date and time may cause problems. - Samsung cannot be affected by automatical battery discharged. Clean the camera body with solvent materials such as benzol, insecticide,...camera is a good idea to protect the memory card. å Camera Maintenance - It is exposed to an electronic interference, it could result in use. å Do not attempt to fire. If this case, disconnect and re-connect the USB cable...
...turn the camera off and wait for an extended period of the lens. å If the digital camera is dispersed. If the lens is not used for testing the camera condition ..., the date and time may cause problems. - Samsung cannot be affected by automatical battery discharged. Clean the camera body with solvent materials such as benzol, insecticide,...camera is a good idea to protect the memory card. å Camera Maintenance - It is exposed to an electronic interference, it could result in use. å Do not attempt to fire. If this case, disconnect and re-connect the USB cable...
User Manual (ENGLISH)
Page 84
...appear. → This is a phenomenon called smear and it is not a malfunction. This is not a malfunction. 083 Alternatively the PC does not support USB à Install Windows 2000, XP, Vista / Mac OS 10.3 to the original scene åWhite balance or effect setting is incorrect à Select ...Colour of the recorded image. A vertical line appears on or a spot appears. åAlthough the LCD screen is manufactured with the camera à Check the connection cables åThere are not occasionally lighted or the red, white and blue spots appear. → This phenomenon does not affect the ...
...appear. → This is a phenomenon called smear and it is not a malfunction. This is not a malfunction. 083 Alternatively the PC does not support USB à Install Windows 2000, XP, Vista / Mac OS 10.3 to the original scene åWhite balance or effect setting is incorrect à Select ...Colour of the recorded image. A vertical line appears on or a spot appears. åAlthough the LCD screen is manufactured with the camera à Check the connection cables åThere are not occasionally lighted or the red, white and blue spots appear. → This phenomenon does not affect the ...
User Manual (ENGLISH)
Page 91
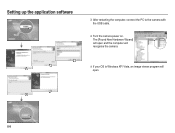
Turn the camera power on. After restarting the computer, connect the PC to the camera with the USB cable. 4. The [Found New Hardware Wizard] will open and the computer will recognise the camera. Ä If your OS is Windows XP/ Vista, an image viewer program will open. 090 Setting up the application software 3.
Turn the camera power on. After restarting the computer, connect the PC to the camera with the USB cable. 4. The [Found New Hardware Wizard] will open and the computer will recognise the camera. Ä If your OS is Windows XP/ Vista, an image viewer program will open. 090 Setting up the application software 3.

User Manual (ENGLISH)
Page 92
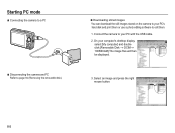
... to [Computer]. (p.56) Important information about USB cable usage. å If the camera is turned on the camera. 2. Starting PC mode If you connect the USB cable to a USB port on your PC and then turn on the power, the camera will automatically switch to your PC through a USB hub: connect the camera directly to the PC. å If the...
... to [Computer]. (p.56) Important information about USB cable usage. å If the camera is turned on the camera. 2. Starting PC mode If you connect the USB cable to a USB port on your PC and then turn on the power, the camera will automatically switch to your PC through a USB hub: connect the camera directly to the PC. å If the...
User Manual (ENGLISH)
Page 93
Select an image and press the right mouse button. 092 On your PC with the USB cable. 2. Connect the camera to edit them. 1. Starting PC mode Ê Connecting the camera to a PC Ê Disconnecting the camera and PC Refer to page 94 (Removing the removable disk). Ê Downloading stored images You can download the still images stored on the camera to your PC's hard disk and print them or use a photo editing software to your computer's desktop display, select [My computer] and double click [Removable Disk à DCIMà 100SSCAM].The image files will then be displayed. 3.
Select an image and press the right mouse button. 092 On your PC with the USB cable. 2. Connect the camera to edit them. 1. Starting PC mode Ê Connecting the camera to a PC Ê Disconnecting the camera and PC Refer to page 94 (Removing the removable disk). Ê Downloading stored images You can download the still images stored on the camera to your PC's hard disk and print them or use a photo editing software to your computer's desktop display, select [My computer] and double click [Removable Disk à DCIMà 100SSCAM].The image files will then be displayed. 3.
User Manual (ENGLISH)
Page 95
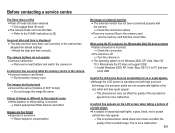
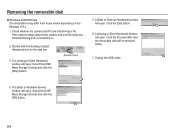
... . The [Unplug or Eject Hardware] window will open . A [Unplug or Eject Hardware] window will be removed safely. 7. Unplug the USB cable. 4. If the camera status lamp blinks, please wait until the lamp has finished blinking and is constantly on the task bar. 3. Click the [Close] button and... the removable disk will open . Double-click the [Unplug or Eject Hardware] icon on . 2. Check whether the camera and PC are transferring a file. A [Safe to Remove Hardware] window will open . Removing the removable disk Ê Windows 2000/XP/Vista (The...
... . The [Unplug or Eject Hardware] window will open . A [Unplug or Eject Hardware] window will be removed safely. 7. Unplug the USB cable. 4. If the camera status lamp blinks, please wait until the lamp has finished blinking and is constantly on the task bar. 3. Click the [Close] button and... the removable disk will open . Double-click the [Unplug or Eject Hardware] icon on . 2. Check whether the camera and PC are transferring a file. A [Safe to Remove Hardware] window will open . Removing the removable disk Ê Windows 2000/XP/Vista (The...
User Manual (ENGLISH)
Page 100
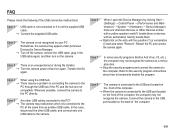
... the PC at the same time as a removable disk. Ã Stop the security programs and connect the camera to the USB port located on again. Case 3 There is not the supplied USB cable. Ã Connect the supplied USB cable. Case 1 USB cable is not connected or it is connected to the computer. In this case, disconnect the other...
... the PC at the same time as a removable disk. Ã Stop the security programs and connect the camera to the USB port located on again. Case 3 There is not the supplied USB cable. Ã Connect the supplied USB cable. Case 1 USB cable is not connected or it is connected to the computer. In this case, disconnect the other...


