Quick Guide (ENGLISH)
Page 7
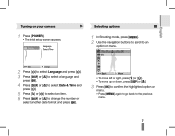
... camera 1 Press [POWER]. ▪▪ The intial setup screen appears. EV 2 Press [ ] to select Language and press [ ]. 3 Press [ ] or [ ] to select a language and press [ ]. 4 Press [ ] or [ ] to select Date & Time and press [ ]. 5 Press [ ] or [ ] to select an item. 6 Press [ ] or [ ] to the previous menu....move left or right, press [ ] or To move up or down, press [ ] or [ ]. 3 Press [ ] to confirm the highlighted option or menu. ▪▪ Press [ ] again to go back to change the number or select another date format and press [ ]. Selecting options 1 In Shooting mode...
... camera 1 Press [POWER]. ▪▪ The intial setup screen appears. EV 2 Press [ ] to select Language and press [ ]. 3 Press [ ] or [ ] to select a language and press [ ]. 4 Press [ ] or [ ] to select Date & Time and press [ ]. 5 Press [ ] or [ ] to select an item. 6 Press [ ] or [ ] to the previous menu....move left or right, press [ ] or To move up or down, press [ ] or [ ]. 3 Press [ ] to confirm the highlighted option or menu. ▪▪ Press [ ] again to go back to change the number or select another date format and press [ ]. Selecting options 1 In Shooting mode...

User Manual (ENGLISH)
Page 29
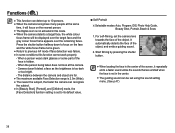
The distance ranges are shown below. When the menu is showing, the Up button operates as a direction button. Show only basic information. [Filming screen] [Information screen] [Auto Focus] [Macro ( )] [Auto Macro ( )] 28 In the recording modes or playback mode, pressing this button will display the image information. Press the Macro button ...
The distance ranges are shown below. When the menu is showing, the Up button operates as a direction button. Show only basic information. [Filming screen] [Information screen] [Auto Focus] [Macro ( )] [Auto Macro ( )] 28 In the recording modes or playback mode, pressing this button will display the image information. Press the Macro button ...
User Manual (ENGLISH)
Page 39
Press the shutter button halfway down to focus on the nearest person. å The Digital zoom is not in this function cannot work properly. - For self-filming, set the camera lens towards the face of the object, and emits a guiding sound. 2. Functions ( ) å This function can detect up to 10...229; Return to previous AF mode if face detection was failure. å In some part of the screen, it will be set using the sound setting menu. (See p.47) 38 The distance between the camera and object are emitted when the face is not activated in the center. å The guiding sound...
Press the shutter button halfway down to focus on the nearest person. å The Digital zoom is not in this function cannot work properly. - For self-filming, set the camera lens towards the face of the object, and emits a guiding sound. 2. Functions ( ) å This function can detect up to 10...229; Return to previous AF mode if face detection was failure. å In some part of the screen, it will be set using the sound setting menu. (See p.47) 38 The distance between the camera and object are emitted when the face is not activated in the center. å The guiding sound...
User Manual (ENGLISH)
Page 53
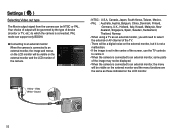
...an external monitor When the camera is not in the centre of the screen, use the TV controls to an external monitor, the menu will be visible on the external monitor and the menu functions are the same ...can be visible on the external monitor, but it . - There will be governed by the type of the camera. Video Out AF Lamp USB NTS:CNTSC PAL :On :Auto Back Set - Your choice of output will be ... is connected to an external monitor, the image and menus on the LCD monitor will be a digital noise on the external monitor and the LCD monitor of device (monitor or TV, etc.) to an ...
...an external monitor When the camera is not in the centre of the screen, use the TV controls to an external monitor, the menu will be visible on the external monitor and the menu functions are the same ...can be visible on the external monitor, but it . - There will be governed by the type of the camera. Video Out AF Lamp USB NTS:CNTSC PAL :On :Auto Back Set - Your choice of output will be ... is connected to an external monitor, the image and menus on the LCD monitor will be a digital noise on the external monitor and the LCD monitor of device (monitor or TV, etc.) to an ...

User Manual (ENGLISH)
Page 67
...] will be saved as [Select1], [Select2] and [Select3]. Images Effect 2. Back Set [Date] : Images taken in the [Start] menu to start the multi slide show effects Unique screen effects can be saved as [Select2] automatically.You can select image to confirm the Back setting. Select a desired sub... menu by pressing Start the UP / DOWN button and press the Images RIGHT button. Press the OK button to view...
...] will be saved as [Select1], [Select2] and [Select3]. Images Effect 2. Back Set [Date] : Images taken in the [Start] menu to start the multi slide show effects Unique screen effects can be saved as [Select2] automatically.You can select image to confirm the Back setting. Select a desired sub... menu by pressing Start the UP / DOWN button and press the Images RIGHT button. Press the OK button to view...

User Manual (ENGLISH)
Page 68
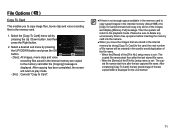
...is displayed. å While the Multi Slide Show is displayed. - OK button : Select the image for an image Back Set to the play mode screen. 67 Off Mist :All Muse:Off Fall :1 sec Daw:nOff Party Set File Options ( ) 1. Use the Up / Down buttons to select ...the RIGHT button. 2. And then press the Right button. 2. Press the Up / Down button and select the [File Options] menu tab and press the OK button. After deletion, the screen will appear. 3. Fn Button : Press the Fn button to delete marked images. [All] : Displays confirmation window. Setting Background...
...is displayed. å While the Multi Slide Show is displayed. - OK button : Select the image for an image Back Set to the play mode screen. 67 Off Mist :All Muse:Off Fall :1 sec Daw:nOff Party Set File Options ( ) 1. Use the Up / Down buttons to select ...the RIGHT button. 2. And then press the Right button. 2. Press the Up / Down button and select the [File Options] menu tab and press the OK button. After deletion, the screen will appear. 3. Fn Button : Press the Fn button to delete marked images. [All] : Displays confirmation window. Setting Background...
User Manual (ENGLISH)
Page 72
... sure to delete any unnecessary files to free up space before inserting the memory card into the camera. å When you to copy image files, movie clips and voice recording files to the ...memory card. 1. Please be created in the card to avoid duplication of the [File No.] setup menu is set : The copied file names start from after the last stored file name. - When the [Reset] ...of the file name. - After copying has been completed, the screen will copy only some of the last copied folder is not enough space available in the memory card to copy...
... sure to delete any unnecessary files to free up space before inserting the memory card into the camera. å When you to copy image files, movie clips and voice recording files to the ...memory card. 1. Please be created in the card to avoid duplication of the [File No.] setup menu is set : The copied file names start from after the last stored file name. - When the [Reset] ...of the file name. - After copying has been completed, the screen will copy only some of the last copied folder is not enough space available in the memory card to copy...

User Manual (ENGLISH)
Page 74
...Index Type Set the quality of the printing Auto, Plain, Photo, paper FastPhoto Quality Set the quality of the picture to be printed. A screen where you want to print. Ê Setting the Number of copies to Print Images 1. After setting the number of prints for printed pictures. ... [When [One Photo] is selected] Quantity Set [When [All Photos] is selected : Use the Left / Right button to select Layout the desired menu, and then press the Type Right button. Use the Up / Down buttons to select another picture. - PictBridge : Picture Selection You can select the ...
...Index Type Set the quality of the printing Auto, Plain, Photo, paper FastPhoto Quality Set the quality of the picture to be printed. A screen where you want to print. Ê Setting the Number of copies to Print Images 1. After setting the number of prints for printed pictures. ... [When [One Photo] is selected] Quantity Set [When [All Photos] is selected : Use the Left / Right button to select Layout the desired menu, and then press the Type Right button. Use the Up / Down buttons to select another picture. - PictBridge : Picture Selection You can select the ...

