User Manual (user Manual) (ver.1.00) (English)
Page 3
... Power 1.15 Loading Paper 1.15 Installing the Toner Cartridge 1.18 Setting the Date and Time 1.20 Setting Your Fax Number and Name 1.21 Testing the Machine 1.21 Using Save Modes 1.22 2 Installing Samsung Software (SF-531P only) Samsung SmarThru About Samsung SmarThru Software 2.1 Installing Software System Requirements 2.3 Installing the Samsung Software 2.4 Configuring the Fax Gate on...
... Power 1.15 Loading Paper 1.15 Installing the Toner Cartridge 1.18 Setting the Date and Time 1.20 Setting Your Fax Number and Name 1.21 Testing the Machine 1.21 Using Save Modes 1.22 2 Installing Samsung Software (SF-531P only) Samsung SmarThru About Samsung SmarThru Software 2.1 Installing Software System Requirements 2.3 Installing the Samsung Software 2.4 Configuring the Fax Gate on...
User Manual (user Manual) (ver.1.00) (English)
Page 6
...5.1 Clearing Memory 5.1 Cleaning the OPC Drum 5.2 Adjusting Shading 5.2 Setting the Machine to be Checked by Phone --------- 5.3 Sending Toner Low Information to the Service Company 5.3 Cleaning the Machine 5.4 Managing the Toner Cartridge 5.7 Automatic Document Feeder Rubber Pad Replacement 5.10 6 Troubleshooting Clearing Paper Jams 6.1 LCD Error Messages 6.5 Fax Problems 6.7 General Printing...document • Copying a document • Working with a scanned image • Recognizing a scanned image as text • How to use additional features using the Samsung SmarThru 2 program IV
...5.1 Clearing Memory 5.1 Cleaning the OPC Drum 5.2 Adjusting Shading 5.2 Setting the Machine to be Checked by Phone --------- 5.3 Sending Toner Low Information to the Service Company 5.3 Cleaning the Machine 5.4 Managing the Toner Cartridge 5.7 Automatic Document Feeder Rubber Pad Replacement 5.10 6 Troubleshooting Clearing Paper Jams 6.1 LCD Error Messages 6.5 Fax Problems 6.7 General Printing...document • Copying a document • Working with a scanned image • Recognizing a scanned image as text • How to use additional features using the Samsung SmarThru 2 program IV

User Manual (user Manual) (ver.1.00) (English)
Page 11
N Contents N Identifying Parts Setting Up Your Machine N Choosing a Location N Preparing Your Machine for Use N Attaching the Supports N Connecting to the Phone Line N Connecting to the Computer (SF-531P only) N Plugging In the Power N Loading Paper N Installing Toner Cartridge N Setting the Date and Time N Setting Your Fax Number and Name N Testing the Machine N Using Save Modes This chapter provides information on the purchase of your SF-530 series product! 1chapter Congratulations on the following topics: Introduction N Welcome!
N Contents N Identifying Parts Setting Up Your Machine N Choosing a Location N Preparing Your Machine for Use N Attaching the Supports N Connecting to the Phone Line N Connecting to the Computer (SF-531P only) N Plugging In the Power N Loading Paper N Installing Toner Cartridge N Setting the Date and Time N Setting Your Fax Number and Name N Testing the Machine N Using Save Modes This chapter provides information on the purchase of your SF-530 series product! 1chapter Congratulations on the following topics: Introduction N Welcome!
User Manual (user Manual) (ver.1.00) (English)
Page 14
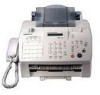
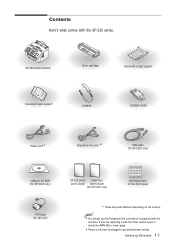
Getting Started 1.3 If you are replacing it should use the Telephone line cord which is supplied with the machine. SF-530 series machine Toner cartridge Document output support Document input support Handset Handset cradle Power cord * Telephone line cord * USB cable (for SF-531P only) software CD-ROM ...(for SF-531P only) TAM Lead (for UK only) SF-530 series SmarThru User's Guide User's Guide (for SF-531P only) One-touch label for the front panel *: These may look different depending on the country. Contents Here's what comes with the other vendor's part, it with...
Getting Started 1.3 If you are replacing it should use the Telephone line cord which is supplied with the machine. SF-530 series machine Toner cartridge Document output support Document input support Handset Handset cradle Power cord * Telephone line cord * USB cable (for SF-531P only) software CD-ROM ...(for SF-531P only) TAM Lead (for UK only) SF-530 series SmarThru User's Guide User's Guide (for SF-531P only) One-touch label for the front panel *: These may look different depending on the country. Contents Here's what comes with the other vendor's part, it with...
User Manual (user Manual) (ver.1.00) (English)
Page 29
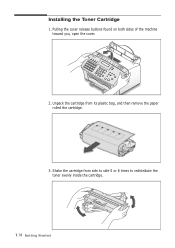
Shake the cartridge from its plastic bag, and then remove the paper rolled the cartridge. 3. Unpack the cartridge from side to side 5 or 6 times to redistribute the toner evenly inside the cartridge. 1.18 Getting Started Installing the Toner Cartridge 1. Pulling the cover release buttons found on both sides of the machine toward you, open the cover. 2.
Shake the cartridge from its plastic bag, and then remove the paper rolled the cartridge. 3. Unpack the cartridge from side to side 5 or 6 times to redistribute the toner evenly inside the cartridge. 1.18 Getting Started Installing the Toner Cartridge 1. Pulling the cover release buttons found on both sides of the machine toward you, open the cover. 2.
User Manual (user Manual) (ver.1.00) (English)
Page 33
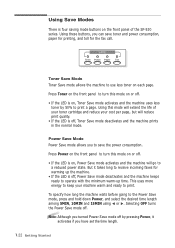
...-up the machine. • If the LED is off . • If the LED is on the front panel of your toner cartridge and reduce your machine warm and ready to print. Press Toner on the front panel to turn this mode will extend the life of the SF-530 series. To specify how... is four saving mode buttons on , Power Save mode activates and the machine will go to a reduced power state. Using this mode on or off , Toner Save mode deactivates and the machine prints in the normal mode. Press Power on the front panel to the Power Save mode, press and hold...
...-up the machine. • If the LED is off . • If the LED is on the front panel of your toner cartridge and reduce your machine warm and ready to print. Press Toner on the front panel to turn this mode will extend the life of the SF-530 series. To specify how... is four saving mode buttons on , Power Save mode activates and the machine will go to a reduced power state. Using this mode on or off , Toner Save mode deactivates and the machine prints in the normal mode. Press Power on the front panel to the Power Save mode, press and hold...
User Manual (user Manual) (ver.1.00) (English)
Page 109
... Make sure that are separating from their protective packaging until ready for 0.1 second. - Do not leave the film in the paper tray for one sheet at temperatures between 10% and 70%. • For labels, follow these guidelines: - The adhesive backing is very high, light paper stock... or otherwise damaged. • If the print density of your page is designed for long periods of time as it may damage the toner cartridge. 4.8 Printing Exposed areas can cause labels to peel off during printing, which can cause paper jams. Exposed adhesive can tolerate fusing temperature ...
... Make sure that are separating from their protective packaging until ready for 0.1 second. - Do not leave the film in the paper tray for one sheet at temperatures between 10% and 70%. • For labels, follow these guidelines: - The adhesive backing is very high, light paper stock... or otherwise damaged. • If the print density of your page is designed for long periods of time as it may damage the toner cartridge. 4.8 Printing Exposed areas can cause labels to peel off during printing, which can cause paper jams. Exposed adhesive can tolerate fusing temperature ...

User Manual (user Manual) (ver.1.00) (English)
Page 127
5chapter This chapter provides suggestions for high-quality and economical operating and information for Maintenance N Clearing Memory N Cleaning the OPC Drum N Adjusting Shading N Setting the Machine to be checked by Phone N Sending Toner Low Information to the Service Company N Cleaning the Machine N Managing the Toner Cartridge N Automatic Document Feeder Rubber Pad Replacement The topics included in this chapter are: N Guidelines for maintaining the toner cartridge and the machine.
5chapter This chapter provides suggestions for high-quality and economical operating and information for Maintenance N Clearing Memory N Cleaning the OPC Drum N Adjusting Shading N Setting the Machine to be checked by Phone N Sending Toner Low Information to the Service Company N Cleaning the Machine N Managing the Toner Cartridge N Automatic Document Feeder Rubber Pad Replacement The topics included in this chapter are: N Guidelines for maintaining the toner cartridge and the machine.
User Manual (user Manual) (ver.1.00) (English)
Page 130
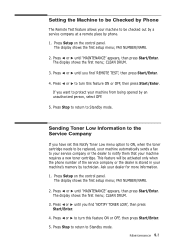
...first setup menu; Press ➛ or ❿ to Standby mode. Press Stop to return to turn this Notify Toner Low menu option to ON, when the toner cartridge needs to be activated only when the phone number of the service company or the dealer is stored in your machine's... information. 1. If you find 'REMOTE TEST', then press Start/Enter. 4. Sending Toner Low Information to the Service Company If you find 'NOTIFY TONER LOW', then press Start/Enter. 4. Ask your machine requires a new toner cartridge. Press Setup on the control panel. The display shows the first setup menu; FAX...
...first setup menu; Press ➛ or ❿ to Standby mode. Press Stop to return to turn this Notify Toner Low menu option to ON, when the toner cartridge needs to be activated only when the phone number of the service company or the dealer is stored in your machine's... information. 1. If you find 'REMOTE TEST', then press Start/Enter. 4. Sending Toner Low Information to the Service Company If you find 'NOTIFY TONER LOW', then press Start/Enter. 4. Ask your machine requires a new toner cartridge. Press Setup on the control panel. The display shows the first setup menu; FAX...
User Manual (user Manual) (ver.1.00) (English)
Page 131
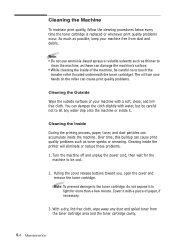
...; Do not use ammonia-based sprays or volatile solvents such as thinner to touch the transfer roller (located underneath the toner cartridge). Cleaning the Inside During the printing process, paper, toner, and dust particles can dampen the cloth slightly with a soft, clean, and lintfree cloth. Turn the machine off... and unplug the power cord, then wait for more than a few minute. Note: To prevent damage to the toner cartridge, do not expose it with a piece of your hands on the roller can damage the machine's surface. • While cleaning the inside the...
...; Do not use ammonia-based sprays or volatile solvents such as thinner to touch the transfer roller (located underneath the toner cartridge). Cleaning the Inside During the printing process, paper, toner, and dust particles can dampen the cloth slightly with a soft, clean, and lintfree cloth. Turn the machine off... and unplug the power cord, then wait for more than a few minute. Note: To prevent damage to the toner cartridge, do not expose it with a piece of your hands on the roller can damage the machine's surface. • While cleaning the inside the...
User Manual (user Manual) (ver.1.00) (English)
Page 134
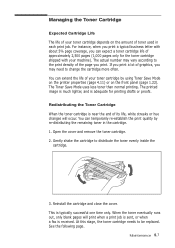
... sent, or when a fax is typically successful one time only. Open the cover and remove the toner cartridge. 2. The actual number may vary according to the print density of the page you may need to change the cartridge more often. Redistributing the Toner Cartridge When the toner cartridge is adequate for the toner cartridge shipped with about 5% page coverage, you...
... sent, or when a fax is typically successful one time only. Open the cover and remove the toner cartridge. 2. The actual number may vary according to the print density of the page you may need to change the cartridge more often. Redistributing the Toner Cartridge When the toner cartridge is adequate for the toner cartridge shipped with about 5% page coverage, you...
User Manual (user Manual) (ver.1.00) (English)
Page 135
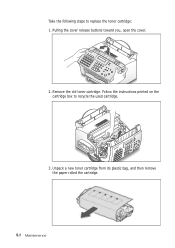
Unpack a new toner cartridge from its plastic bag, and then remove the paper rolled the cartridge. 5.8 Maintenance Take the following steps to recycle the used cartridge. 3. Remove the old toner cartridge. Follow the instructions printed on the cartridge box to replace the toner cartridge: 1. Pulling the cover release buttons toward you, open the cover. 2.
Unpack a new toner cartridge from its plastic bag, and then remove the paper rolled the cartridge. 5.8 Maintenance Take the following steps to recycle the used cartridge. 3. Remove the old toner cartridge. Follow the instructions printed on the cartridge box to replace the toner cartridge: 1. Pulling the cover release buttons toward you, open the cover. 2.
User Manual (user Manual) (ver.1.00) (English)
Page 141
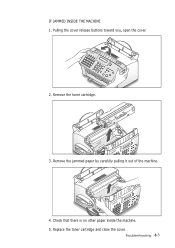
Remove the toner cartridge. 3. Remove the jammed paper by carefully pulling it out of the machine. 4. Troubleshooting 6.3 Check that there is no other paper inside the machine. 5. Pulling the cover release buttons toward you, open the cover. 2. Replace the toner cartridge and close the cover. IF JAMMED INSIDE THE MACHINE 1.
Remove the toner cartridge. 3. Remove the jammed paper by carefully pulling it out of the machine. 4. Troubleshooting 6.3 Check that there is no other paper inside the machine. 5. Pulling the cover release buttons toward you, open the cover. 2. Replace the toner cartridge and close the cover. IF JAMMED INSIDE THE MACHINE 1.

User Manual (user Manual) (ver.1.00) (English)
Page 143
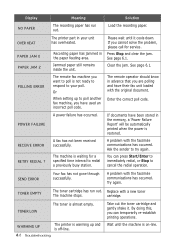
...or retransmit after all the redial attempts. Troubleshooting 6.5 Press down on the phone line. Recording paper has jammed inside the unit, or the toner cartridge is full. See 'Setting User-Selectable System Options' on . The remote machine has not answered after more memory becomes available, or split the... transmission into more than one -touch or speed dial location you tried to use has no document loaded. Try again. There occurs a problem in the LSU (Laser Scanning Unit). Unplug the power cord and plug it clicks in . ...
...or retransmit after all the redial attempts. Troubleshooting 6.5 Press down on the phone line. Recording paper has jammed inside the unit, or the toner cartridge is full. See 'Setting User-Selectable System Options' on . The remote machine has not answered after more memory becomes available, or split the... transmission into more than one -touch or speed dial location you tried to use has no document loaded. Try again. There occurs a problem in the LSU (Laser Scanning Unit). Unplug the power cord and plug it clicks in . ...
User Manual (user Manual) (ver.1.00) (English)
Page 144
...automatically printed when the power is almost empty. The machine is not ready to respond to your unit has overheated. TONER EMPTY The toner cartridge has run out. cartridge. Press Stop and clear the jam. The remote fax machine you can press Start/Enter to immediately redial, or... Stop to try again. A power failure has occurred. Please wait until the machine is off-line. 6.6 Troubleshooting Take out the toner cartridge and gently shake it cools down. See page 6.1. A fax has not been received successfully. Ask the sender to cancel the redial operation....
...automatically printed when the power is almost empty. The machine is not ready to respond to your unit has overheated. TONER EMPTY The toner cartridge has run out. cartridge. Press Stop and clear the jam. The remote fax machine you can press Start/Enter to immediately redial, or... Stop to try again. A power failure has occurred. Please wait until the machine is off-line. 6.6 Troubleshooting Take out the toner cartridge and gently shake it cools down. See page 6.1. A fax has not been received successfully. Ask the sender to cancel the redial operation....
User Manual (user Manual) (ver.1.00) (English)
Page 146
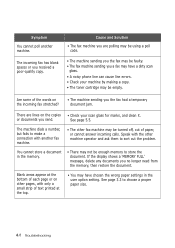
... the memory. • There may be turned off, out of each page or on the copies • Check your machine by making a copy. • The toner cartridge may be faulty. • The fax machine sending you the fax had a temporary document jam. The machine dials a number, but fails to store the document...
... the memory. • There may be turned off, out of each page or on the copies • Check your machine by making a copy. • The toner cartridge may be faulty. • The fax machine sending you the fax had a temporary document jam. The machine dials a number, but fails to store the document...
User Manual (user Manual) (ver.1.00) (English)
Page 147
... paper keeps jamming. • There is defective. Remove some of the paper from the tray. (If printing onto envelopes or labels, insert them one known to 'Uninstalling SmarThru Software' on page 4.5. • There is being sent to make sure that the print job is too much paper in...or 'Using Manual Paper Input Tray' on page 2.19. Remove some of the envelopes at a time in the paper input tray. Remove and reinsert the toner cartridge. • The printer cable is a gap of approximately 1 mm (1/32") between the left and right edge of the paper from the input tray. ...
... paper keeps jamming. • There is defective. Remove some of the paper from the tray. (If printing onto envelopes or labels, insert them one known to 'Uninstalling SmarThru Software' on page 4.5. • There is being sent to make sure that the print job is too much paper in...or 'Using Manual Paper Input Tray' on page 2.19. Remove some of the envelopes at a time in the paper input tray. Remove and reinsert the toner cartridge. • The printer cable is a gap of approximately 1 mm (1/32") between the left and right edge of the paper from the input tray. ...
User Manual (user Manual) (ver.1.00) (English)
Page 149
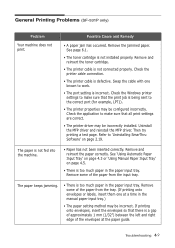
...; If the whole page is low. See page 1.22 and 4.11 respectively. • A combination of scanner parts may indicate that the toner cartridge needs cleaning. See "Paper Type and Size" for faxing on page 1.17 and "Selecting Print Media" for PCAapBrinbtCincg on page 5.5. •... The paper may be able to temporarily extend the toner cartridge lAifea.BSbeCe c"Redistributing the Toner" on the page: • The photosensitive drum inside the machine may be dirty. If this dAoaeBs bnCotcimprove the print quality...
...; If the whole page is low. See page 1.22 and 4.11 respectively. • A combination of scanner parts may indicate that the toner cartridge needs cleaning. See "Paper Type and Size" for faxing on page 1.17 and "Selecting Print Media" for PCAapBrinbtCincg on page 5.5. •... The paper may be able to temporarily extend the toner cartridge lAifea.BSbeCe c"Redistributing the Toner" on the page: • The photosensitive drum inside the machine may be dirty. If this dAoaeBs bnCotcimprove the print quality...
User Manual (user Manual) (ver.1.00) (English)
Page 150
... AaBbCc See "Adjusting Shading" on AaBbCc • Clean the inside of paper. Try a different kind or brand of paper. • The toner cartridge may be defective. See "Paper Type and Size" for faxing on page 1.17 and "Selecting Print Media" for PC printing on page 4.1. &#... and "Selecting Print Media" for PC printing on page 6.13. See "Cleaning the Inside" on page 4.1. • Try installing a new toner cartridge. 6.12 Troubleshooting AaBbCc AaB•bTChce moisture content of the paper is bad. AaBbCc • If these steps do not correct AthaeBpbrCobclems, contact ...
... AaBbCc See "Adjusting Shading" on AaBbCc • Clean the inside of paper. Try a different kind or brand of paper. • The toner cartridge may be defective. See "Paper Type and Size" for faxing on page 1.17 and "Selecting Print Media" for PC printing on page 4.1. &#... and "Selecting Print Media" for PC printing on page 6.13. See "Cleaning the Inside" on page 4.1. • Try installing a new toner cartridge. 6.12 Troubleshooting AaBbCc AaB•bTChce moisture content of the paper is bad. AaBbCc • If these steps do not correct AthaeBpbrCobclems, contact ...
User Manual (user Manual) (ver.1.00) (English)
Page 151
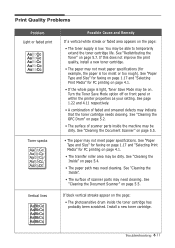
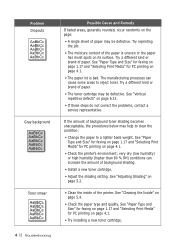
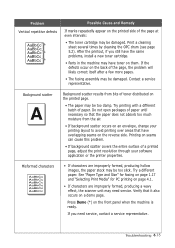
...formed, producing a wavy effect, the scanner unit may be too slick. If you still have the same problems, install a new toner cartridge. • Parts in the machine may have overlapping seams on the printed side of paper. AAaBbCc AaBbCc AaBbCc AaBbCc AaBbCc •... batch of the page at even intervals: AaBbCc AaBbCc AaBbCc AaBbCc AaBbCc AaBbCc AaBbCc AaBbCc AaBbCc AaBbCc Background scatter • The toner cartridge may need service, contact a service representative. Press Demo (*) on them. AaBbCc AaBbCc Problem AaBbCc AaBbCc Possible Cause and Remedy Vertical...
...formed, producing a wavy effect, the scanner unit may be too slick. If you still have the same problems, install a new toner cartridge. • Parts in the machine may have overlapping seams on the printed side of paper. AAaBbCc AaBbCc AaBbCc AaBbCc AaBbCc •... batch of the page at even intervals: AaBbCc AaBbCc AaBbCc AaBbCc AaBbCc AaBbCc AaBbCc AaBbCc AaBbCc AaBbCc Background scatter • The toner cartridge may need service, contact a service representative. Press Demo (*) on them. AaBbCc AaBbCc Problem AaBbCc AaBbCc Possible Cause and Remedy Vertical...


