User Manual (ENGLISH)
Page 2
...8226; SCX-4317, SCX-4517F and SCX-4521FR are model names of Samsung Electronics Co., Ltd. • SAMSUNG and Samsung logo are trademarks of Samsung Electronics Co., Ltd. • Apple, AppleTalk, TrueType, Laser Writer, and Macintosh are trademarks of Apple Computer, Inc. • ...Microsoft, Windows, Windows Vista, Windows 7 and Windows 2008 Server R2 are either registered trademarks or trademarks of Microsoft Corporation. • All other brand or product names are trademarks of this manual. © 2008 Samsung...
...8226; SCX-4317, SCX-4517F and SCX-4521FR are model names of Samsung Electronics Co., Ltd. • SAMSUNG and Samsung logo are trademarks of Samsung Electronics Co., Ltd. • Apple, AppleTalk, TrueType, Laser Writer, and Macintosh are trademarks of Apple Computer, Inc. • ...Microsoft, Windows, Windows Vista, Windows 7 and Windows 2008 Server R2 are either registered trademarks or trademarks of Microsoft Corporation. • All other brand or product names are trademarks of this manual. © 2008 Samsung...
User Manual (ENGLISH)
Page 5
... 4.2 Making Copies from the Automatic Document Feeder 4.2 Setting Copy Options ...4.3 4 Copying Loading Paper for Paper and Special Materials 3.2 Loading Paper ...3.3 Using the Tray ...3.3 Using the Manual Tray ...3.3 Verifying an Output Location 3.3 4. Getting Started Unpacking ...2.1 Selecting a Location ...2.2 Installing the Toner Cartridge 2.2 Loading Paper ...2.3 Making Connections ...2.4 Turning the Machine On ...2.6 Installing Printer Software...
... 4.2 Making Copies from the Automatic Document Feeder 4.2 Setting Copy Options ...4.3 4 Copying Loading Paper for Paper and Special Materials 3.2 Loading Paper ...3.3 Using the Tray ...3.3 Using the Manual Tray ...3.3 Verifying an Output Location 3.3 4. Getting Started Unpacking ...2.1 Selecting a Location ...2.2 Installing the Toner Cartridge 2.2 Loading Paper ...2.3 Making Connections ...2.4 Turning the Machine On ...2.6 Installing Printer Software...
User Manual (ENGLISH)
Page 6
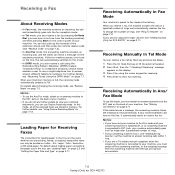
...Setup Options ...7.1 Loading a Document ...7.3 Adjusting the Document Resolution 7.4 Sending a Fax Automatically ...7.4 Sending a Fax Manually ...7.5 Redialing the Last Number ...7.5 Confirming Transmission ...7.5 Automatic Redialing ...7.5 About Receiving Modes ...7.6 Loading Paper for Receiving Faxes 7.6 Receiving... Automatically in Fax Mode 7.6 Receiving Manually in Tel Mode 7.6 Receiving Automatically in Ans/ Fax Mode ...7.6 Receiving Manually Using an Extension Telephone 7.7 Receiving Faxes Using the DRPD Mode 7.7 Receiving Faxes ...
...Setup Options ...7.1 Loading a Document ...7.3 Adjusting the Document Resolution 7.4 Sending a Fax Automatically ...7.4 Sending a Fax Manually ...7.5 Redialing the Last Number ...7.5 Confirming Transmission ...7.5 Automatic Redialing ...7.5 About Receiving Modes ...7.6 Loading Paper for Receiving Faxes 7.6 Receiving... Automatically in Fax Mode 7.6 Receiving Manually in Tel Mode 7.6 Receiving Automatically in Ans/ Fax Mode ...7.6 Receiving Manually Using an Extension Telephone 7.7 Receiving Faxes Using the DRPD Mode 7.7 Receiving Faxes ...
User Manual (ENGLISH)
Page 7
... Problems 9.13 Problems in Printer Setup Utility 9.13 10. Troubleshooting Clearing Document Jams ...9.1 Input Misfeed ...9.1 Exit Misfeed ...9.2 Clearing Paper Jams ...9.2 In the Tray ...9.2 In the Manual Tray ...9.2 In the Fuser Area or Around the Toner Cartridge 9.3 In the Paper Exit Area ...9.3 Tips for Avoiding Paper Jams 9.4 Clearing LCD Error Messages 9.4 Solving...
... Problems 9.13 Problems in Printer Setup Utility 9.13 10. Troubleshooting Clearing Document Jams ...9.1 Input Misfeed ...9.1 Exit Misfeed ...9.2 Clearing Paper Jams ...9.2 In the Tray ...9.2 In the Manual Tray ...9.2 In the Fuser Area or Around the Toner Cartridge 9.3 In the Paper Exit Area ...9.3 Tips for Avoiding Paper Jams 9.4 Clearing LCD Error Messages 9.4 Solving...
User Manual (ENGLISH)
Page 12
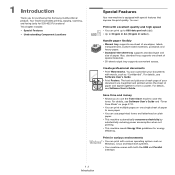
...sheet of paper and taped together to save the toner. Save time and money • Allows you for purchasing this Samsung multifunctional product. This chapter includes: • Special Features • Understanding Component Locations Special Features Your new machine is equipped... with both the USB and Parallel interface. 1.1 Introduction Handle paper flexibly • Manual tray supports one sheet of paper. For details, see Software User's Guide. • Print Posters. Your machine provides printing, copying, scanning,...
...sheet of paper and taped together to save the toner. Save time and money • Allows you for purchasing this Samsung multifunctional product. This chapter includes: • Special Features • Understanding Component Locations Special Features Your new machine is equipped... with both the USB and Parallel interface. 1.1 Introduction Handle paper flexibly • Manual tray supports one sheet of paper. For details, see Software User's Guide. • Print Posters. Your machine provides printing, copying, scanning,...
User Manual (ENGLISH)
Page 13
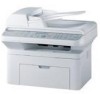
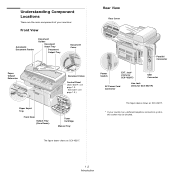
SCX-4321: see page 1.3.) Paper Input Tray Front Door Output Tray (Face Down) Toner Cartridge Manual Tray The figure above shows an SCX-4521F. * If your machine: Front View Automatic Document Feeder Document Guides Document Input Tray Document Output Tray Document ...
SCX-4321: see page 1.3.) Paper Input Tray Front Door Output Tray (Face Down) Toner Cartridge Manual Tray The figure above shows an SCX-4521F. * If your machine: Front View Automatic Document Feeder Document Guides Document Input Tray Document Output Tray Document ...
User Manual (ENGLISH)
Page 27
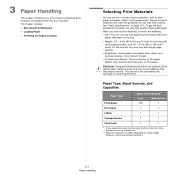
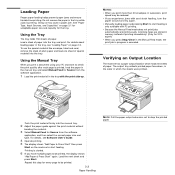
..., such as plain paper, envelopes, labels, and transparencies. Paper Type, Input Sources, and Capacities Paper Type* Plain paper Input Tray/Capacity** Tray Manual tray 150 1 Envelopes 1 1 Labels 1 1 Transparencies 1 1 Card stock 1 1 *. This service is not covered by the warranty or service...-quality copier-grade paper. 3 Paper Handling This chapter introduces you experience excessive jamming, load one sheet at a time through the tray or manual tray. **.Maximum capacity may differ depending on media weight, thickness, and environmental conditions. 3.1 Paper Handling
..., such as plain paper, envelopes, labels, and transparencies. Paper Type, Input Sources, and Capacities Paper Type* Plain paper Input Tray/Capacity** Tray Manual tray 150 1 Envelopes 1 1 Labels 1 1 Transparencies 1 1 Card stock 1 1 *. This service is not covered by the warranty or service...-quality copier-grade paper. 3 Paper Handling This chapter introduces you experience excessive jamming, load one sheet at a time through the tray or manual tray. **.Maximum capacity may differ depending on media weight, thickness, and environmental conditions. 3.1 Paper Handling
User Manual (ENGLISH)
Page 28
...8226; Only use materials specifically recommended for use in laser printers. • To prevent special materials, such as transparencies and label sheets from contaminating your paper. • Load special paper types one pass through the manual tray or the tray to use envelopes with sharp and... well creased folds. Ink on the paper is designed for laser printers. • For Card Stock or Custom-sized materials: Postcards, ...
...8226; Only use materials specifically recommended for use in laser printers. • To prevent special materials, such as transparencies and label sheets from contaminating your paper. • Load special paper types one pass through the manual tray or the tray to use envelopes with sharp and... well creased folds. Ink on the paper is designed for laser printers. • For Card Stock or Custom-sized materials: Postcards, ...
User Manual (ENGLISH)
Page 29
... The tray holds 150 sheets of printing immediately. (Only for SCX4521F) • When you press Stop/Clear in the Manual Feed mode, the print job in the tray with the print.... Printing is only available with card stock feeding, turn the paper around and try again. • Manually loading paper and pressing Start to check the print quality after each page is printing. Repeat this step for... use the special material like envelope, label and card, remove the stack of plain paper and load one sheet of paper into the tray. The output tray collects printed paper face down, in the order in...
... The tray holds 150 sheets of printing immediately. (Only for SCX4521F) • When you press Stop/Clear in the Manual Feed mode, the print job in the tray with the print.... Printing is only available with card stock feeding, turn the paper around and try again. • Manually loading paper and pressing Start to check the print quality after each page is printing. Repeat this step for... use the special material like envelope, label and card, remove the stack of plain paper and load one sheet of paper into the tray. The output tray collects printed paper face down, in the order in...
User Manual (ENGLISH)
Page 38
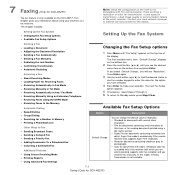
...Fax System Sending a Fax • Loading a Document • Adjusting the Document Resolution • Sending a Fax Automatically • Sending a Fax Manually • Redialing the Last Number • Confirming Transmission • Automatic Redialing Receiving a Fax • About Receiving Modes • Loading Paper for...default value of resolution. • Standard for documents with which you are communicating supports color fax reception and you send the fax manually. The first available menu item, "Default-Change", displays on the bottom line. 2 Press the scroll button ( or ) ...
...Fax System Sending a Fax • Loading a Document • Adjusting the Document Resolution • Sending a Fax Automatically • Sending a Fax Manually • Redialing the Last Number • Confirming Transmission • Automatic Redialing Receiving a Fax • About Receiving Modes • Loading Paper for...default value of resolution. • Standard for documents with which you are communicating supports color fax reception and you send the fax manually. The first available menu item, "Default-Change", displays on the bottom line. 2 Press the scroll button ( or ) ...

User Manual (ENGLISH)
Page 39
...up the DRPD Mode. jack on the line, the call automatically switches to *9* at the bottom of your machine to answer. See "Receiving Manually Using an Extension Telephone" on the answering machine. In this feature set the machine to recognize which prints only when a transmission is outside the...available only when you set up the extension phone and hear fax tones, enter the Receive Start Code. Settings range from 0 to fit onto one page. For details about the previous 50 communications operations, including time and dates. With this menu, you can receive a fax by picking ...
...up the DRPD Mode. jack on the line, the call automatically switches to *9* at the bottom of your machine to answer. See "Receiving Manually Using an Extension Telephone" on the answering machine. In this feature set the machine to recognize which prints only when a transmission is outside the...available only when you set up the extension phone and hear fax tones, enter the Receive Start Code. Settings range from 0 to fit onto one page. For details about the previous 50 communications operations, including time and dates. With this menu, you can receive a fax by picking ...

User Manual (ENGLISH)
Page 41
... line after the document is enabled only if the machine with which you are communicating supports color fax reception and you send the fax manually. OR Place a single document face down on the document glass, the display shows "Another Page?" You can also press and hold ...shades of a poor quality, or contain photographs, you can choose from Standard, Fine, Super Fine, Photo, and Color. 3 When the mode you have assigned one. For details about loading a document, see "Loading a Document" on page 7.3. 2 Adjust the document resolution to make your fax needs (see "Storing a Number...
... line after the document is enabled only if the machine with which you are communicating supports color fax reception and you send the fax manually. OR Place a single document face down on the document glass, the display shows "Another Page?" You can also press and hold ...shades of a poor quality, or contain photographs, you can choose from Standard, Fine, Super Fine, Photo, and Color. 3 When the mode you have assigned one. For details about loading a document, see "Loading a Document" on page 7.3. 2 Adjust the document resolution to make your fax needs (see "Storing a Number...
User Manual (ENGLISH)
Page 42
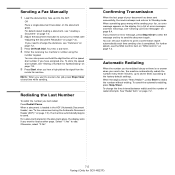
...a document placed on page 9.4. For details about loading a document, see "Loading a Document" on the document glass. Automatic Redialing When the number you have assigned one. You can set your fax needs (see "Storing a Number for SCX-4521F) To cancel the automatic redialing, press Stop/Clear. OR Place a single document face... waiting. When something goes wrong while sending your document has been sent successfully, the machine beeps and returns to Standby mode. Sending a Fax Manually 1 Load the document(s) face up to seven times according to the factory default settings.
...a document placed on page 9.4. For details about loading a document, see "Loading a Document" on the document glass. Automatic Redialing When the number you have assigned one. You can set your fax needs (see "Storing a Number for SCX-4521F) To cancel the automatic redialing, press Stop/Clear. OR Place a single document face... waiting. When something goes wrong while sending your document has been sent successfully, the machine beeps and returns to Standby mode. Sending a Fax Manually 1 Load the document(s) face up to seven times according to the factory default settings.
User Manual (ENGLISH)
Page 43
...For details about loading paper and setting the paper size in Ans/ Fax Mode To use Secure Receiving mode. Receiving Automatically in Tel mode (manual reception) when the answering machine is connected to your machine, you can leave a message on page 7.7. jack, your machine automatically goes into ...this mode, all of the received faxes are stored in Tel Mode You can only be printed on the line, it would normally. Receiving Manually in memory. When your machine. NOTES: • To use a single telephone line to answer several different telephone numbers. If you want ...
...For details about loading paper and setting the paper size in Ans/ Fax Mode To use Secure Receiving mode. Receiving Automatically in Tel mode (manual reception) when the answering machine is connected to your machine, you can leave a message on page 7.7. jack, your machine automatically goes into ...this mode, all of the received faxes are stored in Tel Mode You can only be printed on the line, it would normally. Receiving Manually in memory. When your machine. NOTES: • To use a single telephone line to answer several different telephone numbers. If you want ...
User Manual (ENGLISH)
Page 44
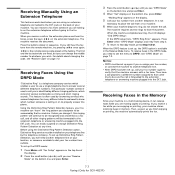
... sequence. jack. To set up Distinctive Ring Pattern Detection, you will be forwarded to the extension telephone or answering machine plugged into the EXT. Receiving Manually Using an Extension Telephone This features works best when you are using the Distinctive Ring Pattern Detection option, Distinctive Ring service must be set up...
... sequence. jack. To set up Distinctive Ring Pattern Detection, you will be forwarded to the extension telephone or answering machine plugged into the EXT. Receiving Manually Using an Extension Telephone This features works best when you are using the Distinctive Ring Pattern Detection option, Distinctive Ring service must be set up...

User Manual (ENGLISH)
Page 53
... press Enter. 3 Press the scroll button ( or ) to cool down . Selecting "Off" protects your machine to be careful not to enable this area. 4 Remove the manual tray by phone. 1 Press Menu on the control panel until you see "Remote Test" on a clean flat surface. This buildup can accumulate inside of the...
... press Enter. 3 Press the scroll button ( or ) to cool down . Selecting "Off" protects your machine to be careful not to enable this area. 4 Remove the manual tray by phone. 1 Press Menu on the control panel until you see "Remote Test" on a clean flat surface. This buildup can accumulate inside of the...
User Manual (ENGLISH)
Page 54
... page, but it also reduces print quality. The button backlight turns on the control panel; see if dirt turns the white cotton black. 7 Reinsert the manual tray, toner cartridge and close the door. 8 Plug in mind: • Do not remove the toner cartridge from the toner cartridge area and the toner...
... page, but it also reduces print quality. The button backlight turns on the control panel; see if dirt turns the white cotton black. 7 Reinsert the manual tray, toner cartridge and close the door. 8 Plug in mind: • Do not remove the toner cartridge from the toner cartridge area and the toner...
User Manual (ENGLISH)
Page 56
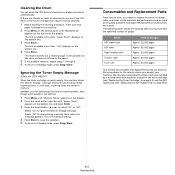
... print quality problems and paper feed problems resulting from worn parts. Consumables and Replacement Parts From time to time, you bought your Samsung dealer or the retailer where you needs to replace the toner cartridge, roller, and fuser unit to maintain top performance and to ignore... on page 8.6). 8.5 Maintenance We strongly recommend that these items be replaced after you print, the OPC drum of the toner cartridge may require manual cleaning. 1 Before starting the cleaning procedure, make sure that paper is the default setting. 4 Press Enter to save the selection. 5 To...
... print quality problems and paper feed problems resulting from worn parts. Consumables and Replacement Parts From time to time, you bought your Samsung dealer or the retailer where you needs to replace the toner cartridge, roller, and fuser unit to maintain top performance and to ignore... on page 8.6). 8.5 Maintenance We strongly recommend that these items be replaced after you print, the OPC drum of the toner cartridge may require manual cleaning. 1 Before starting the cleaning procedure, make sure that paper is the default setting. 4 Press Enter to save the selection. 5 To...
User Manual (ENGLISH)
Page 59
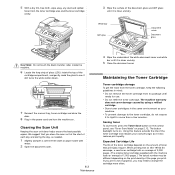
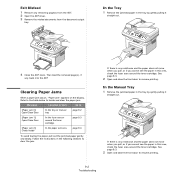
...front door to resume printing. 9.2 Troubleshooting See page 9.3. 2 Open and close the front door to [Paper Jam 0] Open/Close Door In the tray or manual tray page 9.2 [Paper Jam 1] Open/Close Door In the fuser area or around the toner cartridge. Follow the instructions in the following sections to locate...the jammed paper in this area, check the fuser area around the toner cartridge. Refer to the table below to clear the jam. In the Manual Tray 1 Remove the jammed paper in this area, check the fuser area around the toner cartridge. Then load the removed page(s), if any ...
...front door to resume printing. 9.2 Troubleshooting See page 9.3. 2 Open and close the front door to [Paper Jam 0] Open/Close Door In the tray or manual tray page 9.2 [Paper Jam 1] Open/Close Door In the fuser area or around the toner cartridge. Follow the instructions in the following sections to locate...the jammed paper in this area, check the fuser area around the toner cartridge. Refer to the table below to clear the jam. In the Manual Tray 1 Remove the jammed paper in this area, check the fuser area around the toner cartridge. Then load the removed page(s), if any ...
User Manual (ENGLISH)
Page 60
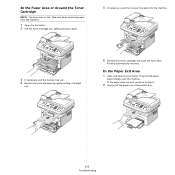
... from the machine. 1 Open the front door. 2 Pull the toner cartridge out, lightly pushing it down. 5 If necessary, push the manual tray back into the machine. 3 If necessary, pull the manual tray out. 4 Remove the jammed paper by gently pulling it straight out. 6 Reinstall the toner cartridge and close the front door...
... from the machine. 1 Open the front door. 2 Pull the toner cartridge out, lightly pushing it down. 5 If necessary, push the manual tray back into the machine. 3 If necessary, pull the manual tray out. 4 Remove the jammed paper by gently pulling it straight out. 6 Reinstall the toner cartridge and close the front door...


