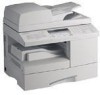
User Manual (ENGLISH)
Page 8
... Jams 8.5 Paper Feed Area 8.5 Fuser Area 8.7 Paper Exit Area 8.8 Duplex Jam 8.10 Bypass Tray Jam 8.10 Optional Tray2 Jam 8.11 LCD Error Messages 8.13 Solving Problems 8.20 Copier Problem Solution Chart 8.20 Printing Problem Solution Chart 8.22 Scanning Problems 8.25 Fax Problem Solution Chart (only for SCX-6320F 8.26 Common Linux Problems 8.28...
... Jams 8.5 Paper Feed Area 8.5 Fuser Area 8.7 Paper Exit Area 8.8 Duplex Jam 8.10 Bypass Tray Jam 8.10 Optional Tray2 Jam 8.11 LCD Error Messages 8.13 Solving Problems 8.20 Copier Problem Solution Chart 8.20 Printing Problem Solution Chart 8.22 Scanning Problems 8.25 Fax Problem Solution Chart (only for SCX-6320F 8.26 Common Linux Problems 8.28...
User Manual (ENGLISH)
Page 134
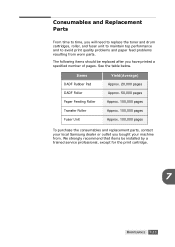
... recommend that items be replaced after you have printed a specified number of pages. Items DADF Rubber Pad DADF Roller Paper Feeding Roller Transfer Roller Fuser Unit Yield(Average) Approx. 20,000 pages Approx. 50,000 pages Approx. 100,000 pages Approx. 100,000 pages Approx. 100,000 pages... To purchase the consumables and replacement parts, contact your local Samsung dealer or outlet you bought your machine from worn parts. See the table below. Consumables and Replacement Parts From time to time, you will ...
... recommend that items be replaced after you have printed a specified number of pages. Items DADF Rubber Pad DADF Roller Paper Feeding Roller Transfer Roller Fuser Unit Yield(Average) Approx. 20,000 pages Approx. 50,000 pages Approx. 100,000 pages Approx. 100,000 pages Approx. 100,000 pages... To purchase the consumables and replacement parts, contact your local Samsung dealer or outlet you bought your machine from worn parts. See the table below. Consumables and Replacement Parts From time to time, you will ...
User Manual (ENGLISH)
Page 148
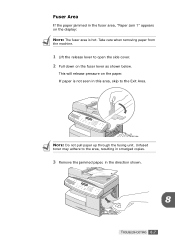
NOTE: Do not pull paper up through the fusing unit. Fuser Area If the paper jammed in the direction shown. 8 TROUBLESHOOTING 8.7 This will release pressure on the fuser lever as shown below. Unfused toner may adhere to the Exit Area. If paper is not seen in this area, skip to the area, resulting in smudged copies. 3 Remove the jammed paper, in the fuser area, "Paper Jam 1" appears on the display: NOTE: The fuser area is hot. Take care when removing paper from the machine. 1 Lift the release lever to open the side cover. 2 Pull down on the paper.
NOTE: Do not pull paper up through the fusing unit. Fuser Area If the paper jammed in the direction shown. 8 TROUBLESHOOTING 8.7 This will release pressure on the fuser lever as shown below. Unfused toner may adhere to the Exit Area. If paper is not seen in this area, skip to the area, resulting in smudged copies. 3 Remove the jammed paper, in the fuser area, "Paper Jam 1" appears on the display: NOTE: The fuser area is hot. Take care when removing paper from the machine. 1 Lift the release lever to open the side cover. 2 Pull down on the paper.
User Manual (ENGLISH)
Page 149
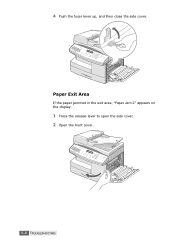
4 Push the fuser lever up, and then close the side cover. Paper Exit Area If the paper jammed in the exit area, "Paper Jam 2" appears on the display. 1 Press the release lever to open the side cover. 2 Open the front cover. 8.8 TROUBLESHOOTING
4 Push the fuser lever up, and then close the side cover. Paper Exit Area If the paper jammed in the exit area, "Paper Jam 2" appears on the display. 1 Press the release lever to open the side cover. 2 Open the front cover. 8.8 TROUBLESHOOTING
User Manual (ENGLISH)
Page 150
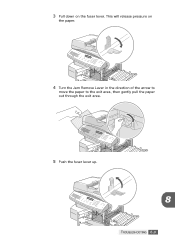
3 Pull down on the paper. 4 Turn the Jam Remove Lever in the direction of the arrow to move the paper to the exit area, then gently pull the paper out through the exit area. 2 1 5 Push the fuser lever up. 8 TROUBLESHOOTING 8.9 This will release pressure on the fuser lever.
3 Pull down on the paper. 4 Turn the Jam Remove Lever in the direction of the arrow to move the paper to the exit area, then gently pull the paper out through the exit area. 2 1 5 Push the fuser lever up. 8 TROUBLESHOOTING 8.9 This will release pressure on the fuser lever.
User Manual (ENGLISH)
Page 154
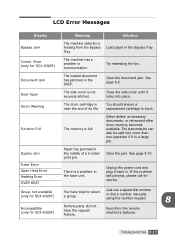
...in communication. Comm. Unplug the power cord and plug it locks into more memory becomes available. If the problem still persists, please call for SCX-6320F) Remote party did not have tried to select a group. Function Full The memory is near the end of a 2-sided print job. ...cover until it back in the middle of its life. Either delete unnecessary documents, or retransmit after more than one operation if it is not securely latched. Fuser Error Open Heat Error Heating Error OVER HEAT There is a problem in the Bypass Tray. LCD Error Messages Display...
...in communication. Comm. Unplug the power cord and plug it locks into more memory becomes available. If the problem still persists, please call for SCX-6320F) Remote party did not have tried to select a group. Function Full The memory is near the end of a 2-sided print job. ...cover until it back in the middle of its life. Either delete unnecessary documents, or retransmit after more than one operation if it is not securely latched. Fuser Error Open Heat Error Heating Error OVER HEAT There is a problem in the Bypass Tray. LCD Error Messages Display...
User Manual (ENGLISH)
Page 156
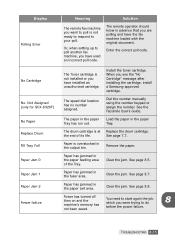
... not ready to respond to start again the job which you see the "No Cartridge" message after installing the cartridge, install a Samsung-approved cartridge. Install the toner cartridge. No Paper The paper in the paper exit area. Replace Drum The drum cartridge is overstocked ... fax machine, you want to do before the power failure. 8 TROUBLESHOOTING 8.15 No. Load the paper in the fuser area. See page 8.5. Not Assigned (only for SCX-6320F) The speed dial location has no number assigned. Remove the paper. Enter the correct poll code. See page 8.8. ...
... not ready to respond to start again the job which you see the "No Cartridge" message after installing the cartridge, install a Samsung-approved cartridge. Install the toner cartridge. No Paper The paper in the paper exit area. Replace Drum The drum cartridge is overstocked ... fax machine, you want to do before the power failure. 8 TROUBLESHOOTING 8.15 No. Load the paper in the fuser area. See page 8.5. Not Assigned (only for SCX-6320F) The speed dial location has no number assigned. Remove the paper. Enter the correct poll code. See page 8.8. ...
User Manual (KOREAN)
Page 160
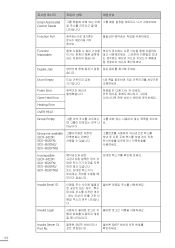
해결방법 Email Associated Cannot Delete Function Full Function Impossible Duplex Jam Drum Empty 134 Fuser Error Open Heat Error Heating Error OVER HEAT Group Empty Group not available (SCX-6320F/ SCX-6520FN/ SCX-6520NG/ SCX-6520FNG) Incompatible (SCX-6320F/ SCX-6520FN/ SCX-6520NG/ SCX-6520FNG) Invalid Email ID Invalid Login Invalid Server Or Port No. 잘못된 SMTP 올바른 SMTP 160
해결방법 Email Associated Cannot Delete Function Full Function Impossible Duplex Jam Drum Empty 134 Fuser Error Open Heat Error Heating Error OVER HEAT Group Empty Group not available (SCX-6320F/ SCX-6520FN/ SCX-6520NG/ SCX-6520FNG) Incompatible (SCX-6320F/ SCX-6520FN/ SCX-6520NG/ SCX-6520FNG) Invalid Email ID Invalid Login Invalid Server Or Port No. 잘못된 SMTP 올바른 SMTP 160
SyncThru 5.0 Guide (ENGLISH)
Page 43
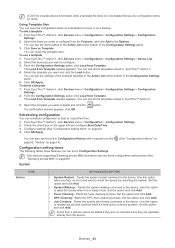
... 5. 3. button. Configure settings (See "Configuration setting items" on page 89). Set the option and click Add. • Fuser Cleaning: Starts the fuser cleaning process. To add a template 1. You can see the items added to wake the device when it 's held due to... Settings > Configuration Settings. 2. From the Configuration Settings panel, click Load from Template window appears. Click OK/Apply. Only devices supporting Samsung private MIB information can see all the templates stored in Configuration Settings. Set the option and click Add. • OPC Cleaning: Starts...
... 5. 3. button. Configure settings (See "Configuration setting items" on page 89). Set the option and click Add. • Fuser Cleaning: Starts the fuser cleaning process. To add a template 1. You can see the items added to wake the device when it 's held due to... Settings > Configuration Settings. 2. From the Configuration Settings panel, click Load from Template window appears. Click OK/Apply. Only devices supporting Samsung private MIB information can see all the templates stored in Configuration Settings. Set the option and click Add. • OPC Cleaning: Starts...


