
User Manual (ENGLISH)
Page 5
... Component Location 1.4 Front View 1.4 Rear View 1.5 Control Panel Functions 1.6 Making Connections 1.8 Installing the Drum and Toner Cartridges 1.11 Turning the Machine On 1.14 Loading Paper 1.14 Setting the Paper Size and ...Out 1.19 Setting the Localization 1.20 Chapter 2: INSTALLING SOFTWARE About Samsung Software 2.2 System Requirements 2.3 Installing Samsung Software 2.4 Installing Samsung SmarThru 2.7 Repairing Software 2.9 Removing Software 2.10 Uninstalling the MFP Driver 2.10 Uninstalling Samsung SmarThru 2.11 Chapter 3: PAPER HANDLING Selecting Print Media 3.2 Paper ...
... Component Location 1.4 Front View 1.4 Rear View 1.5 Control Panel Functions 1.6 Making Connections 1.8 Installing the Drum and Toner Cartridges 1.11 Turning the Machine On 1.14 Loading Paper 1.14 Setting the Paper Size and ...Out 1.19 Setting the Localization 1.20 Chapter 2: INSTALLING SOFTWARE About Samsung Software 2.2 System Requirements 2.3 Installing Samsung Software 2.4 Installing Samsung SmarThru 2.7 Repairing Software 2.9 Removing Software 2.10 Uninstalling the MFP Driver 2.10 Uninstalling Samsung SmarThru 2.11 Chapter 3: PAPER HANDLING Selecting Print Media 3.2 Paper ...
User Manual (ENGLISH)
Page 8
Setting to ignore the toner Empty warning message 7.6 Replacing the Drum Cartridge 7.7 Checking the Serial Number 7.9 Adjusting Shading 7.9 Setting to Notify Toner Low 7.10 Consumables and Replacement Parts 7.11 System Administration Tools 7.12 Password Protect 7.12 ... Error Messages 8.13 Solving Problems 8.20 Copier Problem Solution Chart 8.20 Printing Problem Solution Chart 8.22 Scanning Problems 8.25 Fax Problem Solution Chart (only for SCX-6320F 8.26 Common Linux Problems 8.28 Troubleshooting PostScript Errors (Option) ........ 8.31 Common Macintosh Problems (Option 8.32 vii
Setting to ignore the toner Empty warning message 7.6 Replacing the Drum Cartridge 7.7 Checking the Serial Number 7.9 Adjusting Shading 7.9 Setting to Notify Toner Low 7.10 Consumables and Replacement Parts 7.11 System Administration Tools 7.12 Password Protect 7.12 ... Error Messages 8.13 Solving Problems 8.20 Copier Problem Solution Chart 8.20 Printing Problem Solution Chart 8.22 Scanning Problems 8.25 Fax Problem Solution Chart (only for SCX-6320F 8.26 Common Linux Problems 8.28 Troubleshooting PostScript Errors (Option) ........ 8.31 Common Macintosh Problems (Option 8.32 vii
User Manual (ENGLISH)
Page 22
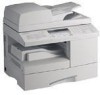
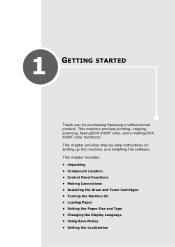
...; Installing the Drum and Toner Cartridges • Turning the Machine On • Loading Paper • Setting the Paper Size and Type • Changing the Display Language • Using Save Modes • Setting the Localization 1 GETTING STARTED Thank you for purchasing Samsung multifunctional product. This machine provides printing, copying, scanning, faxing(SCX-6320F only), and...
...; Installing the Drum and Toner Cartridges • Turning the Machine On • Loading Paper • Setting the Paper Size and Type • Changing the Display Language • Using Save Modes • Setting the Localization 1 GETTING STARTED Thank you for purchasing Samsung multifunctional product. This machine provides printing, copying, scanning, faxing(SCX-6320F only), and...
User Manual (ENGLISH)
Page 24
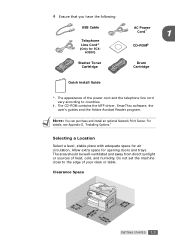
... D, "Installing Options." 4 Ensure that you have the following: USB Cable Telephone Line Cord* (Only for SCX6320F) Starter Toner Cartridge AC Power Cord* 1 CD-ROM† Drum Cartridge Quick install Guide *. The CD-ROM contains the MFP driver, SmarThru software, the user's guides and the Adobe Acrobat Reader program.
... D, "Installing Options." 4 Ensure that you have the following: USB Cable Telephone Line Cord* (Only for SCX6320F) Starter Toner Cartridge AC Power Cord* 1 CD-ROM† Drum Cartridge Quick install Guide *. The CD-ROM contains the MFP driver, SmarThru software, the user's guides and the Adobe Acrobat Reader program.
User Manual (ENGLISH)
Page 32
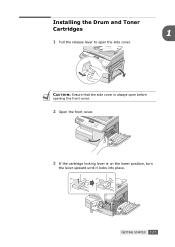
GETTING STARTED 1.11 CAUTION: Ensure that the side cover is always open the side cover. Installing the Drum and Toner Cartridges 1 1 Pull the release lever to open before opening the front cover. 2 Open the front cover. 3 If the cartridge locking lever is on the lower position, turn the lever upward until it locks into place.
GETTING STARTED 1.11 CAUTION: Ensure that the side cover is always open the side cover. Installing the Drum and Toner Cartridges 1 1 Pull the release lever to open before opening the front cover. 2 Open the front cover. 3 If the cartridge locking lever is on the lower position, turn the lever upward until it locks into place.
User Manual (ENGLISH)
Page 33
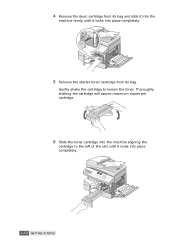
Thoroughly shaking the cartridge will assure maximum copies per cartridge. 6 Slide the toner cartridge into the machine aligning the cartridge to loosen the toner. 4 Remove the drum cartridge from its bag and slide it into the machine firmly until it locks into place completely. 1.12 GETTING STARTED Gently shake the cartridge to the left of the slot until it locks into place completely. 5 Remove the starter toner cartridge from its bag.
Thoroughly shaking the cartridge will assure maximum copies per cartridge. 6 Slide the toner cartridge into the machine aligning the cartridge to loosen the toner. 4 Remove the drum cartridge from its bag and slide it into the machine firmly until it locks into place completely. 1.12 GETTING STARTED Gently shake the cartridge to the left of the slot until it locks into place completely. 5 Remove the starter toner cartridge from its bag.
User Manual (ENGLISH)
Page 34
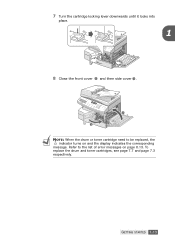
To replace the drum and toner cartridges, see page 7.7 and page 7.3 respectively. GETTING STARTED 1.13 Refer to be replaced, the indicator turns on page 8.13. 7 Turn the cartridge locking lever downwards until it locks into place. 1 8 Close the front cover 1 and then side cover 2 . 2 1 NOTE: When the drum or toner cartridge need to the list of error messages on and the display indicates the corresponding message.
To replace the drum and toner cartridges, see page 7.7 and page 7.3 respectively. GETTING STARTED 1.13 Refer to be replaced, the indicator turns on page 8.13. 7 Turn the cartridge locking lever downwards until it locks into place. 1 8 Close the front cover 1 and then side cover 2 . 2 1 NOTE: When the drum or toner cartridge need to the list of error messages on and the display indicates the corresponding message.
User Manual (ENGLISH)
Page 124
7 MAINTENANCE This chapter provides information for maintaining the cartridge and your machine. This chapter includes: • Cleaning Your Machine • Expected Cartridge Life • Replacing the Toner Cartridge • Setting to ignore the toner Empty warning message • Replacing the Drum Cartridge • Checking the Serial Number • Adjusting Shading • Setting to Notify Toner Low • Consumables and Replacement Parts • System Administration Tools • Setting E-mail Notification
7 MAINTENANCE This chapter provides information for maintaining the cartridge and your machine. This chapter includes: • Cleaning Your Machine • Expected Cartridge Life • Replacing the Toner Cartridge • Setting to ignore the toner Empty warning message • Replacing the Drum Cartridge • Checking the Serial Number • Adjusting Shading • Setting to Notify Toner Low • Consumables and Replacement Parts • System Administration Tools • Setting E-mail Notification
User Manual (ENGLISH)
Page 130
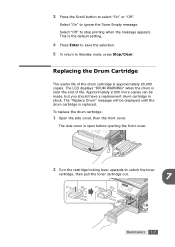
...: 1 Open the side cover, then the front cover. Approximately 2,000 more copies can be displayed until the drum cartridge is approximately 20,000 copies. 3 Press the Scroll button to stop printing when the message appears. Select "Off" to select "On" or "Off". ... 4 Press Enter to save the selection. 5 To return to Standby mode, press Stop/Clear. Replacing the Drum Cartridge The useful life of life. The "Replace Drum" message will be made, but you should have a replacement drum cartridge in stock. Select "On" to unlock the toner cartridge, then pull the toner cartridge out. 7 ...
...: 1 Open the side cover, then the front cover. Approximately 2,000 more copies can be displayed until the drum cartridge is approximately 20,000 copies. 3 Press the Scroll button to stop printing when the message appears. Select "Off" to select "On" or "Off". ... 4 Press Enter to save the selection. 5 To return to Standby mode, press Stop/Clear. Replacing the Drum Cartridge The useful life of life. The "Replace Drum" message will be made, but you should have a replacement drum cartridge in stock. Select "On" to unlock the toner cartridge, then pull the toner cartridge out. 7 ...
User Manual (ENGLISH)
Page 131
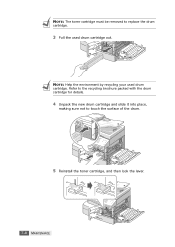
NOTE: The toner cartridge must be removed to touch the surface of the drum. 5 Reinstall the toner cartridge, and then lock the lever. 7.8 MAINTENANCE NOTE: Help the environment by recycling your used drum cartridge out. Refer to the recycling brochure packed with the drum cartridge for details. 4 Unpack the new drum cartridge and slide it into place, making sure not to replace the drum cartridge. 3 Pull the used drum cartridge.
NOTE: The toner cartridge must be removed to touch the surface of the drum. 5 Reinstall the toner cartridge, and then lock the lever. 7.8 MAINTENANCE NOTE: Help the environment by recycling your used drum cartridge out. Refer to the recycling brochure packed with the drum cartridge for details. 4 Unpack the new drum cartridge and slide it into place, making sure not to replace the drum cartridge. 3 Pull the used drum cartridge.
User Manual (ENGLISH)
Page 132
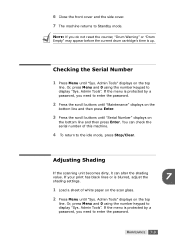
... the bottom line and then press Enter. MAINTENANCE 7.9 If the menu is protected by a password, you do not reset the counter, "Drum Warning" or "Drum Empty" may appear before the current drum cartridge's time is up. Admin Tools" displays on the top line. Checking the Serial Number 1 Press Menu until "Sys. If your...
... the bottom line and then press Enter. MAINTENANCE 7.9 If the menu is protected by a password, you do not reset the counter, "Drum Warning" or "Drum Empty" may appear before the current drum cartridge's time is up. Admin Tools" displays on the top line. Checking the Serial Number 1 Press Menu until "Sys. If your...
User Manual (ENGLISH)
Page 134
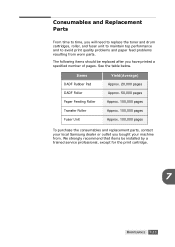
...,000 pages Approx. 100,000 pages Approx. 100,000 pages To purchase the consumables and replacement parts, contact your local Samsung dealer or outlet you will need to replace the toner and drum cartridges, roller, and fuser unit to maintain top performance and to time, you bought your machine from worn parts...
...,000 pages Approx. 100,000 pages Approx. 100,000 pages To purchase the consumables and replacement parts, contact your local Samsung dealer or outlet you will need to replace the toner and drum cartridges, roller, and fuser unit to maintain top performance and to time, you bought your machine from worn parts...
User Manual (ENGLISH)
Page 147
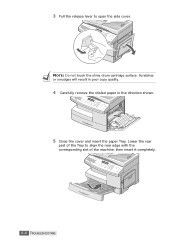
Scratches or smudges will result in poor copy quality. 4 Carefully remove the misfed paper in the direction shown. 5 Close the cover and insert the paper Tray. Lower the rear part of the machine, then insert it completely. 8.6 TROUBLESHOOTING 3 Pull the release lever to align the rear edge with the corresponding slot of the Tray to open the side cover. NOTE: Do not touch the shiny drum cartridge surface.
Scratches or smudges will result in poor copy quality. 4 Carefully remove the misfed paper in the direction shown. 5 Close the cover and insert the paper Tray. Lower the rear part of the machine, then insert it completely. 8.6 TROUBLESHOOTING 3 Pull the release lever to align the rear edge with the corresponding slot of the Tray to open the side cover. NOTE: Do not touch the shiny drum cartridge surface.
User Manual (ENGLISH)
Page 154
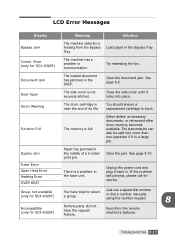
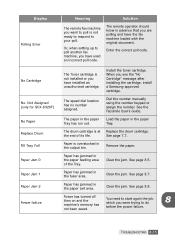
... Drum Warning The drum cartridge is full. Either delete unnecessary documents, or retransmit after more than one operation if it back in the middle of its life. LCD Error Messages Display Meaning Solution Bypass Jam The machine detects no feeding from the Bypass Tray. Error (only for SCX-6320F)... place. Fuser Error Open Heat Error Heating Error OVER HEAT There is not securely latched. If the problem still persists, please call for SCX-6320F) Remote party did not have tried to select a group. Just use a speed dial number or dial a number manually using the number...
... Drum Warning The drum cartridge is full. Either delete unnecessary documents, or retransmit after more than one operation if it back in the middle of its life. LCD Error Messages Display Meaning Solution Bypass Jam The machine detects no feeding from the Bypass Tray. Error (only for SCX-6320F)... place. Fuser Error Open Heat Error Heating Error OVER HEAT There is not securely latched. If the problem still persists, please call for SCX-6320F) Remote party did not have tried to select a group. Just use a speed dial number or dial a number manually using the number...
User Manual (ENGLISH)
Page 156
...correct poll code. Install the toner cartridge. Dial the number manually using the number keypad or assign the number. Replace Drum The drum cartridge is overstocked in the fuser area. Clear the jam. When you are polling and have the fax machine loaded ...drum cartridge. Power failure Power has turned off then on and the machine's memory has not been saved. See the Facsimile User's Guide. The remote operator should know in advance that you see the "No Cartridge" message after installing the cartridge, install a Samsung-approved cartridge. Not Assigned (only for SCX-6320F...
...correct poll code. Install the toner cartridge. Dial the number manually using the number keypad or assign the number. Replace Drum The drum cartridge is overstocked in the fuser area. Clear the jam. When you are polling and have the fax machine loaded ...drum cartridge. Power failure Power has turned off then on and the machine's memory has not been saved. See the Facsimile User's Guide. The remote operator should know in advance that you see the "No Cartridge" message after installing the cartridge, install a Samsung-approved cartridge. Not Assigned (only for SCX-6320F...
User Manual (ENGLISH)
Page 163
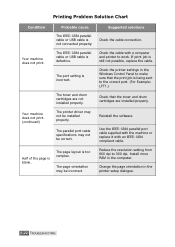
...parallel port cable supplied with the machine or replace it with a computer and printer to the correct port. (For Example: LPT1.) The toner and drum cartridges are installed properly. The port setting is defective. Check that the print job is being sent to work. Reinstall the software. Check the printer... settings in the Windows Control Panel to make sure that the toner and drum cartridges are not installed properly. Half of the page is still not possible, replace the cable. Reduce the resolution setting from 600 dpi to...
...parallel port cable supplied with the machine or replace it with a computer and printer to the correct port. (For Example: LPT1.) The toner and drum cartridges are installed properly. The port setting is defective. Check that the print job is being sent to work. Reinstall the software. Check the printer... settings in the Windows Control Panel to make sure that the toner and drum cartridges are not installed properly. Half of the page is still not possible, replace the cable. Reduce the resolution setting from 600 dpi to...
User Manual (ENGLISH)
Page 229
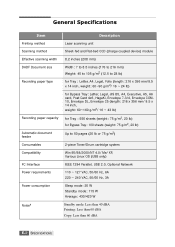
General Specifications Item Description Printing method Laser scanning unit Scanning method Sheet-fed and Flat-bed CCD (charge coupled device) module Effective scanning width 8.2 inches (208 mm) DADF Document size Width: 7 to 8.5 ...) for Bypass Tray: 100 sheets (weight: 75 g/m2, 20 lb) Automatic document feeder Up to 50 pages (20 lb or 75 g/m2) Consumables 2-piece Toner/Drum cartridge system Compatibility Win 95/98/2000/NT 4.0/ Me/ XP, Various Linux OS (USB only) PC Interface IEEE 1284 Parallel, USB 2.0, Optional Network Power requirements...
General Specifications Item Description Printing method Laser scanning unit Scanning method Sheet-fed and Flat-bed CCD (charge coupled device) module Effective scanning width 8.2 inches (208 mm) DADF Document size Width: 7 to 8.5 ...) for Bypass Tray: 100 sheets (weight: 75 g/m2, 20 lb) Automatic document feeder Up to 50 pages (20 lb or 75 g/m2) Consumables 2-piece Toner/Drum cartridge system Compatibility Win 95/98/2000/NT 4.0/ Me/ XP, Various Linux OS (USB only) PC Interface IEEE 1284 Parallel, USB 2.0, Optional Network Power requirements...
User Manual (ENGLISH)
Page 230
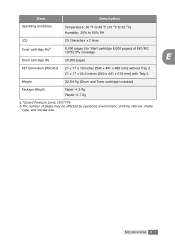
... Humidity: 20% to 80% RH LCD 20 Characters x 2 lines Toner cartridge lifeb 8,000 pages (for Start cartridge 8,000 pages) at ISO/IEC 19752 5% Coverage E Drum cartridge life 20,000 pages SET Dimension (WxDxH) 21 x 17 x 19 inches (540 x 441 x 488 mm) without Tray 2 21 x 17 x 24.4 inches... (540 x 441 x 619 mm) with Tray 2 Weight 32.54 Kg (Drum and Toner cartridge included) Package Weight Paper: 4.3 Kg Plastic: 0.7 Kg a.*Sound Pressure Level, ISO7779 b.The number of pages may be affected by operating environment, printing...
... Humidity: 20% to 80% RH LCD 20 Characters x 2 lines Toner cartridge lifeb 8,000 pages (for Start cartridge 8,000 pages) at ISO/IEC 19752 5% Coverage E Drum cartridge life 20,000 pages SET Dimension (WxDxH) 21 x 17 x 19 inches (540 x 441 x 488 mm) without Tray 2 21 x 17 x 24.4 inches... (540 x 441 x 619 mm) with Tray 2 Weight 32.54 Kg (Drum and Toner cartridge included) Package Weight Paper: 4.3 Kg Plastic: 0.7 Kg a.*Sound Pressure Level, ISO7779 b.The number of pages may be affected by operating environment, printing...
User Manual (ENGLISH)
Page 233
... default printer 5.2 DIMM installing D.14 display language 1.17 document jam, clear 8.2 load in DADF 4.3 load on document glass 4.4 document glass clean 7.2 load 4.4 drum cartridge install 1.11 life E.3 replace 7.7 E error 8.13 extension phone, connect 1.9 F fault clearance 8.2 favorite setting, use 5.6 fitting to page copy 4.17 ... use 5.6 I ID card copy 4.19 Install optional Alphabet Keypad D.6 optional Network Interface Card D.2 optional Tray2 D.17 install drum 1.11 toner 1.11 installing Linux software A.3 Macintosh software C.2 PostScript D.14 PS driver B.2 installing software MFP driver 2.4
... default printer 5.2 DIMM installing D.14 display language 1.17 document jam, clear 8.2 load in DADF 4.3 load on document glass 4.4 document glass clean 7.2 load 4.4 drum cartridge install 1.11 life E.3 replace 7.7 E error 8.13 extension phone, connect 1.9 F fault clearance 8.2 favorite setting, use 5.6 fitting to page copy 4.17 ... use 5.6 I ID card copy 4.19 Install optional Alphabet Keypad D.6 optional Network Interface Card D.2 optional Tray2 D.17 install drum 1.11 toner 1.11 installing Linux software A.3 Macintosh software C.2 PostScript D.14 PS driver B.2 installing software MFP driver 2.4
User Manual (KOREAN)
Page 160
해결방법 Email Associated Cannot Delete Function Full Function Impossible Duplex Jam Drum Empty 134 Fuser Error Open Heat Error Heating Error OVER HEAT Group Empty Group not available (SCX-6320F/ SCX-6520FN/ SCX-6520NG/ SCX-6520FNG) Incompatible (SCX-6320F/ SCX-6520FN/ SCX-6520NG/ SCX-6520FNG) Invalid Email ID Invalid Login Invalid Server Or Port No. 잘못된 SMTP 올바른 SMTP 160
해결방법 Email Associated Cannot Delete Function Full Function Impossible Duplex Jam Drum Empty 134 Fuser Error Open Heat Error Heating Error OVER HEAT Group Empty Group not available (SCX-6320F/ SCX-6520FN/ SCX-6520NG/ SCX-6520FNG) Incompatible (SCX-6320F/ SCX-6520FN/ SCX-6520NG/ SCX-6520FNG) Invalid Email ID Invalid Login Invalid Server Or Port No. 잘못된 SMTP 올바른 SMTP 160

