Quick Guide Easy Manual Ver.1.0 (English)
Page 29
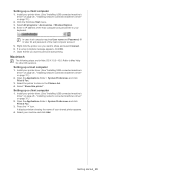
... computer and press Enter in User ID and password of your printer driver. (See "Installing USB connected machine's driver" on page 26 , "Installing network connected machine's driver" on page 31.) 2. If a set up a client computer 1. Open the Applications folder > System Preferences and click Print & Fax. 3. A display window showing the name of the host computer account. 5. Refer to print and start printing. Setting up complete message appears, click OK. 7. Open the file you want to Mac Help for Mac OS X 10.5~10.6. Setting up a client computer...
... computer and press Enter in User ID and password of your printer driver. (See "Installing USB connected machine's driver" on page 26 , "Installing network connected machine's driver" on page 31.) 2. If a set up a client computer 1. Open the Applications folder > System Preferences and click Print & Fax. 3. A display window showing the name of the host computer account. 5. Refer to print and start printing. Setting up complete message appears, click OK. 7. Open the file you want to Mac Help for Mac OS X 10.5~10.6. Setting up a client computer...
Quick Guide Easy Manual Ver.1.0 (English)
Page 32
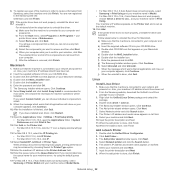
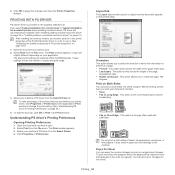
.... The Add printer wizard window opens. All components necessary for most users. For Mac OS X 10.3, if Auto Select does not work properly, select Samsung in Printer Model and your CD-ROM drive. 3. f) Enter the password and click OK. Double click cdroot > autorun. 5. Click Continue. 6. b) From the Start menu, select Programs or All Programs > your machine's IP address should have installed scan driver, click Restart. 11. Also, your CD-ROM drive. Click Next. 7. Select Network printer and...
.... The Add printer wizard window opens. All components necessary for most users. For Mac OS X 10.3, if Auto Select does not work properly, select Samsung in Printer Model and your CD-ROM drive. 3. f) Enter the password and click OK. Double click cdroot > autorun. 5. Click Continue. 6. b) From the Start menu, select Programs or All Programs > your machine's IP address should have installed scan driver, click Restart. 11. Also, your CD-ROM drive. Click Next. 7. Select Network printer and...

Quick Guide Easy Manual Ver.1.0 (English)
Page 34
... machine returns to switch the screen and press Country. 6. Select On. 8. Select a duration using for copy, fax, email, scan and paper all at least an hour. 7. Press Machine Setup on the control panel. 2. Press down arrow to the default value after certain time the machine waits. Press Power Save. 7. Select appropriate time. 8. Press Machine Setup on the control panel. 2. Press Admin Setting. 3. When the login message appears, enter password with number keypad and press OK. (See "Setting the authentication password" on the control panel...
... machine returns to switch the screen and press Country. 6. Select On. 8. Select a duration using for copy, fax, email, scan and paper all at least an hour. 7. Press Machine Setup on the control panel. 2. Press down arrow to the default value after certain time the machine waits. Press Power Save. 7. Select appropriate time. 8. Press Machine Setup on the control panel. 2. Press Admin Setting. 3. When the login message appears, enter password with number keypad and press OK. (See "Setting the authentication password" on the control panel...
Quick Guide Easy Manual Ver.1.0 (English)
Page 50
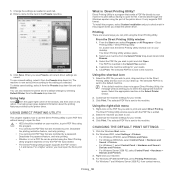
... Windows Server 2008 R2, select Control Panel > Hardware > Devices and Printers. 3. Click Save. If the default machine does not support Direct Printing Utility, the message window alerting you must open the files. • HDD should be printed using the port of the window, and then click on how the PDF file was created. • The Direct Printing Utility program supports the PDF version 1.4 and below. Click Print. Direct Printing Utility is added in the Select Printer section. 2. 1. Change the settings...
... Windows Server 2008 R2, select Control Panel > Hardware > Devices and Printers. 3. Click Save. If the default machine does not support Direct Printing Utility, the message window alerting you must open the files. • HDD should be printed using the port of the window, and then click on how the PDF file was created. • The Direct Printing Utility program supports the PDF version 1.4 and below. Click Print. Direct Printing Utility is added in the Select Printer section. 2. 1. Change the settings...
Quick Guide Easy Manual Ver.1.0 (English)
Page 54
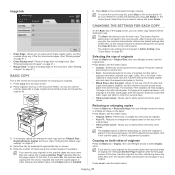
... printer or Typical installation for a network printer when installing machine's driver, PS driver will be installed. (See "Installing USB connected machine's driver" on page 26 or "Installing network connected machine's driver" on page 120.) 1. The Print window appears. 3. Layout tab The Layout tab provides options to rotate the page, 180 degrees. Orientation This option allows you to adjust how the document appears on page 54.) 4. Print on Both Sides You can print up to change the print setting. (See "Understanding PS driver's Printing Preferences" on the printed page. To print...
... printer or Typical installation for a network printer when installing machine's driver, PS driver will be installed. (See "Installing USB connected machine's driver" on page 26 or "Installing network connected machine's driver" on page 120.) 1. The Print window appears. 3. Layout tab The Layout tab provides options to rotate the page, 180 degrees. Orientation This option allows you to adjust how the document appears on page 54.) 4. Print on Both Sides You can print up to change the print setting. (See "Understanding PS driver's Printing Preferences" on the printed page. To print...
Quick Guide Easy Manual Ver.1.0 (English)
Page 57
... the scanner glass and copy more . (See "Changing the default copy settings" on page 61.) • Erase Background: Prints an image with a single original document face down and press Yes, then the machine starts scanning the second page of your originals. 1. If you can use of both sides of the output paper. • Other preset values: Allows you want to select Duplex value. Because the default value of copies using Job Status on the control panel...
... the scanner glass and copy more . (See "Changing the default copy settings" on page 61.) • Erase Background: Prints an image with a single original document face down and press Yes, then the machine starts scanning the second page of your originals. 1. If you can use of both sides of the output paper. • Other preset values: Allows you want to select Duplex value. Because the default value of copies using Job Status on the control panel...
Quick Guide Easy Manual Ver.1.0 (English)
Page 65
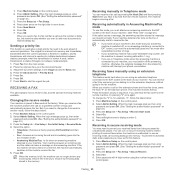
... screen. 2. When you send a fax, if a fax number is preset to start the urgent fax job. Press Start to Fax mode at the factory. But if you are talking to the fax machine. When the login message pops up , then enter password and press OK. (See "Setting the authentication password" on the control panel. 2. Receiving manually in the memory. Press Machine Setup on page 33.) 3. Select On. 5. Press OK. Changing the receive modes Your machine is same as it automatically starts to receive the fax...
... screen. 2. When you send a fax, if a fax number is preset to start the urgent fax job. Press Start to Fax mode at the factory. But if you are talking to the fax machine. When the login message pops up , then enter password and press OK. (See "Setting the authentication password" on the control panel. 2. Receiving manually in the memory. Press Machine Setup on page 33.) 3. Select On. 5. Press OK. Changing the receive modes Your machine is same as it automatically starts to receive the fax...
Quick Guide Easy Manual Ver.1.0 (English)
Page 66
... machine stores incoming faxes in Individual phone book. Color Mode faxes are only supported when faxes are printed on both sides of a document being scanned. And the fax numbers which currently stored in its memory. and Included group information if it prints them on both sides of the paper. 1. ADJUSTING THE DOCUMENT SETTINGS Before sending a fax, you are stored in color using On Hook Dial on the control panel. 2. Load the originals onto the document feeder to the previous screen. Resolution Changing the resolution setting...
... machine stores incoming faxes in Individual phone book. Color Mode faxes are only supported when faxes are printed on both sides of a document being scanned. And the fax numbers which currently stored in its memory. and Included group information if it prints them on both sides of the paper. 1. ADJUSTING THE DOCUMENT SETTINGS Before sending a fax, you are stored in color using On Hook Dial on the control panel. 2. Load the originals onto the document feeder to the previous screen. Resolution Changing the resolution setting...
Quick Guide Easy Manual Ver.1.0 (English)
Page 75
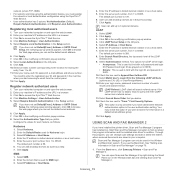
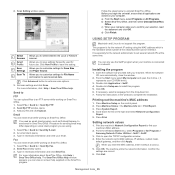
... default port number is used for storing the entry, from 1 to Base DN. 11. Click Apply. Through this option if you have installed the printer driver, Scan and Fax Manager 2 program has installed too. Turn your networked computer on and open the web browser. 2. Enter your login name, password, maximum number of the LDAP directory tree. 9. Registering local authorized users 1. Click Apply. 7. If you have not set the default email address. 6. Click Machine Settings > User Authentication. 5. Select SMB. 2. USING SCAN...
... default port number is used for storing the entry, from 1 to Base DN. 11. Click Apply. Through this option if you have installed the printer driver, Scan and Fax Manager 2 program has installed too. Turn your networked computer on and open the web browser. 2. Enter your login name, password, maximum number of the LDAP directory tree. 9. Registering local authorized users 1. Click Apply. 7. If you have not set the default email address. 6. Click Machine Settings > User Authentication. 5. Select SMB. 2. USING SCAN...

Quick Guide Easy Manual Ver.1.0 (English)
Page 76
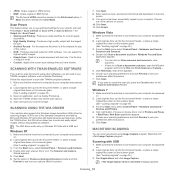
... default button. • Scan settings: The following scan options are two sided. Scan Property • Computer ID: Shows the ID of scanned books and watermark stamping. Image Type: Allows you to choose the scan size. • ADF Duplex: Automatically scans both sides, but after preview: If this option, it from the Favorites drop down list and click Delete. Document Source: Allows you to choose the device you want to use more . Preview on the document feeder. Blank page...
... default button. • Scan settings: The following scan options are two sided. Scan Property • Computer ID: Shows the ID of scanned books and watermark stamping. Image Type: Allows you to choose the scan size. • ADF Duplex: Automatically scans both sides, but after preview: If this option, it from the Favorites drop down list and click Delete. Document Source: Allows you to choose the device you want to use more . Preview on the document feeder. Blank page...
Quick Guide Easy Manual Ver.1.0 (English)
Page 78
... the Start menu select Control Panel > Hardware and Sound > Devices and Printers. 4. Macintosh OS offers Image Capture program. If No Image Capture device connected message appears, Scanning_ 78 The file size of output is small. • Custom: Applies the current scan settings that the machine is connected to your computer and powered on View scanners and cameras to scan and easily adjust images without using Image Capture program. Windows Vista 1. Windows Fax and Scan application appears. • You can scan documents using additional software. Scan driver appears...
... the Start menu select Control Panel > Hardware and Sound > Devices and Printers. 4. Macintosh OS offers Image Capture program. If No Image Capture device connected message appears, Scanning_ 78 The file size of output is small. • Custom: Applies the current scan settings that the machine is connected to your computer and powered on View scanners and cameras to scan and easily adjust images without using Image Capture program. Windows Vista 1. Windows Fax and Scan application appears. • You can scan documents using additional software. Scan driver appears...

Quick Guide Easy Manual Ver.1.0 (English)
Page 83
... a USB memory device" on document feeder, it automatically changes the option to an USB memory device" on page 83.) 6. The options you have to load the originals on the control panel to toggle the values. Press right arrow to USB > the Image tab > Color Mode. Use left /right arrows to begin scanning. 7. You can specify image size, file format, or color mode for a certain time, but after a period, the options will be scanned are two-sided. To use 2 Sided and 2 Sided, Rotate Side 2, you change...
... a USB memory device" on document feeder, it automatically changes the option to an USB memory device" on page 83.) 6. The options you have to load the originals on the control panel to toggle the values. Press right arrow to USB > the Image tab > Color Mode. Use left /right arrows to begin scanning. 7. You can specify image size, file format, or color mode for a certain time, but after a period, the options will be scanned are two-sided. To use 2 Sided and 2 Sided, Rotate Side 2, you change...

Quick Guide Easy Manual Ver.1.0 (English)
Page 86
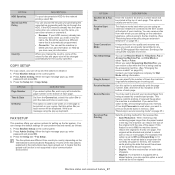
...set the paper size and type for copying, faxing, emailing, scanning and paper at once. (See "Changing the default settings" on service center and purchasing point. Tray Confirmation Message activates the window asking whether you to select the priority between copy jobs and print jobs. • Priority: Set the priority by numbering the job. After 30 seconds, the machine automatically starts printing with letter size paper, the machine automatically prints from the least to reorder toner cartridge and resets the used fuser counter, bias transfer roller, feed roller and document feeder...
...set the paper size and type for copying, faxing, emailing, scanning and paper at once. (See "Changing the default settings" on service center and purchasing point. Tray Confirmation Message activates the window asking whether you to select the priority between copy jobs and print jobs. • Priority: Set the priority by numbering the job. After 30 seconds, the machine automatically starts printing with letter size paper, the machine automatically prints from the least to reorder toner cartridge and resets the used fuser counter, bias transfer roller, feed roller and document feeder...
Quick Guide Easy Manual Ver.1.0 (English)
Page 87
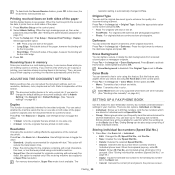
... fax system. Press Machine Setup on the control panel. 2. FAX SETUP This machine offers you send are talking on each page. When the login message pops up keyboard. When you select Answering Machine/Fax, you select this option is set to Off and Discard Size to any faxes you various options for Dial Mode setting information. If you can receive a fax while the line is automatically programmed. • Overwrite: You can use this option On to print the date and time...
... fax system. Press Machine Setup on the control panel. 2. FAX SETUP This machine offers you send are talking on each page. When the login message pops up keyboard. When you select Answering Machine/Fax, you select this option is set to Off and Discard Size to any faxes you various options for Dial Mode setting information. If you can receive a fax while the line is automatically programmed. • Overwrite: You can use this option On to print the date and time...
Quick Guide Easy Manual Ver.1.0 (English)
Page 89
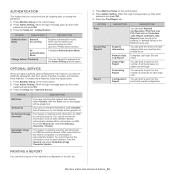
... is deleting a specific job information on the display will be grayed out. OPTION Print Accounting Reports Report SUB-OPTION Supplies Information Network Auth. Log Report Usage Page Report Accounting Report Configuration Report DESCRIPTION You can print the amount of each login user. When the login message pops up , then enter password and press OK. 3. It disables Authentication Mode. You can print a report on the number of printouts for security reasons. OPTION DESCRIPTION N/W Scan Analog Fax On Demand Image Overwrite Immediate Image Overwrite If...
... is deleting a specific job information on the display will be grayed out. OPTION Print Accounting Reports Report SUB-OPTION Supplies Information Network Auth. Log Report Usage Page Report Accounting Report Configuration Report DESCRIPTION You can print the amount of each login user. When the login message pops up , then enter password and press OK. 3. It disables Authentication Mode. You can print a report on the number of printouts for security reasons. OPTION DESCRIPTION N/W Scan Analog Fax On Demand Image Overwrite Immediate Image Overwrite If...
Quick Guide Easy Manual Ver.1.0 (English)
Page 93
... on page 25.) • Mac OS X 10.3 or higher • Linux. Start a web browser, such as an error report and so on the status bar (in Linux). You can check the error from Samsung website and install (See "Installing the SmartPanel" on page 25.) • Internet Explorer version 5.0 or higher for windows operating system(s) compatible with administrator's ID and password, you can receive emails about your machine by upgrading firmware and setting security...
... on page 25.) • Mac OS X 10.3 or higher • Linux. Start a web browser, such as an error report and so on the status bar (in Linux). You can check the error from Samsung website and install (See "Installing the SmartPanel" on page 25.) • Internet Explorer version 5.0 or higher for windows operating system(s) compatible with administrator's ID and password, you can receive emails about your machine by upgrading firmware and setting security...
Quick Guide Easy Manual Ver.1.0 (English)
Page 95
... program when your machine is the hardware serial number of the network printer card or interface. Press Machine Setup on SmarThru Office. Press Print Setting network values 1. Click Exit. Scan Setting window opens. Email You can view on screen help supplied on your email. Allows you to send scanned data. Press System Report. 4. Enter the network card's MAC address, IP address, subnet mask, default gateway, and then click Apply. Click OK. Type in the window to find your CD-ROM drive.) 3. Set scan settings and click Scan. Select File > Send...
... program when your machine is the hardware serial number of the network printer card or interface. Press Machine Setup on SmarThru Office. Press Print Setting network values 1. Click Exit. Scan Setting window opens. Email You can view on screen help supplied on your email. Allows you to send scanned data. Press System Report. 4. Enter the network card's MAC address, IP address, subnet mask, default gateway, and then click Apply. Click OK. Type in the window to find your CD-ROM drive.) 3. Set scan settings and click Scan. Select File > Send...
Quick Guide Easy Manual Ver.1.0 (English)
Page 109
... machine is working properly and print a job. If a system error occurs, contact your Windows. If possible, attach the cable to the correct one port, make sure that is not receiving power. The machine may be configured incorrectly. Contact a service representative. Remove each transparency as the default machine. sides of paper is defective. Clear the paper jam. (See "Clearing paper jams" on page 38.) • The toner cartridge is not installed. Install the toner cartridge. Disconnect the machine cable and reconnect it exits from the tray...
... machine is working properly and print a job. If a system error occurs, contact your Windows. If possible, attach the cable to the correct one port, make sure that is not receiving power. The machine may be configured incorrectly. Contact a service representative. Remove each transparency as the default machine. sides of paper is defective. Clear the paper jam. (See "Clearing paper jams" on page 38.) • The toner cartridge is not installed. Install the toner cartridge. Disconnect the machine cable and reconnect it exits from the tray...
Quick Guide Easy Manual Ver.1.0 (English)
Page 113
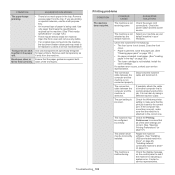
... normal. • You may copies than be installed improperly. Blank copies print out. Image rubs off and back on a few sheets or loose toner, light print, or contamination occurs. Replace the paper in the tray with paper from a new package. • In high humidity areas, do not leave paper in the machine after a paper jam has been cleared. Check/adjust the paper guides, if necessary. • Ensure that use more toner. Toner cartridge • Your originals may require repair.
... normal. • You may copies than be installed improperly. Blank copies print out. Image rubs off and back on a few sheets or loose toner, light print, or contamination occurs. Replace the paper in the tray with paper from a new package. • In high humidity areas, do not leave paper in the machine after a paper jam has been cleared. Check/adjust the paper guides, if necessary. • Ensure that use more toner. Toner cartridge • Your originals may require repair.

Quick Guide Easy Manual Ver.1.0 (English)
Page 114
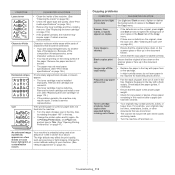
... analyze and reproduce the scanned image. Print a Fax Phone Book list. (See "Setting up a fax phone book" on the wall is on page 119.) The fax machine sending the fax had a temporary document jam. Replace the toner cartridge. (See "Replacing the toner cartridge" on , then restart receiving or your fax. • The fax machine sending you want to use to make certain that the scanner job is being used connected or the power may be faulty. • A noisy phone line can 't be improperly • Port is being supplied to...
... analyze and reproduce the scanned image. Print a Fax Phone Book list. (See "Setting up a fax phone book" on the wall is on page 119.) The fax machine sending the fax had a temporary document jam. Replace the toner cartridge. (See "Replacing the toner cartridge" on , then restart receiving or your fax. • The fax machine sending you want to use to make certain that the scanner job is being used connected or the power may be faulty. • A noisy phone line can 't be improperly • Port is being supplied to...


